
Cypress InLine Commands
This topic describes the Cypress InLine commands that you can use in conjunction with Cypress formats to have more control over document formatting, processing, and routing.
Document Formatting InLine Commands
You can use document formatting InLine commands to apply forms and formats to a document, manage physical and logical pages, and change font and image settings.
dup
The dup InLine command instructs Cypress to print the document on both sides of the physical page. You can insert this command anywhere within the document. When Cypress encounters this command, it will begin printing on both sides of the page until it reaches the end of the print job or it encounters a sim InLine command.
The dup InLine command overrides the plexing configuration in the Cypress format applied to the document.
This is the syntax for printing the document on both sides of the physical page:
^.{dup}
fmt
The fmt InLine command overrides the format specified by the device definition. If the fmt command appears on the page before any printable data, Cypress will apply it to that page; if it appears after printable data, Cypress will apply it to the next page.
You can use multiple documents in a format, but applying a new format resets all formatting values (e.g., margins, fonts, stocks, forms, orientation, and plexing). Formats that you specify with an InLine command take precedence over formats defined by the device or applied by Auto Format.
This is the general syntax for the fmt InLine command:
This is the syntax for replacing the current format with a new format:
fmt = <format name>
where <format name> is the name of a format defined in the Administration Tools module. If the format name contains spaces, you must enclose it in quotation marks.
This is the syntax for replacing the current format but retain it on a stack of previous formats:
fmt + <format name>
where <format name> is the name of the new format.
This is the syntax for reverting to the top format on the stack:
fmt -
fnt
The fnt InLine command specifies the font and its characteristics.
This is the general syntax for the fnt InLine command:
This is the syntax for specifying a font by name:
fnt = <font name>, <font size>
where:
<font name> is a font resident in your DocuVault. If more than one font by the same name exists in the DocuVault, Cypress will use the newest font. If the font name does not begin with a letter, contains blanks, or contains characters other than letters and numbers, you must enclose it in quotes.
<font size> is the size of the specified font. You can specify font size in one of three ways:
| • | To specify the font size in points, use a single positive integer. For example, use 12 to specify a 12-point font. |
| • | To specify the font size by characters per inch, use a single real number in parentheses. For example, use (9) to specify nine characters per inch. |
| • | To specify the font size by the size of a character, use this syntax: |
[<X>, <Y>]
where:
<X> is the horizontal size of the font in points.
<Y> is the vertical size of the font in points.
In addition, you can also specify the line spacing of the font.
| • | To specify the line spacing in inches, append a forward slash (/) to the font size, followed by the distance between lines in inches. For example, use this syntax to indicate that you want to use nine characters per inch with 0.2 inches between lines: |
(9) /.2
| • | To specify the line spacing as a percentage of the character size, append a percent sign (%) to the font size, followed by the percentage. For example, use this syntax to indicate that you want to use 12-point type with six-point line spacing: |
12%50
This is the syntax for specifying a font by its selection number in the current font substitution table:
fnt = #<font number>, <font size>
where <font number> is the selection number in the current font substitution table. If more than one font has the same selection number, Cypress will use the highest priority font of that number.
This is the syntax for putting the current font on the stack so you can revert to it later:
fnt + <font name>, <font size>
Or
fnt + #<font number>, <font size>
This is the syntax for reverting to the font at the top of the stack:
fnt -
font_sub
The font_sub InLine command specifies the font substitution table that you would like to apply to this document. Font substitution tables allow you to map PCL font selection commands to fonts resident in your DocuVault. If you do not specify a font substitution table, Cypress will apply the table specified in the current format.
This is the syntax for specifying a font substitution table:
font_sub = <font sub name>
where <font sub name> is the name of a font substitution table defined in the Administration Tools module. If the name of this table does not begin with a letter or it contains blanks or any characters other than letters, numbers, and underscores, you must enclose it in quotation marks.
form
The form InLine command specifies up to four form overlays that Cypress will place on this and subsequent pages. This command overrides any forms specified in the format definition, including standalone static forms, and will affect the current page no matter where you insert it on the page.
Cypress places the forms on the page in the order in which you specify them, drawing the first form specified first. If Cypress needs to locate a data box on a page with multiple forms, it will search the forms in reverse order: the first form specified will be the last form searched.
The number of forms specified in the form command cannot exceed the number specified at the beginning of the page. You can use the max_page_forms format dialect to specify the maximum number of forms that you will need per page. Cypress supports up to four forms per page.
This is the general syntax for the form InLine command:
This is the syntax for adding forms to the page:
form = <form name 1> [ <X scaling>, <Y scaling>, <rotation>,
<X placement>, <Y placement> ],
<form name 2> [ <X scaling>, <Y scaling>, <rotation>,
<X placement>, <Y placement> ], ...,
<form name 4> [ <X scaling>, <Y scaling>, <rotation>,
<X placement>, <Y placement> ]
where:
|
Parameter |
Description |
|
<form name n> |
The name of the form to apply to the page. If the form name contains any spaces or characters other than letters, numbers, or underscores, you must enclose it in quotation marks. |
|
<X scaling> |
The percentage by which Cypress should scale the form horizontally. |
|
<Y scaling> |
The percentage by which Cypress should scale the form vertically. |
|
<rotation> |
The number of degrees the form should be rotated clockwise. |
|
<X placement> |
The distance that Cypress should shift the form horizontally in inches. |
|
<Y placement> |
The distance that Cypress should shift the form vertically in inches. |
You can find a list of available forms in the Resource Manager application.
This is the syntax for putting the current forms on the stack so you can revert to them later:
form + <form name n> [<X scaling>, <Y scaling>, <rotation>,
<X placement>, <Y placement>]
This is the syntax for reverting to the forms on the top of the stack:
form -
This example causes Cypress to overlay three forms on the page:
form = "Invoice", "Logo"[95,95,0,0,0.15], "Watermark"
frm
The frm InLine command specifies the name of the form overlay that Cypress should apply to the current page and all subsequent pages. This command overrides any forms specified in the format definition, including standalone static forms. If the frm command appears on the page before any printable data, Cypress will apply it to that page; if it appears after printable data, Cypress will apply it to the next page. You cannot change forms in the middle of a page.
This is the general syntax for the frm command:
This is the syntax for applying a form to the current page:
frm = <form name>, <X scaling>, <Y scaling>, <rotation>,
<X placement>, <Y placement>
where:
|
Parameter Value |
Description |
|
<form name> |
The name of the form to apply to the page. If the form name contains any spaces or characters other than letters, numbers, or underscores, you must enclose it in quotation marks. |
|
<X scaling> |
The percentage by which Cypress should scale the form horizontally. |
|
<Y scaling> |
The percentage by which Cypress should scale the form vertically. |
|
<rotation> |
The number of degrees the form should be rotated clockwise. |
|
<X placement> |
The distance that Cypress should shift the form horizontally in inches. |
|
<Y placement> |
The distance that Cypress should shift the form vertically in inches. |
Only the <form name> parameter is required. If you do not specify a matrix, Cypress will not scale, rotate, or shift the form when applying it to the page.
You can find a list of available forms in the Resource Manager application.
This is the syntax for putting the current form on the stack so you can revert to it later:
frm + <form name>, <X scaling>, <Y scaling>, <rotation>,
<X placement>, <Y placement>
This is the syntax for reverting to the form at the top of the stack:
frm -
image_quality
The image_quality InLine command specifies the image compression value. This value determines whether Cypress will give preference to image size or quality when it compresses color images.
This is the syntax for setting the image quality:
image_quality = <image compression value>
where <image compression value> is an integer from 1 to 100. The higher the value, the higher the preference that Cypress will give to image quality. For lossless compression, set <image compression value> to 100.
ink
The ink InLine command specifies the current font color. You can define the color using red/green/blue (RGB) values from 0 to 255. For example, black corresponds to 0, 0, 0; white corresponds to 255, 255, 255. For a table of 216 colors and their RGB values, see http://www.web-source.net/216_color_chart.htm.
The ink command takes effect as soon as Cypress encounters it. Cypress will continue to use the specified font color until it encounters another ink command or a new format.
This is the general syntax for the ink InLine command:
This is the syntax for setting the font color:
ink = <red value>, <green value>, <blue value>
where:
<red value> is the red color value.
<green value> is the green color value.
<blue value> is the blue color value.
This is the syntax for putting the current font color on the stack so you can revert to it later:
ink + <red value>, <green value>, <blue value>
This is the syntax for reverting to the font color at the top of the stack:
ink -
insert_image
The insert_image InLine command enables you to insert into a document images stored in Cypress. Cypress will place the upper left corner of the image at the current cursor position. You might find it helpful to use other InLine commands (e.g., tab or pos), to change the cursor’s position before inserting the image.
This is the general syntax for the insert_image InLine command:
This is the syntax for inserting an image:
insert_image <image name> [<X scaling>, <Y scaling>, <rotation>]
where:
<image name> is the name of the image as specified in the Resource Manager application. If the image name does not begin with a letter, or it contains spaces or any characters other than letters, numbers, and underscores, you must enclose it in quotation marks.
<X scaling> is the percentage by which Cypress should scale the image horizontally.
<Y scaling> is the percentage by which Cypress should scale the image vertically.
<rotation> is the number of degrees that the image should be rotated. Use a positive number to rotate the image clockwise and a negative number to rotate it counterclockwise.
margins
The margins InLine command resets the page margins to the specified values. You can change the margins several times within the same page; this allows you to build a page with different logical sections.
This is the general syntax for the margins InLine command:
This is the syntax for resetting the page margins:
margins = <left margin>, <top margin>, <right margin>,
<bottom margin>
where:
<left margin> is the new left margin in inches. Use an asterisk if you want to retain the current left margin.
<top margin> is the new top margin in inches. Use an asterisk if you want to retain the current top margin.
<right margin> is the new right margin in inches. Use an asterisk if you want to retain the current right margin.
<bottom margin> is the new bottom margin in inches. Use an asterisk if you want to retain the current bottom margin.
The left margin and top margin parameters are required; the right margin and bottom margin parameters are optional. If you do not specify a right margin or bottom margin, Cypress will retain the existing right or bottom margin.
newpage
The newpage InLine command ends the current page and starts a new page. You might find this command useful in applications where it is difficult to insert a form feed character.
This is the syntax for starting a new page:
^.{newpage}
nf
The nf InLine command creates a new physical front page and forces Cypress to print the current page on the it. This command has no effect if the document is not duplex. Although you can specify this command anywhere on the page, it will not take effect until the current page ends.
If the previous physical page was on a front page, this command will print a blank back page and print the current page on a new physical front page.
This is the syntax for creating a new physical front page:
^ {nf}
orn
The orn InLine command changes the orientation of all following text. This enables you to create a page with mixed orientation. Page orientation will revert to the default orientation at the end of the page. If you insert the orn command before any printable data on the page, Cypress will treat the specified orientation as the view orientation.
When you use the orn command, Cypress will set the cursor position to the origin of the page based on the new left and top margins. For example, if you change a portrait page to a landscape page, Cypress treats the original left margin as the top margin and the original bottom margin as the left margin. Use the pos command to reset the cursor position, if necessary.
This is the general syntax for the orn InLine command:
This is the syntax for setting the orientation of the page
orn = <orientation>
where <orientation> is a token indicating the new orientation of the page. This table lists the supported values for <orientation>:
|
Value |
Function |
|
por |
Sets the page to portrait orientation. |
|
lan |
Sets the page to landscape orientation. |
|
ipor |
Sets the page to inverse portrait orientation. |
|
ilan |
Sets the page to inverse landscape orientation. |
This is the syntax for retaining the previous orientation on the stack so you can revert to it later:
orn + <orientation>
This is the syntax for reverting to the orientation at the top of the stack:
orn -
out
The out InLine command enables you to specify the output tray or trays to which Cypress should deliver all subsequent pages. If this command appears before any printable data, Cypress will deliver the current page and all pages that follow to the specified tray; otherwise, Cypress will begin using the specified tray with the next page.
This is the general syntax for the out InLine command:
This is the syntax for specifying an output tray:
^. { out = <output tray> }
where <output tray> is the name of an output tray defined in the Administration Tools module. If the name of the tray does not begin with a letter or includes characters other than letters, numbers, or underscores, you must enclose it in quotation marks.
This is the syntax for replacing the current output tray but retain it on a stack of previous trays:
^. {out + <output tray> }
where <output tray> is the name of the new tray.
This is the syntax for reverting to the output tray at the top of the stack:
out -
page_matrix
The page_matrix InLine command allows you to replace the scaling, rotation, and placement values in the format definition.
After you add the page_matrix command to a document, Cypress will apply the new matrix to all subsequent pages. Be sure to place the page_matrix command before any printable data on the page.
This is the general syntax for the page_matrix InLine command:
| – |
|
This is the syntax for changing the matrix values:
page_matrix <X scaling>, <Y scaling>, <rotation>, <X placement>, <Y placement>
where:
|
Parameter Value |
Description |
|
<X scaling> |
The percentage by which Cypress should scale the form horizontally. |
|
<Y scaling> |
The percentage by which Cypress should scale the form vertically. |
|
<rotation> |
The number of degrees the form should be rotated clockwise. |
|
<X placement> |
The distance that Cypress should shift the form horizontally in inches. |
|
<Y placement> |
The distance that Cypress should shift the form vertically in inches. |
pform
The pform InLine command changes the form overlay on the current page. This command will not change the form overlay on subsequent pages. Cypress will ignore the pform command if no form is associated with the current page. Unlike the frm command, you can implement the pform command in the middle of a page.
This is the syntax for the pform InLine command and its parameters:
This is the syntax for applying the form to the current page:
pform = <form name>, <X scaling>, <Y scaling>, <rotation>,
<X placement>, <Y placement>
where:
|
Parameter Value |
Description |
|
<form name> |
The name of the form to apply to the page. If the form name contains any spaces or characters other than letters, numbers, or underscores, you must enclose it in quotation marks. |
|
<X scaling> |
The percentage by which Cypress should scale the form horizontally. |
|
<Y scaling> |
The percentage by which Cypress should scale the form vertically. |
|
<rotation> |
The number of degrees the form should be rotated clockwise. |
|
<X placement> |
The distance that Cypress should shift the form horizontally in inches. |
|
<Y placement> |
The distance that Cypress should shift the form vertically in inches. |
Only the <form name> parameter is required. If you do not specify a matrix, Cypress will not scale, rotate, or shift the form when applying it to the page.
You can find a list of available forms in the Resource Manager application.
pos
The pos InLine command enables you to move the cursor to another position on the page.
This is the general syntax for the pos InLine command:
This is the syntax for setting the cursor position:
pos = <position>
where <position> indicates the new cursor position.
You can specify an absolute position for the cursor, or you can set the cursor position based on its current position.
| • | To specify an absolute position, use a pair of real numbers to set the location of the endpoint. For example, the position 1, 1 indicates a point one inch from the left edge and one inch from the top edge of the page or data box. |
| • | To specify a relative position, use the notation @+ or @-, followed by a real number, to set the location of an endpoint relative to the current cursor position. For example, the position @+1, @-1 indicates a point one inch to the right of and one inch above the current cursor position. |
You can use absolute positioning for one position value and relative positioning for the other. For example, pos = 7, @.5 moves the cursor seven inches from the left margin and down one-half inch from its current position.
This is the syntax for putting the current position on the stack so you can revert to it later:
pos + <position>
This is the syntax for reverting to the cursor position at the top of the stack:
pos -
pstock
The pstock InLine command specifies the stock for the current page. It does not affect subsequent pages. Unlike the stk command, you can insert this command anywhere on the page.
This is the syntax for changing the stock on the current page:
pstock = <stock name>
where <stock name> is the name of a stock defined in the Administration Tools module. If the stock name does not begin with a letter, or contains spaces or characters other than letters, numbers, and underscores, you must enclose it in quotation marks.
rfmt
The rfmt InLine command instructs Cypress to discard the current page and begin again with the specified format.
This is the general syntax for the rfmt InLine command:
This is the syntax for restarting the page with a different format:
rfmt = <format name>
where <format name> is the name of a format defined in the Administration Tools module. If the format name contains spaces, you must enclose it in quotation marks.
This is the syntax for replacing the current format but retain it on a stack of previous formats:
rfmt + <format name>
Keep in mind that you should still set <format name> to the name of the new format.
This is the syntax for reverting to the format at the top of the stack:
rfmt -
sim
The sim InLine command instructs Cypress to print only on one side of the physical page and can be inserted anywhere within the document. When Cypress encounters this command, it will begin printing only on one side of the page until it reaches the end of the print job or it encounters a dup InLine command.
The sim InLine command overrides the plexing configuration in the Cypress format applied to the document.
This is the syntax for printing the document on only one side of the physical page:
^ {sim}
start_new_document
The start_new_document InLine command begins a new Cypress document. Cypress will start the new document as soon as it encounters this command, which enables you to capture several documents from one input file.
To start a new document
| > | Use this syntax: |
^ {start_new_document}
stk
The stk InLine command changes the stock for all subsequent pages. If this command appears before any printable data, it will affect the current page; otherwise, it will not take effect until the beginning of the next page. This command overrides the stock specified in the format definition.
This is the general syntax for the stk InLine command:
This is the syntax for changing the stock:
stk = <stock name>
where <stock name> is the name of the stock defined in the Administration Tools module. If the stock name does not begin with a letter, or it contains spaces or any characters other than letters, numbers, or underscores, you must enclose it in quotation marks.
This is the syntax for putting the current stock on the stack so you can revert to it later:
stk + <stock name>
This is the syntax for reverting to the stock name at the top of the stack:
stk -
ul
The ul InLine command underlines text. You can also use the ul command to turn off underlining.
This is the general syntax for the ul InLine command:
This is the syntax for turning underlining on or off:
ul = <underline value>
where <underline value> is a token indicating whether and how Cypress should underline text. This table lists the supported values for <underline value>:
|
Value |
Function |
|
none |
Does not underline text. |
|
full |
Underlines words and spaces. |
|
word |
Underlines words only. |
This is the syntax for putting the current underline value on the stack so you can revert to it later:
ul + <underline value>
This is the syntax for reverting to the underline value at the top of the stack:
ul -
uri
The uri InLine command stores a URI onto the page at the specified location. This URI will be emitted as a hyperlink in any output PDFs created by the PDF driver (it is not supported by the CypPDF driver). An optional line width value may be specified. If specified, and is non-zero, a rectangle is drawn around the hyperlink area, with this width giving the thickness of the rectangle’s lines, rounded to the nearest point size.
This is the general syntax of the uri InLine command:

Example:
^{uri (*,*),(@+0.4,@+0.1),"www.asg.com",0.03}
This command will emit a URI of www.asg.com starting at the current cursor location, and extended 0.4 inches to the right and 0.1 inches down. A rectangle of 0.03 inch thick lines will be drawn around the hyperlink field.
view_orn
By default, Cypress sets the view orientation to the orientation of the data at the beginning of the page. You can change the view orientation using the view_orn InLine command. It has no effect on how the document will print.
This is the general syntax for the view_orn InLine command:
This is the syntax for changing the view orientation of the page:
view_orn = <orientation>
where <orientation> is a token indicating the new orientation of the page. This table lists the supported values for <orientation>:
|
Value |
Function |
|
por |
Sets the view orientation to portrait orientation. |
|
lan |
Sets the view orientation to landscape orientation. |
|
ipor |
Sets the view orientation to inverse portrait orientation. |
|
ilan |
Sets the view orientation to inverse landscape orientation. |
This is the syntax for retaining the previous view orientation on the stack so you can revert to it later:
view_orn + <orientation>
This is the syntax for reverting to the view orientation at the top of the stack:
view_orn -
Document Processing InLine Commands
You can use document processing InLine commands to change JTIC property values, change retention and purge times, modify document security, set indexes and variables, and configure printing options.
collate
The collate InLine command instructs Cypress to collate print jobs when you request multiple copies. This is the syntax for collating print jobs:
^ {collate}
cpy
The cpy InLine command enables you to set the number of copies that you want to print. This is the syntax for setting the number of print copies:
^ {cpy = <number of copies> }
where <number of copies> is the desired number of print copies.
creator
The creator InLine command enables you to set the creator field in the document and in any JTICs or DTICs associated with it. This is the syntax for setting the creator:
^ {creator = "<name>" }
where <name> is the creator name you want to use.
doc_title
By default, Cypress sets the document title to the name of the file that you sent to Cypress. The doc_title InLine command enables you to set the document title to a custom string. This is the syntax for setting the document title:
^ {doc_title = "<document title>" }
where <document title> is the new title of the document.
docret
The docret InLine command enables you to set the number of days that Cypress will retain a document in the DocuVault.
If you include this command in your document, its value will override the document retention time specified by the document format. However, you cannot override the minimum and maximum retention times configured in the Administration Tools module.
| • | If you set this parameter to a value lower than the specified minimum retention time, Cypress will set the document retention time to the minimum. |
| • | If you set it to a value higher than the specified maximum time, Cypress will set the document retention time to the maximum. |
This is the syntax for setting document retention time:
^ {docret = <document retention time>}
where <document retention time> is the number of days you want to retain the document in the DocuVault.
This is the syntax for using the default document retention time:
^ {docret = default}
This is the syntax for retaining the document in the DocuVault indefinitely:
^ {docret = forever}
dticret
The dticret InLine command enables you to set the number of days that a DTIC will remain in a recipient Inbox.
This is the syntax for setting the DTIC retention time:
^ {dticret = <document ticket retention time>}
where <document ticket retention time> is the number of days that a DTIC can remain in a recipient Inbox.
This is the syntax for using the default DTIC retention time:
^ {dticret = default}
This is the syntax for retaining the DTIC in an Inbox indefinitely:
^ {dticret = forever}
init_ilc_char
By default, the initial InLine command character is a caret (^). However, at times ^[ or ^{ appears in the text of a document. If you need to include this combination of characters in your document, you must change the initial InLine command character; if you do not, Cypress will interpret all text that follows these characters as an invalid InLine command.
This command must appear in the document before the first instance of ^[ or ^{. In most cases, you should include this command in the first line of text.
This is the syntax for changing the initial InLine command character:
^ {init_ilc_char = <initial character> }
where <initial character> is the new initial InLine command character.
All subsequent InLine commands must begin with the new character.
inx
The inx InLine command enables you to set a page index. You can insert this command anywhere on the page that you wish to index; it will take effect at the end of the page. You can include multiple inx commands on a single page.
This is the general syntax for the inx InLine command:
This is the syntax for defining a single index value:
^ {inx <index name> = <index value> }
where:
<index name> is the name of the page index you want to set.
<index value> is the value you want to associate with that index. If this value contains spaces or characters other than letters, numbers, and underscores, you must enclose it in quotation marks.
<template name> is optional and used to process the value for numeric and date/time indexes.
You can set a single page index to multiple values using this syntax:
^ {inx <index name> = <index value 1>, <index value 2>,
..., <index value n>
This is the syntax for setting a page index on this page and automatically set it on all subsequent pages:
^ {inx <index name> + <index value> }
Or
^ {inx <index name> + <index value 1>, <index value 2>,
... <index value n>
This is the syntax for canceling automatic indexing of a particular index:
^ {inx <index name> - }
For example, given that you entered this command on the first page of your document:
^ {inx account + 083197 inx acc_type = "Normal Checking",
Savings}
Cypress would set two acc_type indexes for the first page of the document, giving one acc_type index the value of Normal Checking and the other the value of Savings. In addition, Cypress would set the account index to 083197 for the first page and all subsequent pages. If you entered no additional indexing commands, Cypress would set the account index to 083197 on each page of the document.
However, you might enter this command on page six of your document:
^ {inx account -}
In that case, Cypress would set the account page index on the second, third, fourth, and fifth pages, but not on the sixth page or on any pages that followed.
You could also enter this command on page six of your document:
^ {inx account + 111602}
Cypress would set the account page index on the sixth page and all subsequent pages to 111602. However, because page indexes can have multiple values, Cypress would also continue to set the account page index to 083197. If you want to stop setting the account page index to 083197 at the same time that you start setting it to 111602, you can use this syntax instead:
^ {inx account - inx account + 111602}
jticpur
The jticpur InLine command enables you to configure a JTIC’s purge time, or the number of hours that a JTIC will remain in a device queue without being processed before it is purged. Cypress will cancel the print job and delete the JTIC when this time expires. If you use this command in your document, it will override the JTIC’s purge time specified in the format.
This is the syntax for setting the JTIC purge time:
^ {jticpur = <job ticket purge time>}
where <job ticket purge time> is the number of hours that a JTIC can remain in a device queue without being processed before it is purged.
This is the syntax for using the default JTIC purge time:
^ {jticpur = default}
This is the syntax for retaining the JTIC in the device queue indefinitely:
^ {jticpur = forever}
jticret
The jticret InLine command enables you to configure the number of hours that the JTIC will remain in a device queue after it finishes processing. Cypress will delete the JTIC when this time expires. The document will remain in the DocuVault.
If you use this command in your document, it will override the JTIC retention time specified by the format.
In addition, keep in mind that the JTIC retention time does not affect the document retention time. Use the docret command to set the document retention time.
This is the syntax for setting the JTIC retention time:
^ {jticret = <job ticket retention time>}
where <job ticket retention time> is the number of hours that a JTIC can remain in a device queue after it finishes processing.
This is the syntax for using the default JTIC retention time:
^ {jticret = default}
This is the syntax for retaining the JTIC in the device queue indefinitely:
^ {jticret = forever}
pri
The pri InLine command sets the JTIC priority. Cypress uses this value to determine the print order of JTICs in a device queue.
This is the syntax for setting the JTIC priority:
^ {pri = <priority> }
where <priority>is a value ranging from 1 to 100. The lower the priority value, the lower the priority of the JTIC.
sec_role
The sec_role InLine command adds the specified Cypress Role to the document and JTIC security list. Cypress will apply permissions for Role members based on the permissions configured for the members in the Administration Tools module.
This is the syntax for adding a Role to the document and JTIC security list:
^ {sec_role <role name> }
where <role name> is the name of a Cypress Role defined in the Administration Tools module. If this value contains spaces or characters other than letters, numbers, and underscores, you must enclose it in quotation marks.
sec_user
The sec_user InLine command adds the specified user to the document and JTIC security list. Cypress applies the specified permissions for this user.
This is the general syntax for the sec_user InLine command:
This is the syntax for adding a user to the document and JTIC security list:
sec_user <domain>/<user>, <permissions>
where:
<domain> is the name of the Windows domain.
<user> is the name of a Windows user in the specified domain.
<permissions> is an eight-digit string of zeroes and ones. Each digit corresponds to a permission type:
|
Digit Position |
Permission Type |
|
1 |
Read |
|
2 |
Append |
|
3 |
Write |
|
4 |
Delete |
|
5 |
Copy |
|
6 |
Control |
|
7 |
Execute |
|
8 |
Owner |
This is the syntax for setting permissions for Everyone:
^ {sec_user *, <permissions> }
For example, to give the user Admin permissions to read, append, and delete the document, use this InLine command:
^ {sec_user Admin, 11010000}
stime
The stime InLine command sets the job’s start time. If you do not include this command in your document, Cypress will begin processing the document as soon as it enters a device queue.
This is the general syntax for the stime InLine:
This is the syntax for setting a job to start in the next 24 hours:
^ {stime = "<time>" }
where <time> is the time of day the job should start. Specify the time in 24-hour format; if you want to start the job at 1:00 P.M., you should set <time> to 1300.
This is the syntax for setting a job to start on a specific day of the week:
^ {stime = "<day of week> <time>" }
where <day of week> is one of these values:
| • | Sunday (or Su) |
| • | Monday (or Mo) |
| • | Tuesday (or Tu) |
| • | Wednesday (or We) |
| • | Thursday (or Th) |
| • | Friday (or Fr) |
| • | Saturday (or Sa) |
If you specify a day of the week for the job to start, Cypress will begin processing the job on the next occurrence of that day; you cannot postpone a job for longer than seven days.
suspend
The suspend InLine command enables you to suspend a job as soon as it enters a device queue. You can use this command when you want to verify page layout and form position before printing a document. When you have verified the job, you can resume it.
This is the syntax for suspending a print job:
^ { suspend }
unit
The unit InLine command enables you to specify whether you want to provide measurement parameters in inches or centimeters. If you do not include the unit command in your document, Cypress will assume that you are giving all measurements in inches.
This is the syntax for providing measurements in centimeters:
^ { unit = cm }
This is the syntax for providing measurements in inches:
^ { unit = inch }
var
The var InLine command sets page variables. The Report Distribution Manager will use these page variables to control report processing. For example, you might decide to break subreports or deliver documents to specific recipients based on the contents of a page variable. Cypress does not print or display these variables.
This is the general syntax for the var InLine command:
This is the syntax for defining a page variable:
^ {var <variable name> = <variable value> }
where:
<variable name> is the name of the page variable you want to set.
<variable value> is the value you want to associate with that variable. If this value contains spaces or characters other than letters, numbers, and underscores, you must enclose it in quotation marks.
This is the syntax for setting a page variable on this page and automatically set it on all subsequent pages:
^ {var <variable name> + <variable value> }
This is the syntax for canceling an automatic variable setting:
^ {var <variable name> - }
For example, given that you entered this command on the first page of your document:
^ {var account + 072899 var acc_type = "Normal Checking"}
Cypress would set the acc_type page variable on the first page of the document. In addition, Cypress would set the account page variable to 072899 for the first page and all subsequent pages. If you entered no additional var commands, Cypress would set the account page variable to 072899 on each page of the document.
You could, however, enter this command on page six of your document:
^ {var account -}
In that case, Cypress would set the account page variable on the second, third, fourth, and fifth pages, but not on the sixth page or on any pages that followed.
varinx
The varinx InLine command sets both a page variable and an index of the same name.
This is the general syntax for the varinx InLine command:

This is the syntax for setting a page variable and a page index:
^ {varinx <var/index name> = <var/index value> [<template name>]}
where:
<var/index name> is the name of the page variable and index.
<var/index value> is the value that you want to associate with the page variable and index. If this value contains spaces or characters other than letters, numbers, and underscores, you must enclose it in quotation marks.
<template name> is optional and used to process the value for numeric and date/time indexes.
This is the syntax for setting a page variable and index on this page and automatically set them on all subsequent pages:
^ {varinx <variable and index name> + <value> }
This is the syntax for canceling an automatic variable setting:
^ {varinx <variable and index name> - }
For example, given that you entered this command on the first page of your document:
^ {varinx account + 091600 var acc_type = "Normal Checking"}
Cypress would set the acc_type page variable and page index on the first page of the document. In addition, Cypress would set the account page variable and page index to 091600 for the first page and all subsequent pages. If you entered no additional varinx commands, Cypress would set the account page variable and index to 091600 on each page of the document.
You could, however, enter this command on page six of your document:
^ {varinx account -}
In that case, Cypress would set the account page variable on the second, third, fourth, and fifth pages, but not on the sixth page or on any pages that followed.
Document Distribution InLine Commands
You can use document distribution InLine commands to send documents to printers, fax machines, and e-mail addresses. You can also set distribution-related JTIC properties (e.g., the e-mail message subject) using document distribution commands.
destq
The destq InLine command enables you to send the document to multiple Cypress devices at one time. You can also specify the number of print copies that each device should generate.
This is the general syntax for the destq InLine command:
This is the syntax for sending the document to multiple Cypress devices:
^ { destq <device 1>, <device 2>, ..., <device n> }
where <device n> is the name of a Cypress device configured in the Administration Tools module. If the device name does not begin with a letter or includes characters other than letters, numbers, and underscores, you must enclose it in quotation marks.
If you want to print more than one copy of the print job at a particular device, you can append a colon followed by the number of copies. All of these examples are valid device values:
| • | finance_1 |
| • | "Finance Printer" |
| • | finance_1:3 |
| • | "Finance Printer":3 |
For example, this is a valid destq command:
^ { destq finance_1, "Finance Printer", finance_1:3,
"Finance Printer":3 }
fax_num
The fax_num InLine command sets the ad-hoc fax number. You will use this command when you want to send a document directly to a fax machine rather than routing it via a Cypress recipient.
This is the syntax for sending the document to a specific fax number:
^ { fax_num = + <country code> (<area code>) <fax number>}
where:
<country code> is the one-digit country code.
<area code> is the three-digit area code.
<fax number> is the seven-digit fax number. You must include a hyphen between the third and fourth digits of the fax number.
You must insert a space between the country code and the opening parenthesis and another space between the closing parenthesis and the fax number.
job_address
The job_address or job_addr InLine command sets the job address. You can use this value in reports, print it on banner pages, or include it in a disk_out file title.
If you set the job address using the job_address InLine command and then route the document through a recipient whose Address field is set, the recipient’s job address setting takes precedence.
This is the syntax for setting the job address:
job_address = "<address value>"
where <address value> is the new job address value.
job_desc
The job_desc InLine command sets the job description, a value that appears after the JTIC name in the Enterprise Output Manager’s tree view. You can also use this value in Report Distribution Manager (RDM) reports and subreports, print it on banner pages, or include it in a disk_out file title.
This is the syntax for setting the job description:
job_desc = "<job description value>"
where <job description value> is the new job description.
job_email_bcc
The job_email_bcc InLine command sets the e-mail address of one of the recipients to which Cypress should send the document as an e-mail attachment. The specified recipient will receive a blind copy of the e-mail.
This is the syntax for setting the recipient e-mail address:
job_email_bcc = "<target e-mail address>"
where <target e-mail address> is the address to which Cypress should send the document. This value must be a valid e-mail address.
job_email_cc
The job_email_cc InLine command sets the e-mail address of one of the recipients to which Cypress should send the document as an e-mail attachment. The specified recipient will be copied on the e-mail.
This is the syntax for setting the recipient e-mail address:
job_email_cc = "<target e-mail address>"
where <target e-mail address> is the address to which Cypress should send the document. This value must be a valid e-mail address.
job_email_from
The job_email_from InLine command sets the e-mail address that should appear as the sender of a message to which the document is attached.
This is the syntax for setting the e-mail address that appears as the sender of a document:
job_email_from = "<sender e-mail address>"
where <sender e-mail address> is the address from which the document’s message should originate. This value must be a valid e-mail address.
job_email_msg
The job_email_msg InLine command sets the text of the e-mail message to which Cypress will attach the document.
This is the syntax for setting the e-mail message text:
job_email_msg = "<e-mail message text>"
where <e-mail message text> is the text of the e-mail message to which Cypress will attach the document.
job_email_subject
The job_email_subject InLine command sets the subject line of the e-mail message to which Cypress will attach the document.
This is the syntax for setting the e-mail subject line:
job_email_subject = "<e-mail subject line>"
where <e-mail subject line> is the subject line of the e-mail message to which Cypress will attach the document.
job_email_to
The job_email_to InLine command sets the e-mail address of the recipient to which Cypress should send the document as an e-mail attachment.
This is the syntax for setting the recipient e-mail address:
job_email_to = "<target e-mail address>"
where <target e-mail address> is the address to which Cypress should send the document. This value must be a valid e-mail address.
job_identity
The job_identity or job_id InLine command sets the job identity value. You can use this value for reporting purposes, print it on banner pages, or include it in the file name of Disk Out files.
This is the syntax for setting the job identity:
job_identity = "<identity value>"
where <identity value> is the new job identity value.
job_recipient
The job_recipient or job_rcp InLine command sets the job recipient value. You can use this value for reporting purposes, print it on banner pages, or include it in the file name of disk_out files.
Cypress provides the rcp command for implementing Auto Recipient criteria via InLine commands.
You can also set the job recipient in the Recipient field on a recipient’s Banner tab in the Address Book. If you set the job recipient using the InLine command and then route the document through a recipient whose Recipient field is set, the recipient’s job recipient setting takes precedence.
This is the syntax for setting the job recipient value:
^ {job_recipient = "<job recipient>"}
where <job recipient> is the new job recipient value.
prn
The prn InLine command sets the Cypress device to which you want to send the document. This command overrides the device to which the document was originally sent.
The prn command allows you to specify only a single device. If you need to send the document to more than one device, use the destq InLine command, described earlier.
This is the syntax for sending a document to one Cypress device:
^ {prn = <device name>}
where <device name> is the name of the Cypress device defined in the Administration Tools module. If the name does not begin with a letter, or if it includes any characters other than letters, numbers, or underscores, you must enclose it in quotation marks.
This is the syntax for archiving a document in the DocuVault without sending it to a device:
^ {prn = none}
Recipient InLine Commands
The rcp InLine command enables you to add Auto Recipient criteria expressions to your documents for controlling document delivery based on recipient attributes defined in the Cypress Address Book. The rcp command alerts Cypress that the remainder of the InLine command contains Auto Recipient criteria. The criteria expressions used in InLine commands are identical to those used in Report Distribution Manager.
Cypress also provides special shortcut recipient InLine commands to reduce the size of the expression criteria parameters.
The rcp command instructs Cypress to queue reports to recipients instead of a physical device. A recipient is can be an explicit user or an abstract one (e.g., Administrator) who can receive documents and reports. You can define recipients and their associated output destinations in the Cypress Address Book application.
The rcp command takes one parameter: a valid Auto Recipient expression criteria string.
For example, this is a valid rcp InLine command statement:
rcp select printer where recipient([city]="Detroit")
You can use any Auto Recipient expression criteria statement with the rcp InLine command. However, Cypress provides several shortcut InLine commands to make developing a recipient criteria string easier. For example, this statement would function exactly as the statement shown previously:
rcp_prn [city]=”Detroit”
This table lists all the supported recipient InLine command shortcuts:
|
Shortcut |
Equivalent |
Function |
|
select all where recipient |
Queues the document to the highest priority devices of each type defined for the recipient |
|
|
select any where recipient |
Queues the document to the highest priority device defined for the recipient |
|
|
select email where recipient |
Sends a document to the highest priority recipient-defined e-mail address |
|
|
select fax where recipient |
Sends a document to the highest priority recipient-defined fax device |
|
|
select inbox where recipient |
Sends a document to the highest priority Inbox defined for the recipient |
|
|
select printer where recipient |
Sends a document to the highest priority printer defined for the recipient |
The rcp_all shortcut will not necessarily send the document to all devices defined for the recipient; instead it will send the document to the highest priority device of all types defined for the recipient. For example, if you have defined three printers, one fax, and two e-mail devices for a particular recipient, Cypress will send three copies of the document: one to the highest priority printer, one to the fax, and one to the higher priority e-mail device.
If you use the rcp_any shortcut with the same recipient, Cypress would send only one copy of the document to the device with the highest priority.
Advanced Formatting Module InLine Commands
You can use the Advanced Formatting Module InLine commands if you have a license for Cypress’s Advanced Formatting Module. These commands enable you to add bar codes, data boxes, lines, and tabs to your documents.
barcode
The barcode InLine command converts data to a bar code. After you issue a barcode command, Cypress displays all characters following the command as a bar code until it encounters barcode-.
This is the syntax for the barcode InLine command and all of its parameters:
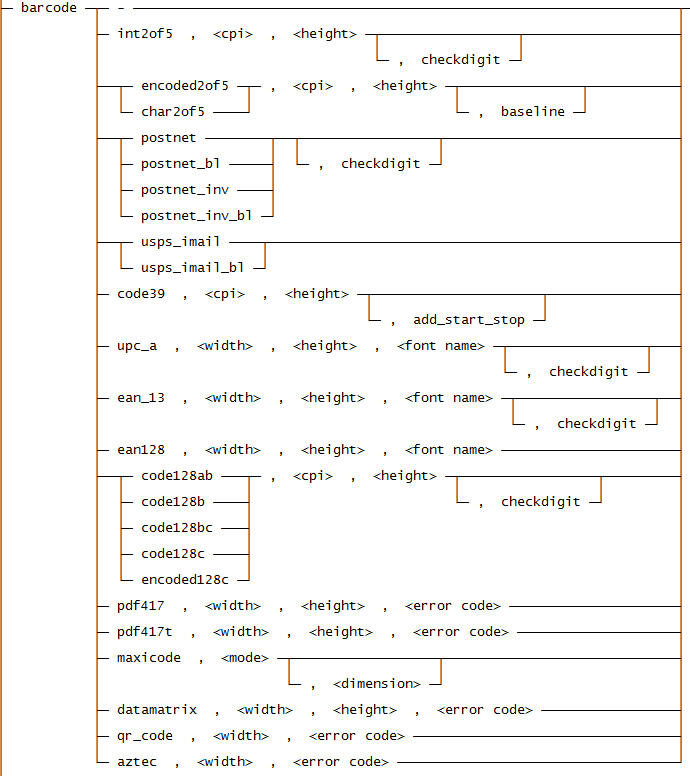
The sections that follow describe each of the supported bar code types. All bar codes except postnet_bl, postnet_inv_bl, and usps_imail_bl draw down from the current cursor position.
int2of5
This is the syntax for specifying a 2-of-5 bar code:
barcode int2of5, <cpi>, <height>, checkdigit
where:
<cpi> is a real number indicating the horizontal spacing of the bar code. This value must be between 1 and 18. Values between 9 and 12 are common.
<height> is a real number indicating the height of the bar code in inches. This value must be at least 0.25.
checkdigit (optional) is used if your data does not already include the check digit. If you specify this parameter, Cypress will automatically calculate and append a check digit to the end of the data.
This is an example of a valid int2of5 InLine command:
^ {barcode int2of5, 12.7, 0.4, checkdigit}04568934567812
^ {barcode-}
postnet and postnet_bl
This is the syntax for specifying a PostNet bar code:
barcode postnet, checkdigit
Or
barcode postnet_bl, checkdigit
The postnet and postnet_bl tokens work identically except that postnet_bl draws the bar code up from the current baseline rather than down.
The checkdigit token is optional. Use it if your data does not already include the check digit. If you specify this parameter, Cypress will automatically calculate and append a check digit to the end of the data.
Cypress always draws the PostNet bar code to meet U.S. Postal Service specifications: 22 bars per inch and 0.125 inches high.
This is an example of a postnet InLine command:
^ {barcode postnet, checkdigit}48307129804^ {barcode-}
usps_imail and usps_imail_bl
This is the syntax for specifying a usps_imail bar code:
barcode usps_imail
Or
barcode usps_imail_bl
The usps_imail and usps_imail_bl tokens work identically except that usps_imail_bl draws the bar code up from the current baseline rather than down.
Cypress encodes the usps_imail bar code as a 20-digit tracking code, along with a 5-, 9-, or 11-digit routing code (zip code). It accepts 20, 25, 29, or 31 digits of data and emits the appropriate bar code.
This is an example of a usps_imail InLine command with a routing length of 5:
^ {barcode usps_imail}0123456709498765432112345^ {barcode-}
code39
This is the syntax for specifying a Code 3-of-9 bar code:
barcode code39, <cpi>, <height>, add_start_stop
where:
<cpi> is a real number specifying the horizontal spacing of the bar code. This value must be between 0.1 and 9.8.
<height> is a real number specifying the height of the bar code in inches. This value must be at least 0.25.
The add_start_stop token is optional. Use this parameter if your data does not include the start/stop characters. If you specify this parameter, Cypress will automatically add start/stop characters to the beginning and end of the data stream.
This is an example of a valid code39 InLine command:
^ {barcode code39, 4.7, 0.5, add_start_stop}REG25-DIV12
^ {barcode-}
upc_a
This is the syntax for specifying a UPC version A bar code:
barcode upc_a, <width>, <height>, <font name>, checkdigit
where:
<width> is the width of the bar code in inches. This value must be between 0.98 and 2.48 inches. Values close to 1.235 inches are most common.
<height> is a real number specifying the height of the bar code in inches. This value must be at least 0.25. Values close to 0.9 inches are most common.
<font name> is the font resident in your DocuVault that Cypress should use for the human-readable portion of the bar code. Most customers use OCR-B fonts with this bar code, although some use Courier or Lucida. If more than one font with the specified name exists in the DocuVault, Cypress will use the most recent.
The checkdigit token is optional. Use it if your data does not already include the check digit. If you specify this parameter, Cypress will automatically calculate and append a check digit to the end of the data.
This is an example of a valid upc_a InLine command:
^ {barcode upc_a, 1.235, 0.9, "OCR-B MT", checkdigit}01234567890^ {barcode-}
ean_13
This is the syntax for specifying an ean_13 bar code:
barcode ean_13, <width>, <height>, <font name>, checkdigit
where:
<width> is the width of the bar code in inches. This value must be between 0.98 and 2.48 inches. Values close to 1.235 inches are most common.
<height> is a real number specifying the height of the bar code in inches. This value must be at least 0.25. Values close to 0.9 inches are most common.
<font name> is the font resident in your DocuVault that Cypress should use for the human-readable portion of the bar code. Most customers use OCR-B fonts with this bar code, although some use Courier or Lucida. If more than one font with the specified name exists in the DocuVault, Cypress will use the most recent.
checkdigit (optional) is used if your data does not already include the check digit. If you specify this parameter, Cypress will automatically calculate and append a check digit to the end of the data.
This is an example of a valid ean_13 InLine command:
^ {barcode ean_13, 1.4, 0.9, "OCR-B MT", checkdigit}123456789012
^ {barcode-}
ean128
This is the syntax for specifying an EAN 128 bar code:
barcode ean128 <width>, <height>, <font name>
where:
<width> is the width of the bar code in inches. This value must be between 0.98 and 2.48 inches. Values close to 1.235 inches are most common.
<height> is a real number specifying the height of the bar code in inches. This value must be at least 0.25. Values close to 0.9 inches are most common.
<font name> is the font resident in your DocuVault that Cypress should use for the human-readable portion of the bar code. Most customers use OCR-B fonts with this bar code, although some use Courier or Lucida. If you specify a font name and more than one font with that name exists in the DocuVault, Cypress will use the most recent. If you specify an empty string as the font name, the text characters below the barcode are omitted.
checkdigit (optional) is used if your data does not already include the check digit. If you specify this parameter, Cypress will automatically calculate and append a check digit to the end of the data.
This is an example of a valid ean128 InLine command:
^ {barcode ean128,2.8,0.5,"OCR-B"} (01)1234(5602)12ABC50|(27)123456
^ {barcode-}
code128ab
This is the syntax for specifying a Code 128 bar code (types A and B):
barcode code128ab, <cpi>, <height>, checkdigit
where:
<cpi> is a real number specifying the horizontal spacing of the bar code. This value must be between 1 and 18.
<height> is a real number specifying the height of the bar code in inches. This value must be at least 0.25.
checkdigit (optional) is used if your data does not already include the check digit. If you specify this parameter, Cypress will automatically calculate and append a check digit to the end of the data.
This is an example of a valid code128ab InLine command:
^ {barcode code128ab, 8.7, 0.5, checkdigit}Region025:Division12
^ {barcode-}
code128b
This is the syntax for specifying a Code 128 bar code (type B):
barcode code128b, <cpi>, <height>, checkdigit
where:
<cpi> is a real number specifying the horizontal spacing of the bar code. This value must be between 1 and 18.
<height> is a real number specifying the height of the bar code in inches. This value must be at least 0.25.
checkdigit (optional) is used if your data does not already include the check digit. If you specify this parameter, Cypress will automatically calculate and append a check digit to the end of the data.
This is an example of a valid code128b command:
^ {barcode code128b, 8.7, 0.5, checkdigit}Region025:Division12
^ {barcode-}
code128bc
This is the syntax for specifying a Code 128 bar code (type BC):
barcode code128bc, <cpi>, <height>, checkdigit
where:
<cpi> is a real number specifying the horizontal spacing of the bar code. This value must be between 1 and 18.
<height> is a real number specifying the height of the bar code in inches. This value must be at least 0.25.
checkdigit (optional) is used if your data does not already include the check digit. If you specify this parameter, Cypress will automatically calculate and append a check digit to the end of the data.
This is an example of a valid code128bc command:
^ {barcode code128bc, 8.7, 0.5, checkdigit}Region025:Division12
^ {barcode-}
code128c
This is the syntax for specifying a Code 128 bar code (type C):
barcode code128c, <cpi>, <height>, checkdigit
where:
<cpi> is a real number specifying the horizontal spacing of the bar code in character pairs per inch. This value must be between 1 and 18.
<height> is a real number specifying the height of the bar code in inches. This value must be at least 0.25.
The checkdigit token is optional. Use it if your data does not already include the check digit. If you specify this parameter, Cypress will automatically calculate and append a check digit to the end of the data.
This is an example of a valid code128c command:
^ {barcode code128c, 8.7, 0.5, checkdigit}56930210000698402847
^ {barcode-}
pdf417
This is the syntax for specifying a PDF 417 bar code:
barcode pdf417, <width>, <height>, <error code>, truncate
where:
<width> is the width of the bar code in inches.
<height> is a real number specifying the height of the bar code in inches.
<error code> is an integer between 0 and 8 that indicates the amount of error correction (redundancy) that is built into the bar code data. The higher the value, the better the error correction; however a higher value reduces the amount of data you can encode.
The truncate token is optional. It indicates that Cypress should draw the bar code as a truncated PDF 417 bar code. If omitted, Cypress will draw the bar code as a normal PDF 417 bar code.
This is an example of a valid pdf417 InLine command:
^ {barcode pdf417, 1.5, 0.6, 4}
172387:SKDM458320:3958302krw84csp769
^ {barcode-}
maxicode
This is the syntax for specifying a MaxiCode bar code:
barcode maxicode, <mode>, <dimension>
where:
<mode> is an integer specifying how Cypress should interpret and encode the data. This table lists the supported values for <mode>:
|
Mode Value |
Function |
|
2 |
Structured carrier symbol that encodes a nine-character Postal Code, Country Code, and Service Class. |
|
3 |
Structured carrier symbol that encodes a six-character Postal Code, Country Code, and Service Class. |
|
4 |
Normal encoding of up to 93 characters. |
|
5 |
Encoding of up to 73 characters with enhanced error correction. |
|
6 |
Scanner programming. |
<dimension> is an optional parameter that specifies the size of the bar code in millimeters. This value must be between 24 and 30. If you omit this parameter, the dimension defaults to 26.
This is an example of a valid maxicode InLine command:
^ {barcode maxicode, 4}
SN04820172387XKU58304856HNW8475HWO84-39058849
^ {barcode-}
datamatrix
This is the syntax for specifying a DataMatrix bar code:
barcode datamatrix, <width>, <height>, <error code>
where:
<width> is the width of the bar code in inches.
<height> is a real number specifying the height of the bar code in inches.
<error code> is an integer that indicates the amount of error correction (redundancy) that is built into the bar code data. It must be set to 0, 50, 80, 100, 140, or 200. The higher the value, the better the error correction; however a higher value reduces the amount of data you can encode.
This is an example of a valid datamatrix InLine command:
^ {barcode datamatrix, 1.1, 0.7, 200}
172387SKD45320:395302kr84sp769
^ {barcode-}
qr_code
This is the syntax for specifying a qr_code bar code:
barcode qr_code, <width>, <error code>
where:
<width> is the width of the bar code in inches. (This value also sets the height since this bar code is square.)
<error code> is an integer between 0 and 3 that indicates the amount of error correction (redundancy) that is built into the bar code data. The higher the value, the better the error correction; however a higher value reduces the amount of data you can encode.
This is an example of a valid qr_code InLine command:
^ {barcode qr_code, 1.1, 2}
172387SKD45320:395302kr84sp769
^ {barcode-}
aztec
This is the syntax for specifying an aztec 2-D bar code:
barcode aztec, <width>, <error code>
where:
<width> is the width of the bar code in inches. (This value also sets the height since this bar code is square.)
<error code> is an integer between 1 and 99 that indicates the amount of error correction (redundancy) that is built into the bar code data. The higher the value, the better the error correction; however a higher value reduces the amount of data you can encode.
This is an example of a valid aztec InLine command:
^ {barcode aztec, 1.1, 88}
172387SKD45320:395302kr84sp769
^ {barcode-}
dbox
The dbox InLine command causes Cypress to jump to a specified data box on the page.
This is the general syntax for the dbox InLine command:

This is the syntax for moving to a specific data box:
dbox = <databox name>
where <databox name> is the name of a data box defined in Resource Manager and associated with the current form. You must specify the form that you want to apply to the page before you use the dbox command.
This is the syntax for treating the entire page as a data box:
dbox = page
When you call the dbox command, Cypress will apply the font, color, margins, and other settings defined for the data box in Resource Manager and position the cursor at the top left corner of the data box.
Cypress will write all text to that data box until it encounters a form feed character or an InLine command that moves the cursor to a new position. If text extends past the right margin, Cypress will either truncate it or wrap it to the next line, depending on the data box configuration.
fontindex
The fontindex command will be de-implemented in a future release. ASG recommends that you do not use this command in your documents. If you have questions about fontindex, contact ASG Customer Support.
img_databox
The img_databox InLine command inserts an image (usually a TIFF) into the specified data box.
This is the general syntax for the img_databox InLine command:
This is the syntax for inserting an image into a data box:
img_databox <size> <page> <databox name> <scaling>
where:
<size> is the size of the image data in bytes. Passing an asterisk instead of a number will cause the previous image data to be used.
If you have a two-page, 1352-byte TIFF file, these example InLine commands, extract images from both pages:
img_databox 1352 1 data1
img_databox * 2 data2
This would insert the image on page 1 into the first data box and the image on page 2 into the second.
<page> is the number of the image page that you want to insert.
<databox name> is the name of the data box into which Cypress should insert the image. If you want Cypress to write the image directly to the page, use the token page instead of a data box name.
<scaling> is an optional parameter that specifies how Cypress should scale the image.
This is the syntax for specifying the scaling parameter:
[<X percent>, <Y percent>]
where:
<X percent> indicates the percentage by which Cypress should scale the image horizontally.
<Y percent> indicates the percentage by which Cypress should scale the image vertically.
You can replace either <X percent> or <Y percent> with an asterisk if you want Cypress to automatically scale the image to fit the data box horizontally or vertically.
If you do not know the page number, you can specify an image offset instead. This allows you to use the number of bytes that Cypress should discard before extracting the image rather than a page number.
This is the syntax for inserting an image using the image offset value:
img_databox <size> @ <offset> <databox name> <scaling>
where <offset> is the number of bytes that Cypress should discard.
line
The line InLine command draws a line. You can specify the two endpoints and the width of the line. Cypress will draw the line in the color specified by the most recent ink command or the current data box configuration.
If you use a line command in a data box, Cypress will clip the line at the margins of the data box.
This is the general syntax for the line InLine command:
This is the syntax for adding a line to a document:
line ( <position> ), ( <position> ), <line width>
where:
<position> indicates one of the line’s endpoints. You can specify the position in one of three ways:
| • | Use a pair of real numbers to set the position of the endpoint absolutely. For example, the position (1, 1) indicates a point one inch from the left edge and one inch from the top edge of the page or data box. |
| • | Use the notation @+ or @-, followed by a real number, to set the position of an endpoint relative to the current cursor position. For example, the position (@+1, @-1) indicates a point one inch to the right of and one inch above the current cursor position. |
| • | Use an asterisk to specify the current cursor position. |
<line width> indicates the width of the line, in inches.
shade
The shade InLine Command draws a shaded box. You can specify any pair of opposite corners of the rectangle to draw (for example, the upper left corner and the lower right corner), and the color for the shading. The color specified in this command only affects this shaded box, and does not affect any other page content such as text or lines.
If you use a shade command in a data box, Cypress clips the shaded box at the margins of the data box.
This is the general syntax for the shade InLine Command:

This is the syntax for drawing a shaded box:
shade ( <position> ) , ( <position> ), <red>, <green>, <blue>
where
<position> is a pair of location values that indicate one of the boxes corners. You can specify each location value in one of three ways:
| • | Use a pair of real numbers to set the corner position absolutely. For example, the position (1,2) indicates a corner one inch from the left edge and two inches from the top edge of the page or data box. |
| • | Use the notation @+ or @-, followed by a real number, to set the position of the corner relative to the current cursor position. For example, the position (@+1, @-0.5) indicates a corner one inch to the right of and one half inch above the current cursor position. |
| • | Use an asterisk to specify the current cursor position. An asterisk is equivalent to @+0 |
<red>, <green>, <blue> indicate the color value, from 0 to 255 for each corresponding color component.
This example draws a 2.5 inch by 0.3 inch shaded box with a light green color. The box extends up and to the right from the current cursor position.
^{shade (*,*),(@+2.5,@-0.3), 200, 230, 200}
If the shade command is being used with form overlays and the lines of the form need to be “on top” of the shading, then add the dialect dbox_background_shade to the Format. This dialect causes the shade operation to be placed into the page's “background”, at a level below the other page content.
tab
The tab InLine command moves the cursor to the location of the specified tab and prints text according to the justification value in the tabset command. Cypress will print at this location until it reaches the end of the line or until another InLine command changes the cursor position.
This is the syntax for moving a tab position:
tab <tab name>
where <tab name> is the name of the tab to which you want to move the cursor. You must enclose the name in quotation marks if it contains blanks or any characters that are not letters, numbers, or underscores.
tabset
The tabset InLine command declares a tab name, its location, and its justification. Once defined, a tab and its associated information remain in effect until the end of the document.
This is the general syntax for the tabset InLine command:
This is the syntax for declaring a tab:
tabset <tab name> = <justification>, <tab position>
where:
<tab name> is the name of the tab. If the tab contains blanks or any characters that are not letters, numbers, or underscores, you must enclose the tab name in quotation marks.
<justification> indicates whether Cypress should align text to the left, right, or center. This table lists the supported values for <justification>:
|
Value |
Function |
|
L |
Left alignment |
|
Left |
Left alignment |
|
C |
Center alignment |
|
Center |
Center alignment |
|
R |
Right alignment |
|
Right |
Right alignment |
<tab position> is a real number indicating the tab’s distance in inches from the left edge of the page or data box.
If you replace <tab position> with an asterisk, Cypress will base the tab position on the justification:
| • | If you specified a left-aligned tab, an asterisk will set the tab position at the left edge of the page or data box. |
| • | If you specified a right-aligned tab, an asterisk will set the tab position at the right edge of the page. |
| • | Using an asterisk with a center-aligned tab will set the tab at the midpoint between the left and right margins of the data box or page. |
This example creates three tabs:
^ {tabset desc=L,2.3 tabset tax=C,4.3 tabset price=R,5.6}
To move the cursor position to one of these tabs, use the tab command discussed earlier.
The Image Capture Module
The Cypress Image Capture Module enables image and OCR content to be captured from virtually any scanning solution. Cypress only requires that the scanning solution’s export file be consistent with the file format described in the drawing.
This drawing illustrates how the Cypress Image Capture Module can capture scanned images and store them in your DocuVault.
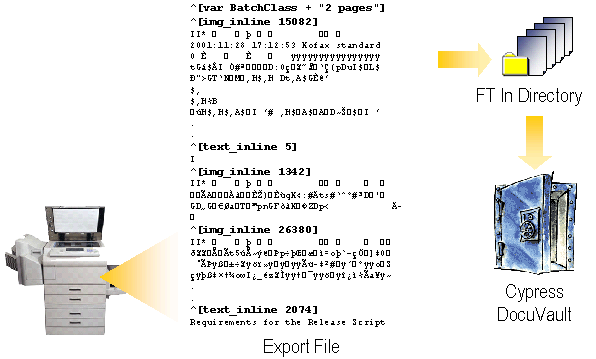
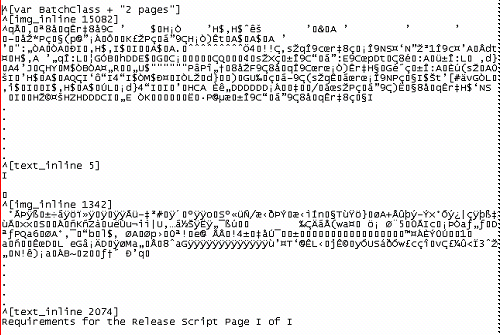
Virtually any scanning solution can be used to scan images and export them to the designated FT In directory. Cypress’s only requirement is that the image files must be formatted with InLine commands. Image data should be preceded by the img_inline or img_databox InLine command; OCR text should be preceded by the text_inline command.
Other InLine commands (e.g., inx or var) can be used to specify variable or index data to the image. By design, files exported for capture via the Cypress Image Capture Module contain all information related to the scanned content, including InLine commands, index data, text data, and image data (in binary format).
Adding Images to a Page
The Cypress Image Capture Module provides two InLine commands that allow you to add images to a page: img_inline and img_databox. Most customers who use these commands have integrated Cypress with Kofax, but it is possible to use them outside Kofax implementations.
The img_inline Command
To add an image directly to a page
| 1. | At the location where you want to insert the image, add the img_inline InLine command to your document, using this syntax: |
^ [img_inline <byte size>]
where <byte size> is the size of the image in bytes.
| 2. | Immediately after the closing bracket of the InLine command, add the image data, for example: |
The img_databox Command
To add an image to a data box
| 1. | Add the img_databox InLine command to your document, using this syntax: |
^ [img_databox <byte size> <page> <databox> <scaling>]
where:
<byte size> is the size of the image in bytes.
<page>is the image page that you want to add to the document. If you prefer, you can specify an offset instead. The value of the offset should be the number of bytes of image data that Cypress should skip before beginning to extract the image. When you specify an offset, prepend the number with @.
<databox> is the name of the data box into which you want to insert the image.
<scaling> is the scaling percentage of the image data. Specify this parameter in the format [<X%>, <Y%>] where <X%> is the horizontal scaling percentage and <Y%> is the vertical scaling percentage. If you want to scale the image to fit the data box either horizontally or vertically, use * instead of a number.
By default, Cypress will not scale the image. If the image is too large for the data box, Cypress will crop it; if it is too small, Cypress will fill the remaining area with white space.
| 2. | Immediately after the closing bracket of the InLine command, add the image data, for example: |
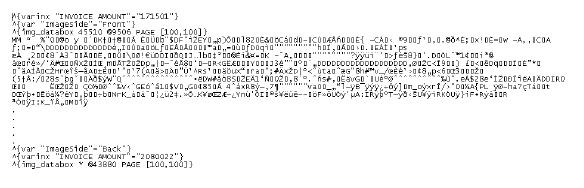
Notice that no image data follows the second img_databox command. Instead, the use of the asterisk as the first parameter indicates that the second img_databox command refers back to the image data passed in with the first img_databox command.
Although the previous example demonstrates the use of the offset parameter, you will probably more often use the page parameter, for example:
The image data here represents a seven-page TIFF. The image data follows the first img_databox command, which accesses the first page; all following img_databox commands refer to a different page of the image data inserted by the first img_databox command. No offsets are used.
Adding Invisible Text to a Page
The Cypress Image Capture Module provides an InLine command that allows you to add invisible text to a page: text_inline. Although you cannot view the text added with this command, Cypress will add it to the full-text index so that you can search on it. Most customers use this command in conjunction with a Kofax OCR implementation, but you can use it in other types of implementations.
To add invisible text to a page
| 1. | At the location where you want to insert the text, add the text_inline InLine command to your document, using this syntax: |
^ [text_inline <byte size>]
where <byte size> is the size of the image in bytes.
| 2. | Immediately after the closing bracket of the InLine command, add the text, for example: |
Document Composition
The execute_spruce InLine command executes Spruce with the specified template, using the input data that follows the command.
This is the syntax for the execute_spruce InLine command:
execute_spruce "<spruce template name>"
This command is followed by the input XML data, to the end of the file. Any page data before this command is ignored and discarded. Some InLine commands that effect the document in general may be used before the execute_spruce command, such as commands to set the document title, security, document retention, and so on. InLine commands that effect page content, such as font, stock, image, and so on will have no effect and should not be used before execute_spruce.