
Introduction to Cypress Formats and Inline Commands
This topic provides a description of Cypress formats and Inline Commands.
Document Formatting
This topic describes the unformatted data and formatted data options for your Cypress documents. Any document submitted to Cypress via FT In, LPD In, TCP In, or DDI can take advantage of these formatting features:
- Cypress formats
- Cypress InLine commands
- Cypress Advanced Formatting Module
- Cypress Auto Format
Unformatted Data
Unformatted data (also called ASCII, straight-ASCII, raw data, or SYSOUT) typically refers to minimally-formatted documents with text placed on a page based at specific row/column positions. These documents do not contain font, graphics, or other formatting features. New lines can be defined explicitly using line feed or new line characters, or the document can contain carriage controls that cause output to be printed at specific lines. For example, Skip to Channel 1 advances the paper so that output will be printed on line one on the next page (Top of Form).
This is an example of a typical unformatted document:
Cypress Formats and Unformatted Data
Cypress offers ways to create sophisticated, easy-to-read documents from applications that generate raw or minimally-formatted text. Using Cypress formats, you can control a variety of document formatting and delivery features.
With Cypress formats, you can perform these formatting tasks:
| • | Select portrait or landscape orientation. |
| • | Define margins. |
| • | Define fonts. |
| • | Create physical pages with multiple logical pages. |
| • | Create simplex or duplex documents. |
| • | Rotate logical pages from their default orientation. |
| • | Indicate horizontal and vertical position of logical pages. |
| • | Scale logical pages proportionally or non-proportionally. |
| • | Merge variable data and electronic forms. |
Cypress also enables you to capture unformatted data in a Cypress DocuVault as fully-formatted documents composed of unique, individual pages. This opens your documents to new destinations and uses. Once documents are captured in the DocuVault, you can manipulate them in many ways:
| • | View them. |
| • | Fax them to recipients or to specific fax numbers. |
| • | Print them on workgroup printers. |
| • | Print them on production printers. |
| • | Distribute them to recipients. |
| • | Archive them. |
| • | E-mail them. |
| • | Deliver them to a web browser. |
Any job processed using a Cypress format can be indexed and archived as individual pages in the Cypress DocuVault.
Cypress InLine Commands and Unformatted Data
InLine commands are commands embedded within output files that are used in conjunction with Cypress format definitions to control how documents are formatted, indexed, archived, routed, printed (imaged), and much more.
In general, formats offer document-level control of formatting features, while InLine commands offer data-level control of formatting features and the ability to control document delivery to devices and recipients. By adding InLine commands to an application, you can invoke select formatting features at any point on a page. Also, InLine commands are often more direct to use and offer individual control per print file; formats are typically specific to a device queue.
Two sets of InLine commands are provided – one set for documents (output files) sent to Cypress via FT In, LPD In, and DDI, and one set for output files sent to Cypress from Windows platforms. The Windows command set is a subset of the FT In, LPD In, and DDI command set.
InLine commands offer data- and page-level control. InLine commands provide this level of control; Cypress formats alone offer document-level control. InLine commands also allow documents to be routed using the recipient feature, enabling Cypress to automatically route documents and reports to recipients based on job characteristics or content.
For example, with Cypress InLine commands, you can format your documents in many ways:
| • | Change the fonts of specific lines, words, or characters. |
| • | Use bold and italics to make specific lines, words, or characters stand out. |
| • | Change ink colors to punctuate important information and improve document appearance. |
InLine commands allow you to change documents (e.g., unformatted data) into something that is easier to read and more professional in appearance. For example:
Cypress InLine commands also offer many other functions. See Using Cypress InLine Commands for more information.
Unformatted Data and the Advanced Formatting Module
The Advanced Formatting Module extends your ability to customize document appearance and provides significant productivity benefits when creating document applications.
The Advanced Formatting Module provides controls that allow you to place print data anywhere on a page and with unique formatting. Forms are no longer tied to the row/column position of text within the print file.
This is an example of a document modified by the Advanced Formatting Module:
Auto Format and Document Delivery
Any document delivered to Cypress via FT In, LPD In, TCP In, or DDI must reference a format in one way or another. Often, customers accomplish this by defining a default format for each device, any FT In, LPD In, TCP In, or DDI job delivered to a device is printed using the device’s default format. In many cases, this approach is sufficient.
However, using this approach alone creates a one-to-one relationship between jobs and devices. Instead, you might want to print any job to any device. To extend job portability, Cypress offers formats, InLine commands, the Auto Format feature, and other methods.
Using Cypress formats and InLine commands, you can extend document routing and delivery services:
| • | Direct output to a specific device. |
| • | Direct output to a specific recipient. |
| • | Configure Cypress to automatically direct output to a recipient’s preferred output destination. |
| • | Automatically identify format selection and routing requirements for SAP, Oracle, Peoplesoft, and other business applications |
Using the Cypress Auto Format feature, you can further extend your ability to deliver documents across your enterprise. The Auto Format feature is the simplest and most robust solution for associating formats with jobs—it automatically determines the appropriate format based on the content of the print file. This advanced feature gives you the ability to print any document at any enterprise destination, without specifying format requirements using InLine commands or other methods.
The Cypress Format
A Cypress format is an object that enables Cypress to transform unformatted data into fully-formatted pages before being captured in a DocuVault. A Cypress format is a type of form development tool, but one that offers more control, flexibility, and capability than other tools.
Cypress formats are used to create logical pages containing output data, which are then mapped to production pages. A logical page is the page that contains data from the output file and is formatted to particular page layout requirements. Logical pages are referred to as faces within Cypress.
A production page is the page that is ultimately imaged or printed. A production page includes requirements for duplex, multiple-up images (i.e., multiple logical pages on a single production page), and position and placement of logical pages. A production page can also be thought of as a physical page, even though its final form can be electronic.
Faces
Faces are used to define front and back printing of a production page. Faces are configured on the Front Face and Back Face tabs on the Format dialog in the Administration Tools application.
Faces are used to define front and back printing of a production page. Fronts and backs are used to control whether a job is to be printed simplex or duplex as well as the number of logical pages on each production page. Each front and back can be thought of as a placeholder for logical pages to be positioned on production pages. The maximum number of fronts and backs is eight each, which would define an eight-up job.
Front faces define requirements for logical pages printed on the front side of production pages. Back faces define requirements for logical pages printed on the back side of production pages.
For example:
| • | If a format has one front face defined, the document will print in simplex. |
| • | If a format has one front face and one back face defined, the document will print in duplex. |
| • | If a format has four front faces defined, the document will print in four-up simplex. |
| • | If a format has one front face and two back faces defined, the document will print in duplex with one logical page on the front and two logical pages on the back. |
Faces can be scaled up or down to best fit a production page, rotated to accommodate multiple-up or landscape printing, and placed at specific locations on a page.
This is Cypress’s process for determining the size, orientation, and placement of a face:
| 1. | Cypress finds the necessary format. |
| 2. | Cypress uses the format’s stock information to determine the size of the page. |
| 3. | Cypress uses the format’s orientation to determine the page height and width based on the stock size. |
| 4. | Cypress uses the format’s margin settings to establish the face’s margins. |
| 5. | Cypress uses the face’s scaling settings to size the logical page. |
| 6. | Cypress uses the face’s rotation settings to orient the logical page. |
| 7. | Cypress uses the face’s placement settings to determine where the logical page should start within the margins of the physical page. |
| 8. | Cypress places the face’s data within the defined area. |
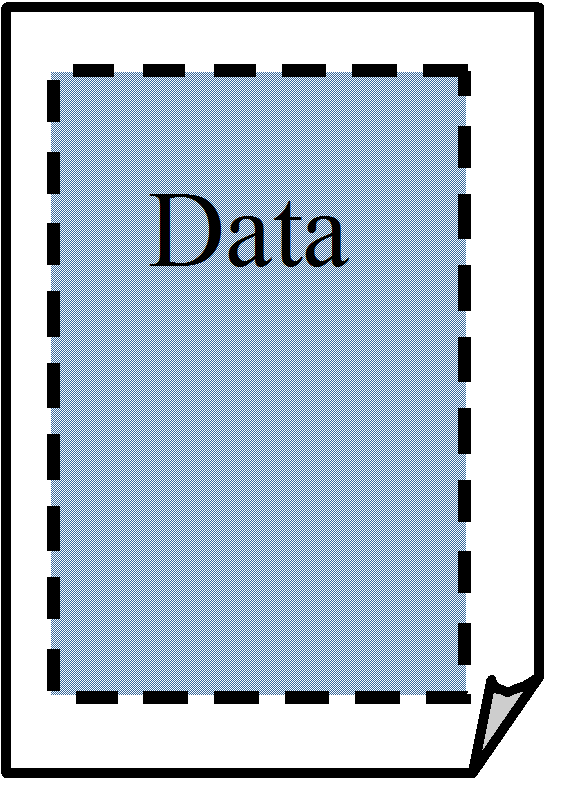
If your print file is formatted as a portrait document (80 columns by 66 rows) and you have selected the Portrait option button in the General tab, Cypress will place the logical page on the production page, for example:
However, if your print file is formatted as a landscape document (132 columns by 66 rows) and you have selected the Landscape option button in the General tab, the default placement of the logical page onto the production page, for example:
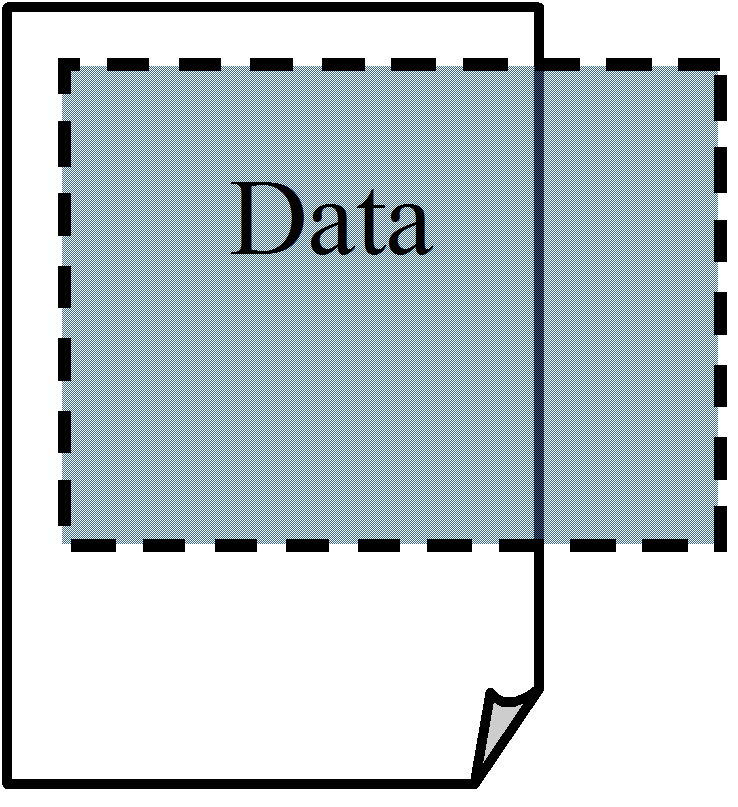
Part of the logical page is clipped and data is lost, because the portrait and landscape controls on the General tab only affect the orientation of the logical page, not the physical page. Cypress always treats the production page as a portrait page.
In order to print a document in landscape orientation, you need to rotate and shift the logical page so that it fits on the production page. As a point of reference, the upper left corner of the portrait page is always treated as the default placement or origin. Any values you enter to position the face are relative to the default origin.
In order to properly place a landscape logical page onto a production page, you must rotate the logical page by 270 degrees and then shift it down 11 inches so that it fits on the production page, as illustrated in this example:
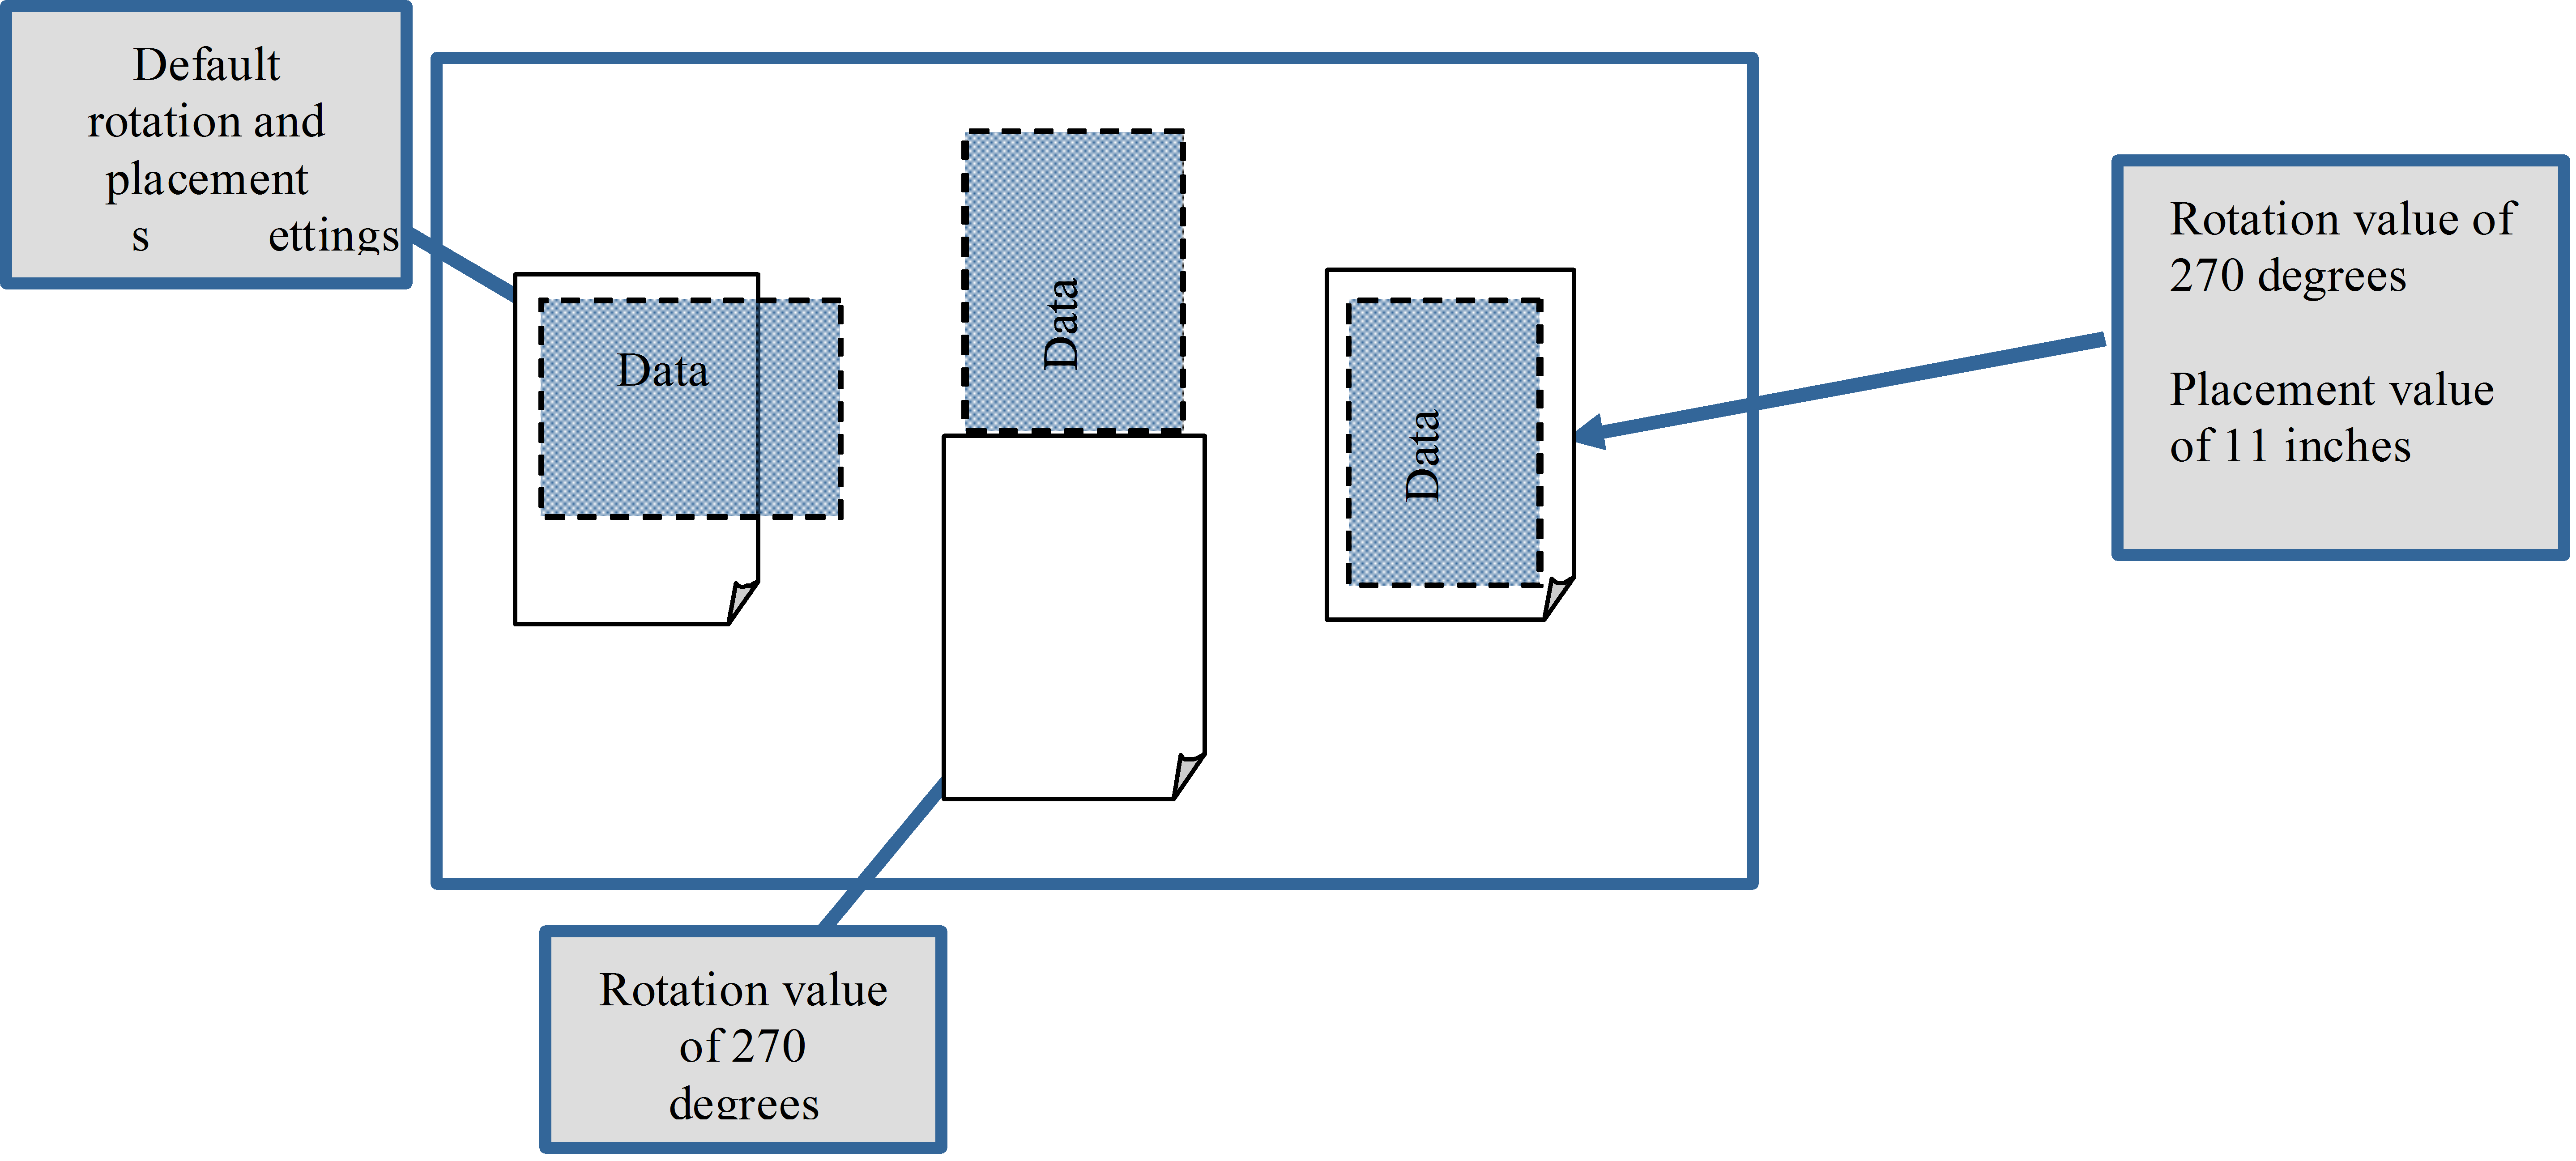
In order to shift pages successfully, you need to understand how Cypress interprets X and Y placement values. A positive X value will shift the origin to the right and a negative value will shift the origin to the left. A positive Y value will shift the origin down and a negative value will shift the origin up.
This example shows that 11 inches must be added to the default origin’s Y axis value to achieve the desired origin for landscape printing. The X value remains at 0. The 11-inch value is positive as lines are being added to the default origin.
Forms
Forms can be defined for each face. There is a limit of one form per face. Forms can be created in any popular desktop application, captured in Cypress as a form resource, and referenced in a format definition.
The previous example shows the controls that allow you to configure forms. Several of them (e.g., the Scaling, Rotation, and Placement fields) are very similar to the controls for configuring faces.
You can indicate if forms are to be merged with output data (by selecting Data Overlay) or if no data is to be printed on the form (by selecting Stand alone). For example, a duplex billing application might use both data-overlay and stand-alone forms. The front side of the page could contain all customer charges merged on a data-overlay form. The back side of the page could contain boiler-plate information (e.g., Terms and Conditions) on a stand-alone form. No output data is printed on the stand-alone form.
Cycle forms are also supported using Cypress formats. The use of cycle forms is a printing technique to automatically switch forms between logical pages. Cycle forms have been useful for businesses who print unformatted data but want to print documents composed of several different forms. The term cycle refers to a fixed sequence of forms used to print the output data.
Margins
Margins define the boundaries from the top, bottom, left, and right edges of a logical page. Every logical page within a job uses the same margin settings, and all faces are placed within the defined margins. The default margins are zero inches.
When defining margins, you need to consider the face placement values. The margin values defined in the General tab (shown previously) are relative to the placement values configurable in the Front Face and Back Face tabs.
For example, if you create a format where all margin values within the General tab are set to 1, and all placement values in the Front Face tab are set to 1, printing will begin two inches down from the top edge of page, and two inches from the left edge as illustrated in this example:
Orientation
Orientation is way that the logical page should be turned. Because mainframe output is typically printed in landscape orientation and workgroup output is typically printed in portrait orientation, you need to select the orientation that will best accommodate the structure of your print files.
Once a document is printed, it’s easy to control orientation – you just rotate the page in your hands so that the document appears right side up in your hands. But many documents will not be printed; they are designed to be viewed on-screen within a DocuSpace, Inbox Viewer, or the Enterprise Output Manager. When you have a document that will primarily be used on-scree, you want to ensure that it is presented in the proper orientation so that it can be easily read.
Cypress determines view orientation by looking at the value of the Rotation field on the first face of the logical page (front or back). This table illustrates how view orientations correspond to the rotation values:
|
Rotation value (in degrees) |
Resulting view orientation |
|
0 |
Portrait |
|
90 |
Inverse portrait |
|
180 |
Inverse landscape |
|
270 |
Landscape |
Fonts
You can configure the fonts to be used with a format on the format’s Font tab, for example:
Fonts can have a major impact on how a document is ultimately formatted, imaged, and printed, so choose the font that will best serve your document. You will probably find that one font will not work for all documents. If the data in the output file uses spaces for margins and row/column alignment, be sure to select a fixed-pitch font (e.g., Courier New) to maintain the desired alignment. Popular fonts that are not fixed-pitch include Arial, Times New Roman, and Century Schoolbook. A font name must be specified before a format can be saved.
You can specify the font size in either points or pitch and use it to control the width and height of the printable area. For example, if the incoming data is 132 columns wide and you want to print the document in portrait orientation, you can select a smaller font size rather than scaling down the size of the face. You can also scale the font differently for X and Y dimensions. This allows you to stretch or compress the size of the data to fully fit the page, without having to use face scaling. The most commonly used font sizes are 10 to 12 points for portrait printing and 8 to 10 points for landscape printing.
Line spacing controls the distance between lines. Because line spacing is relative to the specified font size, you should also consider the font size when setting line spacing.
You might wish to choose a substitute font if your primary font is customized or unusual. For example, Andale is not a font that is installed on all computers, so you might choose Courier New as its substitute. Cypress supports four types of font substitution tables:
| • | AFP |
| • | PCL |
| • | PostScript/PDF |
| • | Xerox Metacode |
Channels
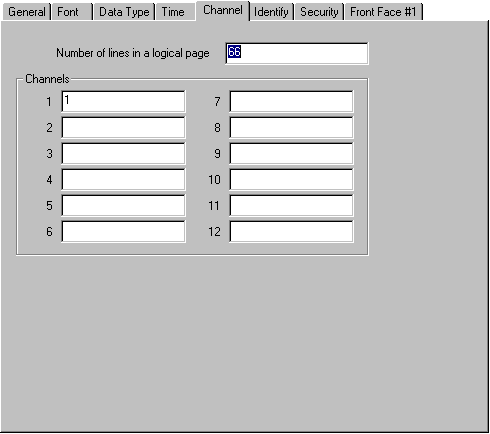
The Channel tab defines the number lines on a logical page and associates carriage control codes with specific line numbers:
The Channel tab settings only apply if one of these conditions is true:
| • | If you use the –r flag when submitting an LPD In job. |
| • | If you submit an FT In job to a device with FTI_ASA_CC in the Device dialog’s Dialect field. |
| • | If you use the ASA_CC DDI command when submitting a DDI job. |
When any of those conditions applies, Cypress interprets the first character in a line as an ASA carriage control.
The Channel tab serves two purposes. First, it defines the number of lines that compose a logical page. Most pages contain 66 lines of data, the maximum number of lines that a line printer can print on an 11" by 14" landscape page (standard mainframe output). This default value can be edited as some applications are designed differently.
The second purpose of the Channel tab is to associate carriage control codes to specific line numbers. Carriage controls are typically present in output files generated by IBM-compatible applications. They are used to advance the paper in a line printer to a specific line. As these codes can vary from application to application, you need to tell Cypress the line number that corresponds to every carriage control code contained in the output data file.