Using the Cypress Capture Driver
This topic describes the role the Cypress capture driver plays in document capture.
Overview
The capture driver is a universal print driver that replaces all other print drivers that you currently use. It actually captures the content (i.e., text, graphics, fonts, formatting, etc.) of every page within a document. Captured documents are frozen and cannot be edited or altered. You can, however, view and reprint them with 100 percent accuracy. The capture driver enables your users to print documents from Windows applications into the Cypress DocuVault.
After you install the capture driver, you must configure it to act as a dynamic, static, or DocuVault printer. See the ASG-Cypress Installation and Upgrade topic for further information.
- The Cypress Capture Driver’s dynamic printer option gives you the ability to route a job from a single printer to any Cypress-defined device or recipient for which you have been given the appropriate access level.
- The static printer option allows you to set up the Capture Driver to route documents to a specific device or group of devices.
- The DocuVault printer option prints all documents to the DocuVault without sending them to a device.
Dynamic printers are more flexible than static printers but require more user input. Static printers are faster and more convenient for users than dynamic printers but provide fewer options. DocuVault printers are useful when the user needs to store documents without producing any output.
You can configure the Capture Driver to work with either 32-bit or 64-bit operating systems that use Advanced Micro Devices (AMD) processors, or share the Capture Driver on a network accessed by both platforms.
If you intend to share the Capture Driver with multiple platforms, you must install it on a 64-bit operating system. Sharing the Capture Driver from a 32-bit operating system with a 64-bit operating system does not work properly.
The capture driver has these capabilities:
|
•
|
Allows you to select the appropriate full-text indexing option for all documents submitted to Cypress via the capture driver. |
|
•
|
Enables users to print documents to the newly created fax device. |
|
•
|
Allows documents to be captured from Windows-based applications, then delivered to the desired destination. |
|
•
|
Provides a Cypress-specific driver that you can use to submit jobs to Cypress from Windows applications. |
|
•
|
Allows you to print documents to any Cypress-defined device or recipient. |
For example,assume that you need to send a sales analysis report created in Microsoft Word to a PCL5 printer. The document contains a company logo, three fonts, and an embedded (OLE) spreadsheet that was created in Microsoft Excel. Cypress uses this process to print your document:
|
1.
|
When you are ready to print, you select File Print menu in Microsoft Word. (This is the only step that you need to perform – all remaining steps are transparent.) |
|
2.
|
Microsoft Windows creates a spool file of the document. |
|
3.
|
The Cypress capture driver acquires the document and captures each page in the Cypress format, including the company logo, fonts, and spreadsheet. |
|
4.
|
The Cypress client writes the captured document to the DocuVault in a compressed format. All information is date-and-time-stamped so you can track it. You also can specify that the document is indexed and archived. |
|
5.
|
Once all the information is stored, the Cypress client sends a notice to the Cypress server’s print controller indicating that the job is ready for printing. The print job now appears as a job icon in the Enterprise Output Manager. |
|
6.
|
The Cypress server verifies that all stocks and banner pages that you requested match the stocks currently loaded in the printer. |
|
7.
|
The Cypress server sends to the printer all referenced fonts that are not already resident there. |
|
8.
|
The Cypress server processes the print request and translates the Cypress-formatted document into the destination device format (in this case, PCL5). |
|
9.
|
The document is sent to the printer. |
Capturing Source Files
You can capture source files and archive them in the Cypress DocuVault. After the files are archived, you will be able to search the DocuVault using Cypress.Web or Knowledge Builder and retrieve source files matching your criteria.
To archive source files in the DocuVault
|
1.
|
Create a directory where files to be processed by Cypress will be delivered by the source application. |
|
2.
|
Configure the source application to write output to the directory created in step 1. |
When you configure the device’s FT In directory, select the Original File option button to treat documents that enter the directory as original source files.
If you associate a format with the FT In device, Cypress will use the format’s retention settings for all documents that enter the directory. If you do not associate a format with the device, Cypress will use the <default> format’s retention settings. If the <default> format does not exist, Cypress will use DocuVault defaults.
|
4.
|
Run the source application. |
Using the Native File Conversion Utility
You can use the Native File Conversion utility to convert original source documents in many common formats into Cypress DDOC documents. This enables you to perform full-text searches on documents while retaining the ability to open the documents in their original source applications. You can reference both the original source document and the converted DDOC document using the same DDOC ID.
The Native File Conversion utility supports these formats:
The Native File Conversion utility also supports most image formats, including JPG and BMP.
You can configure Cypress to automatically convert original source files to the DDOC format or manually convert individual documents from the Enterprise Output Manager. See Enabling Native File Conversion for information on enabling automatic file conversion. See the topic on managing your output environment in the ASG-Cypress Output Environment Administrator’s topic for step-by-step instructions for performing a manual conversion.
You must be a member of Super Role with Write permissions to perform a manual conversion.
In addition, when you capture an original source file document in a CPF program, you can choose to convert it using the create_native_document function.
Keep in mind that, whatever method you choose to convert your documents, you must configure a dedicated capture driver as a DocuVault printer. For instructions on configuring a capture driver as a DocuVault printer, see the ASG-Cypress Installation and Upgrade topic. You should also understand that Cypress will not create a job ticket for the converted document; instead, Cypress will associate the converted document with the job ticket for the original source document. Native File Conversion processing might require several minutes to complete.
If you need to determine the conversion status of a particular document, you can look at the properties of the associated job ticket in Enterprise Output Manager or the document’s properties in a DocuSpace. You can also perform a query to determine whether or not the document has been converted using the Document System Type system index.
When you open a converted document in a DocuSpace or in a Cypress.Web page using the CypressQuery ActiveX control, you can either view it as a Cypress DDOC document or launch it in its native application.
Requirements
To ensure successful Microsoft Word, Excel, and PowerPoint file conversions, verify these requirements before enabling Native File Conversion:
|
•
|
Microsoft Office is installed on the same server as Cypress. |
|
•
|
The Cypress service is running under the same user account as Microsoft Office. If you already have a user account for CPF/CSP usage, ASG recommends that you use that same user account. |
By default, Microsoft Office uses the user account entered during your installation.
Configuring a Capture Driver as a DocuVault Printer
To use Native File Conversion, you must configure a capture driver as a DocuVault printer.
To configure the capture driver as a DocuVault printer
You cannot use your existing capture driver for Native File Conversion. You must install a separate capture driver that will be dedicated to converting source files.
For Windows Server 2008: The user installing this capture driver must be the same as the user under which Cypress service is running. This is the user account you specified during the post-installation setup for your Cypress Server. For more information, see the section on Specifying a User Account for Windows Server 2008 in the post-installation topic of the ASG-Cypress Installation and Upgrade topic.
|
1.
|
Install a capture driver. See the topic on implementing the Cypress Capture Driver in the ASG-Cypress Installation and Upgrade topic for the required steps. |
|
2.
|
Open the Printers and Faxes window, and right-click the capture driver you just added. |
|
3.
|
Select Properties from the context menu, and click the Device Settings tab. |
|
4.
|
Locate and select the name of the DocuVault with which you want to associate this printer. You can locate the DocuVault by clicking either Browse or Find DocuVault. |
When the DocuVault is selected, you will see all devices defined to it in the Capture Destination tree display.
Enabling Native File Conversion
Native File Conversion runs as a background process. Converted documents will not be available as quickly as documents that are captured without conversion. Do not rely on the immediate availability of these documents.
To enable native file conversion
|
1.
|
Open the Administration Tools module. |
|
2.
|
Select the Parameter tab. |
|
3.
|
Select the Option tab. |
|
4.
|
Select the Enable Native File Conversion check box. |
|
5.
|
In the Printer Name field, enter the name of the Cypress capture driver that you will use to convert documents. This capture driver must be configured as a DocuVault printer. See Configuring a Capture Driver as a DocuVault Printer for more information. |
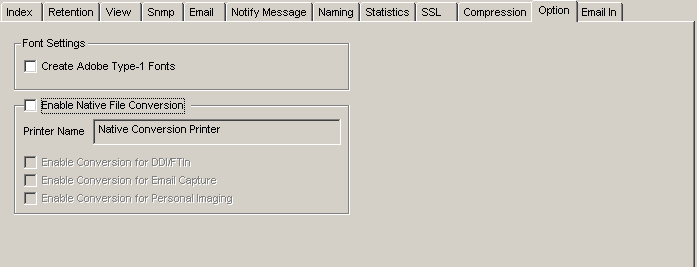
|
6.
|
Select the appropriate check boxes to enable conversion: |
|
•
|
If you want to convert DDI and FT In documents automatically, select Enable Conversion for DDI/FT In. Keep in mind that the Native File Conversion utility will convert all DDI and FT In documents if you select this option. |
|
•
|
If you want to convert Email Capture documents automatically, select Enable Conversion for Email Capture. |
|
•
|
If you want to convert native file documents captured through the Personal Imaging module automatically, select Enable Conversion for Personal Imaging. |
|
7.
|
Click the Apply button on the button panel at the right side of the Administration Tools window to save your changes. |
Cypress does not create new job tickets for converted documents; it updates the original one that is in the queue. When the conversion process is complete, Cypress releases the JTIC and a Report Distribution Manager (RDM) processor or other device processes it.
Invoking E-mail Notification from the Capture Driver
To ensure that users have immediate access to their documents and reports, Cypress can generate and deliver an email message to a recipient notifying them of specific document processing events. If the message pertains to a document delivered to an Inbox, the message may contain a hyperlink that will allow the user to launch a Cypress.Web Inbox and display the appropriate document.
You can generate an e-mail notification message for these events:
|
•
|
Cypress created and sent a document ticket to a recipient's Inbox |
|
•
|
Cypress created a job ticket for a document |
|
•
|
Cypress began printing or processing a document |
|
•
|
Cypress finished printing or processing a document |
|
•
|
Cypress encountered an unrecoverable error while printing or processing a document |
When you print a Cypress document to a recipient, you can choose to notify the recipient of one of the events listed above. The content of the message, which will vary according to the event, is configurable within the Administration Tools module. When Cypress receives the request for e-mail notification, it retrieves the recipient's e-mail address from the Address Book, constructs the notification message based on administration settings and job ticket information, and sends the notification message.
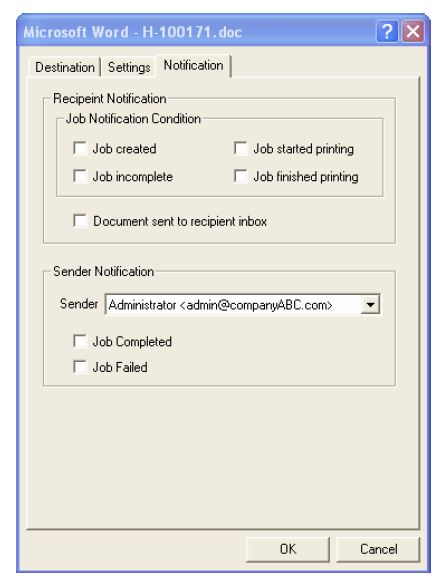
You can use the Cypress capture driver to generate e-mail notification from a Windows application when dynamic printing is enabled.
To invoke e-mail notification from the Cypress capture driver
|
1.
|
Select File Print from the Windows application. |
|
2.
|
From the print dialog, choose the Cypress dynamic printer. Remember that you must choose a Cypress driver configured for dynamic printing; Cypress capture drivers configured for specific printers or other devices will not allow you to generate e-mail notification. |
|
3.
|
From the Destination tab, choose the appropriate DocuVault, recipient, delivery location, and delivery device type as necessary. |
|
4.
|
From the Notification tab, select the events for which you would like to generate an e-mail notification message and click OK. |
Using the Capture Driver Wizards
The dynamic printer has fax and e-mail wizards for printing documents.
Using the Fax Wizard
You can send documents from Windows applications to a fax machine using the Cypress fax wizard. To start the fax wizard, select the Cypress fax device from the list of devices available from the dynamic printer’s dialog.
To use the Cypress fax wizard
|
2.
|
Select the dynamic printer and click OK. |
|
3.
|
Select a fax device. Click OK to display the Cypress fax wizard. |
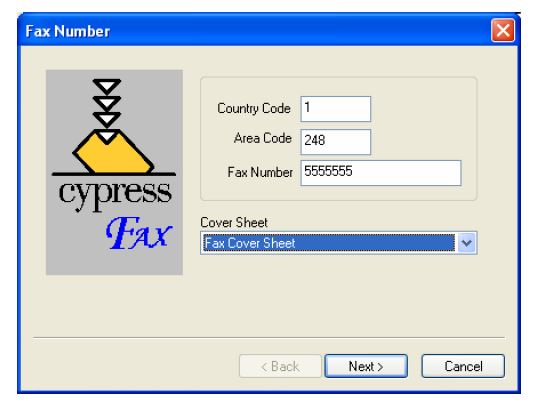
|
4.
|
Enter the Country Code of the fax machine's telephone number. The default value of 1 denotes the United States. Country Code is a required field. |
|
5.
|
Enter the AreaCode of the fax machine's telephone number. AreaCode is a required field. |
|
6.
|
Enter the fax machine's Fax Number. |
|
7.
|
Select a banner from theCover Sheet drop-down list, if desired. If you select <None> (the default) from the drop-down list, Cypress will not generate a cover sheet. |
|
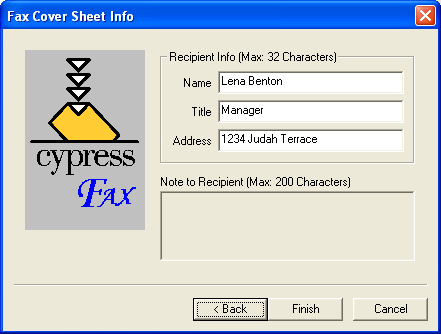
9.
|
Enter the name of the recipient in the Name input field, if desired. This information will appear in the Recipient databox on your cover sheet. |
|
10.
|
Enter a description of the recipient's identity in the Title input field, if desired (such as Marketing Manager or Supervisor). This information will appear in the Identity databox on your cover sheet. |
|
11.
|
Enter a routing address in the Address input field, if desired (such as Mail Stop 9-09 or Office #1298). This information will appear in the Address databox on your cover sheet. |
|
12.
|
Enter a brief note in the Note to Recipient input field. This information will appear in the FaxNote databox on your cover sheet. |
|
13.
|
Click Finish to send the fax, or click the Back button to change any information. |
Using the E-mail Wizard
You can send documents from Windows applications, DocuSpaces, or Cypress Inbox Viewers to an e-mail address using the Cypress e-mail wizard. You can access the wizard by printing the document to a Cypress dynamic printer and selecting an e-mail device from the list of devices in the dynamic printer’s dialog. You can also print to a static printer configured to print directly to an e-mail device.
To use the Cypress E-mail Wizard
|
1.
|
From a Windows application, DocuSpace, or Cypress Inbox Viewer, select File } Print. |
|
2.
|
Select a Cypress dynamic printer, click OK, and choose an e-mail device from the list. |
Or
Select a Cypress static printer configured to print to an e-mail device and click OK.
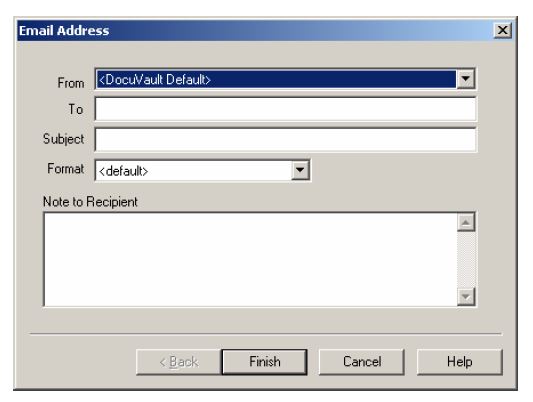
The Cypress e-mail wizard’s Email Address dialog displays:
|
3.
|
Choose from the From drop-down list the e-mail address from which you want to send the document. (To add an e-mail address to this list, configure your recipient information in the Cypress Address Book.) To use the DocuVault’s default e-mail sender address, select <DocuVault Default>. |
Use the Email subtab of the Parameter tab in the Administration Tools module to specify the DocuVault’s default e-mail sender address.
|
4.
|
Enter the e-mail address to which you want to send the document in the To input field. |
|
5.
|
Enter the subject of the e-mail message to which Cypress will attach the document in the Subject field. |
|
6.
|
Choose one of these e-mail formats from the Format drop-down list: |
|
7.
|
Enter an e-mail message in the Note to Recipient field. If you accessed the wizard from a Windows application, the message cannot exceed 200 characters. When you use the wizard from the Inbox Viewer or a DocuSpace, there is no character limit. |
|
8.
|
Click Finish to send your e-mail message and the attached document. |
InLine Commands Supported by the Capture Driver
This table describes the InLine commands available for use with the Cypress capture driver. Inline Commands are processed if the Process Inline Commands checkbox is checked in the printer Preferences dialog.
|
Command
|
Function
|
|
creator
|
Sets the creator field in the document and in any job tickets (JTICs) or document tickets (DTICs) associated with it.
Changing the creator does not affect the security associated with the document, JTIC, or DTIC.
|
|
dup
|
Directs Cypress to print the job on both sides of a physical page
|
|
init_ilc_char
|
Changes the initial InLine command character
|
|
inx
|
Indexes the page with the specified index and value
|
|
orn
|
Changes the orientation of all the text that follows it
|
|
out
|
Specifies the device’s output tray for delivery
|
|
prn
|
Specifies the Cypress-defined device for delivery
|
|
rcp
|
Queues a document to a specific recipient
|
|
rcp_all
|
Queues a document to all devices defined for the specified recipient
|
|
rcp_any
|
Queues a document to the highest priority device defined for the specified recipient
|
|
rcp_email
|
Sends a document to a recipient-defined e-mail address
|
|
rcp_fax
|
Sends a document to a recipient-defined fax
|
|
rcp_inbox
|
Queues a document to the highest priority Inbox defined for the specified recipient
|
|
rcp_prn
|
Queues a document to the highest priority printer defined for the specified recipient
|
|
sec_role
|
Adds the specified Role to the document and job ticket security lists
|
|
sec_user
|
Adds the specified user, with specified permissions, to the document and job ticket security lists
|
|
sim
|
Specifies printing only on the front side of a physical page
|
|
stk
|
Specifies the stock to be used for the current and subsequent pages
|
|
unit
|
Sets the units of other InLine commands to either inches or centimeters
|
|
uri
|
Stores a URI onto the page at the specified location. This URI will be emitted as a hyperlink in any output PDFs created by the Cypress PDF driver
|
|
var
|
Adds to the page nonprintable data for use by Report Distribution Manager or Content Processing Facility
|
|
varinx
|
Sets both page variables and page indexes with the specified name and value
|
