Using Network File Transfer
This topic describes the Cypress FT In module, which enables users to print documents through network file transfer. Cypress regularly scans specific directories searching for files, then retrieves, captures, and prints the files when they are found.
Creating an FT In Device
FT In enables most operating systems to print unformatted data through Cypress to a specific device. You can use your operating system’s file transfer utility (such as FTP) to transfer output files from the client to a spool directory on the Cypress Server or to a directory on a remote server. (If you want to use a directory on a remote server, see Creating an FT In Directory on a Remote Server for instructions.)
The directory to which you submit the job determines which device and format Cypress will use to process it. When you submit documents to a spool directory, Cypress detects them, identifies the device that points to the spool directory, determines the format defined for that device, and processes the job accordingly.
To create a device that will receive FT In documents
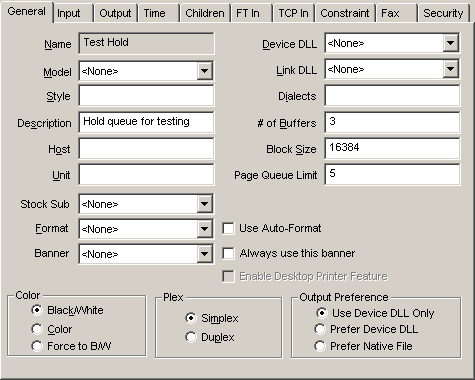
- From the Administration Tools module, select the Device tab.
- Click New.
Or
Select an existing device.
- From the General tab, choose a format from the Format drop-down list. When Cypress processes this document, it will inherit this format’s settings.
If you plan to use this FT In device to capture original source files rather than Cypress documents, Cypress will apply only the format’s document retention settings; it will ignore all other format configuration values.
If you do not choose a format, Cypress will apply the <default> format’s settings. If the <default> format does not exist, the DocuVault defaults will apply.
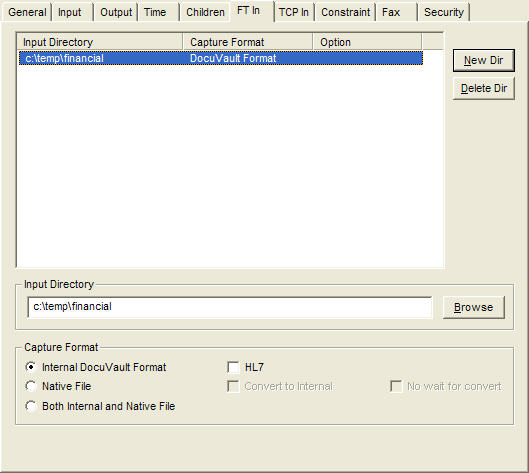
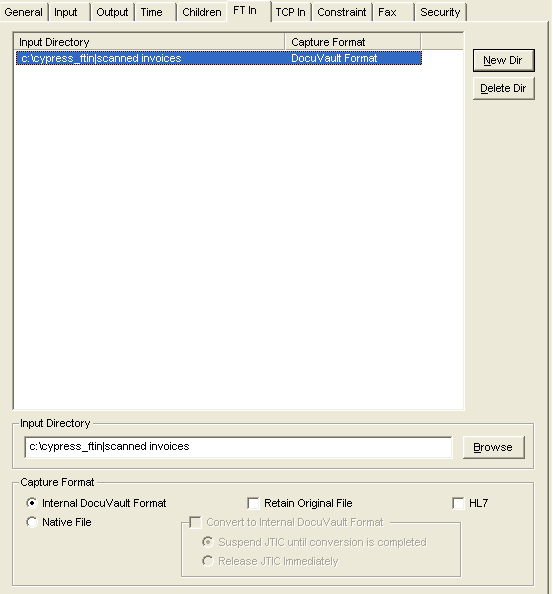
- Select the FT In tab.
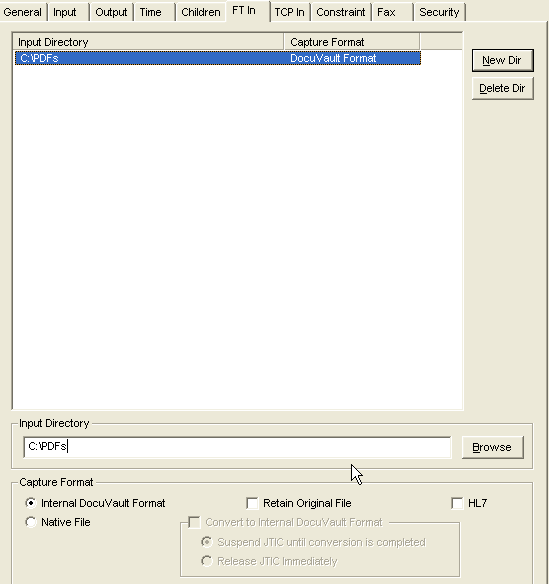
- Click the New Dir button.
- Enter the entire spool directory path name in the Input Directory field.
Or
Click the Browse button to choose a directory from a tree of existing local and network directories.
You can use the Browse button only if you are running the UI on the Cypress Server machine.
Cypress will not process any directory that contains a file with an exe, dll, or cdb extension at any level.
- Choose the appropriate Capture Format option buttons:
|
•
|
Internal DocuVault Format: Cypress will convert the document to the DDOC format. |
|
•
|
Retain Original File: Cypress will store the document in its existing format. |
|
•
|
HL7: Cypress will treat the document as an HL7 document. You also can select Retain Original File if you want to capture the file as both a DDOC and a native file. |
|
•
|
Native File: Cypress will retain the ability to open the documents in their original source application. |
When you select the Native File option, the Convert to Internal DocuVault Format check box is selected automatically.
Choose the JTIC option:
|
–
|
Suspend JTIC until conversion is completed |
|
–
|
Release JTIC immediately |
- Click the Apply button at the right of the Administration Tools window. Any job sent to this spool directory will be sent to the selected device and use the assigned device format.
Using Environment Variables
System Environment Variables may be inserted into the file path by specifying them as %envvar.<name>%, where <name> is the name of the environment variable.
For example, if the environment variable SYS_NAME contains QA2 then C:\FTin\%envvar.sys_name%_files results in the file path: C:\FTin\QA2_files
Creating an FT In Directory on a Remote Server
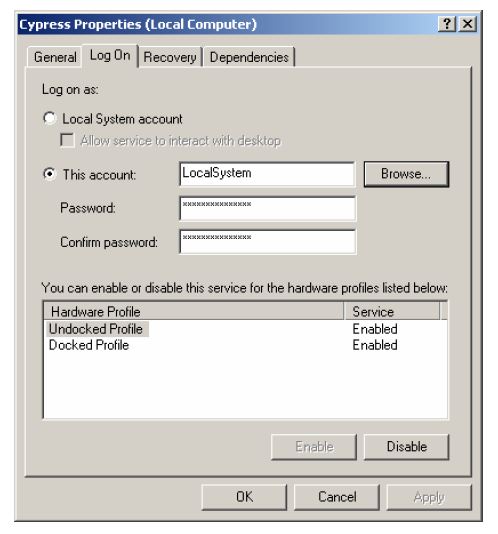
If you need to create an FT In directory on a machine other than the Cypress Server, you can appropriately configure Windows domain security to ensure that the Cypress service can access the remote directory.
If you are using Windows Server 2008 and user account control (UAC) is enabled, you must right-click each command and run as administrator. Additionally, you might need to respond to an elevation prompt.
To create an FT In directory on a remote server
|
1.
|
Create a Windows domain user account for Cypress. The Cypress service will run under this account. |
|
2.
|
Stop the Cypress hub service by selecting Start Programs Cypress Server Stop Hub. |
|
3.
|
Specify read, write, and execute permissions for all directories that the Cypress service accesses. You can specify permissions by opening each directory’s Properties dialog, then choosing Read, Write, and Execute in the Permissions section on the Security tab. |
Set permissions for these directories:
|
•
|
All directories within the main Cypress directory (including the Cypress directory) |
|
•
|
The Cypress log file directory |
|
•
|
Any FT In directories on the Cypress Server |
|
•
|
Any Disk Out (i.e., disk_o) directories on the Cypress Server |
|
4.
|
Change the account under which the Cypress hub service runs to the account that you created in step 1. . |
|
5.
|
From the system Control Panel (Start Administration Tools Control Panel), open the Services utility. |
|
6.
|
Right-click the Cypress service entry, and select Properties. |
|
7.
|
Select the Log On tab on the Cypress Properties dialog, and click the This account option button. |
|
8.
|
Click the Browse... button, and select the user account you created in step 1. . |
|
9.
|
Click OK, and close the Services utility. |
|
10.
|
Start the Cypress hub service by selecting Start Programs Cypress Server Start Hub. |
|
11.
|
From the system from which you need to receive files, create a shared folder to use as a remote FT In directory. |
|
12.
|
Open the Properties dialog of the shared folder you just created. |
|
13.
|
Select the directory’s Sharing tab. Set the Name field to the user account you created in step 1. , and set the read, write, and execute permissions. |
|
14.
|
Select the Security tab. Set the Name field to the user account you created in step 1. , and set the read, write, and execute permissions. |
|
15.
|
Open the Administration Tools module, and select or create the device that will process the files placed in the shared folder you created in step 11. . |
|
16.
|
Select the FT In tab. |
|
17.
|
Click the New Dir button, and enter the Universal Naming Convention (UNC) path to the remote FT In directory in the Input Directory field. |
As an alternative to specifying the UNC path, you can map a network drive to the remote FT In folder and enter the path to the mapped drive in the Input Directory field. Consult your Windows help system for instructions on how to map a network drive.
|
18.
|
Click the Apply button on the right of the Administration Tools window to save your changes. |
FT In and PeopleSoft SQR
Cypress can automate and simplify the delivery of PeopleSoft SQR reports to any enterprise device and provide PeopleSoft customers with efficiencies and capabilities only found in a unified print environment. Cypress can process single-page PeopleSoft views, large 50,000-plus page reports, check registers, and statement runs and deliver them to multiple output devices.
The primary interface between PeopleSoft SQR reports and Cypress is the file transfer interface, or FT In. This interface is built into both PeopleSoft and Cypress. After generating an SQR report, a user can use the PeopleSoft interface to place it into a Windows sever/folder structure. Cypress polls this structure and ingests any files that it finds in the structure.
To import PeopleSoft SQR reports into Cypress
|
1.
|
Create an input directory in Cypress. |
|
a.
|
Open the Cypress Administration Tools module, and click the Device tab. |
|
b.
|
Select the desired receiving device. |
|
c.
|
Select the FT In tab, click the New Dir button, and type the drive/folder name in the Input Directory text box. |
|
d.
|
Set the Capture Format to Cypress Document to allow for formatting and form overlays of the report. |
|
e.
|
Click Apply to save your changes. |
Cypress will automatically create the folder structure entered in the input directory. Depending on system defaults, you might need to modify the sharing and security attributes of the created folder structure to allow PeopleSoft to place the SQR reports in the folder.
|
2.
|
Define the Output Destination for the Process Scheduler Request. See your PeopleSoft administrator for assistance. |
PeopleSoft enables you to define an SQR report’s destination in the Process Scheduler Request dialog.
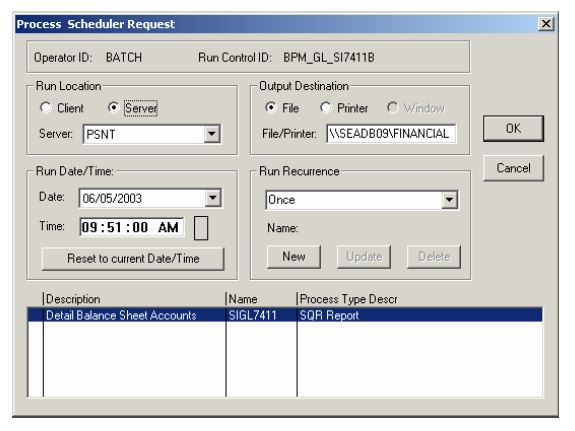
|
3.
|
Click the File option button in the Output Destination area and enter a fully qualified directory path in the File/Printer field. The directory path must correspond to the Cypress input directory that you created in step 1. . |
|
4.
|
Click OK to save your changes. |
FT In and Kofax Ascent Capture
To make importing images and indexes into Cypress easier, a Kofax Ascent Capture release script is included with the Cypress Scanner Input module (also known as the Image Capture module). This topic provides instructions for implementing the Ascent Capture release feature.
To release an Ascent Capture image to Cypress
|
1.
|
Adding the Cypress release script to your Ascent Capture system |
|
2.
|
Configuring the desired release options in the Document Class’s release options |
|
3.
|
Configuring a Cypress device with an FT In directory that matches the Document Class’s Output file directory |
|
4.
|
Configuring the Cypress device’s format to process InLine commands |
Adding the Release Script to Your Ascent Capture System
To add the release script to Ascent Capture
|
1.
|
Copy all files from X:\Cypress\Server\Plugins\Kofax to the Ascent Capture server that will be releasing images and indexes to the Cypress Server. Place the files in C:\Program Files\Ascent\bin. |
|
2.
|
From the Ascent Capture Administration module, select Tools Release script manager. The Release Script Manager Dialog is displayed. |
|
3.
|
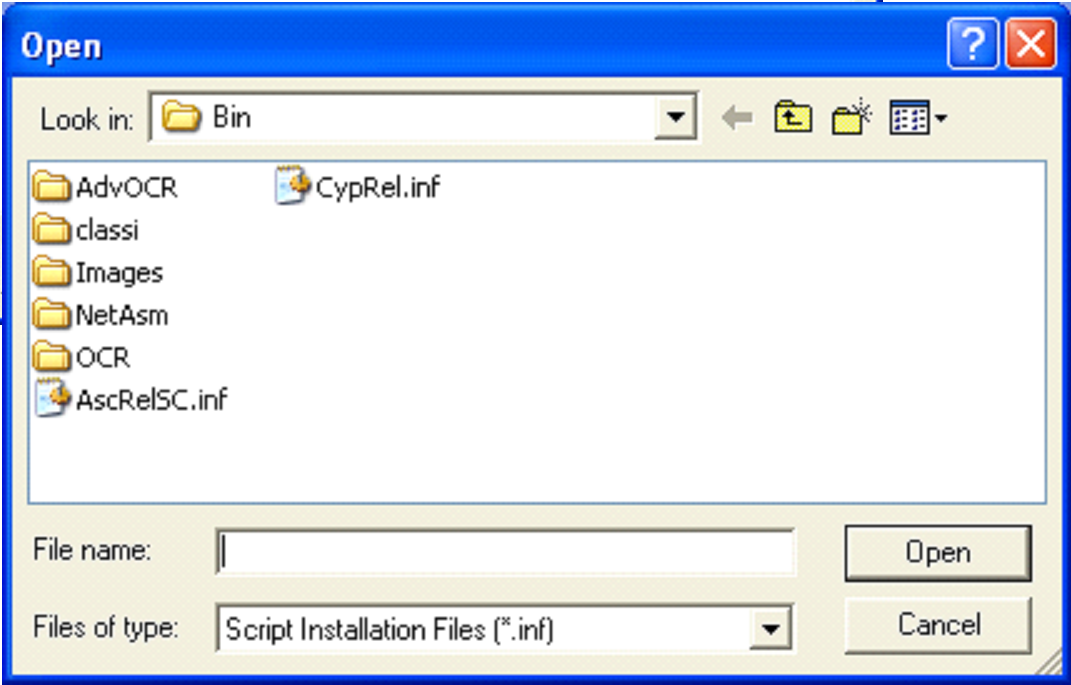
Click the Add button. In the Open dialog, select the CypRel.inf file (e.g., C:\Program Files\Ascent\bin\CypRel.inf), and click the Open button. |
|
4.
|
Select Ascent Capture for Cypress from the Release Script Manager dialog, and click the Install button. |
|
5.
|
Close the Release Script windows. |
Configuring Release Options for a Document Class
To configure release options for a document class
|
1.
|
From the Ascent Capture Administration window, select the desired Document Class, right-click, and select Release Scripts from the context menu. |
|
2.
|
Select Ascent Capture for Cypress from the available release scripts, and click the Add button to display the Ascent Capture - Cypress Release Setup dialog. |
|
3.
|
In the Name field, enter a release name that is consistent with other release script names. |
|
4.
|
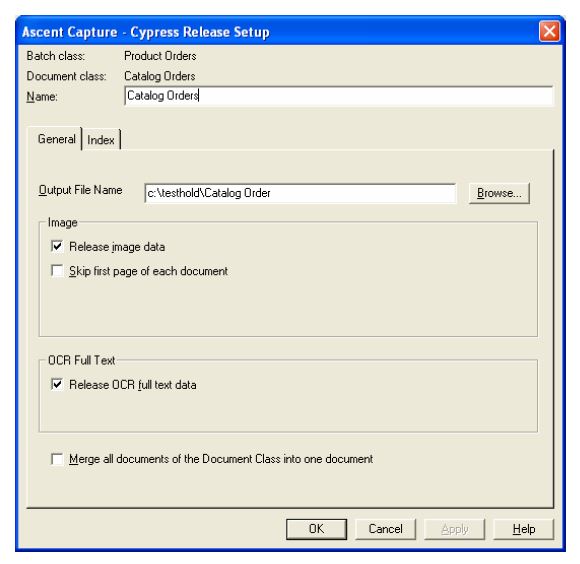
On the General tab, complete this information: |
|
a.
|
Enter the path and file name of the output images and index data in the Output File Name field. The path entered must correspond to the FT In directory of the Cypress device that will accept the images and index data. You can build the %doc_id% and the %batch_name% replacement parameters into the file name. |
|
b.
|
Select the Release image data check box. If it is not selected, images will not be passed to Cypress. |
|
c.
|
Select the Skip first page of each document check box if you plan to use separator sheets to indicate the beginning of a new document type. |
|
d.
|
Select the Release OCR full text data check box to release the results of the Ascent Capture OCR Full text queue. |
|
e.
|
Select the Merge all documents of the Document Class into one document check box to allow different form types to be part of the same document. |
|
5.
|
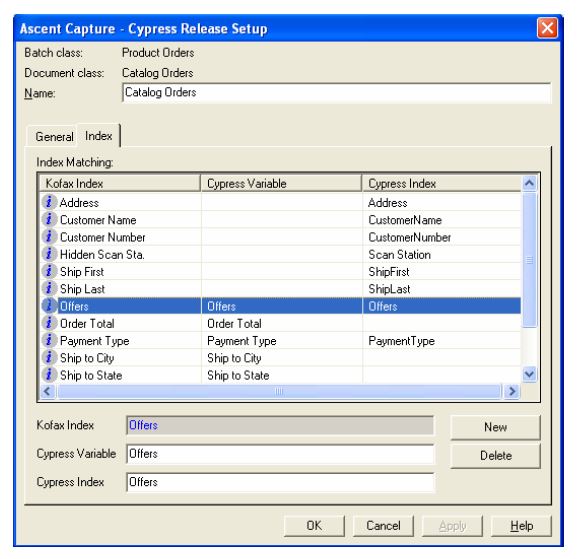
Select the Index tab. This tab matches Ascent Capture index names to the desired Cypress page variable names and index names. |
|
a.
|
Click the New button, and type or select the desired Kofax Index name. |
|
b.
|
If desired, enter a Cypress variable name of your choosing. This variable name will be accessible from the Cypress Report Distribution Manager (RDM) module. |
|
c.
|
If desired, enter a Cypress index name. This name must be defined in the Cypress Knowledge Builder module. |
|
6.
|
Click OK to save your changes. |
Configuring a Cypress Device’s FT In Directory
To configure a Cypress device’s FT In directory
|
1.
|
From the Administration Tools module, select the Device tab. |
|
2.
|
Create or select the device that will process the images passed from Ascent Capture. |
|
4.
|
Click the New Dir button. |
|
5.
|
In the Input Directory field, enter the directory path that you entered in the Output File Name field in configuring the Ascent Capture release script. Only the path—not the file name—should be entered. |
|
6.
|
Ensure that the Capture Format is set to Internal DocuVault Format. |
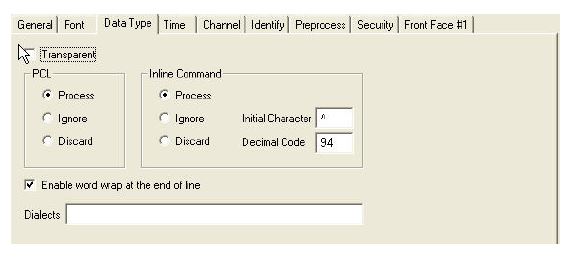
The release script uses special InLine commands, and the font must be able to process them.
To configure a Cypress device’s format to process InLine commands
|
1.
|
From the Administration Tools module, select the Device tab. |
|
2.
|
Select the device that will process the images passed from Ascent Capture. |
|
3.
|
Select the device’s General tab. |
|
4.
|
From the Format drop-down list, select a format for the scanned images to use. |
|
5.
|
Select the Format tab from the Administration Tools main window. |
|
6.
|
Select the format you specified in step 4. . |
|
7.
|
Select the format’s Data Type tab. |
|
8.
|
Ensure that the Process option button in the InLine Command area has been clicked. |
