
Managing Cypress DocuVaults
This topic provides high-level information on managing your Cypress DocuVault(s). You can perform most of the tasks using Cypress command-line utilities and the controls in the Administration Tools module.
Using Cypress Command-line Utilities
You can use these command-line utilities to manage your site’s DocuVault(s):
- The db_prog utility enables you to perform many administrative functions, including renaming the DocuVault, emptying the DocuVault, and repairing the entire DocuVault or individual DocuVault tables. In addition, the utility provides commands that help you control system backup and recovery. See Administering Your DocuVault Using the db_prog Utility for more information.
- The export_xml utility exports Cypress object data to an XML file. You can either use this file in reports or modify the XML and re-import it into Cypress. You also can perform mass deletes or renames of certain Cypress objects. See Exporting Cypress Resources for more information.
- The font_prog utility enables you to investigate your DocuVault’s font usage and to add, reload, and delete fonts. See Using the font_prog Utility for more information.
- The hub_service utility enables you to stop/restart the Hub Service. See Managing the Hub Service for more information.
- The import_xml utility enables you to import Cypress objects using XML data. See Importing Cypress Resources for more information.
- The license_utility utility provides a list of named users who have connected to a specific DocuVault or DocuVaults. See Creating a Cypress Users List for more information.
- The stat_prog utility generates statistics for printed and viewed documents. See Enabling Document Access Tracking for more information.
- The storage_prog utility enables you to analyze the growth rate of your DocuVault. See storage_prog Utility for more information.
- The xml_converter utility enables you to convert Cypress-generated XML to an ActiveX Data Objects-compatible schema. See Converting Cypress Export XML for more information.
Managing the Hub Service
The Hub Service is the application used to start or stop your Cypress client. Changes that you make to your DocuVault normally require you to stop and restart the Hub Service for the changes to take effect.
To enter a hub_service command
| 1. | Open a command prompt window. |
| 2. | Change the working directory to the Cypress Server directory. You also might find it useful to increase the viewable area of the command prompt window by modifying its properties. |
| 3. | Enter the appropriate hub_service command, as listed in this table: |
|
Command |
Description |
|
install |
Registers the Cypress Hub Service with Microsoft Windows. |
|
remove |
Unregisters the Cypress Hub Service. |
|
stop |
Stops the Cypress Hub Service. |
Starting the Hub Service
To start the Hub Service
| > | Start the Cypress Hub Service by taking one of these actions: |
From a command prompt, enter net start cypress.
Or
From the Windows task bar, select Start } Programs } Cypress Server } Start Hub.
Or
Open the Control Panel, and start the Services utility. Select Cypress from the list, and click the Start the service hyperlink.
When you start the Cypress Server’s Hub Service, it starts the db_prog utility, which writes information to the pcon_log folder. The files in this folder provide information for you about the current DocuVault parameters as well as the DocuVault’s current state.
Cypress automatically logs any events to day-of-the-week-specific log files. The files, which are named using the convention <weekday>.log, can be viewed with any text editor. As generated log files are daily in nature, they are automatically overwritten on a weekly basis. Log files are located in the Cypress pcon_log directory (e.g., D:\Program Files\Cypress\pcon_log).
These parameters are available in the daily log files:
| • | Current DocuVault version and build number |
| • | Name of DocuVault |
| • | Path to DocuVault |
| • | Path to Cypress log files |
| • | Log file disposition (dump or delete) |
| • | Maximum size of each log file created |
| • | Size of data cache (by default, this value is 25 percent of system memory) |
| • | Data cache mode (Physical or Virtual) |
| • | State of DocuVault during initial startup (clean or dirty) |
| • | DocuVault schema level |
| • | Current state of DocuVault |
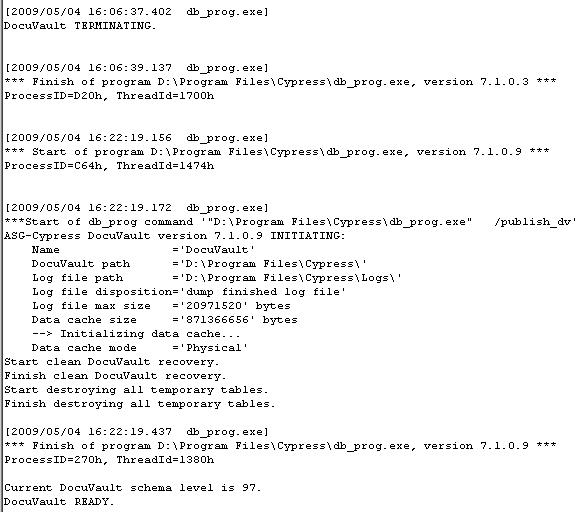
This is a sample extract from the Monday.log file generated on May 4, 2009:
Creation of Special Log Files
There are various reasons why Cypress may not start. For example, Cypress cannot start if the database is in offline dump mode, or if it is in the midst of running a repair. In addition to emitting messages to the PCON log or the Application Event log, Cypress in some cases emits messages to the DV_StartUp.log file in the pcon_log directory. This log provides the date and time and a description of why Cypress cannot start and possible remedies. If Cypress will not start, it is suggested to look to see if this file exists and has any current messages.
Stopping the Hub Service
| > | Start the Cypress Hub Service by taking one of these actions: |
From a command prompt, enter net stop cypress.
Or
From the Windows task bar, select Start } Programs } Cypress Server } Stop Hub.
Or
From a command prompt, navigate to the Cypress\Server directory, and execute this command:
hub_service stop
Or
From Windows Explorer, navigate to the Cypress\Server directory. Double-click the Hub_stop batch file.
Registering the Hub Service
| 1. | Determine the type of startup to use for the Hub Service: |
| • | To start the Cypress Hub Service manually, choose a manual startup. |
| • | To allow Windows to start the Cypress Hub Service automatically, choose an automatic startup. |
| • | To prevent users and Windows from starting the Cypress Hub Service, choose a disabled startup. |
| 2. | Open a command prompt window, and set the working directory to the Cypress Server directory. At the command prompt, enter this command: |
hub_service install <startup type keyword>
where <start-up keyword> is the appropriate keyword from this table:
|
Startup Type Keyword |
Description |
|
Manual startup; Cypress client. maybe started anytime. |
|
|
Automatic startup; Cypress client starts with Windows |
|
|
Disabled; Cypress client cannot be started |
Removing the Hub Service
To remove the Hub Service
| > | Open a command prompt window, and set the working directory to the Cypress Server directory. At the command prompt, enter this command: |
hub_service remove
Pooling DocuVaults
DocuVault pooling improves document delivery reliability by ensuring that document resources (i.e., fonts, stocks, recipients, roles, etc.) are always available for printing and viewing at sites where multiple DocuVaults are used. Pooling DocuVaults also ensures that report distribution applications will complete as intended, even if a destination DocuVault is unavailable during report processing. When DocuVaults are joined, the DocuVault processing the inbound report file already has the role and recipient information needed to create, secure, and address subreports.
Cypress automatically synchronizes resources across all member DocuVaults whenever a resource is created, captured, modified, or deleted. Copying resources ahead of time ensures that resources are always available and eliminates any delay to retrieve remote resources. If subreports are to be delivered to a destination defined in a DocuVault that is unavailable, the documents will be sent automatically when the destination DocuVault becomes available.
Without DocuVault pooling, you can store resources only on the DocuVault on which they were captured or created. If documents are printed or distributed across multiple DocuVaults, it is possible that resources required to correctly process, print, or display the document will not be available when needed. The omitted resources can cause these problems:
| • | Printing or viewing documents from remote DocuVaults: When a document is captured at a local DocuVault, so are all the resources needed to print and view the document (e.g., fonts, stocks, and banners). If that document is sent to a device or recipient defined to a different DocuVault, a job ticket (JTIC) or document ticket (DTIC) is sent to the remote DocuVault, but not the document itself or its associated resources. That information resides only on the local DocuVault. When the JTIC or DTIC on the remote DocuVault is processed for printing or viewing, Cypress will retrieve the document and all associated resources from the local DocuVault. If the local DocuVault is unavailable, the document cannot be printed or viewed from the remote DocuVault. |
| • | Reprinting or retrieving documents from remote DocuVaults: If a document has been printed to a remote DocuVault from a local DocuVault, the document—but not its resources—will be captured at the remote DocuVault. If that document is reprinted or retrieved via Cypress query, Cypress retrieves the document's resources from the local DocuVault. If the local DocuVault is unavailable, the document cannot be printed or viewed from the remote DocuVault. |
| • | Distributing reports across multiple DocuVaults: Recipient information that is needed to control page selection, routing, etc. is stored in the Cypress Address Book. When a Cypress subreport definition is configured to create and deliver subreports to recipients defined in an Address Book on a remote DocuVault, that Address Book must be available during report processing. If the remote DocuVault is unavailable, its Address Book information cannot be used during report processing and reports will not be created for those recipients. |
DocuVault pooling eliminates these issues, ensuring that resources are always available and documents are delivered regardless of DocuVault availability.
Types of DocuVault Pools
There are two types of DocuVault pooling relationships: peer-to-peer and master-slave.
Peer-to-peer DocuVault Pools
In a peer-to-peer DocuVault pool, Cypress automatically synchronizes resources across all member DocuVaults whenever a resource in any of them is created, captured, modified, or deleted. Copying resources ahead of time ensures that resources are always available and eliminates any delay to retrieve remote resources.
Master-slave DocuVault Pools
In a master-slave DocuVault pool, there is only one master DocuVault but there can be an unlimited number of slave DocuVaults. The master-slave DocuVault pool is similar in logic to the peer-to-peer pool, except that the synchronization of information and distribution of documents moves in only one direction (i.e., from master to slave).
Cypress automatically synchronizes resources across all slave DocuVaults whenever a source is created, captured, modified, or deleted in the master DocuVault. The master DocuVault can distribute documents to any of its slave DocuVaults but not the other way around.
Report distribution applications complete as intended, even if a slave DocuVault is unavailable during report processing. When DocuVaults are joined, the DocuVault processing the inbound report file already has the role and recipient information needed to create, secure, and address subreports. If subreports are to be delivered to a slave DocuVault that is unavailable, the documents will be sent automatically when the slave DocuVault becomes available.
Joining and Disjoining DocuVaults
DocuVaults can be joined to create DocuVault pools or disjoined to remove a DocuVault from a pool.
Joining DocuVaults
When DocuVaults are joined to create DocuVault pools, these resources are immediately copied across DocuVaults in the peer-to-peer pool and from the master to the slave DocuVaults in the master-slave pool:
| • | Banner definitions |
| • | Forms (includes databoxes) |
| • | Images |
| • | Recipient definitions |
| • | Role definitions |
| • | Stock definitions |
| • | System fonts (standard Windows fonts) |
Only resources that reside on the local DocuVault (i.e., the DocuVault in which the resources were initially captured or created) in peer-to-peer pools or on the master DocuVault in master-slave pools can be modified or deleted. Pooled resources (resources copied to other DocuVaults in the pool) are read-only.
All DocuVaults in a pool must be running under either the same domain and user account, or the same local account with the same password. You cannot join DocuVaults running under a local system account.
The ability to print, copy, and deliver documents across DocuVaults, and to use recipient or Address Book information defined on a different DocuVault, is supported only for DocuVaults that are members of the same pool.
The user performing the join must have Append permission set in the Super Role.
| 1. | Launch the Cypress user interface from the Cypress Server that manages the DocuVault you want to join. |
| 2. | From the main Cypress user interface, select File } Join DocuVault to display the Joining DocuVault wizard. The wizard walks you through the joining process. Cypress automatically populates the Name field in the Local DocuVault section with the name of the local DocuVault. |
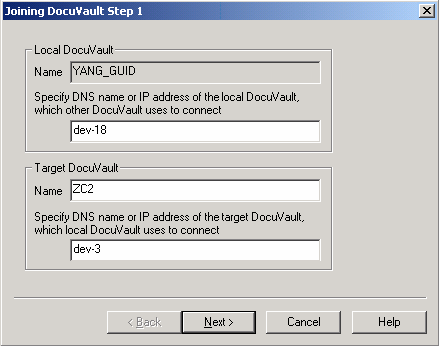
| 3. | In the Local DocuVault area, enter this information: |
| – | The DNS name or IP address of the local DocuVault. The DNS name is preferable since the IP address can change if you move the DocuVault to a new machine. |
| – | The name of the local DocuVault to be joined with the target DocuVault. |
| 4. | In the Target DocuVault area, enter this information: |
| – | The DNS name or IP address of the target DocuVault. The DNS name is preferable since the IP address can change if you move the DocuVault to a new machine. |
| – | The name of the target DocuVault to be joined with the local DocuVault. |
| 5. | Click the Next button to display step 2 of the wizard. |
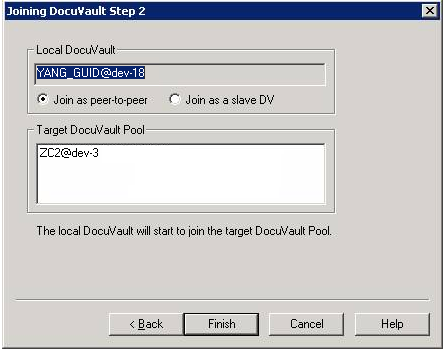
| 6. | Select the type of pooling relationship that you want between your DocuVaults by performing one of these tasks: |
| • | Click the Join as peer-to-peer option button to have Cypress automatically synchronize resources across all member DocuVaults whenever a resource is created, captured, modified, or deleted. |
| • | Click the Join as a slave DV option button to have Cypress make the local DocuVault the slave DocuVault. |
| 7. | Check the Target DocuVault Pool field to ensure that you chose the correct target DocuVault. |
If it is not the correct target DocuVault, click the Back button and repeat steps 4 through 6.
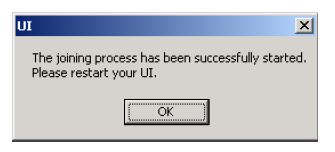
Otherwise, click Finish to display a message box indicating that pooling succeeded:
| 8. | Repeat steps 2 through 7 for each DocuVault that you want to join. |
Disjoining DocuVaults
To disjoin a DocuVault from a pool
| 1. | Launch the Cypress user interface from the Cypress Server that manages the DocuVault you want to disjoin. |
| 2. | In the main Cypress user interface window, select File } Leave Pool to display the Leave Pool dialog. |
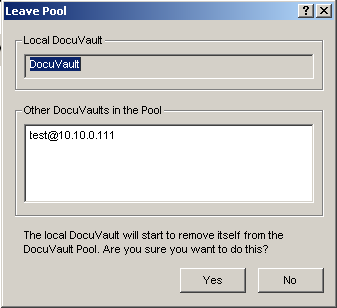
| 3. | Click Yes to disjoin the DocuVault from the pool. |
Or
Click No to cancel the disjoining and leave the DocuVault in the pool.
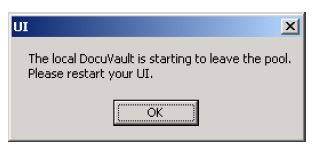
If you click No, Cypress will display a message box indicating that the disjoining was successful:
| 4. | Repeat steps 2 and 3 for each DocuVault that you want to disjoin. |
To remove a DocuVault that no longer exists from a pool
If a DocuVault no longer exists, you will not be able to access the user interface for that DocuVault. In that case, follow these steps to use the remove_dv_from_pool db_prog command to remove it:
| 1. | Stop these DocuVaults, as appropriate to your situation: |
| • | Each DocuVault in a peer-to-peer pool |
| • | The master DocuVault in a master-slave pool |
| 2. | Run this command on each of the DocuVaults listed in step 1: |
db_prog remove_dv_from_pool <DocuVault name>
where <DocuVault name> is the name of the DocuVault to be removed.
Viewing DocuVault Pools
You can view the DocuVaults that are actively joined in the pool or that have been previously disjoined from the pool.
To view DocuVault pools
| 1. | Open the Administration Tools module, and click the Info tab. |
| 2. | From the Info tab, click the DV Pool tab. The content of this tab is duplicated across all member DocuVaults. |
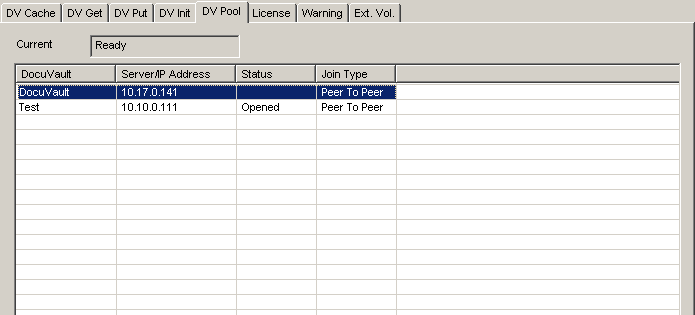
The Current Status field indicates one of these states:
| • | Ready: The DocuVault pool is ready. |
| • | Joining: A DocuVault is being added to the pool. |
| • | Disjoining: A DocuVault is being removed from the pool. |