Using the Bundling Feature
This topic provides information on using the bundling feature.
Introduction
The bundling feature is a simple extension of the existing report distribution functionality. By default, report files processed by RDM are separated into customized subreports and delivered to the appropriate destination immediately following their creation. The bundling feature enables multiple subreports to be collected according to criteria you define, then released at a specific time or when the bundle is completed. The productivity feature allows information created in any part of the enterprise to be bundled together as required by each user, regardless of the originating platform or application.
The bundle is the Cypress object that enables subreports to be collected and delivered when the bundle definition’s release criteria are satisfied. To identify the contents of a bundle, you simply enter the name of a bundle definition on the Destination tab of a subreport definition. All subreports generated by the subreport definition are held in a bundle specific to each recipient or device.
For example, assume that Company ABC has five financial analysts who regularly create cash reports for unique budget centers based on the content of three different reports. The bundling feature can be implemented to enhance both the productivity and satisfaction of the analysts by collecting the subreports that each analyst uses and releasing each bundle when it contains all three subreports required to perform their task. Using this feature, each financial analyst receives a single bundle that contains three subreports whose content is specific to the analyst's budget center.
Creating a Bundle Definition
Bundle definitions are easily created within RDM. You will need to name the bundle definition, define release criteria, and set security.
To create a bundle definition
| 1. | In the upper-left window of the RDM application, select the Bundle tab at the bottom of the tree display. |
| 2. | Click New. |
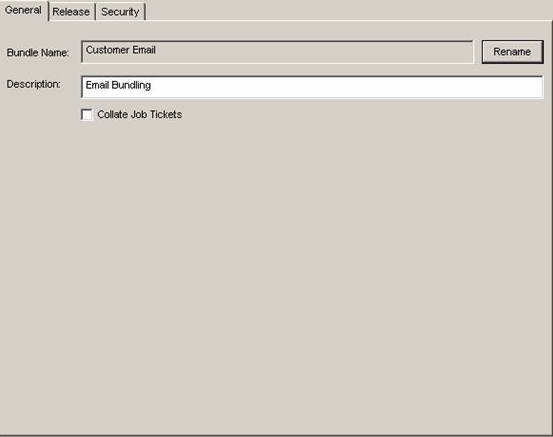
| 3. | Select the General tab. |

| 4. | Enter the name of the bundle definition in the Bundle Name field |
| 5. | Enter a brief description of the bundle in the Description field, if desired. |
| 6. | Select the Collate Job Tickets option, if desired. Cypress will collate your printout when you print multiple copies of a bundle. For example, if a bundle consists of jobs A, B, and C and you print two copies of the bundle, your printout will be returned in the order A, B, C, A, B, C. If Collate Job Tickets is not selected, your printout will be in the order A, A, B, B, C, C. |
| 7. | Select the Release tab. |
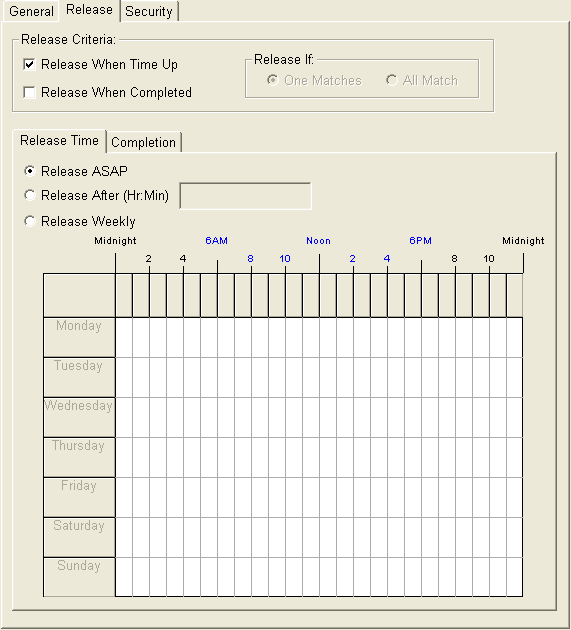
| 8. | Select the appropriate option(s) from the Release Criteria area to control when the bundle is to be released. |
| • | Release When Time Up |
| • | Release When Completed |
| 9. | If you selected both Release Criteria check boxes, specify the Release If option by clicking either One Matches or All Match: |
| • | Clicking One Matches releases the bundle as soon as one release criterion has been met. |
| • | Clicking All Match releases the bundle when both time and completion criteria have been met. |
If you selected only one of the Release Criteria options, the Release If option buttons will be disabled.
If Release When Time Up is selected, select the Release Time tab and click one of these buttons:
| • | Release ASAP, which releases the bundle immediately. |
| • | Release After, which releases the bundle once a specified amount of time has passed after the receipt of the first subreport. |
| • | Release Weekly, which releases the bundle every week as specified by selecting the desired day and time in the calendar. |
If you selected Release When Completed, select the Completion tab, where you can add to or modify the list of subreports in the bundle.
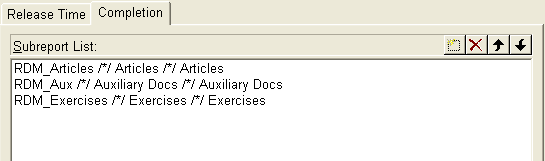
You can add required subreports can be added to the bundle by clicking the New  button, then navigating to and selecting the appropriate subreports from the list. To delete subreports from the bundle, click the Delete
  button.
You can control the order in which subreports appear in the bundle by selecting the desired subreport and using the up and down arrow tool bar buttons. The order of subreports within the Subreport List field determines the order in which they will be printed and presented within an Inbox.
| 10. | Select the Security tab, on which you can define the extent to which a bundle definition and the resulting bundle can be used. |
Configuring a Subreport to Use Bundling
You can identify bundles in a subreport definition either by manually entering the exact name of the bundle or by dynamically building the bundle’s name based on document content (e.g., region text) and recipient name. You also can create sub-bundles within a specific bundle definition. This section provides instructions for both methods of associating subreports with bundles.
Manually Entering the Name of the Bundle
To add a subreport to a bundle
| 1. | Open the RDM, and select the subreport definition that you want to add to a bundle. |
| 2. | Select the Destination tab. |
| 3. | Select the Bundle tab in the lower portion of the window. |
| 4. | Enter the name of the bundle to which you want to add the subreport in the Bundle Name input field. |
| 5. | Click the Apply button when you are finished. |
Explicitly Identifying Bundle Definition Names
To add a subreport to a specific bundle
| 1. | Open the RDM, and select the subreport definition that you want to add to a bundle. |
| 2. | Select the Destination tab. |
| 3. | Select the Bundle tab in the lower portion of the window. |
| 4. | Enter the name of the bundle to which you want to add the subreport in the Bundle Name input field. |
This is the syntax for adding a subreport to a specific bundle:
"<bundle name>"
where <bundle name> is the name of the bundle.
This is the syntax for adding a subreport to a subbundle:
"<bundle name>/<sub-bundle>" where <sub-bundle> is the name of a sub-bundle within the <bundle name> bundle.
Building the Name of the Bundle
You might prefer to base bundle definition names on the content of the document rather than specifying a particular bundle. You can use the recip_name string selection variable for this process. You can also use variables defined on the Variable tab in a subreport definition to dynamically identify the name of a bundle.
Using recip_name
You can use recip_name to create descriptive names for bundles shown within Enterprise Output Manager and the Inbox Viewer, even if the actual sub-bundles are not defined. When the bundles display in the EOM tree display or a Cypress Inbox, the name of the bundle is composed of the information entered in the Bundle Name detail.
This is an example Bundle Name field if you are using Auto Recipient criteria and you want to specify a bundle based on the name of a recipient:
"Cash Reports/" + recip_name
This expression would select the Cash Reports bundle definition, and then select the sub-bundle within that definition with a name that exactly matches the name of the recipient identified for the current subreport.
Using the Variable Tab
You can also use variables defined on the Variable tab in a subreport definition to dynamically identify the name of a bundle. For example, assume that a doc_type variable has been created to extract a specific string from a report title that indicates the document type. Identifying bundles using this variable enables Cypress to choose the appropriate definition based on document type, and eliminates the need to create additional subreport definitions that map to a specific bundle example.
"Accounts Payable/" + doc_type + "/" + recip_name
This expression would select the bundle Accounts Payable, then select a sub-bundle named with the current value of the doc_typevariable (e.g., Summary), and finally choose a sub-sub-bundle identified by the recipient’s name (e.g., Dennis Masters).
Example - Creating a Bundle Variable
These screens demonstrate the process for creating a variable for your bundle in Distribution Manager.
When you select a bundle (or create a new one) in Distribution Manager, this screen displays the selected bundle’s name and description:
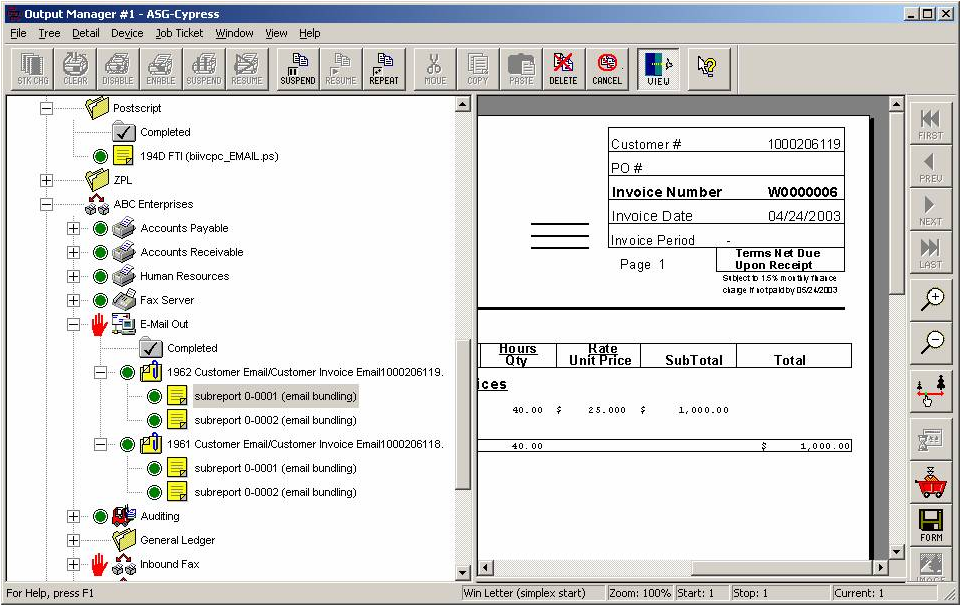
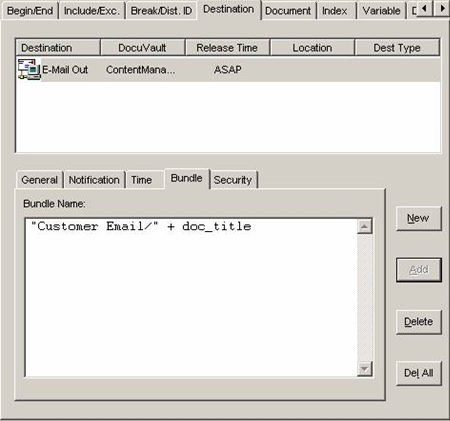
This screen shows the subreport created with the bundle name:
"Customer Email/" + doc_title
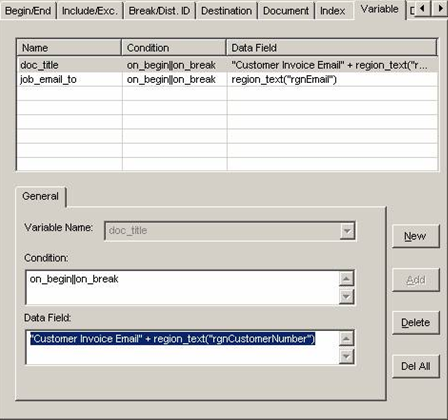
This screen shows the definition of the doc_title variable:
on_begin||on_break "Customer Invoice Email" + region text("rgnCustomer Number")
This screen shows the results in Output Manager: