Distributing Reports and Subreports
This topic provides information on distributing subreports to devices and individual recipients.
Introduction
Cypress can deliver subreports or documents either to devices or individual recipients. You can explicitly specify by name the output device or individual recipient to receive the subreport, or you can use the Auto Device or Auto Recipient options to automatically distribute reports.
To explicitly specify output devices or recipients, you use these tabs:
To automatically distribute reports and subreports, you use these options:
- The Auto Device and Multi Auto Device options, which extract information from the page, which is then used as the distribution ID. When used in conjunction with Auto Device, the distribution ID enables you to use the contents of a region to identify the name of a destination device (seeDistributing a Subreport using Auto Device).
- The Auto Recipient option, which automatically distributes subreports without your having to explicitly specify the names of all recipients (see Distributing Subreports to Recipients).
Distributing Subreports to Devices
Using RDM, you can control device selection using any combination of these options:
|
•
|
The traditional approach to addressing and delivering subreports—explicitly specifying by name the output device that is to receive the subreport. |
|
•
|
The Auto Device option, which dynamically identifies output devices based on the contents of a region within the document. For example, you can create an RDM expression that uses text from the report file to map to a specific output device. |
|
•
|
The Multi Auto Device option, which dynamically identifies output devices based on the contents of a subreport. For example, you can extract a list of output devices embedded within the report file via the variable (var) inline command. RDM then addresses the current subreport for delivery to each device on the list. |
These options enable subreports to be dynamically addressed for specific output devices based on report file content. The difference between the options is in the number of devices to which the current subreport can be delivered.
ASG strongly encourages you to use Auto Device and Multi Auto Device whenever appropriate, as they reduce the time required to implement an RDM application and often eliminate the need to modify an existing RDM application when report applications are updated.
You can access the Auto Device and Multi Auto Device options from the Devices list, located in the lower left frame of the Distribution Manager window (beneath the Report Definition tree view), then specify settings using the New button on the Destination tab, which enables you to specify devices to which you want the subreport distributed.
This topic provides step-by-step instructions for:
|
•
|
Sending subreports to specific devices |
|
•
|
Distributing subreports using Auto Device |
|
•
|
Faxing subreports to a specific recipient or fax number |
Sending a Subreport to a Specific Device
To add a printer to the destination list
|
1.
|
Select the Device tab in the bottom left corner of the Distribution Manager window, beneath the Report Definition tree view, to display the Devices list. |
|
2.
|
Select the desired printer from the Devices list. |

If you cannot locate the Devices list, make sure that the Device tab in the bottom left corner of the window is selected.
|
3.
|
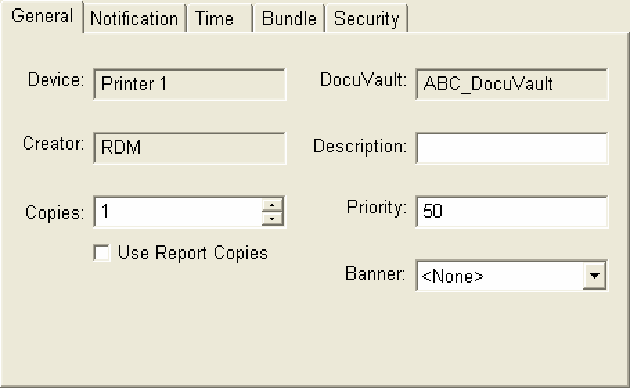
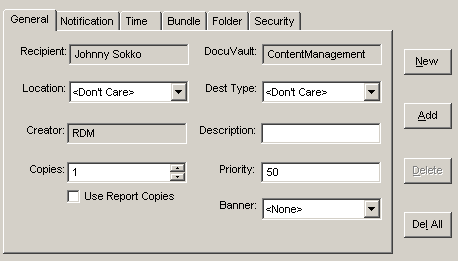
Click the New button on the Destination tab, then select the General tab if it is not already displayed. |
|
4.
|
Enter a description for the device in the Description field. The description you enter here will be displayed as the title of the new device in Enterprise Output Manager and Inbox Viewer. |
|
5.
|
Enter the number of copies to be delivered to the destination device in the Copies input field. |
|
6.
|
Enter the relative job priority in the Priority input field. |
|
7.
|
Optional. Select a banner sheet from the Banner to be used during printing from the Banner drop-down list. |

|
9.
|
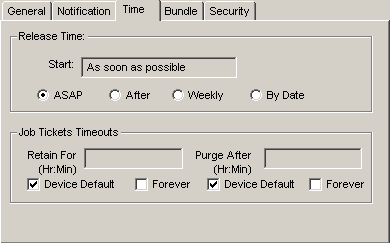
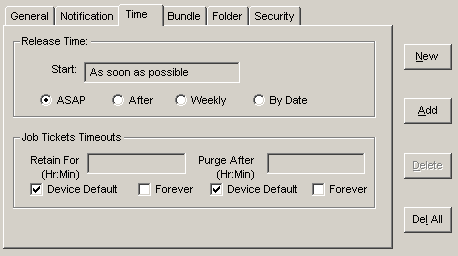
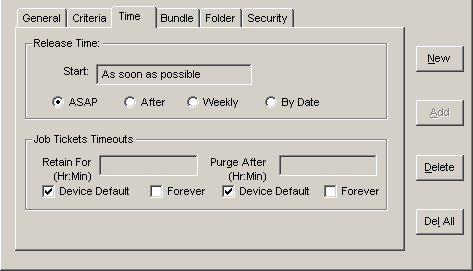
Select the desired Release Time option: |
|
•
|
ASAP specifies Release immediately |
|
•
|
After specifies delay release up to 100 days. If you selected After, a Start After detail displays. Select the days by clicking the left-most 00, then select the small up and down arrow until the desired number of days appears. Repeat this process for the hours and minutes. |
|
•
|
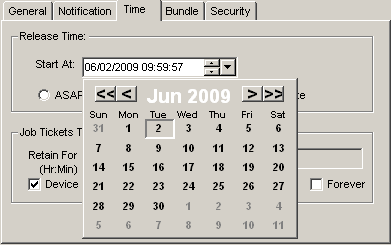
Weekly specifies Schedule release by week. If you selected Weekly, click the button to the right of the Start At detail to display a calendar. Choose the day of the week and the time during which you want the subreport released. |
|
•
|
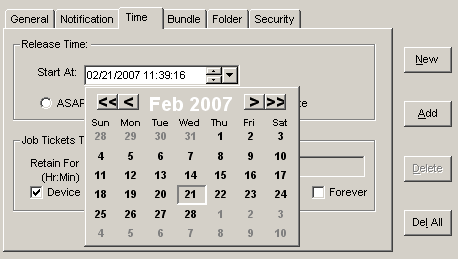
By Date specifies Scheduled release by date. If you selected By Date, the current date and time displays in the Start At field. |
You can change the date and time by specifying the month, day, year, hour, minute, or second in the detail, then selecting the small up or down arrow.
Or
You can select the date from a calendar by clicking on the large down arrow to the right of the Start At field.
|
10.
|
Enter the retention time in the Retain For field. The retention time specifies the length of time that the subreport will be available after being processed by the output device. |
|
11.
|
Enter the purge time in the Purge After field. The purge time specifies the maximum length of time that the subreport can wait in a device queue before being processed by the device. |
|
12.
|
If you are implementing bundling, select the Bundle tab. Enter the name of the bundle in which you want the subreport included. |
|
13.
|
Click the Add button on the Destination tab. |
Click the Apply button at the right side of the window to create the device and add it to the Devices list.
Distributing a Subreport using Auto Device
Cypress provides Auto Device to enable you to dynamically identify output devices based on the contents of a field or region within the report. Using Auto Device, for example, you can create an RDM expression that uses text from the report file to map to a specific output device. Auto Device evaluates the expression found in the Distribution ID field and attempts to distribute the report to a Cypress device with an identical name. If no match is found, the report is rerouted to the Undeliverable Hold queue.
To distribute a report using auto device
This procedure is very similar to the procedure for sending subreports to a specific device. In addition to the basic steps that you perform when sending to a specific device, however, you also must complete information in the Notification and Security tabs
|
1.
|
Open the RDM, and select the Break/Dist. ID tab. |
|
2.
|
Enter criteria in the Distribution ID field to generate the name of the desired output device. |
The criteria in the Distribution ID field must generate a name that exactly matches the name of a Cypress device.
|
3.
|
Select the Device tab in the bottom left corner of the Distribution Manager window, beneath the Report Definition tree view, to display the Devices list. |
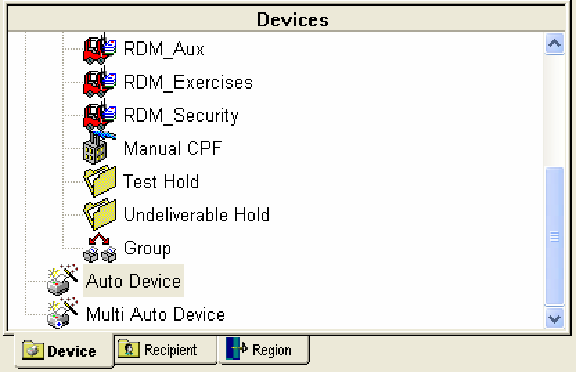
If you cannot locate the Devices list, make sure that the Device tab in the bottom left corner of the window is selected.
|
4.
|
Select Auto Device from the list. |
|
5.
|
Click the New button on the Destination tab, then select the General tab if it is not already displayed. |

|
6.
|
Enter a description for the subreport in the Description field. The description you enter here will be displayed as the title within Enterprise Output Manager and Inbox Viewer. |
|
7.
|
Enter the number of copies to be delivered to the destination device in the Copies field. |
|
8.
|
Enter the relative job priority in the Priority field. |
|
9.
|
Optional. Select a banner sheet to be used during printing from the Banner drop-down list. |
|
10.
|
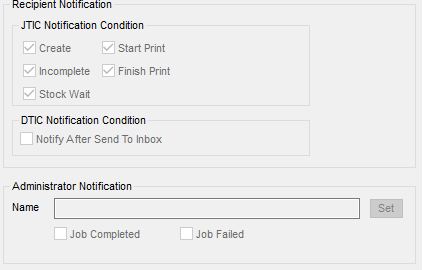
Select the Notification tab, and select the desired notification options. These are the available options: |
|
•
|
Notifying a recipient when a document ticket is sent to their inbox |
|
•
|
Notifying an administrator when a job completes or fails |
|
•
|
Sending e-mail notifications to recipients upon any or all of these events: |
|
–
|
A job ticket (JTIC) is created |
|
–
|
A JTIC completes printing |
|
–
|
A JTIC fails with printing incomplete |
|
–
|
A JTIC is waiting for paper stock |
|
12.
|
Select the desired Release Time option: |
|
•
|
ASAP specifies Release immediately |
|
•
|
After specifies Delay release up to 24 hours. If you selected After, a Start After detail displays. Select the hours by clicking the left-most 00, then select the small up or down arrow until the desired hour displays. Repeat this process for the minutes. |
|
•
|
Weekly specifies Schedule release by week. If you selected Weekly, click the button to the right of the Start At detail to display a calendar. Choose the day of the week and the time during which you want the subreport released. |
|
•
|
By Date specifies Scheduled release by date. If you selected By Date, the current date and time displays in the Start At field. |
You can change the date and time by specifying the month, day, year, hour, minute, or second in the detail, then selecting the small up or down arrow.
Or
You can select the date from a calendar by clicking on the large down arrow to the right of the Start At field.

|
13.
|
Enter the retention time in the Retain For field. The retention time specifies the length of time that the subreport will be available after being processed by the output device. |
|
14.
|
Enter the purge time in the Purge After field. The purge time specifies the maximum length of time that the subreport can wait in a device queue before being processed by the device. |
|
15.
|
If you are implementing bundling, select the Bundle tab. Enter the name of the bundle in which you want the subreport included. |
|
16.
|
Optional. Create a dynamic inbox folder for the report. Select the Folder tab and enter the folder name there. |
|
17.
|
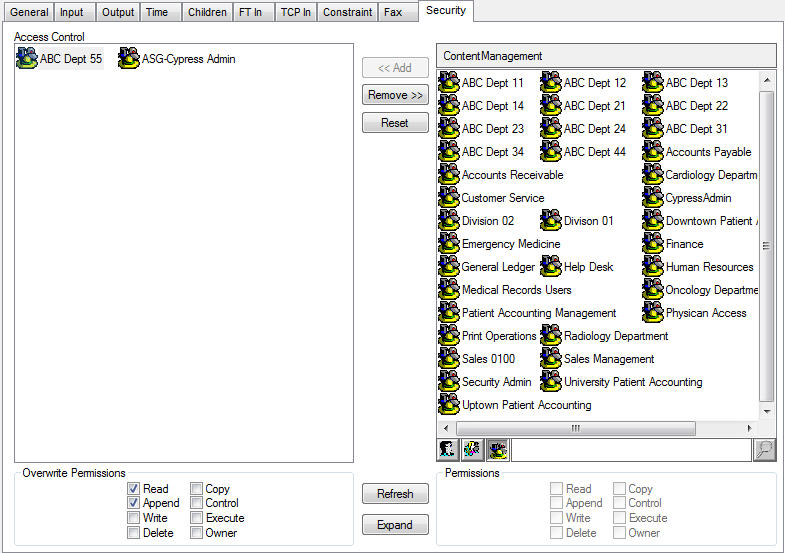
Select the Security tab, which provides controls for defining who can access the resulting subreport at the destination. While you can set security for individual users, the user’s permissions apply to all subreports created by a specific subreport definition. Therefore, if you are creating multiple subreports from a single subreport definition, consider your security requirements carefully. See Defining Security Requirements for Individual Subreports for more information on configuring Cypress security. |
|
18.
|
Click the Add button on the Destination tab. |
|
19.
|
Click the Apply button at the right side of the window to create the device and add it to the Devices list. |
Faxing Subreports
You can use RDM to configure subreports so that they are sent directly to a fax machine. They can be sent either to a recipient’s fax machine or to a specific fax number.
Faxing a Subreport To a Recipient-defined Fax Machine
You can send a subreport to a recipient-defined fax machine by configuring the subreport’s Destination tab in one of two ways:
Faxing a Subreport to a Specific Fax Number
To fax a subreport to a specific fax number
|
1.
|
Select a Cypress-defined fax device on the subreport’s Destination tab. |
If you have multiple Cypress fax devices, you also can choose Auto Device on the Destination tab.
|
2.
|
Declare the job_fax_num predefined variable on the Variable tab. |
The job_fax_num variable enables you to extract a fax number from a page (via associated region text) and condition the number so that it adheres to the canonical form (i.e., a plus sign, the country code, a space, the area code within parentheses, a space, and the phone number). RDM then automatically uses the value of the variable as the outbound fax number to distribute the subreport to the Cypress fax device.
For example, after appropriately configuring the Destination tab, you could configure job_fax_num on the Variable tab, as shown in this example:
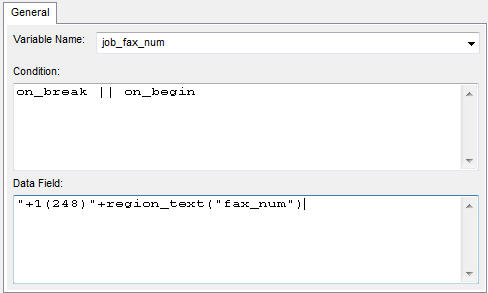
The value of job_fax_num might then resolve to, for example:
"+1 (248) 8527025"
E-mailing Subreports
You can configure subreports to e-mail documents either to a recipient or to a specific e-mail address. This topic provides instructions for the e-mail configuration of subreports.
Sending Subreports as Attachments to a Recipient-defined E-mail Address
You can send a subreport to a recipient-defined e-mail address by configuring thesubreports Destination tab in one of two ways:
|
•
|
If you are selecting a specific recipient, select e-mail as the destination type. |
|
•
|
If you are using Auto Recipient, specify e-mail as the destination type in your Auto Recipient criteria. |
Sending Subreports as Attachments To a Specific E-mail Address
To e-mail a subreport to a specific e-mail address
|
1.
|
Select a Cypress-defined e-mail out device on the subreport’s Destination tab. |
If you have multiple Cypress e-mail out devices, you also can choose Auto Device from the Destination tab.
|
2.
|
Declare the job_email_to predefined variable in the Variable tab. |
The job_email_to variable enables you to extract an e-mail address from a page (via associated region text). You also can format the region text so that it adheres to the correct e-mail address format, if necessary. RDM then automatically uses the value of the variable as the destination e-mail address to distribute the subreport to the Cypress e-mail out device.
For example, after appropriately configuring the Destination tab, you could configure job_email_to on the Variable tab shown in this example:
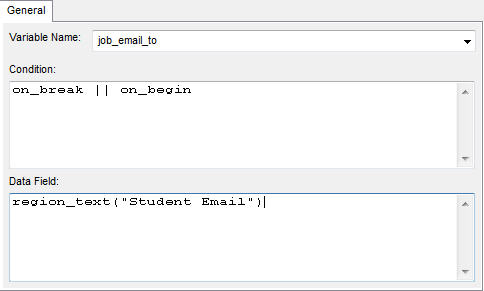
This configuration would result in using the contents of the region named Student Email as the e-mail address for the current subreport.
Similarly, the job_email_from variable can be used to set the sender’s e-mail address. If it is not specified, Cypress will use the contents of the Sender Email Address field configured on the Email subtab of Administration Tools module’s Parameter tab.
Distributing Subreports to Recipients
As an alternative to identifying an output device for subreport delivery, you can specify a recipient, who is a real or abstract user defined in the Address Book. For each recipient, you can define associated output devices and destinations, along with attributes that enable them to be selected dynamically by Cypress to receive subreports.
Using RDM, you can control recipient selection using either of these options alone or in combination:
|
•
|
Explicitly specifying the name of one or more recipients |
|
•
|
Choosing the Auto Recipient option |
The Auto Recipient option enables subreports to be dynamically addressed to recipients based on report file and Address Book content. RDM recipient criteria enable you to control the selection of multiple recipients, destination locations, and even device types. For example, in the Sales Performance example, you can route a subreport to any recipient defined in the Address Book with an attribute of Eastern Sales Region or to an Inbox for any recipient with an attribute of Manager.
Implementing recipients not only creates an intuitive output environment in which documents can be sent to people or groups instead of devices, but it also allows end users to receive documents at their preferred locations, and simplifies RDM application maintenance when new users are added or preferred devices change.
The subreport definition’s Destination tab enables you to specify recipients to whom subreports should be distributed.
This section explains how Cypress identifies destinations for subreport delivery and provides step-by-step instructions for:
|
•
|
Sending subreports to specific recipients |
|
•
|
Distributing subreports using Auto Recipient |
|
•
|
Routing Documents for All Users through a Single Cypress Device |
|
•
|
Configuring Inbound Faxing to a Recipient |
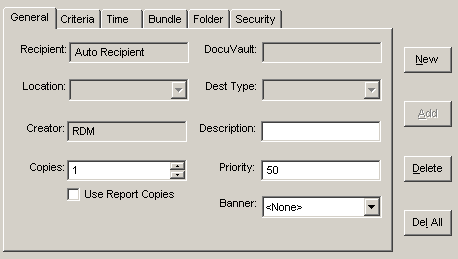
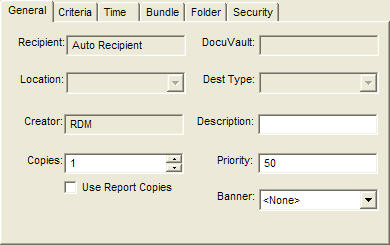
Sending a Subreport to a Specific Recipient
To add a recipient to the destination list
|
1.
|
Open the RDM, and select the report and/or subreport for which you want to add recipients. |
|
2.
|
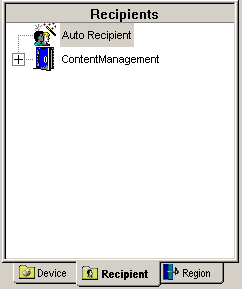
Select the desired recipient under the ContentManagement node from the Recipients list, located in the lower left frame of the window, beneath the Report Definition tree view, for example: |
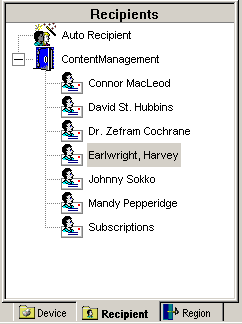
If you cannot locate the Recipients list, make sure that the Recipient tab in the bottom left corner of the window is selected.
|
3.
|
Click the New button on the Destination tab, then select the General tab if it is not already displayed. |
|
4.
|
Select the desired delivery location for the subreport from the Location drop-down list. If you select <Don’t Care>, Cypress will consider all destinations defined for all recipient locations. |
|
5.
|
Select the appropriate destination type from the Dest Type drop-down list. If you select <Don’t Care>, Cypress will deliver the subreport to the destination with the highest priority value, regardless of its destination type. |
|
6.
|
Enter a subreport description in the Description detail. The text that you enter will be displayed as the title in Enterprise Output Manager and Inbox Viewer. |
|
7.
|
Enter the number of copies to be delivered to the recipient in the Copies input field. |
|
8.
|
Enter the relative job priority in the Priority input field. |
|
9.
|
Optional. Select a banner from the Banner drop-down list sheet to be used during printing. |
|
10.
|
Select the Notification tab, and select the desired notification options. You can choose to notify a recipient when a document ticket is sent to the recipient’s Inbox as well as the Cypress administrator when a job completes or fails. You also can choose to send e-mail notifications to recipients when any or all of these events occur: |
|
•
|
A job ticket (JTIC) is created |
|
•
|
A JTIC completes printing |
|
•
|
A JTIC fails with printing incomplete |
|
•
|
A JTIC is waiting for paper stock |
|
12.
|
Click the button for the appropriate option in the Release Time area: |
|
•
|
ASAP for Release immediately |
|
•
|
After for Delay release up to 24 hours |
|
•
|
Weekly for Schedule release by week |
|
•
|
By Date for Schedule release by date |
|
13.
|
Take one of these actions, depending on your Release Time option: |
|
•
|
If you selected After, a Start After detail displays. Select the hours by clicking on the left-most 00, then clicking the small up or down arrow until the desired hour displays. Repeat this process for the minutes. |
|
•
|
If you selected Weekly, click the button to the right of the Start At input field to display a calendar. Choose the day of the week and the time during which you want the subreport released. |
|
•
|
If you selected By Date, the current date and time appear in the Start At input field. You can change the date and time by selecting the month, day, year, hour, minute, and/or second in the input field, then clicking the small up or down arrow. |
Alternatively, you can select the date from a calendar by clicking on the large down arrow to the right of the Start At input field.
|
14.
|
Enter the retention time in the Retain For input field. The retention time specifies the length of time the subreport will be available after being processed by the output device. |
|
15.
|
Enter the purge time in the Purge After input field. The purge time specifies the maximum length of time that the subreport can wait in a device queue before being processed by the device. |
|
16.
|
Optional. If you are implementing bundling, select the Bundle tab. Enter the name of the bundle in which the subreport should be included. |
|
17.
|
Optional. If you wish to create a dynamic inbox folder for the report, select the Folder tab and enter the folder name there. |
|
18.
|
Select the Security tab, which provides controls for defining access to the resulting subreport at the destination. |
While security can be set for individual users, the user’s permissions apply to all subreports created by this subreport definition. Therefore, if you are creating multiple subreports from a single subreport definition, consider your security requirements carefully. See the ASG-Cypress System Administrator’s for more information on configuring Cypress security.
|
19.
|
Click the Add button on the Destination tab. |
|
20.
|
Click the Apply button at the right side of the window to add the recipient. |
Distributing a Subreport using Auto Recipient
You can distribute a subreport using Auto Recipient in either of these two ways:
|
•
|
You can include criteria in your documents using the recipient (shortcut: rcp) InLine command. |
|
•
|
You can configure criteria using the Destination tab. |
Using the Recipient InLine Command
The recipient command instructs Cypress to queue reports to recipients instead of a physical device. A recipient is a user (either a real person or an abstract user, such as Administrator) who can receive documents and reports. The rcp shortcut takes one parameter: a valid Auto Recipient expression criteria string (see Auto Recipient Criteria). For example, a valid rcp InLine command statement might look like this:
rcp select printer where recipient([city]="Detroit")
You can use any Auto Recipient expression criteria statement with the rcp InLine command. However, Cypress provides several shortcut InLine commands to make developing a recipient criteria string easier. For example, this statement would function exactly as the statement shown above:
rcp_prn [city]=”Detroit”
This table lists all the supported recipient InLine command shortcuts:
|
Shortcut
|
Equivalent
|
Function
|
|
rcp_all
|
select all where recipient
|
Queues the document to the highest priority devices of each type defined for the recipient
|
|
rcp_any
|
select any where recipient
|
Queues the document to the highest priority device defined for the recipient
|
|
rcp_email
|
select email where recipient
|
Sends a document to the highest priority recipient-defined e-mail address
|
|
rcp_fax
|
select fax where recipient
|
Sends a document to the highest priority recipient-defined fax device
|
|
rcp_inbox
|
select inbox where recipient
|
Sends a document to the highest priority Inbox defined for the recipient
|
|
rcp_prn
|
select printer where recipient
|
Sends a document to the highest priority printer defined for the recipient
|
The rcp_all shortcut does not necessarily send the document to all devices defined for the recipient; instead it sends the document to the highest priority device of all types defined for the recipient. For example, if you have defined three printers, one fax, and two e-mail devices for a particular recipient, Cypress sends three copies of the document: one to the highest priority printer, one to the fax, and one to the higher priority e-mail device.
If you use the rcp_any shortcut with the same recipient, Cypress would send only one copy of the document to the device with the highest priority. As with all InLine commands, you must enclose the rcp command in braces ({ }) or brackets ([ ]), which should be preceded by the appropriate initial character. By default, the initial character is a caret (^). However, you cannot append additional InLine commands to the rcp command within the same set of braces or brackets. For more information on using InLine commands, see the ASG-Cypress Advanced Formatting Administrator’s topic.
Configuring Criteria Using the Destination Tab
You can specify the destination to which you want Cypress to send subreports using the subreport definition’s Destination tab.
To configure a subreport’s Auto Recipient criteria using the Destination tab
|
1.
|
Launch the Distribution Manager, and select the report and/or subreport for which you want to define the auto recipient. |
|
2.
|
Select the Auto Recipient node in the Recipients list, which is located in the lower left frame of the window, beneath the Report Definition tree view, for example: |
|
3.
|
Click the New button on the Destination tab, then select the General tab if it is not already displayed. |
|
4.
|
Enter a description of the subreport in the Description field. The text you enter will be displayed as the title in Enterprise Output Manager and Inbox Viewer. |
|
5.
|
Enter the number of copies to be delivered to the recipient in the Copies field. |
|
6.
|
Enter the relative job priority in the Priority field. |
|
7.
|
Optional. Select a banner sheet from the Banner drop-down list to be used during printing. |
|
8.
|
Select the Criteria tab. |
|
9.
|
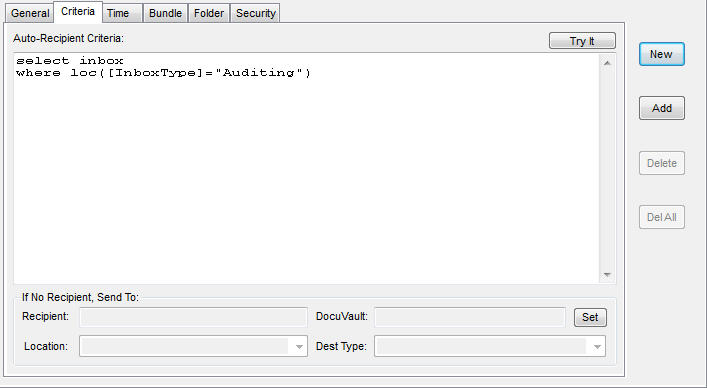
Enter the expression criteria in the Auto-Recipient Criteria field. For example: |
|
•
|
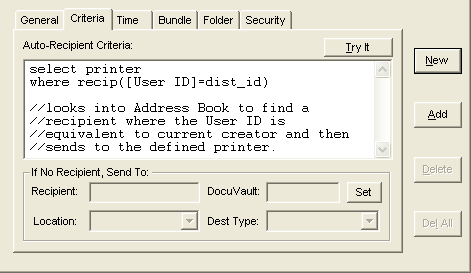
To distribute the subreport to the printers for all defined recipients in a particular department, you could enter this Auto Recipient expression: |
select printer
where recip ([Department] = dist_id)
|
•
|
To distribute the subreport to the Inboxes of all recipients who have their report IDs set to Income Statements, you could enter this expression: |
select inbox
where loc ([Report ID] = "Income Statements")
|
•
|
To distribute the subreport to the Inboxes of all recipients in a particular department who have report IDs of Income Statements, you could enter this expression: |
select inbox
where recip ([Department] = dist_id) and
loc ([Report ID] = "Income Statements")
|
10.
|
In the If No Recipient, Send To area, select a default recipient from the Recipient field and click the Set button. The recipient will receive the subreport in the event that no recipients match the Auto Recipient criteria. |
You also can specify this default recipient’s location and destination type by selecting the appropriate settings on the Location and Dest Type drop-down lists.
|
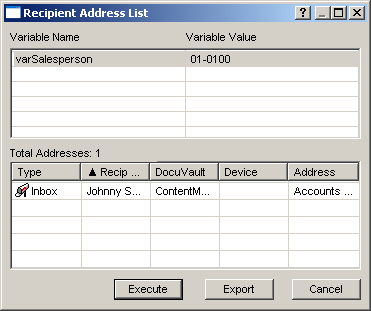
11.
|
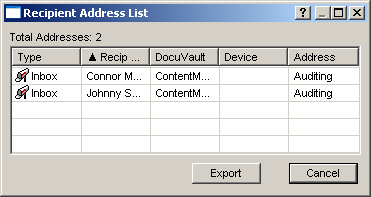
Preview the results of your expression by clicking the Try It button. The Recipient Address List dialog opens, listing all recipients who will be selected based on your criteria. |
|
•
|
If your criteria contain the dist_id or variables defined on the Variable tab, this version of the Recipient Address List dialog is displayed: |
|
•
|
If your criteria do not contain any variables, this version of the dialog is displayed. Review the results for accuracy, and click Cancel to close the Recipient Address List dialog. |
|
12.
|
Optional. Test different values for each variable by entering a value in the Variable Value detail and clicking the Execute button. Review the results for accuracy. You can test and retest as many times as you like. Click Cancel to close the Recipient Address List dialog. |
|
14.
|
Select the desired Release Time option: |
|
•
|
ASAP for Release immediately |
|
•
|
After for Delay release up to 24 hours |
|
•
|
Weekly for Schedule release by week |
|
•
|
By Date for Scheduled release by date |
|
15.
|
If you select After, a Start After input field set to 00:00 is displayed. Select the hours by clicking on the left-most 00, then click the small up or down arrow until the desired hour is displayed. Repeat this process for the minutes. |
|
•
|
If you select Weekly, click the button to the right of the Start At input field to display a calendar. Choose the day of the week and the time during which you would like to release the subreport. |
|
•
|
If you select By Date, the current date and time displays in the Start At input field. You can change the date and time by selecting the month, day, year, hour, minute, and/or second in the input field, then clicking the small up or down arrow. |
Alternatively, you can select the date from a calendar by clicking the large down arrow to the right of the Start At input field.

|
16.
|
Enter the retention time in the Retain For input field. The retention time specifies the length of time the subreport will be available after being processed by the output device. |
|
17.
|
Enter the purge time in the Purge After input field. The purge time specifies the maximum length of time the subreport can wait in a device queue before being processed by the device. |
|
18.
|
Optional. Select the Bundle tab, and enter the name of the bundle in which you want this subreport included. |
|
19.
|
Optional. If you wish to create a dynamic Inbox folder for the report, select the Folder tab and enter the folder name there. |
|
20.
|
Select the Security tab, which provides controls for defining access to the resulting subreport at the destination. |
While security can be set for individual users, the user’s permissions apply to all subreports created by this subreport definition. Therefore, if you are creating multiple subreports from a single subreport definition, consider your security requirements carefully. See the ASG-Cypress System Administrator’s topic for more information on configuring Cypress security.
|
21.
|
Click the Add button on the Destination tab. |
|
22.
|
Click the Apply button at the right side of the window to save your Auto Recipient criteria. |
Routing Documents for All Users through a Single Cypress Device
In some environments, administrators prefer to route all desktop printing through a single Cypress device. This section provides step-by-step instructions for establishing the appropriate RDM and Address Book criteria so your users can print to a single desktop device.
To automate user-based distribution, you must create and configure an RDM processor. You should set up this RDM processor for the specific use of daily desktop output delivery; do not use it for any other purpose.
This process modifies security for existing documents. It does not create new documents, and retains the existing document’s title, retention settings, and creation dates.
To route desktop printing through a single device
|
1.
|
Open the Administration Tools module, and create an RDM processor. For more information, see Creating RDM Processors . |
|
2.
|
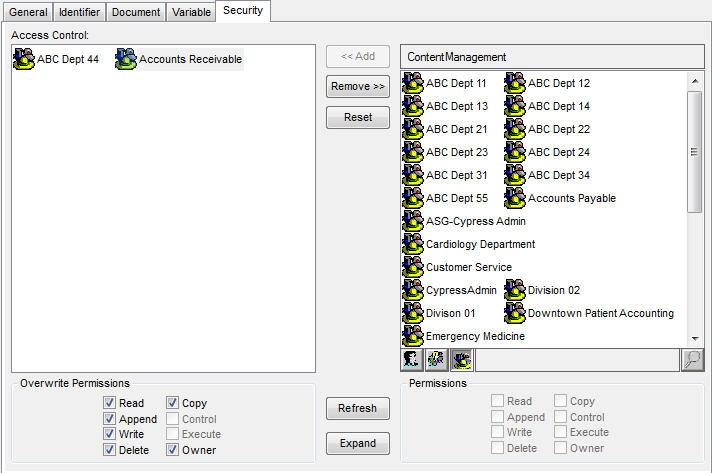
Select the Security tab to configure the new RDM processor’s security. For more information, see step 7. . |
ASG strongly recommends that you grant Owner permissions to the Cypress administrator on the device and only Read and Append permissions to all other users.
|
3.
|
Open the RDM, and create a new report group with the same name as the RDM processor you just created. For more information, see Creating Report Group Definitions. |
|
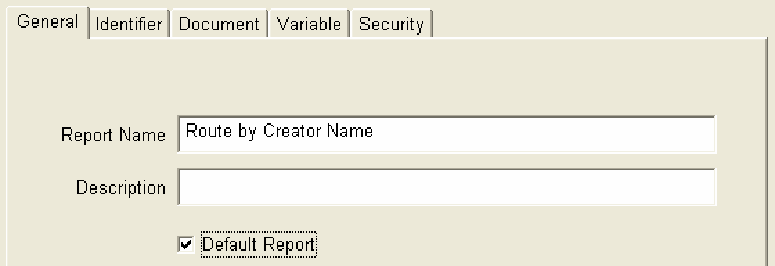
5.
|
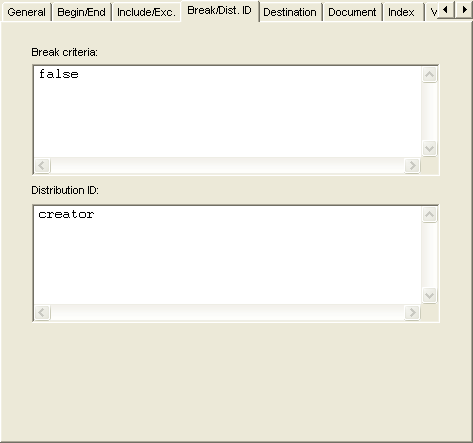
Because this device must accept any type of document, select the Default Report option. |
|
6.
|
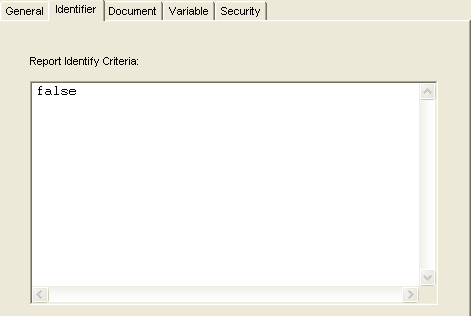
Select the Identifier tab, and enter false in the Report Identify Criteria field. |
|
7.
|
Select the Document tab. |
|
8.
|
Optional. If you want to specify an archive time for all documents sent to this RDM processor: |
|
a.
|
Clear the Keep Original option. |
|
b.
|
Enter in the Retain For (Days) field the number of days you want to keep the documents. |
|
c.
|
Click the Document Creation Time option button. |

|
9.
|
Optional. Specify security settings for documents sent to this RDM processor. For more information, see step 7. . |
|
11.
|
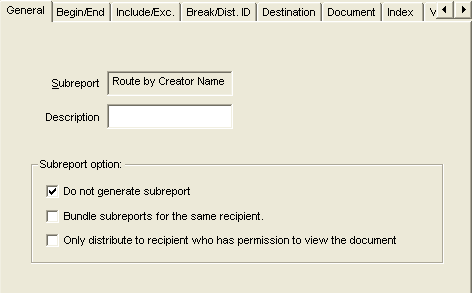
Select Do not generate subreport if you do not need to specify additional indexing, security, retention, or naming convention settings. |
|
12.
|
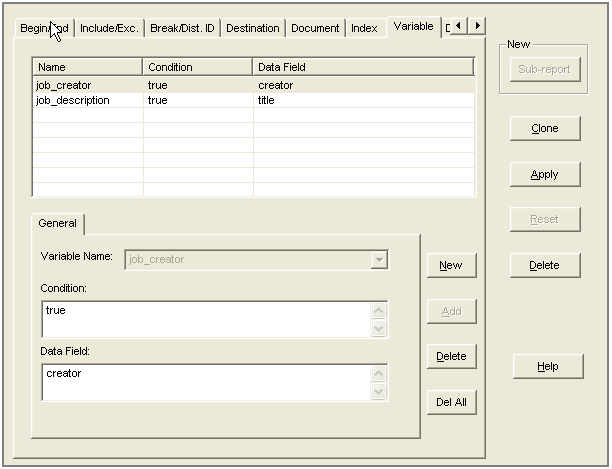
Select the Break/Dist. ID tab, and enter the keyword creator in the Distribution ID field. When RDM processes a document, it will replace this keyword with the document’s user ID. |
|
14.
|
Optional. Select the Security tab and grant access to any additional Roles, users, or groups. |
|
15.
|
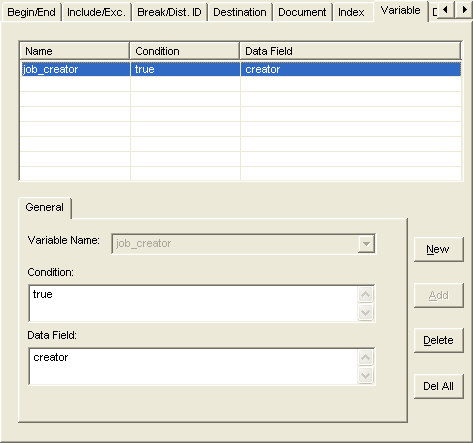
Optional. Modify the predefined job_creator variable to reflect the value of the original job creator rather than the default value (RDM). Making this change enables Cypress to generate accurate printing statistics. |
|
16.
|
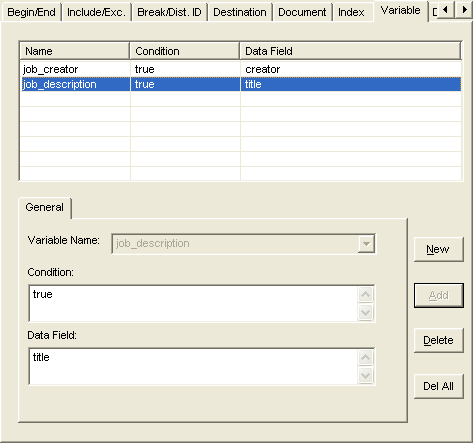
Optional. Modify the predefined job_description variable to reflect the original title of the job rather than the default value (i.e., the name of the subreport). |
|
17.
|
To save your subreport definition, click the Apply button at the right side of the RDM window. |
|
18.
|
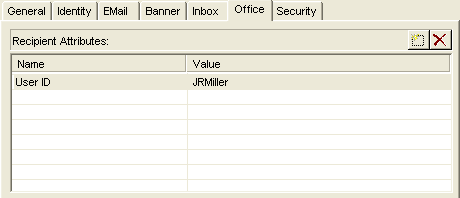
Open the Address Book, and add the appropriate attribute and value combinations to each recipient’s location tab or tabs along with the associated distribution device. In this example, the attribute name User ID has been used and the corresponding value has been set to the recipient’s Windows user ID: |
|
19.
|
Print a document to your new RDM processor and, using Enterprise Output Manager, ensure that RDM routed the document correctly. |
Configuring Inbound Faxing to a Recipient
You can configure Cypress to send all documents routed to a fax machine to a particular recipient if you are using a Brooktrout fax card.
To configure inbound faxing to a recipient, you must create a fax device representing the fax machine. In addition, you must modify the recipient definition in the Address Book and create new report and subreport definitions in RDM.
To configure inbound faxing to a recipient
|
1.
|
Open the Address Book, and select the recipient(s) to whom you want to send the fax(es). |
|
2.
|
Add a fax extension attribute to each recipient’s Inbox tab or to one of the recipient’s location tabs. Set the attribute to the fax machine extension. |
|
3.
|
Click the Apply button to save your changes. |
|
4.
|
Open the RDM. Choose a report group and add a new report to it. Give the report a meaningful name (e.g., FaxRecipReport). |
|
5.
|
Select the report’s Identifier tab, and enter an expression criteria string in the Report Identify Criteria field, for example: |
creator match "*fax*"
Compose the expression criteria string so that it will return true only if the document being processed originated at the fax machine.
|
6.
|
Modify any other report definition fields, as appropriate. |
|
7.
|
Click the Apply button to save your changes. |
|
8.
|
Create a subreport from the new report you configured. Give the subreport a meaningful name (e.g., FaxRecipSubreport). |
|
9.
|
Select the Do not generate subreport option. |
|
10.
|
Select the Break/Dist. ID tab, and enter this line in the Distribution ID field: |
page_var("DID")
|
11.
|
Select the Destination tab, and create an Auto Recipient. |
|
12.
|
Select the Auto Recipient’s Criteria tab and enter an Auto Recipient criteria expression that queries on the attribute that you created in step 2. . For example, if you created a fax extension attribute named DID on one of the recipient’s location tabs, you might enter this string: |
select inbox where loc([DID] = dist_id)
|
13.
|
Modify any other Auto Recipient and subreport definition fields, as appropriate. |
|
14.
|
Click the Apply button to save your changes. |
|
15.
|
Open the Administration Tools module, and create a fax device. |
|
16.
|
Select the General tab, and set the Device DLL drop-down list to bt_1034. |
|
17.
|
Enter the fax machine’s channel number in the Unit field. |
|
18.
|
Set the Link DLL drop-down list to tapidata_io. |
|
19.
|
Select the Fax tab, and set the Fax Mode drop-down list to Inbound Only or Inbound and Outbound. |
|
20.
|
Set the Inbound Fax Device drop-down list to the RDM processor that routes documents to the report you created in step 4. . |
|
21.
|
Click the Apply button to save your changes. |
When you complete these steps, Cypress will deliver faxes sent to this fax machine to the device(s) or Inbox(es) specified in the Auto Recipient criteria in step 12. .
Sending Reports to Dynamic Inbox Folders
The dynamic folder feature saves users time and increases productivity by automatically organizing documents within Inboxes into an intuitive folder structure. Dynamic folders help users locate and view content quickly and easily, as the folder structure is created based on business rules and the content of documents being delivered to an Inbox. This feature also eliminates the significant drawbacks and administrative overhead associated with rigid, predefined document folder structures.
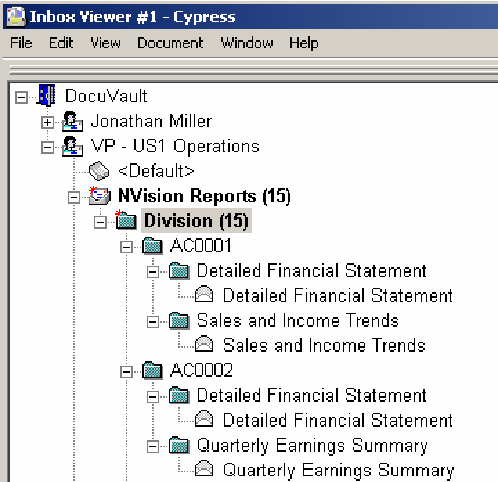
Cypress has the ability to dynamically generate folders and subfolders within Inbox destinations. Just as document names, distribution rules, indexing, bundles, etc., can be based upon variable data, static data or a combination of the two, so can criteria for creating folder structures. Inbox folders can be extremely useful in further organizing how documents are displayed within a user’s Inbox. Additionally, Inbox folders can help increase Inbox response time, as DTIC entries are only loaded at the time the selected folder is accessed. The dynamic folders feature enables subreports created by RDM Subreport Definitions to be organized in a folder/subfolder hierarchy based on business rules and document content. The folder hierarchy can be structured using variable information (such as department name or customer name), hardcoded text (such as West Coast Region), page variables, or using a combination of each, as shown in this example:
Because dynamic folders are generated based on business rules and document content, users receive pertinent information in an intuitive, easy-to-navigate structure of folders and sub-folders. Administrators benefit by virtually eliminating the time to maintain and populate a rigid, pre-defined folder structure. Once business rules defining folder hierarchy and content are created, new folders and subfolders are automatically created—even in highly dynamic environments when new users, departments, and document types may frequently change.
Inbox Folders are not intended to serve as a long-term document archive structure. You should pay careful attention to Inbox retention times.
To implement dynamic folders in RDM
|
1.
|
Enter folder criteria into the Destination tab’s Folder tab as you create a definition for a subreport. For more information and examples of folder criteria, see Creating Folder Criteria. |
The criteria automatically creates and names a multilevel folder structure within any Inbox that receives a report generated from this subreport definition.
|
2.
|
Ensure that these requirements are met: |
|
•
|
The Bundle subreports for same recipient option on the subreport definition’s General tab must be cleared. |
|
•
|
Auto Recipient must be selected on the subreport definition’s Destination tab. |
|
•
|
The Bundle tab on the subreport definition’s Destination tab must be empty. |
Creating Folder Criteria
The folder criteria expression is simply a string that contains the name of each folder in the hierarchy. Just as you can control document names, distribution rules, indexing, bundles, and other Cypress features based on region text, page variables, static data, or a combination, so you can control the criteria for creating folder names. This is an example of a simple folder criteria string:
"Division/Department"
This criteria string would create two folders in the recipient’s inbox: a Division folder with a Department folder inside it.
String literals and the forward slash that divides the folder names must be enclosed in quotes.
You can create more complicated folder criteria using region text, page variables, and string functions. This is an example of a complicated folder criteria based on the title of a source file:
"Division/" +
title.right("_").right("_").right("_").right("_").left(".") +
"/Detailed Financial Statement"
You can use plus signs (+) to concatenate the string literals with the title variable and the string functions. This is the resulting folder structure:
If you are using date information extracted from region text, be certain that the date format does not include forward slashes (e.g., 12/04/02), because Cypress will process them. To capture date information in this format, ASG recommends using string functions to extract the month, date, and year.
Inbox Folder Considerations
Keep these points in mind when you are implementing dynamic Inbox folders:
|
•
|
Folder definitions are created at the subreport level, rather than the user (recipient Address Book) level, in order to minimize administrative tasks. |
|
•
|
Users cannot create their own folder structure like they can with actual inboxes. |
|
•
|
Because Inbox folders are dynamic in nature, once the last item within one of them is deleted (either manually or automatically), the folder itself disappears. For users, this means that a folder will never exist unless a document exists within it. |
|
•
|
The Bundle Name field on the Auto Recipient’s Bundle tab must be blank. To access this field, select the subreport, click the Destination tab, highlight Auto Recipient in the list at the top of the Destination tab, and click the Bundle tab in the tabbed page below the list. |
|
•
|
The Bundle Subreports for same recipient option on the subreport’s General tab must be cleared. |
Selecting Subreport Recipients Based on the Sender of the Report
To select subreport recipients based on the sender of a report
|
1.
|
Open the RDM, and select the subreport whose recipients you wish to configure from RDM’s main tree view, located in the upper left frame of the application window. |
|
2.
|
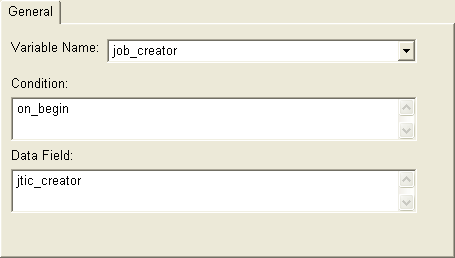
Select the General tab. |
|
3.
|
Select the job_creator predefined variable from the Variable Name drop-down list. |
|
4.
|
Enter on_begin in the Condition field. |
|
5.
|
Enter jtic_creator in the Data Field field. |
|
6.
|
Click Add to add the variable. |
|
7.
|
Click the Apply button to save your changes. |
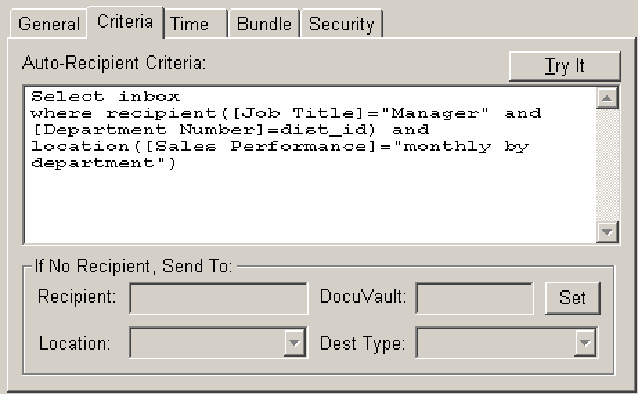
|
9.
|
Select the Criteria tab. Create an expression query that suits your needs, and enter it in the Auto Recipient Criteria window, for example: |
select all where recipient ([manager] = job_creator)
This query would send the report to the highest priority device of each type (i.e., printer, fax, e-mail, and Inbox) to recipients who are managed by the creator of the report.
|
10.
|
Click Add to add the Auto Recipient to the destination list. |
|
11.
|
Click the Apply button to save your changes. |
Subreport Delivery via Subscription
Cypress provides the ability for end users to subscribe to subreports that are regularly generated by RDM. Specifically, users can display a list of subscribable reports in an Inbox Viewer and select one or more to which to subscribe. Security is provided to control several levels of access to subscriptions (e.g., the ability to see an item in the subscription list, to subscribe to an item in the subscription list. etc.).
The subscription feature provides these key benefits:
|
•
|
The ability to create an environment in which information and knowledge is pulled rather than pushed |
|
•
|
A significant reduction in your Cypress administrator workload |
By enabling subscriptions, the Cypress administrator no longer has to modify either the RDM application or the Address Book when a new user wants to receive a subreport. The actual act of subscribing results in the Address Book being updated so that the desired subreport is delivered to the user’s (recipient’s) Inbox the next time it is created. The Cypress administrator no longer has to manually update the Address Book with new recipient information; the update is performed automatically by Cypress. For more information, see the ASG-Cypress Address Book Administrator’s topic.
Distributing Source Files
Cypress allows you to manage not only documents for distribution in the Cypress DDOC format, but also source files, or documents that have been stored in their original formats (e.g., Excel, Word, etc). The FT In component allows you to submit documents to Cypress via network file transfer and store them in their original format, in the Cypress DDOC format, or both. When you open a source file in Cypress, you can view the document in its native application rather than a Cypress DocuSpace.
Your business application or reporting facility writes the source document files to a specific directory that is monitored by Cypress. Any files that are placed in this directory will be processed by Cypress via FT In per your requirements. Inbound e-mails from your Microsoft Exchange Server(s) do not require FT In. They are automatically captured and sent directly to Cypress for processing.
You can use RDM to automate source file delivery to specific recipients. This is achieved using RDM. The steps to configure RDM to route source files are very similar to the steps to configure RDM to route subreports. Because source files cannot be divided into subreports and often access only the indexing and routing capabilities of RDM, however, automating source file delivery often is less complicated than configuring a typical RDM report.
How Cypress Handles Source Files
If a Report Distribution Manager (RDM) processor is configured to monitor the directory, the files will be processed by RDM. Specifically, RDM can process source files for addressing (recipient selection) and indexing requirements, then deliver them to the Inboxes of all appropriate recipients. The subreport definition is used for routing and indexing only; the content of a source document file cannot be broken down into smaller subreports.
Once a document has been delivered to the user’s Inbox, users can launch the document in its original authoring application. As documents are acquired by Cypress, they are indexed in several system indexes. In addition, you can index and archive documents automatically (using an RDM subreport or a CPF program) or manually (using controls available in the Cypress DocuSpace).
Incoming e-mails can create two types of source files: the e-mail record and the attachment document record (if there is an attachment to the e-mail). Each e-mail record includes references to any associated attachments, which have the document system type of e-mail attachment.
The device monitoring the watched directory substantially dictates how the source files are to be processed by Cypress. If your goal is to distribute files to recipients, you must configure an RDM processor to watch the directory and create report and subreport definitions to control addressing and indexing, as required.
Before you configure RDM to enable source file distribution, ASG recommends that you complete these preparation tasks:
- Identify the naming convention to be used to control source file routing (recipient selection) and indexing (if desired).
You can extract information contained in the title of the source file use it to control RDM routing and indexing functions. Make sure that the structure of the file name enables you to use RDM criteria to extract unique data that can be used for recipient identification and automated indexing. Before you begin to configure RDM, ASG strongly encourages you to identify a file naming convention that will enable you to achieve your objectives.
Files supported by Native File Conversion can use document content for RDM purposes and are not restricted to the same file-naming convention limit, allowing for more intuitive distribution.
- Configure the Cypress Address Book, if necessary.
Implement the Address book before configuring the RDM if you are planning to use the RDM Auto Recipient feature.
- Create any required indexes, if necessary.
If you are planning to index source files processed by RDM, ensure that the indexes have already been created within Knowledge Builder.
Configuring an RDM Subreport to Distribute Source Files
To configure an RDM subreport for source file distribution
|
1.
|
Create a directory to be used for the source files that you want RDM to distribute. |
|
2.
|
Configure the source application to write output to the new directory. |
|
3.
|
Create an RDM processor that will be responsible for monitoring the directory created in step 1. |
|
5.
|
Create a subreport definition. With the exception of the fields used to control routing and indexing functions, leave the default values in all the fields. Many of the tabs and fields are not used to process source files with RDM. |
|
6.
|
On the Break/Dist. ID tab, leave the Break criteria set to the default value. |
|
•
|
If you do not plan to distribute source files using the Auto Recipient feature, leave the distribution ID set to the default value. |
|
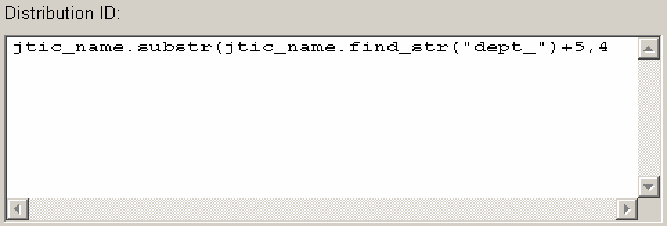
•
|
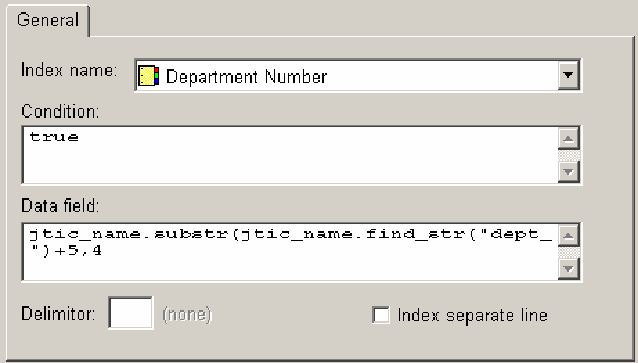
If you plan to use the Auto Recipient feature, you can enter criteria in the Distribution ID field so that the Dist ID value can be used to uniquely identify a recipient. You also can use a variable. This example illustrates how information in the job ticket name can be extracted to identify recipients based on their Department Number: |
|
7.
|
On the Destination Tab, set the configuration fields as necessary for your purposes. |
|
•
|
If you are going to manually select recipients, select recipient names from the Recipients display on the left side of the window. |
|
•
|
If you are choosing to distribute source files automatically, select Auto Recipient from the Recipients tab at the bottom left corner of the window, and enter the appropriate criteria. |
You are strongly encouraged to use the Try It button as this feature enables you to see the exact recipients selected based on your Auto Recipient criteria. This productive feature helps to ensure that your subreport definition is correctly constructed prior to testing and going live.
|
8.
|
Configure the Index tab according to your site’s indexing requirements. |
|
9.
|
Configure the Variable tab as necessary to support the RDM criteria that you are using to control indexing and routing. If you do not require variables in your criteria, leave the default values in all the fields. |
|
10.
|
Run reporting application. |
Controlling the Copy Count of Subreports
When you configure the Destination tab of a subreport definition, you can specify the number of copies to be sent to a specific destination. You also can opt to use the number of copies requested by the user who submitted the job to RDM. This section provides step-by-step instructions for specifying the copy count.
To control a subreport’s copy count
|
1.
|
Open the RDM, and select subreport for which you want to add recipients. |
|
2.
|
Click the New button on the Destination tab, then select the General tab if it is not already displayed. |
|
3.
|
Optional. Check the Use Report Copies check box to use the number of copies requested by the user who submitted the job to RDM. |
|
4.
|
To set a specific number of copies, clear the Use Report Copies option and enter in the copies field the number of copies that should be sent. The RDM application will ignore the number of copies requested by the user who submitted the job to RDM in favor of the number that you specify. |
If you clear the Use Report Copies option and leave the Copies field blank, only one copy of the subreport will be distributed.
Verifying Subreport Distribution
You can verify that your subreport distribution is working as intended using Enterprise Output Manager and the Inbox Viewer.
Verifying Subreport Distribution To the Correct Device(s)
When you are testing a RDM report, it is possible to use Enterprise Output Manager to verify that your document distribution is working as expected.
To verify that a subreport was distributed to the correct device
|
>
|
Click the plus sign next to the device’s name in the tree view on the left side of the Enterprise Output Manager window. If you do not see the subreport, click the plus sign next to the Completed icon, for example: |
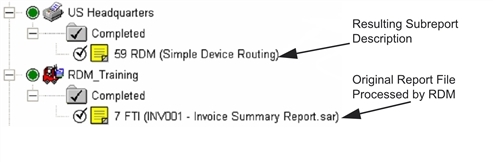
The subreport should be displayed either directly under the device or under the Completed icon.
Verifying Subreport Distribution To the Correct Recipient(s)
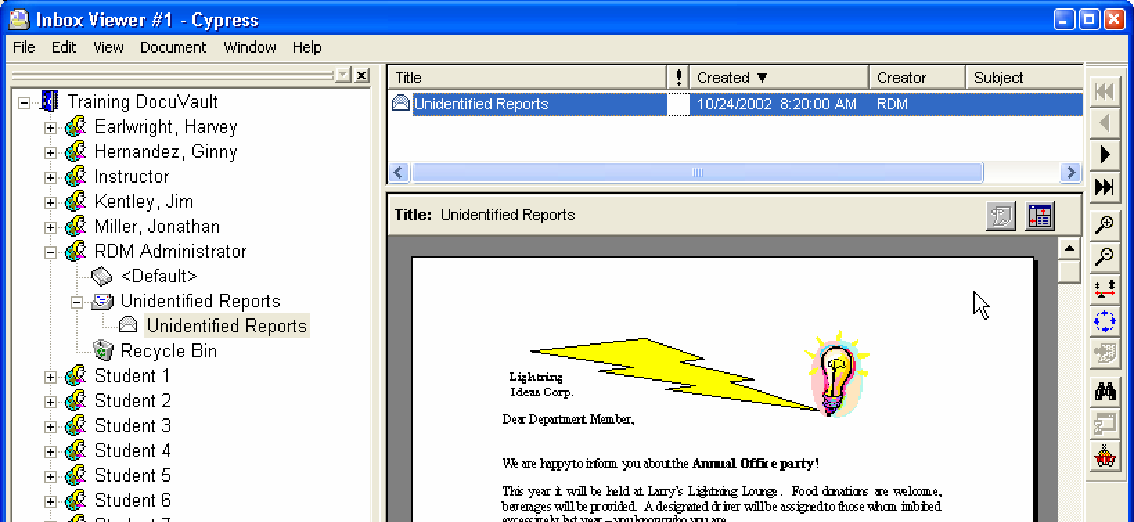
When you are testing an RDM report, it is possible to use Inbox Viewer to verify that distribution to recipients is working as expected.
To verify that a subreport was distributed to the correct recipient
|
1.
|
From the Cypress Main window, open the Inbox Viewer module. |
|
2.
|
Turn on Show All Recipients. |
|
3.
|
Click the plus sign next to a recipient who should have received the report. |
|
4.
|
Verify that the report was received by the correct recipient and that the dynamic Inbox folders, if any, were created as anticipated. |
