
Creating and Using Regions
This topic provides an overview of regions as well as step-by-step instructions for creating them.
Introduction
A region is a structure RDM uses to capture data at a specific location on a page within a report file. The captured data can be a single word, a series of numbers, a paragraph, an entire section of a page, or any alphanumeric information. You create regions within the Cypress Enterprise Output Manager and define them either by name or X and Y coordinates.
Regions are used in report and subreport definition expressions to control subreport creation and delivery based on specific data within the report file. For example, you could create this expression for identify criteria:
first_page.region_text ("Title") match "*PERFORMANCE*"
This expression will return a value of TRUE when the Title region contains the string PERFORMANCE, and will result in a report definition being selected. The asterisk (*) is a wildcard function.
Think of regions as invisible forms that overlay every page in a report file. You can use the text that lies within each region can be used by you to control a variety of subreport-related functions, including where to begin a new subreport, which pages to include or exclude, where the subreport is to be delivered, etc.
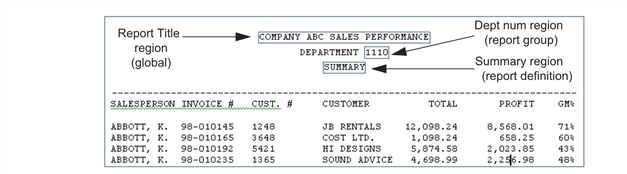
This is an example of how regions are laid on top of data within a report file. This figure shows the continuing example of the Sales Performance report application:
Using Regions
When report applications are updated, critical information within the report file can be deleted or moved to new locations. If you are using regions to capture specific data on a page within the report file, make sure you verify that the placement of currently defined regions is still correct and captures the desired information. Otherwise, subreports will not be generated as expected.
To verify placement of regions
| 1. | View the newly updated report file in the Enterprise Output Manager. |
| 2. | Next, right-click the document and select the View Region option from the pop-up menu. You also can use the Text Inside option to ensure that the correct data is being captured. |
| 3. | Ensure that the regions are still capturing the data they were created to capture. |
| 4. | If the desired data has moved to a new location on the page because of the update, drag the region to the new location while the region displays on the page. |
| 5. | After you have repositioned the region, click the Apply button within the View Region dialog. Subreports will then be generated as expected. |
Creating Regions
Before you can create regions for an application report file, the report file must be available for viewing in Enterprise Output Manager. You also should have already created all necessary report groups and report definitions.
If the report file is not available for viewing in a device queue, print the report file through Cypress before proceeding with these instructions. The simplest thing to do is to print the report file to a hold queue.

To create a region
| 1. | Open the Enterprise Output Manager. |
| 2. | From the tree display on the left side of the window, find and select the report file you want to view. |
| 3. | If the report is not already displayed in the right frame of the window, click the View button at the top of the window. |
| 4. | Magnify the view area as necessary by clicking the Zoom In button on the right side of the window. |
| 5. | Create a region over the area. |
While depressing the left mouse button, drag the mouse over the area. A dotted rectangle displays as you drag the mouse. Once the entire area has been selected, release the mouse button.
| 6. | With the dotted rectangle still visible, click the right mouse button in the rectangle. A menu of region options appears. |
| 7. | Verify that the region contains the desired information by selecting the Text Inside option from the pop-up menu. A window displays, containing the actual text that you have captured. Make sure that the size of the region is large enough to capture all desired information on different pages. |
| 8. | Click the right mouse button in the rectangle to redisplay the pop-up menu, and select Define Region…. |
| 9. | From the Define Region dialog, select the General tab if it is not already displayed. |
| 10. | Enter a name in the Region Name field. ASG recommends that you preface the region name with rgn_. |
| 11. | Enter a brief description of the region in the Descriptor field. |
| 12. | From the DocuVault drop-down list, select the DocuVault in which the region is to be stored. |
| 13. | Select the region scope. The region scope can be set to one of three levels: |
| • | Global regions can be referenced in any report or subreport definition. Use them to appear in a consistent position throughout many or all of your report files (e.g., over titles or page numbers). Defining regions globally can save you time since you define a region only once, yet can access it for any report application. To create a global region, select <All> from the Group drop-down list. |
| • | Regions specific to Report Groups can be referenced only by report and subreport definitions within the report group. Candidate regions are regions that appear in a consistent position throughout many or all of the reports processed by a particular report group. Limiting the region to a report group simplifies maintenance and usage as fewer regions are displayed. To create a region specific to a report group, select the group from the Group drop-down list on the General tab, then <All> from the Report drop-down list. |
| • | Regions specific to report definitions can be referenced only by the specified report definition and its associated subreport definitions. These regions are generally specific to a report file and are not relevant to any other report definition. To create a region specific to a report definition, choose the report’s report group from the Group drop-down list and the report itself from the Report drop-down list. |
| 14. | Select the Security tab to access controls that enable you to specify the user(s) who can access and modify the region you are creating. |
See the ASG-Cypress System Administrator’s topic for more information.
| 15. | Click OK. |
| 16. | Repeat step 5. through step 15. until you have created all your required regions. |
Examples
These examples illustrate how you can use regions to capture data in a report file.
Example 1
first_page.region_text("Heading") == "Inventory Controls Report"
This example will examine the Heading region on the first page of the incoming report, and will evaluate to TRUE if the text is found in the same case as specified.
Example 2
If you want to cover all variations of uppercase and lowercase letters, you can use either the to_upper_case or to_lower_case options. For example:
first_page.region_text("Heading").to_lower_case == "inventory controls report"
Example 3
region_text ("Heading") match "*Inventory *"
This example will examine a region using the match criteria. The region needs to contain only the word Inventory within the area for the criteria to evaluate to TRUE. Again, the text in this example is case-sensitive.
Example 4
creator == "Sue" && first_page.region_text ("Date") == "May 1998"
This example will evaluate the creator of the document and also will check a region on the first page of the document for the date. Both criteria need to evaluate to TRUE before the report is processed.
Example 5
title match "*Inventory *" || title match "*Stock Control *"
This example will use the OR ( || ) condition to evaluate the title variable and also to evaluate the match criteria. If the title of an incoming report contains the words Inventory or Stock Control, the Report Identify criteria will evaluate to TRUE.
For a complete guide to using expression criteria in the Report Distribution Manager, see RDM String Selection Criteria.