
Creating Subreports
This topic provides information on creating subreport definitions.
Introduction
Subreport definitions specify how RDM is to break up, distribute, archive, and index report files when they are submitted to RDM. You can control subreport creation using a variety of RDM definitions and criteria. This topic provides an overview of subreport creation and delivery options.
Distribution Manager Window
This topic introduces the tabs of the Distribution Manager window that you use to define subreports. The use of each tab is described in detail throughout this topic.
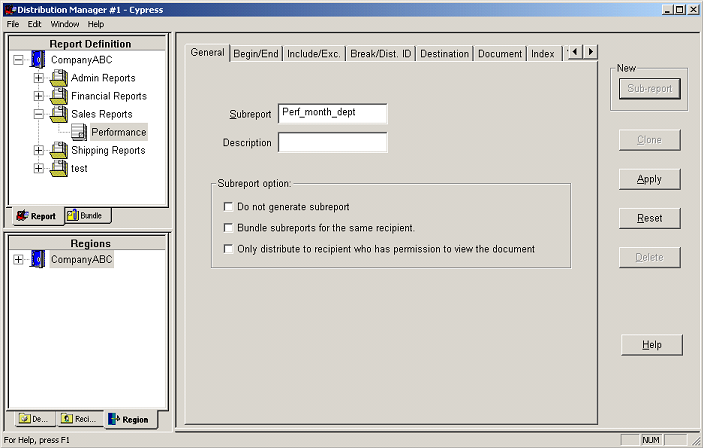
General Tab
These configurations specify the report name, subreport description, as well as subreport options for generation, bundling, and distribution.
Begin/End Tab
These configuration settings specify the beginning and ending points within a report file that RDM is to process. Report files can contain multiple types of reports. The begin and end criteria allow you to create an expression using RDM criteria to identify the starting and/or ending point within the file.
Include/Exclude Tab
Include and Exclude criteria determine which individual pages should be included in or excluded from a subreport. Typically, these controls are used in cases in which desired subreport data is not contiguous. Include/Exclude criteria also can be used in conjunction with the Break criteria.
Break Criteria/Dist. ID Tab
If desired subreport data is contiguous, and each new set of information starts on a new page in a consistent location (as in the sales managers’ subreports), you can control subreport creation and delivery by creating expressions for break criteria, which specify specify how to break large reports into smaller pieces, and by using the distribution ID. These configuration settings enable you to use a single subreport definition to create and deliver multiple subreports, as opposed to using a separate subreport definition for each desired subreport.
Destination Tab
The Destination settings identify the subreport’s destination and define subreport release time and method, the length of time that the subreport is to be available at the destination, security parameters for the resulting subreport, etc.
Document Tab
The Document configuration settings define the length of time that a subreport is to be archived in the DocuVault, and the security requirements for the archived subreport (i.e., who can retrieve the subreport from a DocuVault). These security controls apply to the archived subreport only. You can either set security that is common to all subreports generated by a subreport definition, or use the Auto Role feature to set unique security requirements for each subreport generated by a subreport definition. The Auto Role feature is extremely helpful when, for example, you want to restrict retrieval so that recipients can retrieve only their own subreports, and cannot retrieve any other subreports generated by the same subreport definition.
Data Mining Tab
If you are implementing data mining, the Data Mining tab settings identify and configure the model file that is to be applied to the report file, and to specify how the resulting subreport is to be saved.
The data mining module gives organizations the ability to transparently mine enterprise-class report files, generate customized subreports in Excel or text format, and automatically route the subreport to the appropriate recipient or device. The data mining module is a separately licensed option that enables lights-out, fully automated data mining at the Cypress Server.
Index Tab
The Index configuration settings index all or select pages within the report file, resulting subreports, or both. Indexed pages are stored within the DocuVault and are retrievable based on keys that you add to Cypress indexes. The keys are automatically associated with the selected pages as defined in the subreport definition and can be indexed either using the full text option (which adds every word on the selected page to the index) or by specifying region text to be added to a predefined index created using Knowledge Builder. One or more predefined indexes can be applied as required. You also can add any text string you want to a predefined index, whether it appears within the report file being processed. Once indexed, the report file and/or subreports can be retrieved, viewed, and printed either using Knowledge Builder or within a Web browser using Cypress.Web.
When indexing using predefined indexes, rather than the full text option, you typically associate specific regions with a predefined index. For example, you can create an index named Date that will be used to index all report files processed by RDM. You likely will be using a different region, however, to capture date information for each report application, unless all reports in your enterprise have the data in the exact same location. Using RDM criteria, you specify the region whose contents are to be indexed.
Variable Tab
The Variable configuration settings enable you to declare variable names and control how their values are acquired and updated. This feature is provided to simplify subreport definition creation and maintenance, as using variables instead of constants is efficient, requires less coding, and often eliminates the need to update the subreport definition when a report file changes.
Security Tab
Subreport security enables you to specify which users can modify or edit the subreport definition.
Defining Subreports
This topic describes how to create RDM subreports and how to define the method for delivering them to a device.
Expression Criteria
You can control RDM subreport creation using expression criteria, which are commands that you can use within RDM and other Cypress modules. RDM criteria are composed of Boolean operators and operands (e.g., TRUE, FALSE, AND, OR, and NOT), relational operators (i.e., equal sign [=], less than sign [<], greater than sign [>], and MATCH), and other RDM-specific commands. Using RDM criteria, you can create expressions that define specific actions to be taken (e.g., creating new subreports) when certain report file data is encountered by RDM. For more information, see RDM String Selection Criteria.
As of Version 8.0, you can add logic to the criteria by using RDM functions that use syntax similar to C++. The advantage to functions is that you can implement much more complex logic than what you can with a single expression. This feature helps with complex documents and makes the application more usable. For example, you can include an IF statement with an optional else clause. For more information, see RDM Functions.
These examples illustrate how RDM criteria can be applied to variable data within a report. Many reports, however, are highly structured and do not require searching for specific data on a page. If a report file is composed of reports of identical length, you can create an expression that will result in a new subreport beginning after, for example, every sixth page. RDM criteria expressions are highly flexible and can be implemented in many different ways to achieve the same result.
For example, you might want to break a large report file into subreports based on an actual department number. Using a special RDM structure called a region, you can create an expression that tells RDM to create a new subreport every time the value within the Department Number region changes. A region is used to capture the alphanumeric contents of an area on a page within a report file. For more information, see Creating and Using Regions.
You might want to send certain recipients only report summaries rather than entire reports. In this situation, you can create an expression that tests for the occurrence of the text string SUMMARY at a specific location on a page. If RDM detects the string within the defined region, it includes that page in a separate subreport for the recipients.
Specifying Subreport Delivery
RDM provides powerful and intuitive report addressing and delivery capabilities. It supports three methods for addressing and delivering subreports:
| • | You can explicitly specify a device to receive a subreport. |
| • | You can use RDM functions that enable Cypress to dynamically identify a destination device based on report file content. |
| • | You can use the Cypress Address Book facility to further automate and simplify subreport addressing and delivery. |
For more information, see Distributing Reports and Subreports.
Creating Subreport Definitions
To create a subreport definition
| 1. | Open the RDM. |
| 2. | From the Report Definition Manager tree view, select the report definition that is to reference the subreport definition you want to create. |
| 3. | Click the Sub-report button on the right side of the Distribution Manager window. |
| 4. | Select the General tab if it is not already selected. |

| 5. | Enter the name of the subreport definition in the Subreport field. |
| 6. | Enter a brief description for the subreport definition in the Description field. RDM will use the contents of this field as the archived document title of the subreport if the Description field on the Destination tab is empty. |
| 7. | Select one or more of the options in the Subreport option area: |
| a. | Select the Do not generate subreport option if you want to distribute the report file without breaking it into subreports. |
| b. | Select the Bundle subreports for the same recipient check box to indicate whether RDM should deliver multiple subreports generated for the same recipient and device as a single package. |
| 8. | Select the Begin/End tab, and enter criteria as appropriate. Enter begin or end criteria only if you wish to begin processing the report file somewhere after its beginning or finish processing the file before its end. For more information, see Using the Begin/End Tab. |
| 9. | Select the Include/Exc. tab, and enter criteria as appropriate. RDM uses include and exclude criteria expressions to selectively include or exclude pages on a page-by-page basis. For more information, see Using the Include/Exc. Tab. |
| 10. | Select the Break/Dist. ID tab, and enter criteria as appropriate. The Break criteria and distribution ID are used to control creation and delivery of multiple subreports, but with a single subreport definition. For more information on using the Break/Dist. ID tab, see Using the Break/Dist. ID Tab. |
| 11. | Select the Destination tab, and enter criteria as appropriate. RDM uses the Destination tab to define the subreport’s destinations and/or recipients, length of time it will be available at the destination, and security parameters. The list box at the top of the tabbed page displays information about all output destinations that are to receive the resulting subreport. The area below the list box is used to configure output destination requirements before adding them to the list of destinations. For more information, see Using the Destination Tab. |
| 12. | Select the Document tab, which provides controls for defining the length of time that a subreport is to be archived in the DocuVault and security requirements for the archived subreport. This feature does not control job ticket or document ticket retention or security. |
Users or members of groups displayed in the Access Control list can retrieve and view any DocuVault document created by this subreport definition. For more information, see Using the Document Tab.
| 13. | Select the Index tab, which enables the selected pages within the original report file, resulting subreports, or both to be indexed as they are stored in the DocuVault. Users can them retrieve the archived documents from within Knowledge Builder or a Web browser via Cypress.Web. For more information, see Using the Index Tab. |
| 14. | Select the Variable tab, and enter criteria as appropriate. The Variable tab allows you to create variables that can be referenced in your RDM expressions. |
You can use this tab to set up variable names, identify the region from which Cypress should obtain the value, and control when or under what circumstances Cypress should modify the value. You can use the variable names you create within the attribute criteria of an Auto Recipient criteria expression and in any string selection expression (with the exception of Begin criteria). For more information, seeUsing the Variable Tab.
| 15. | If you are implementing data mining, select the Data Mining tab and enter criteria as appropriate. The data-mining module is a separately licensed option that enables lights out, fully automated data mining at the Cypress Server. See Using the Data Mining Tab for further details. |
| 17. | Click the Apply button to store this subreport definition in the DocuVault. When you click the button, RDM checks the subreport definition to ensure that all the expressions you entered are valid and displays any errors in the window just below the tab area. Each error message identifies the tab where the error occurred and describes the specific error. |
If RDM encounters no errors, the definition appears in the upper-left frame, nested under the corresponding report definition.
Turning Off Subreport Generation
Turning off subreport generation allows you to use the subreport definition tabs to specify a destination for your subreport and create indexes and variables without creating new documents. You might wish to do this, for example, when creating default report definitions that serve as catch-alls for files that do not meet any specific report’s identify criteria. For more information, see Creating a Default Report Definition.
To turn off subreport generation
| > | Select the Do not generate subreport option on the General tab in this example: |
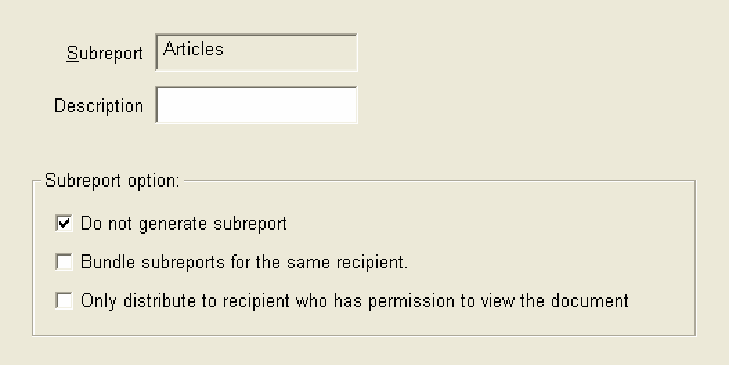
When you turn off subreport generation, all retention and security settings should be configured on the report’s Document tab rather than the subreport’s Document tab. For more information, see Using the Document Tab.
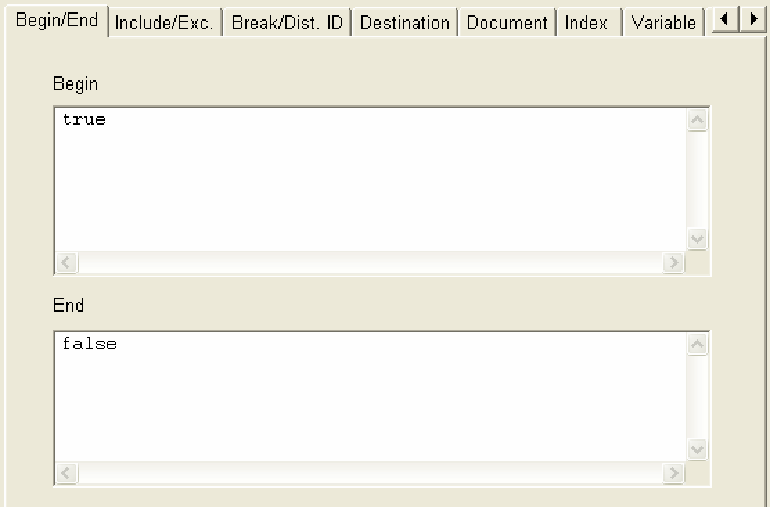
Using the Begin/End Tab
The Begin/End tab is used to control whether all pages in the report are needed during processing or on which page(s) processing should occur. The default value for Begin is TRUE (indicating begin on the first page and include every page). The default value for End is FALSE (indicating finish on the last page and not to exclude any pages).
For a complete guide to using expression criteria in RDM, see RDM String Selection Criteria.
Examples of Begin Criteria
Example 1
This example will begin report processing on the first page of the incoming report:
TRUE
Example 2
This example will begin report processing on page 10 of the incoming report.
page_number == 10
Example 3
This example will begin processing the incoming report when the Subheading region contains the text Product Description:
region_text ("Subheading") == "Product Description"
Example 4
This example will begin processing when the Dept region contains either 10 or 11:
region_text ("Dept") == "10" || region_text ("Dept") == "11"
Examples of End Criteria
Example 1
This example will end report processing on the last page of the incoming report:
FALSE
Example 2
This example will end report processing on page 10 of the incoming report:
page_number == 10
Example 3
This example will end processing the incoming report when the Subheading region contains the text Product Description:
region_text ("Subheading") == "Product Description"
Example 4
This example will close the subreport when the Dept region contains either 1110 or 1111:
region_text ("Dept") == "1110" || region_text ("Dept") == "1111"
Using the Include/Exc. Tab
The Include/Exc. tab is used to specify whether all pages in the report are needed during processing, or on which page(s) processing should occur. The default value for Include criteria is TRUE (indicating to begin on the first page and include every page). The default value for Exclude criteria is FALSE (indicating to finish on the last page and not to exclude any pages).
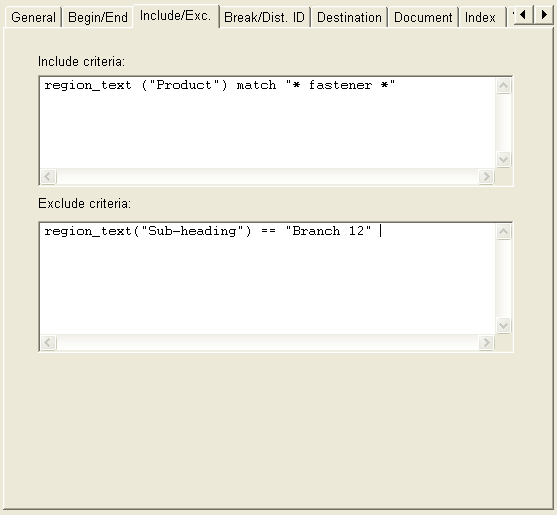
| • | Include criteria specify the data to be included in a subreport on a page-by-page basis. Once Begin criteria evaluate to TRUE, the Include criteria are evaluated for every page within the report file being processed by RDM. By default, this field is set to TRUE to include every page in the subsequent subreport. |
Examples of Include Criteria
Example 1
This example will include any page that contains fastener as part of the text within the Product region:
region_text ("Product") match "*fastener*"
Example 2
This example will include all pages exclusively matching Branch 12 in California:
region_text("Sub-heading") == "Branch 12" && region_text("Area Code") == "CA"
Example 3
This example will include any page for department 1112 that contains either summary or final totals:
region_text ("Dept") == "1112" && ( region_text ("Heading") == "Summary Totals" || region_text ("Heading") == "Final Totals")
The use of the parentheses works the same in RDM expression as in normal algebra: The OR ( || ) operator within the parentheses will be worked first, followed by the AND (&&) operator.
Example 4
This example using the modulus operator (%) will only include even numbered pages:
page_number % 2 == 0
Examples of Exclude Criteria
Example 1
This example will exclude any page that contains fastener as part of the text within the Product region:
region_text ("Product") match "*fastener*"
Example 2
This example will exclude all pages exclusively matching Branch 12 in California:
region_text("Sub-heading") == "Branch 12" && region_text("Area Code") == "CA"
Example 3
This example excludes any page for department 1112 that contains either summary or final totals:
region_text ("Dept") == "1112" && ( region_text ("Heading") == "Summary Totals" || region_text ("Heading") == "Final Totals")
The use of the parentheses works the same as normal algebra: The OR ( || ) operator within the parentheses will be worked first, followed by the AND (&&) operator.
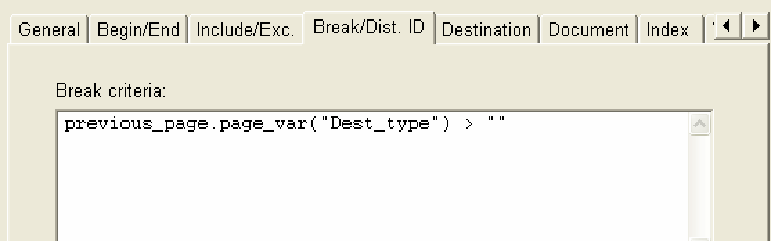
Using the Break/Dist. ID Tab
The Break/Dist. ID tab is used to specify criteria for separating large reports into subreports, as shown in this example:
Separating Reports into Subreports
If a report contains a unique identifier at the beginning of each section, but not on each succeeding page, you can use the distribution ID and break criteria to separate the report into subreports.
Fore example, assume that you have a report file that contains several pages, one page for each agent. In the top right corner of each page, are located two pieces of information: the page number and the agent ID number in the format Agent: ##. The report is easy to break into subreports—simply create a region for the agent ID, strip away the Agent: text, and break the report each time the agent ID changes.
Now, however, assume that some of your agents have more than one page of data. On the first page for each agent, your region still shows the agent ID, but on subsequent pages, it shows continued instead. Breaking the report each time the agent ID changes means that continued pages will be in different subreports than the first page of each agent’s data; in addition, you have no way of associating these pages with a valid agent ID.
A simple way to break the report file into subreports is to create two regions: a Name region that will contain the Agent: text and a Number region that will hold the agent ID. You can use the value in the Number region as the distribution ID. Because this value is unique to each agent and always appears on the first page of relevant data (along with the string Agent:), you can use this value to address subreports and also start a new subreport any time both of these conditions are true:
| • | The text of the Name region is Agent:. |
| • | The text of the Number region is not equal to the distribution ID |
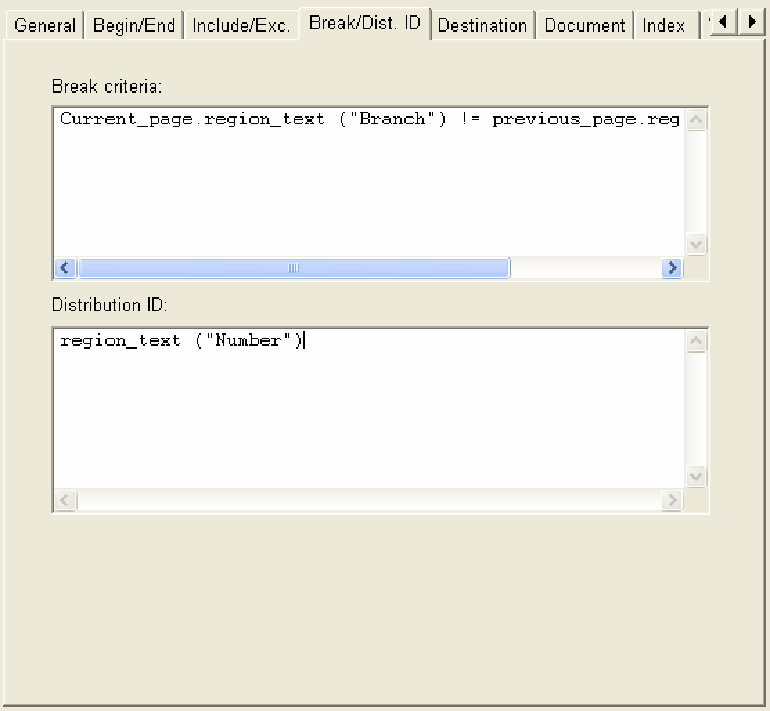
To separate reports into subreports using Break criteria and Distribution ID
| 1. | Enter this expression in the Break criteria field on the Break/Dist. ID tab on the Distribution Manager window: |
current_page.region_text ("Name") == "Agent: " && region_text ("Number") != dist_id
| 2. | Enter this expression in the Distribution IDfield: |
region_text ("Number")
| 3. | Click the Apply button to save your changes. |
Specifying Break Criteria
The Break criteria can be used in situations in which desired subreport data is contiguous and each new set of information starts on a new page in a consistent location. These criteria are repeatedly applied to the report file. Anytime the criteria evaluates to TRUE, the previous subreport is closed and a new subreport is opened. By default, the Break criteria are set to FALSE, therefore, the Break criteria are not evaluated.
Specifying the Distribution ID
The distribution ID (dist_id) is a text string that can be used in conjunction with Break criteria to control a variety of RDM functions. It is a special Cypress variable that allows data from a report file to be retained by RDM, then used to control report processing functions. You can use the same criteria expressions for the distribution ID as are used throughout RDM. For a complete guide to using expression criteria in RDM, see RDM String Selection Criteria.
The distribution ID has two basic functions:
| • | Appending information to a job or document ticket |
| • | Serving as the basis for distribution when you or the user is using the Auto Device and Auto Recipient distribution options |
For example, you can create a distribution ID by combining the department number (variable data) with literal text so that the distribution ID matches output devices already in use. Using a few keystrokes, you can create the distribution ID of DEPT 1112 MGR. When Auto Device is selected, RDM automatically delivers the subreport to the output device with the same name.
You also can use the distribution ID to control other RDM functions. For example, you can use it to index text from a page, identify recipient attributes or destinations defined in the Address Book, etc.
If distributing subreports using the Auto Device or Multi Auto Device options, you can use the distribution ID to identify a Cypress-controlled output device. When the Auto Device option is selected, the distribution ID is a text string that is presumed to exactly match the name of a Cypress-controlled output device.
The distribution ID also can be used in Auto Recipient criteria just as any other variable (e.g., to identify a recipient based on a defined attribute). It can be either the exact text extracted from a report file region, or a combination of canned text and the variable text contained within the region. The latter case is required in instances in which the distribution ID text string does not exactly match the name of an output device or a recipient attribute value.
Examples of Break Criteria
Example 1
This example will compare the contents of a region on the current page with the contents of the same region on the previous page:
current_page.region_text ("Branch") != previous_page.region_text ("Branch")
When the values are not equal, a new subreport is created. This criteria is ideal to use when reports are segregated into sections (e.g., by Branch, Product, or geographic location) and values for the region appear on every page. Each occurrence of the subreport can be individually directed to a separate destination.
Examples of Distribution ID Criteria
Example 1
region_text ("Number")
For each page within the subreport where the Break Criteria has a value of TRUE, the text in the Number region will be retained as the dist_id. It is then your decision whether or not to use the string.
Example 2
"Dept " + dist_id + " Mgr"
Often, the value returned by the dist_id does not exactly match the name of the output device to which the subreport is to be delivered. In these cases, you must create a new dist_id by adding text strings before and/or after the value returned by the dist_id. In this example, the value returned by the dist_id equals 1112; however, the desired output device for this subreport is Dept 1112 Manager. Thus, it is necessary to add "Dept " (with a space following “t”) before the dist_id, and " Mgr" (with a space preceding “M”) after the dist_id. The result will be a new dist_id that contains Dept 1112 Mgr.
Example 3
If using Multi Auto Device, you can specify multiple regions as the distribution ID. For example, you might have two unique ID numbers printed on a page, and deliver the page to two different devices:
region_text("ID_1")+"+"+region_text("ID_2")
Notice the use of plus signs (+) with Multi Auto Device: Regions are separated by plus signs without spaces between them, and a literal plus sign is included so the new dist_id possesses the plus sign.
For information on using Break Criteria and distribution ID in conjunction, see Separating Reports into Subreports.
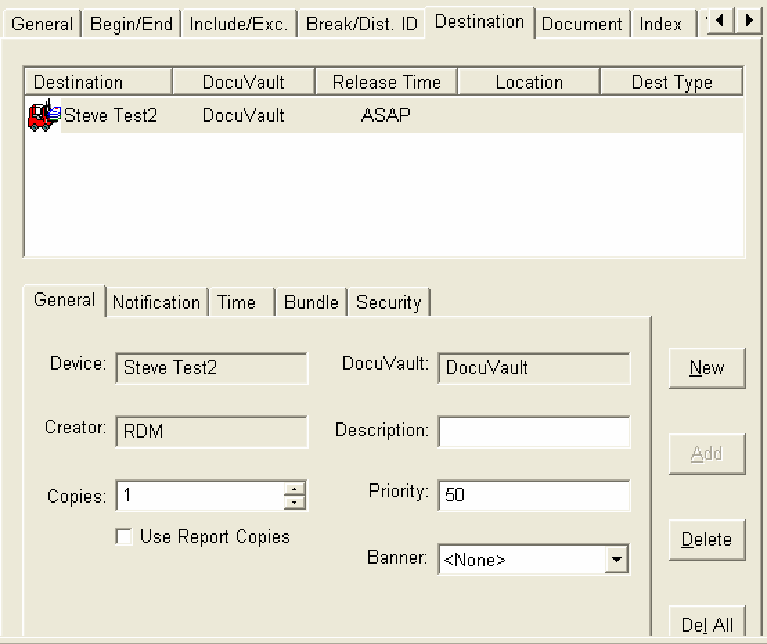
Using the Destination Tab
The Destinationtab is used to specify where the documents are to be directed. Destinations can be printers, fax servers, e-mail servers, recipients or, if the tabbed page is left blank, to the archive.
The Destination tab contains a list of destinations for the subreport and a collection of subtabs. The subtabs change depending on the item selected in the destination list. For example, if a device is selected, the Destination tab displays these five subtabs:
| • | General |
| • | Notification |
| • | Time |
| • | Bundle |
| • | Security |
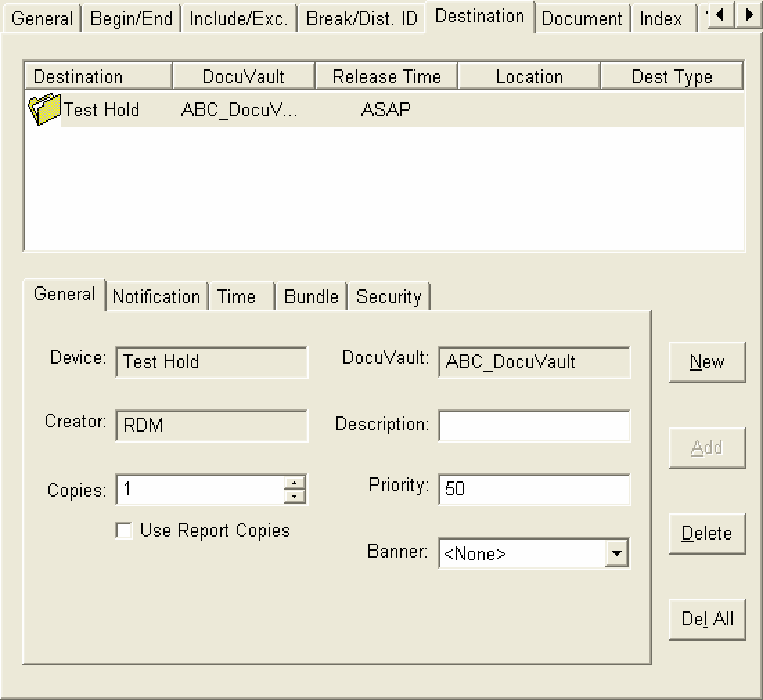
When you create a subreport, you can choose to send it directly to one or more devices and/or one or more recipients. To specify the devices and recipients to which the subreport should be sent, you must configure the Destination tab. You can specify these settings on the Destination tab:
Using the Document Tab
You can specify retention time settings and security requirements on the Document tab, for example:
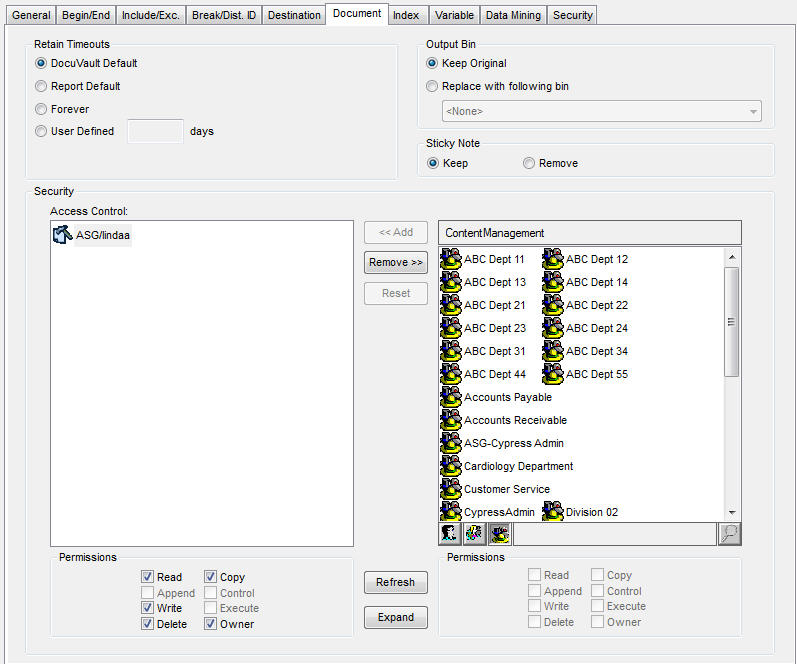
The Document tab’s Retain Timeouts area enables you to choose a document retention setting:
|
Option |
Description |
|
Sets retention time to the DocuVault default established by the Cypress administrator on the Parameter Tab in the Administration Tools module. |
|
|
Sets retention time to the retention time of the original input document. |
|
|
Retains the document indefinitely. Deletion will only occur if an individual with Delete permission for the document views the document within the Cypress DocuSpace and manually deletes it. |
|
|
Retains the document for the specified number of days. For example, if an archive requirement of 2 years is needed, the correct value for retention would be (365 X 2 =) 730 days. |
The Output Bin area enables you to specify the output bin that should be used for the subreport when it is printed:
|
Option |
Description |
|
Keep Original |
Retains the settings specified in the report file. |
|
Replace with following bin |
Overrides original settings with the bin selected from the drop-down list. |
The Sticky Note area enables you to specify how sticky notes attached to the original document should be handled:
|
Option |
Description |
|
Keep |
Keeps the sticky notes included in the document. |
|
Remove |
Deletes the sticky notes from the document. |
You also can set the security requirements for the subreport on the Document tab that define who can access the subreport once it is stored in the DocuVault. See the ASG-Cypress System Administrator’s topic for more information on configuring Cypress security.
Using the Index Tab
The subreport definition’s Index tab enables you to index selected pages within the report file being processed and/or the resulting subreport. You can specify document indexing on the tab, as shown in this example of a subreport index:
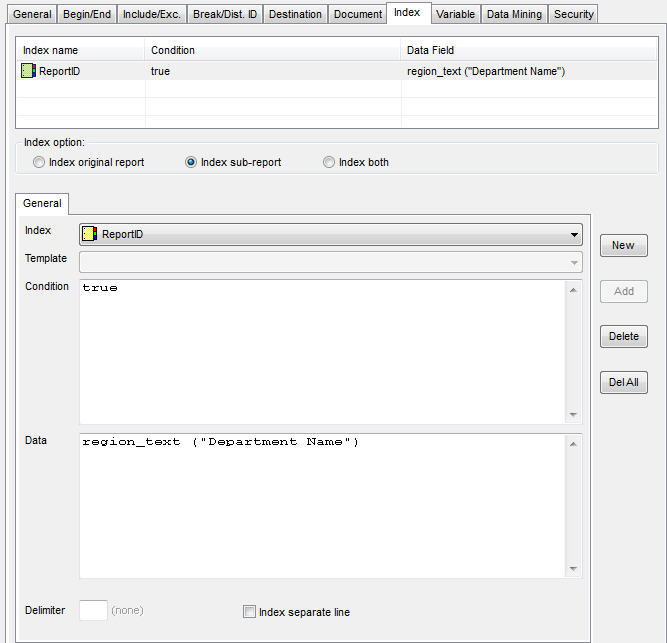
The Index Options control whether the original report, subreport, or both are to be indexed as defined.
When indexing a region that contains a column of data, each line of the region must be indexed separately. This is done by selecting the Index separate line checkbox.
Similarly, if data are linear in nature and separated by a delimiter (e.g., a comma), a rectangular region can be drawn around a row. Rather than selecting the Index separate line check box, you would enter the appropriate separation character in the Delimiter field.
Example 1
This example results in indexing every page that contains the Department Name region. The key added to the index will be the contents of the Department Name region (e.g., Accounting and Biological Sciences).
|
Field |
Entry |
|
Index Name |
Department Number |
|
Condition |
TRUE |
|
Data |
region_text("Department Name") |
Example 2
This example adds the contents only of the regions to the index in which Department Number has a value of 1110 or greater. Using the integer function allows the region to be tested against a numeric value. Otherwise, a value of 2 would be higher than 1110 because of the way characters and numbers are stored. Any pages containing department numbers less than 1110 will not be indexed.
|
Field |
Entry |
|
Index Name |
Department Number |
|
Condition |
(int)region_text ("Department Number") >= 1110 |
|
Data |
region_text ("Department Number") |
Example 3
In this example, the multiple conditions must evaluate to TRUE if any pages are to be associated with the index. Specifically, the page must contain a Department Number greater than or equal to 1110, and Summary Totals within the Report Title region.
|
Field |
Entry |
|
Index Name |
Department Number |
|
Condition |
(int)region_text ("Department Number") >= 1110 && region_text("Report Title") == "Summary Totals" |
|
Data |
region_text ("Department Number") |
Example 4
This example adds the text string Case No. 1453A to the Case Number index for any page where the Customer ID region contains 16583. This implementation allows pages to be indexed using text that does not necessarily appear in the report file.
|
Field |
Entry |
|
Index Name |
Case Number |
|
Condition |
(int)region_text ("Customer ID")== "16583" |
|
Data |
"Case No. 1453A" |
Example 5
Entering TRUE in the Condition field indexes every page within all subreports being processed.
|
Field |
Entry |
|
Index Name |
Product ID |
|
Condition |
TRUE |
|
Data |
region_text ("prod_id") |
Two types of criteria are available to control how report files and subreports are indexed:
By entering expressions in the Condition and Data fields on the General tab, you can control the pages to be indexed and identify the associated text—or key—that will enable RDM to retrieve those pages. When you index a page, you actually are adding the key (for example, Third Quarter Summary) to the specified Cypress index (e.g., Title) along with a reference to its associated page(s) stored in the DocuVault. You can create and add keys to indexes as follows:
| • | Add every word on the selected page(s) using the full text option, |
| • | Add only the contents of regions within the selected page(s) (e.g., Department 1112, Sales Performance Summary, or Branch 10), |
| • | Add any text you define for the selected page(s). The text need not be contained within the selected page or report file (e.g., Case No. 1453A). |
A page can be indexed only if the Condition criteria evaluates to TRUE. To index every page within a report file and/or resulting subreport, ensure that the expressions you create result in a value of TRUE for all pages.
Once the report file or subreport is indexed, RDM automatically stores it in the DocuVault and it can be retrieved using Knowledge Builder or a Web browser via Cypress.Web.
When populating a numeric or date/time data index, an appropriate template can be selected from the Template drop-down list. The value in the Data field will be converted to Cypress’s standard numeric or date/time format based on the specified template.
Using the Variable Tab
The Variable tab enables you to create variable names that you can use when creating RDM expressions, rather than always having to enter a constant string or value. Creating variables is a process similar to the establishing criteria during indexing, for example:
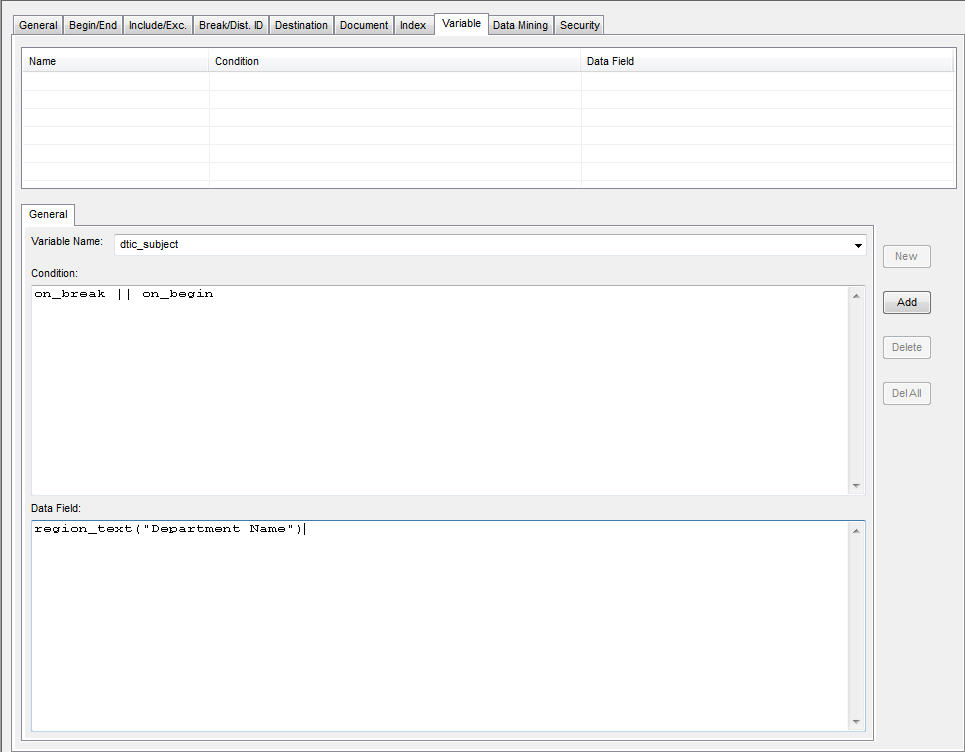
You name the variable and establish a condition for it, and an expression is created in the Data Field, which becomes the value of the variable.
Based on the criteria you enter in the Condition and Data Field, RDM will sets and resets the value associated with the variable name. You can use variable names in any string selection expression (with the exception of expressions within the Begin field on the Begin/End Tab) or within the Attribute criteria of an Auto Recipient criteria expression.
Data field criteria are used to identify the region whose contents you want to use as a value. For example, you might want to use the contents of the Department Name region as a value within Auto Recipient criteria.
Condition criteria control how (or when) to set/reset the value associated with the variable.
Predefined variables are provided to give users improved customization and control of RDM subreport generation, processing indexing, and delivery. They can set any of these variables to extract variable information or to an explicit string, depending on their needs. These predefined variables can be configured within the Variable Tab of an RDM Subreport Definition by selecting the desired predefined variable (via the down arrow next to the Variable Name field), then entering the appropriate Condition and Data Field information.
For a list of predefined variables, see Predefined RDM Variables.
As RDM processes each page, it evaluates the condition criteria. If a criterion is evaluated to TRUE, the expression contained in the Data Field is calculated for the current page and the variable is populated with that value.
You will often want to change a variable’s data once when the report begins processing and again at each subreport break thereafter. To accomplish this, use the keywords on_break and on_begin. The keyword on_begin evaluates to TRUE if processing has just begun; the keyword on_break evaluates to TRUE if a new subreport has been started. Setting Condition to on_break || on_begin means that the condition criteria will evaluate to TRUE in either scenario, and Cypress will repopulate the value of the Department Auto Role variable appropriately.
Example
In this example, RDM uses the contents of the Department Name region as the value associated with the variable name Department_Name. The value, however, is reset when the Begin or Break criteria evaluate to TRUE. This could be used for controlling subreport breaks, indexing the department name.
|
Field |
Entry |
|
Variable Name |
Department_Name |
|
Condition |
on_break || on_begin |
|
Data Field |
region_text("Department Name") |
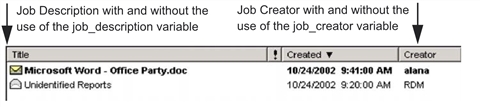
Naming a Job Ticket Dynamically
You can use the Variable tab of a subreport definition to generate meaningful job creator and job ticket names.
By default, a document generated by a subreport definition is given the name specified on the subreport’s General tab. The document’s creator defaults to RDM. However, in many cases, it may be more useful to create a meaningful name for the report; you might also want to know the actual name of the user or system that sent the report.
To specify different values for the job creator and job ticket names
| 1. | Open the subreport definition in RDM and select the Variable tab. |
| 2. | Click the New button next to the General subtab. |
| 3. | To specify a different value for the creator, select job_creator from the Variable Name drop-down list. |
| 4. | Enter the conditions under which this variable should be changed in the Condition field. The variable’s value will be changed only when the criteria that you enter here evaluate to TRUE. In most cases, when you are setting job_creator and job_description, you will want to set the condition to TRUE, so that the variable’s value will be set for each subreport. |
| 6. | To specify a different value for the job ticket name, repeat steps step 3. through step 5. for the job_description variable. In this case, you might wish to set job_description to title. This would give the subreport the name of the original file that was submitted. |
Copying Subreport Definitions
If you need to copy a subreport’s configuration information to a new report in a different group, you can use RDM’s copy/paste feature.
To copy a subreport’s configuration information into a different report group
| 1. | FromRDM’s main tree view, located in the upper left frame of the application window, select the subreport you want to copy. |
| 2. | Right-click the subreport and choose Copy from the context menu. |
| 3. | Right-click the report group into which you want to copy the subreport, and select Paste from the context menu. |
When you paste in the subreport, it retains its original same name in the new report group unless a subreport with that name already exists. If that is the case, RDM appends _<index> to the name, where <index> is a unique integer.
| 4. | After you copy the subreport into the report group, RDM attempts to resolve the subreport’s regions: |
| • | If the source subreport uses only global regions or no regions at all, the copy and paste process completes, and you can modify the report in the destination report group or report as necessary. |
If the source subreport uses a local region that is not defined in the destination report group or report, RDM notifies you, and the copy and paste process is unable to complete:
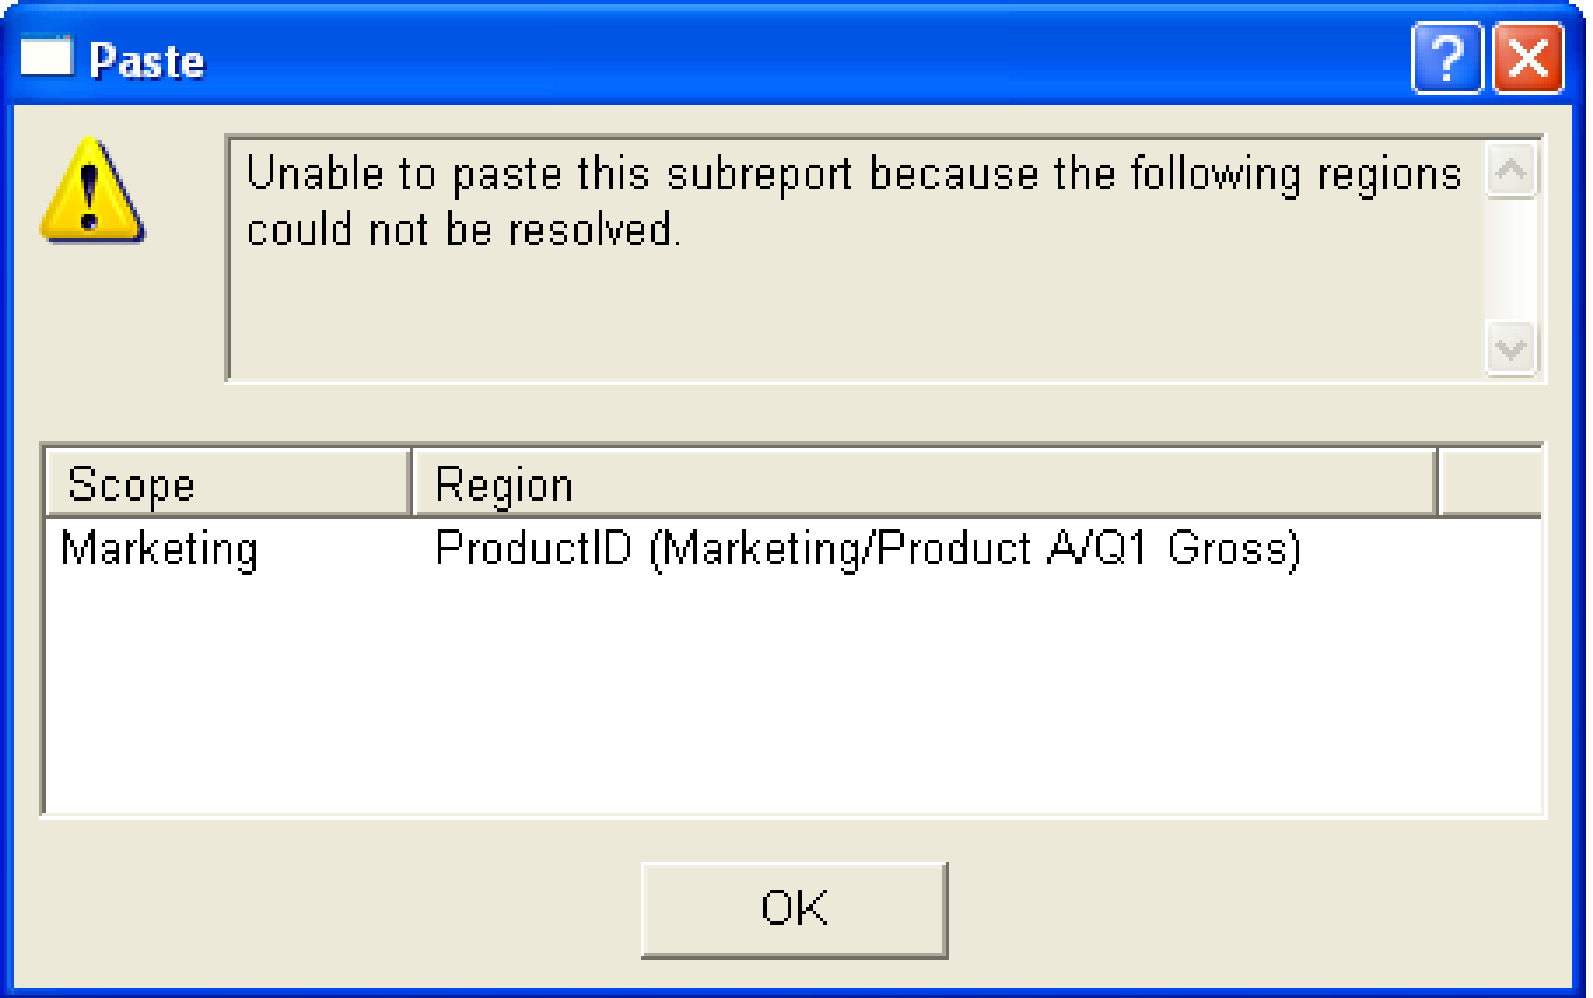
| • | Click OK to close the message box, and use Enterprise Output Manager to adjust the region definitions and scope. |
If the source report uses a local region that is defined in the destination report group, RDM displays a message box that asks whether it should employ the region definition in
the destination report group.
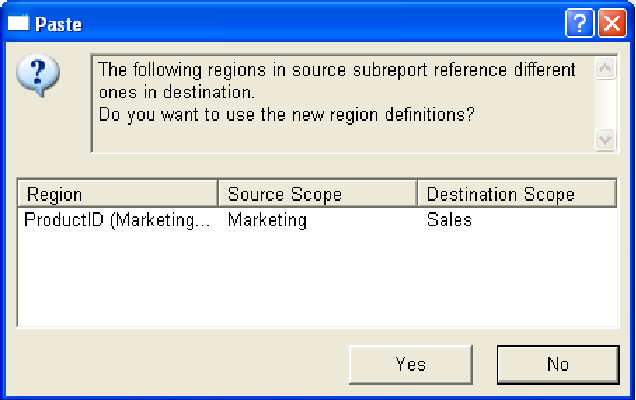
| – | To use the region in the destination report group, click Yes. The copy and paste process will complete, and you can modify the copied report as desired. |
| – | If you do not wish to use the region in the destination report group or report, click No. Open the Enterprise Output Manager and create new region definitions as necessary. |
Using Subreport Last Page Content
Ideally, page content needed to control report routing, indexing, and security occurs at the beginning of the report break (i.e., on the first page of a report). Occasionally, however, the needed information is found at the end of a report break, or on each page of the report.
Although this is unusual, you can easily break and distribute these types of reports by processing the report file using two specially configured subreports associated with unique RDM processors in conjunction with the last_page function.
Specifically, you configure the first subreport to break reports so that the desired control information on a page appears on the last page of each report. You then send the output from this RDM processor to a second RDM processor. You configure the second RDM processor to control report delivery, indexing, and security using the information on the last page of each report (made possible by the last_page function). This process creates temporary subreports.
To use content on the last page of a subreport break
| 1. | Choose or create a report in the appropriate report group. For more information, see Creating a Report Definition. |
| 2. | Select the Identifier tab, and enter appropriate report identification criteria in the Report Identify Criteria field. For more information, see step 9. . |
| 3. | Select the Break/Dist ID tab and specify criteria that will break the subreport when previous_page routing information exists. This will generate a set of subreports that have the routing information on the last page of each subreport. |
For example:
| 4. | Select the Destination tab and specify a secondary RDM Processor to perform the distribution, indexing, and security. For example: |
The report and subreport definitions associated with the second RDM processor will process the temporary subreports based on the information that is now consistently on the last page of each subreport.