
Using the Cypress Pull Printing Thin Client
This topic provides instructions for using the Pull Printing thin client.
Overview
After a print job is queued in a My Print Queue in a Cypress Server DocuVault, you can pull the job from anywhere and print it on a locally-installed printer or send it to a Cypress device. This feature is herein called Pull Printing.
See the Thin Clients Implementation topic for installation instructions. After completing your installation, you can access the Pull Printing client interface using a URL on either your desktop or mobile device.
Sending a Document to Your Personal Queue
You can send a document to your personal queue by using any of these methods:
- Cypress Capture Driver
The Cypress Capture Driver allows you to capture a document in your personal queue.
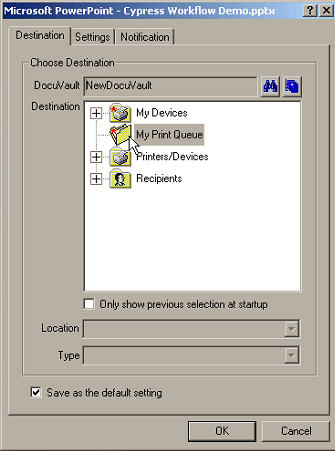
- Cypress Client
When printing a document from a Cypress client (including DocuSpace, Inbox Viewer, Query control, and Inbox control), you can select a personal queue as the destination.
Using the Pull Printing Client User Interface
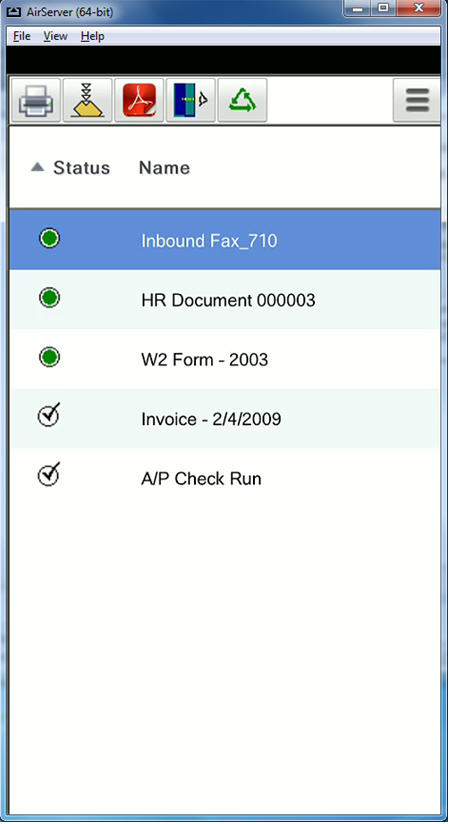
Personal Queue Display. After logging into the Pull Printing client, your personal queue is displayed.
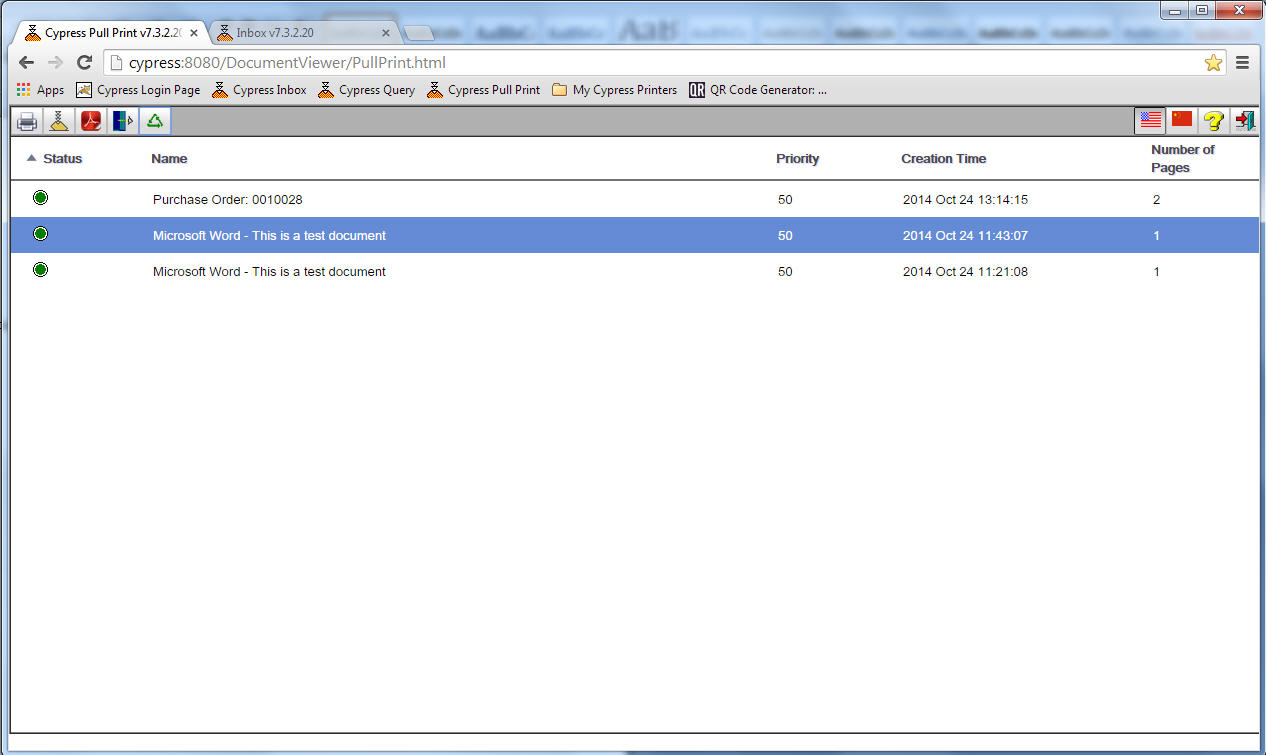
A print job is listed in the queue as an item containing a status icon, a job title (which is the document title), and a number of pages.
A print job can have one of these statuses:
| • | Ready. This status indicates that a job is ready for print. You can only print a job whose status is ready. |
This status changes to printing automatically after you click the Print button to initiate the printing process.
You can change this status to completed manually.
| • | Printing. This status indicates that a printing process was started for the job. Due to the limitation of a Web application, the application cannot tell whether and when the job has been completed or aborted. Thus, you must manually change this status to another status. |
You can change this status to ready or completed.
| • | Completed. This status indicates that a printing job is complete and is ready for deletion based on the retain time of the queue. |
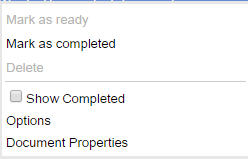
If you want these jobs to be displayed in the queue, check the Show Completed box under the View Menu.
You can change this status to ready if you want to reprint the job or you can delete a job in completed status manually.
All ready jobs are listed at top of the queue from latest to oldest based on creation time. The latest one is selected by default when you log into the client. All printing jobs are listed after ready jobs, from latest to oldest based on start printing time. All completed jobs are listed at the end of the list if you have checked the Show Completed box.
Actions on a Job. You can perform several actions on a job. You can perform these actions by clicking an icon at the top of the screen or by right-clicking to select from a context-sensitive menu:
|
Action |
Icon |
Description |
|||||||||
|
|
|
This action only applies to a job when the job is selected and is in ready status. It launches a new browser window and loads the document as a SVG file in the browser window. After the document is loaded, the browser’s Print dialog pops up. In the meantime, the status of the job is changed to printing and the job is moved down to be grouped with printing jobs in the list. |
|||||||||
|
Send to Device |
|
This action only applies to a job when the job is selected and is in ready status. A dialog to queue the job to a Cypress device is displayed. After sending the job to a Cypress device, a job ticket is queued to the Cypress device and the job status is changed to printing. After the job ticket finishes printing, the job status is changed to complete. The automatic update does not refresh a job’s status. You might need to manually refresh the queue to see the status change. |
|||||||||
|
|
|
This action launches a new browser window and displays the document as a PDF file. You can save the PDF document as a PDF file or print it in PDF format. |
|||||||||
|
View |
|
This action launches a new browser window and displays the document as a SVG file. |
|||||||||
|
Document Properties |
|
This action applies to a job in any status. It displays all properties of a document. |
|||||||||
|
Change Status |
|
This action can apply to a job in any status. You can make these changes:
|
|||||||||
|
Delete |
|
This action only applies to a job if the job’s status is completed and you have checked the Show Completed box. The action will be ignored if any selected job is not in completed status. |


Multiple Selections. You can select and highlight multiple jobs in the queue list. When multiple selection happens, only these actions are available:
|
Action |
Description |
|||||||||
|
Change Status |
This action only applies if the status change is legitimate for all selected jobs. The action will be ignored if the requested status change is not legitimate for any one of the selected jobs. You can make these status changes:
|
|||||||||
|
Delete |
This action only applies to a job if the job’s status is completed and you have checked the Show Completed box. The action will be ignored if any selected job is not in completed status. |
General Actions. These actions apply to the queue in general, regardless of current job selection:
|
Action |
Icon |
Description |
||||||
|
Refresh |
|
This action refreshes the queue by reloading all jobs from the server. After refreshing, the selection will be set to the latest job. |
||||||
|
Settings |
|
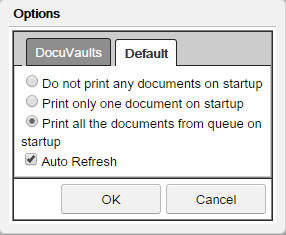
This action brings up a dialog to view and configure these queue settings:
|
||||||
|
Log Off |
|
This action logs you off of the Pull Printing client. |


Queue Update. The print queue is automatically updated if the Auto Refresh box is checked on the Default tab in the Options dialog.
The automatic update only loads new jobs to the top of the list. It will not load the new status of an existing job.
You can manually refresh the queue, which actually reloads all jobs from the server and rebuilds the queue list.
Mobile Client
This example shows the Pull Printing main window on a mobile phone:
Printing a Document
To print a document on a local printer
| 1. | Click the Print icon.  |
The Pull Printing client launches a new browser window and downloads the current selected document in SVG format. After the document is displayed in the new browser window, the browser’s Print dialog pops up.
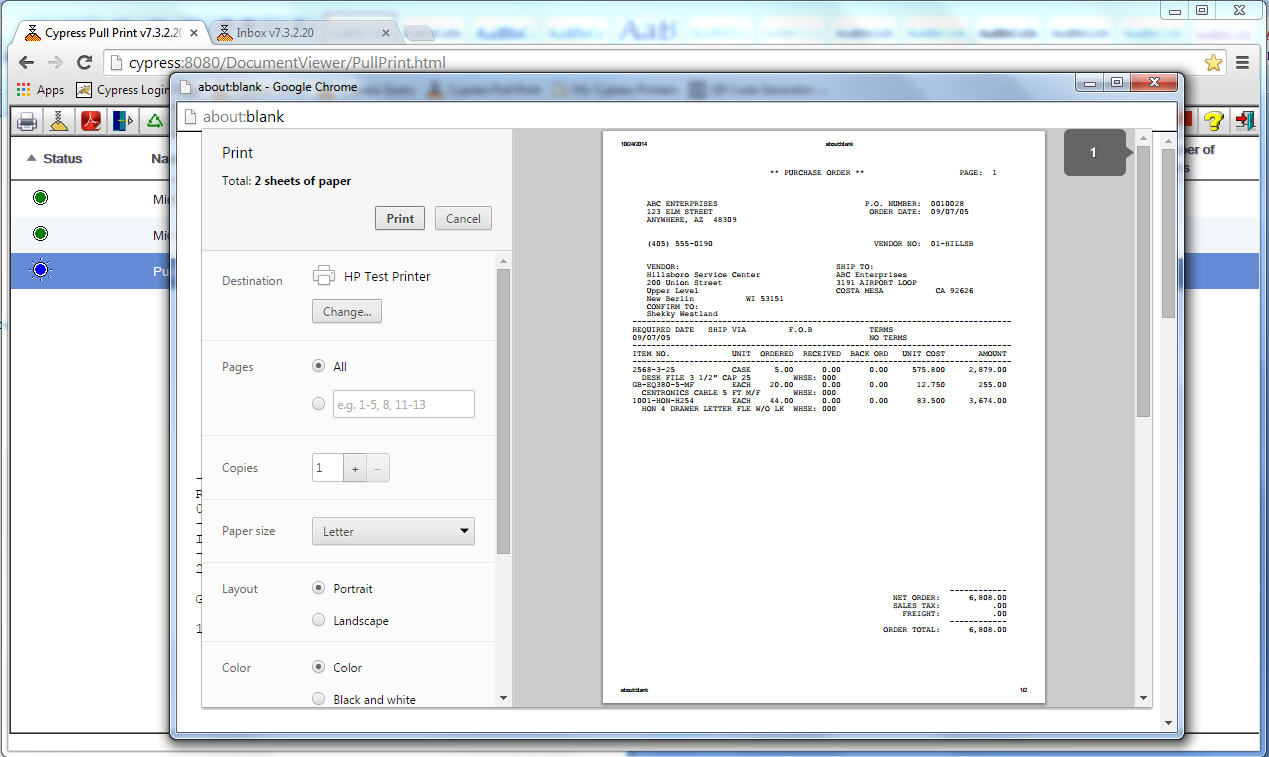
| 2. | Use the Print dialog to configure the print job. |
| 3. | Click Print to send the document to a selected printer. |
In the meantime, the status of the job is changed to printing and the job might be moved down to be grouped with other printing jobs in the list.
On the top of the page in the new browser window, two buttons will be displayed on top of the document: Print Complete and Print Cancelled.
| 4. | Click the Print Complete button to set the status of the current job to complete and close the browser window. |
Or
Click the Print Cancelled button to set the status of the current job back to ready and close the browser window.
To send a document to a Cypress device
| 1. | Highlight the document that you want to send to a Cypress device. |
| 2. | Click the Send to Device icon.  |
A dialog to queue the job to a Cypress device is displayed.
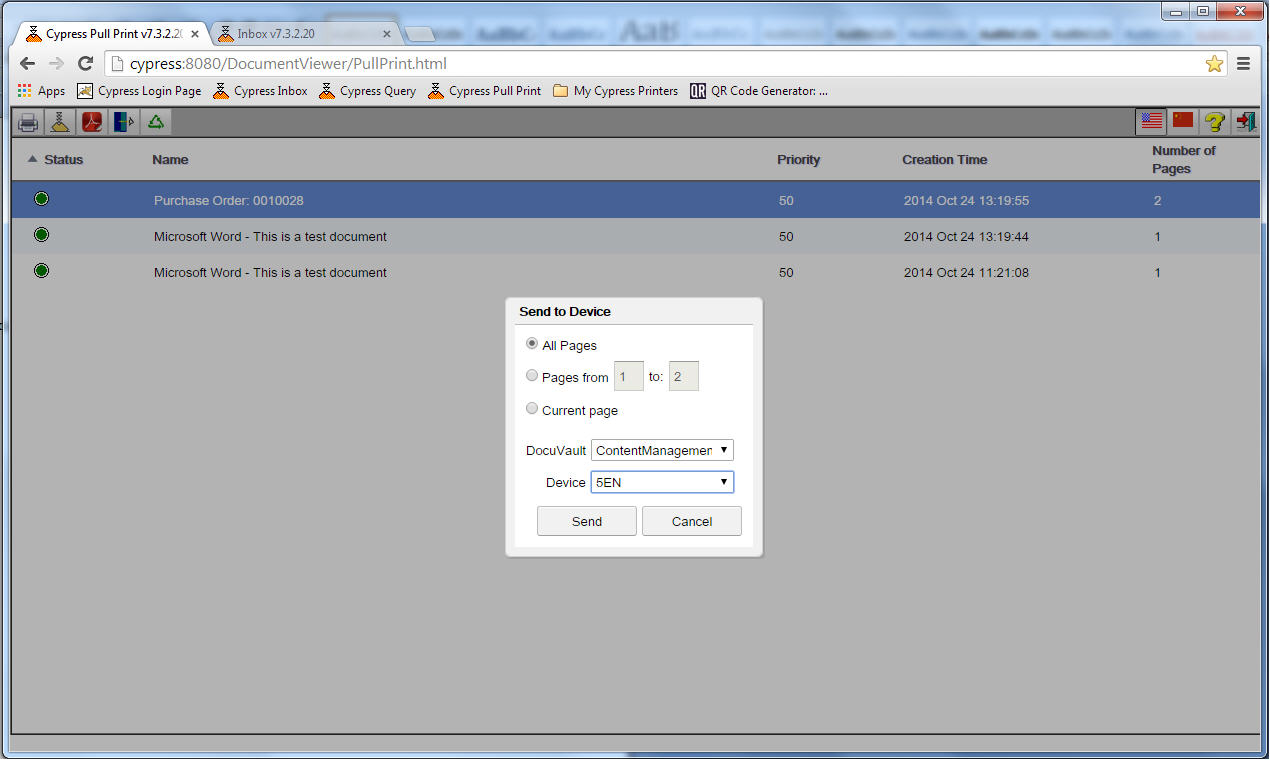
| 3. | Fill out the dialog and select a Cypress device. |
| 4. | Click the Send button. |
A job ticket is then queued to the selected Cypress device and the job status is changed to printing. After the job ticket finishes printing on the selected Cypress device, the job status is automatically changed to complete. However, you might need to manually refresh the queue to see the status change.
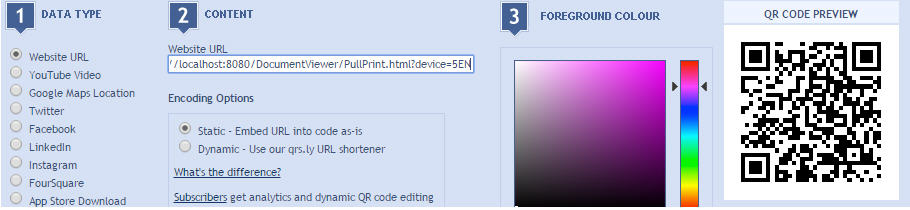
Using Customized URLs
You can also release jobs to a specific Cypress printer from the Pull Printing thin client by using a customized URL.
The default URL for Pull Printing is
http://{host name}:8080/DocumentViewer/PullPrint.html
where host name is the host name of the thin client Web server.
To release jobs automatically (one job at a time or all jobs in the queue) to a specific Cypress printer from the Pull Print queue, use a customized URL. For example, if you want to release your queue to Cypress printer 5EN, use this URL:
http://{host name}:8080/DocumentViewer/PullPrint.html?device=5EN
To control whether to release one document or all documents to the queue is based on the Default settings. Right-click in the Pull Printing queue and select the appropriate option.

These customized URLs can also be created by the administrator as QR code stickers placed on the printers. This would allow users to walk up to a printer, scan the QR code and release their personal print queue to the printer. QR codes can be created online. For example:
Using the Cypress Administration Module
The Cypress Administration module allows you to view and modify personal queues. You can select to view your personal queue or all personal queues where you have read permission.
A queue’s properties are displayed and you can modify the properties if you have write permission to the queue. You must have owner permission if you want to modify the SD of the queue.
The list of jobs in a queue are displayed and you can change their status if you have write permission to the queue. A job in the queue can be deleted if you have delete permission to the queue. A job can viewed in DocuSpace if you have read permission to the document.
You always have all the permissions to your own queue, including viewing a document referenced by a job in the queue, regardless of what the security descriptor specifies.
Layout. The Administration module has a Personal Queue tab, following the Info tab.
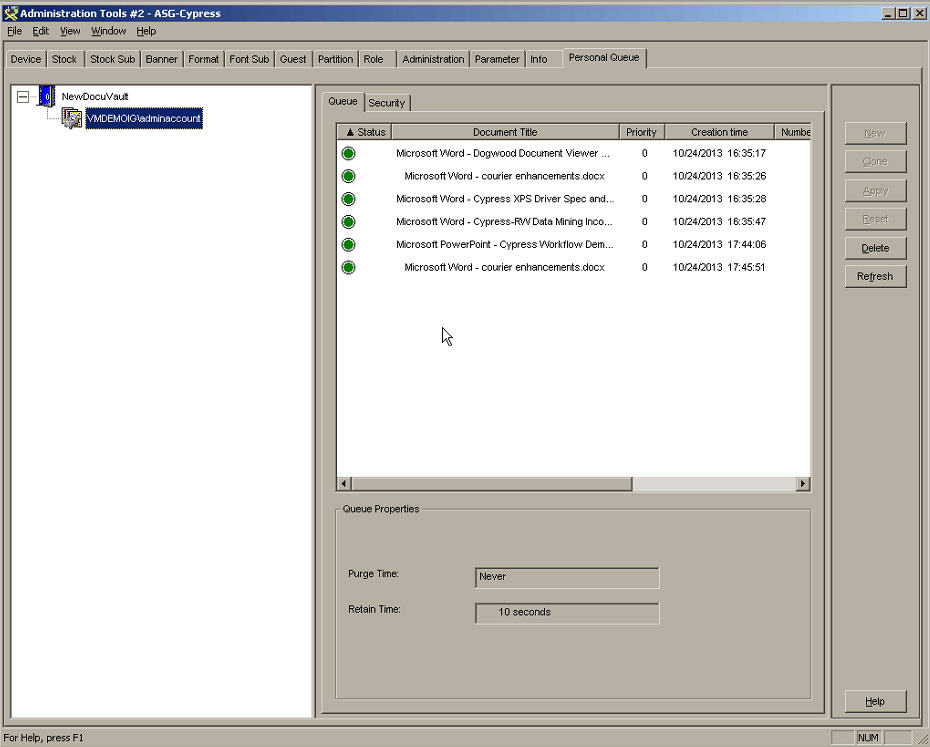
The layout on the tab, which is similar to Output Manager, has these sections:
| • | The left tree view displays connected DocuVault(s) and personal queues under a DocuVault. |
| • | The top right part displays a list view, which shows all jobs in the selected personal queue. |
| • | The bottom right part displays a property view, which shows the details of either the selected queue if no job is highlighted or the selected job if one job is highlighted. |
Tree View. The tree view displays either your personal queue or all queues where you have read permission. By default, only your personal queue is displayed. However, you can right click the tree viewer and select to display all queues, so that all queues to which you have read permission are displayed.
A queue item is displayed by using your domain\user_name as the title. Your personal queue must be displayed as a different icon to distinguish which queues belong to others.
If you have delete permission to a selected queue, you can delete a queue and all its jobs.
List View. The list view displays all jobs in the highlighted queue in the tree view. The list view has these columns:
| • | Job Status (shown in icon) |
| • | Document Title |
| • | Priority |
| • | Job Creation Time |
| • | Number of Pages |
All behaviors of the list view are the same as the corresponding Web Pull Printing client, except the job list is not automatically refreshed. See Using the Pull Printing Client User Interface for more details.
Property View. The property view displays the properties of a selected item, either a personal queue and/or a job. If multiple jobs are selected, the property view is blank.
When displaying a queue’s properties, you can change the SD of the queue if you have owner permission to the queue. All other properties of a queue or a job cannot be modified here.
Default Queue Settings. The retention time and purge time of all the queues are set by the corresponding DocuVault-level settings when a queue is created. The DocuVault-level setting is set in the Administration } Parameter } Retention page.
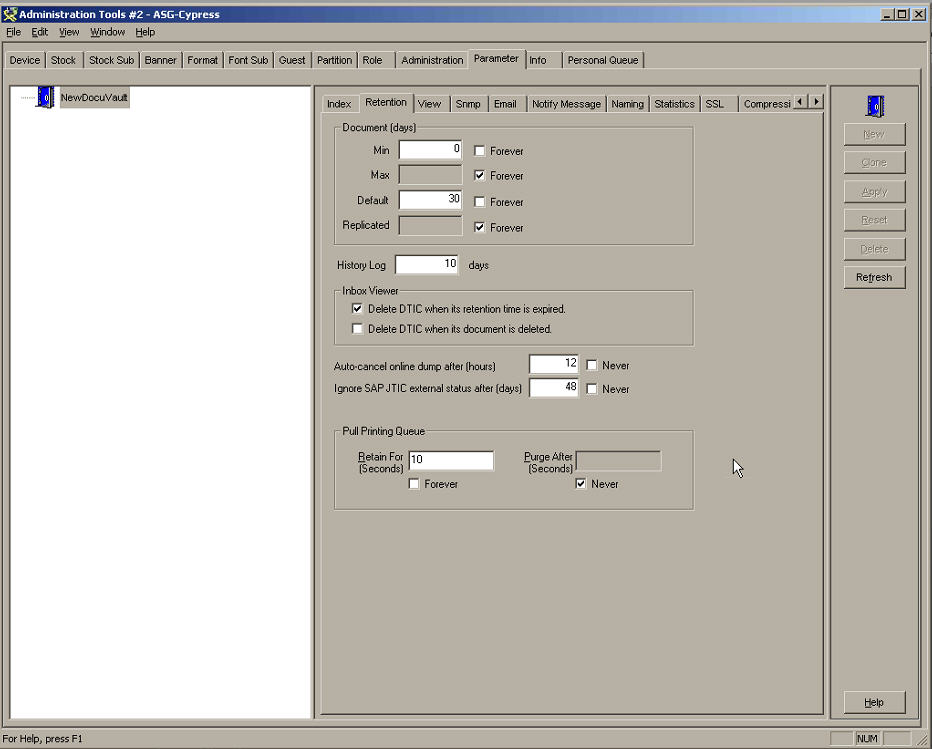
A Pull Printing Queue group box contains two check boxes: Job Retention Time and Job Purge Time. These two settings only apply to a newly-created queue. Modification of the two values only affect an existing queue.
Configuring Pull Printing
Pull Printing Web Application
The Pull Printing client is a Web application written in Java and GWT. It is hosted on a Java Web application server, such as Tomcat.
Configuration
The Pull Printing Web application uses a properties file for configuration.
You can change these settings in the properties file:
| • | A list of URL addresses to Cypress Web services. The first one in the list points to the default DocuVault. Each Cypress Web service points to one Cypress server DocuVault. |
| • | Logon mechanism, with these choices: |
| • | Whether to use single signon. If single signon is turned on, no logon dialog will be displayed and logoff action on the client will be disabled. |
| • | If not using single signon, you can specify to either display a pop-up dialog or use an HTML form for logon. |
| • | Default update rate. |
| • | Default language. |
All text values of the Pull Printing client are stored in separate resource files, which enable them to be easily extracted for translation. When you first log on to a Pull Printing client, the default language set in the application properties file is used. You can change it to another supported language by using the settings on the client. After changing, each user’s preference will be persistent for that user.
| • | Cache settings. |
The Pull Printing application provides a cache mechanism so that frequently-used documents and required fonts can be cached on the Web server, instead of loading from the DocuVault.
The document cache can be turned off to protect sensitive information. If the document cache is turned on, the document content is encrypted and its title is changed before saving to disk.
Cypress Web Service
One Cypress Web service can only connect to one DocuVault. To support multiple DocuVaults, multiple Web service applications must be installed.
Configuration
An XML properties file is used to configure a Cypress Web service.
Cypress Server
Personal Queue Creation
A personal print queue is created automatically when you first print a job to the queue. The newly-created queue will inherit the default settings, such as retain time and purge time, from the DocuVault.
Personal Queue Properties
A personal queue has these properties:
| • | Retain Time (Administration } Parameter } Retention) is set to 10 seconds by default (see the “Default Queue Settings” section in Using the Cypress Administration Module). |
| • | Purge Time (Administration } Parameter } Retention) is set to never by default (see the “Default Queue Settings” section in Using the Cypress Administration Module). |
| • | Security (Administration } Personal Queue } Security) determines who else can access the queue; for example: |
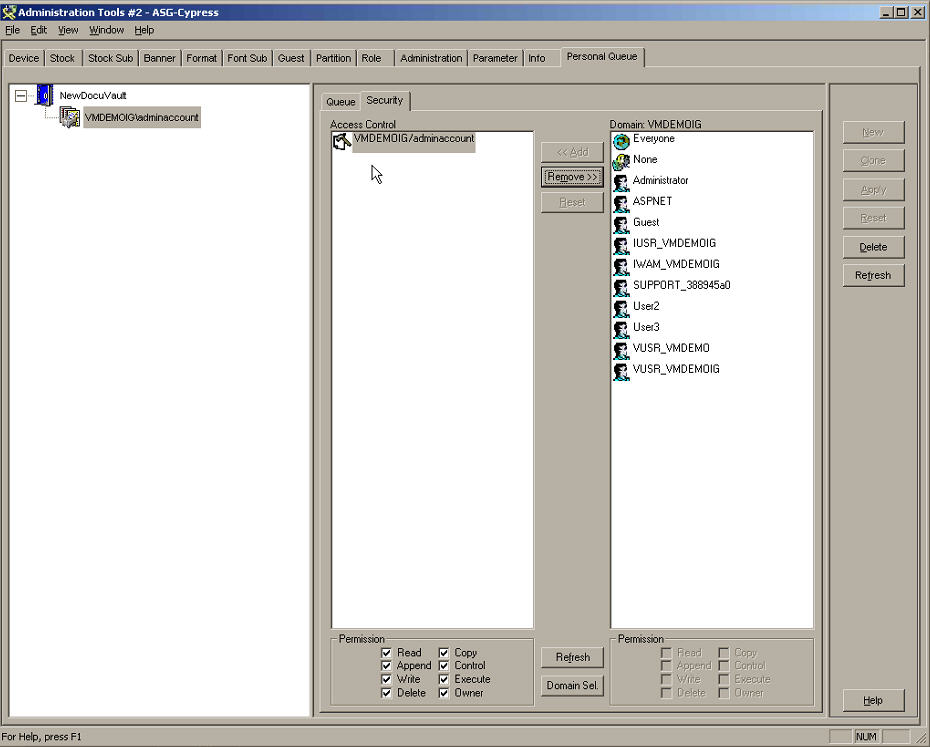
The user who is associated with the queue will always have full access permission to the queue regardless of the Access Control List setting.