
Overview
The ASG OM Service comes with a new web user interface and a Cypress Cloud Driver. The cross-platform service enables you to focus on jobs instead of devices. The service offers more intelligence on the selection of the device or destination, instead of the traditional way of selecting a printer. The Cypress Cloud Driver, similar to the capture driver, creates a PDF of the document and sends it to the OM Service. The OM Service also enables you, as an administrator, to create new rules and grant administrator privileges to users for managing the devices at various locations.
In addition, the OM Service provides these features:
| • | Updating the list of devices automatically. |
| • | Filtering using the devices attributes such as location, which is based on country, city, and so on. |
| • | Creating jobs using the print request. |
| • | Linking each job to a device. |
| • | Marking the job as released after sending it to the output. |
| • | Reopening finished jobs. |
| • | Finding a print destination: A job can be sent to a printer or to a virtual group. |
| • | Filter: A user should be able to find a printer by printer attributes, such as 'city', 'department', and wildcard full-text search. The current location of the user might be captured when the user logs on, or manually set by the user in the profile. The printers in the current location of the user, by default, will be in the search filter when searching for a printer. |
| • | Virtual Group: A device attribute can be used as virtual group so that printers are grouped by the value of the attribute. A print job can be delivered to a virtual group; and the OM service chooses the best available printer in this group for the job. |
When distributing a document to a device, the sender has the option to specify a user as the receiver of the job and whether the job should be 'released' or 'Held'. If a job is set as 'Held', the job is targeting for a device but not queued for the device. The receiver must manually release 'Held' job, which means queuing the job to the device.
Only the receivers of the jobs can release their own 'Held' jobs and view the content of their job.
The user can view the number of jobs that are currently queued.
The user knows the number of jobs or pages in the printer queue before the job is released. After a job is released, it is displayed in the 'Queued' jobs list for the user. After a job is printed, it is displayed in the 'Delivered' list.
A job stays in 'Delivered' list until the user clicks 'collected' on the device, then the job is set as 'Complete'. A user may query for all 'Complete' jobs.
A user may select a printer or a virtual group and upload a PDF document or multiple PDF documents to be delivered to the selected destination.
OM User Interface
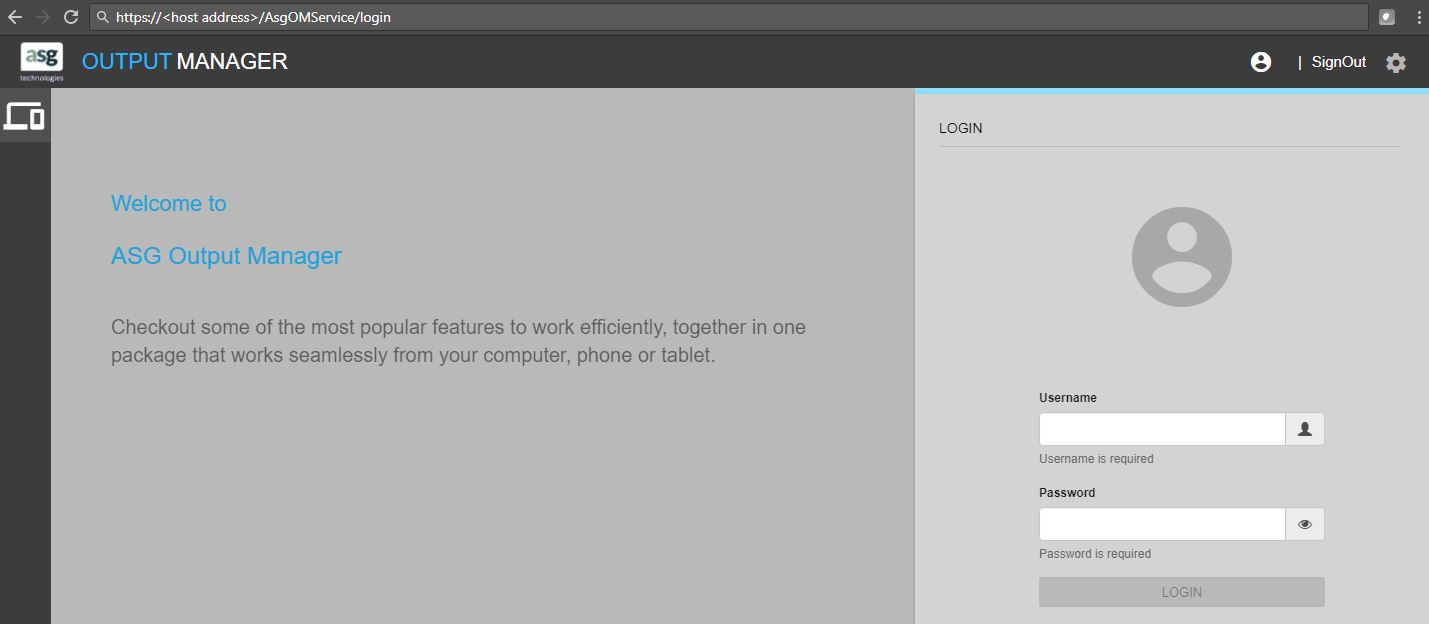
Enter the URL address, in the format https://<host address>/AsgOMService in the address bar. Enter the Username and Password and click LOGIN.
In the OM user interface, the left pane displays Jobs View icon and Administration icon (if you are an administrator). In addition, you can search the devices and create print request. The right pane contains the job status, wherein a print job may have one of the four status: Unreleased, Pending, Delivered, and Completed. A print job can have one of the sub-status. You can use the refresh icon to refresh the status of the jobs. When the user clicks on a job, a job details pane displays the details about the job. Click View button in the lower portion of the job details pane to view the document.
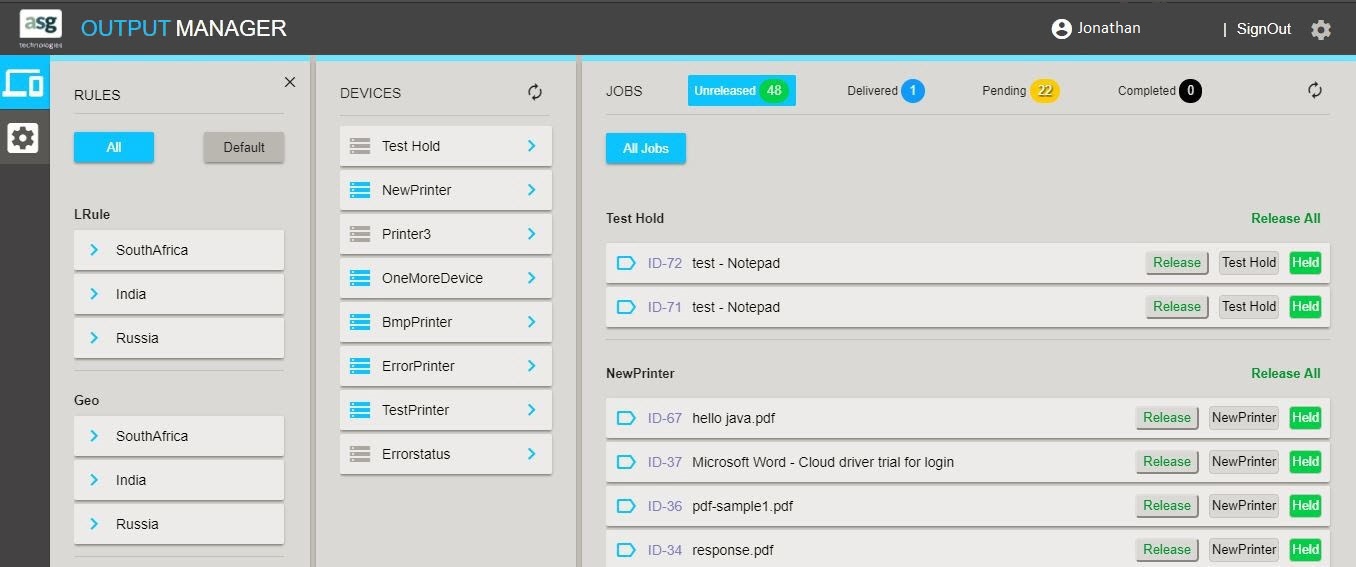
Jobs View
The Jobs View icon notifies you when other users create new jobs (through print request or copy functions) or update existing jobs or print a job from the Cloud Driver to a device. The notification happens through a text label in the bottom of the OM UI.
The navigation bar contains the Job and Admin modules. As an admin user, you can switch to the admin module from the navigation bar. You, as an admin, can set attributes format, and specify attributes with devices.
When a print job is created, it can be in one of these sub-status: 'In PQ', 'Unreleased', or 'Releasing'.
| • | Unreleased job view status may have either one of the two sub-status: |
| – | In PQ: a job is in a personal queue, it has no device associated with the job. The job can be changed to Unreleased or Releasing status when you deliver the job to a device. |
| – | Held: a job is associated with a device, but has not been queued for the device. It waits for the receiver of the job to release using the Release button. The job is removed from the display when you click the Release button. |
A user should be able to release all jobs in a device (click Release All link at the top-right corner of the device) or an individual job (click Release button within the specific device).
You are notified through a text label in the bottom of the OM UI when you perform these scenarios:
| • | Create Print Request for a device or group of devices-In the Devices pane, expand the target printer or group of printers and click Create Print Request. A new job is created, with the notification pane displaying the name and updated status of the target device. |
| • | Moving or copying a job to a device or group of devices-When you drag and drop a device or group of devices, select Move or Copy as suitable. The selected job is moved or copied to the target device and displayed in the list of the target device. The notification pane displays the name and updated status of the target device. |
| • | Pending job view status may have these sub-status: |
| – | Releasing: a job is queued for the backend Cypress server. An internal process in the OM service delivers the job to a Cypress device in the backend for printing. After the job is sent to Cypress and a JTIC is created, the job status will be changed to Queued. |
| – | Queued: a job is queued for a Cypress device in the backend and will be sent to the physical printer. The job status will be changed to Printing if Cypress starts to print the job; it can be changed to 'Error' if something goes wrong with the job. |
| – | Printing: a job is in the middle of printing. |
| – | Error: a job encounters an error before or during printing. |
Using the Show status drop-down, you can choose the suitable status to display the device and their status. When the Release button is clicked on a specific job, it is removed from this view and placed in the Pending jobs view.
| • | Delivered job view status may have one sub-status: |
| – | Delivered: a job is printed and ready for picking up. You must use the OM UI to mark a job complete after picking up the printout. |
When the user clicks the Received All link at the top-right corner of the device, all Delivered jobs in the device are removed from this view and placed in the Completed jobs view.
| • | Completed job view status may have one sub-status: |
| – | Complete: a job delivery process is complete. |
Administration
The Administration icon on the OM user interface consists of RULES tab, PERMISSIONS tab, and BACKEND tab. This icon is displayed or hidden based on whether the logon user is in the administrator role.
RULES
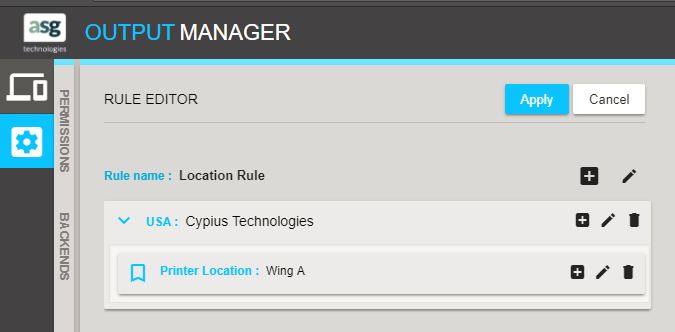
You, as an administrator, can customize the management of devices at various locations through Administration > RULES. You can map or associate the devices based on locations, departments, device types, and so on using the rules you create. In addition, you can edit or delete the rules.
The rule hierarchy, as shown in this table with examples, consists of:
| • | Rule Name-Name of the rule. For example, you can give the name as Location Rule or Department Rule or Device Rule. |
| • | Key Name-Name of the attribute. For example, you can give the name of a country, state, city, office, printer location, device type, and so on. |
| • | Value-Value of the attribute. |
A rule can have a single key name with multiple values. Refer the Department Rule or Device Rule examples in the table. Within a single key, you can create hierarchical keys and values. Refer the Location Rule examples in the table and the figure below.
|
Rule Name |
Key Name(s) |
Value(s) |
|
Location Rule |
Country > State > City > Office |
US > New York > Rochester > Cypius Technologies |
|
Country > City > Office |
UK > London > Cypius Technologies |
|
|
Office > City > Branch > Printer Location |
Cypius Technologies > Washington > Office1 > Left Wing |
|
|
Office > Printer Location |
Cypius Technologies > Wing A |
|
|
Department Rule |
Department |
Admin, IT, Facilities, Stationery, Marketing |
|
Device Rule |
Type |
HP, Canon, Xerox |
Configuring Rules
| 1. | Click Create New Rule (Administration > RULES). In the RULE EDITOR pane, enter the rule name in the required filed and click the check mark next to it. |
| 2. | Click the plus icon to add new element(s). |
| 3. | Enter key name and value, and click the check mark next to the fields. |
| 4. | Click Apply or Cancel as suitable. |
Click the edit or delete icon to edit or delete the element or key name or value as suitable.
When you click on a rule (Administration > RULES), a Devices pane on the right displays all the devices that are already associated with the selected rule. When you click the Not associated button in the Devices pane, the pane displays all the devices which are not associated with the selected rule. When you click a device in the Devices pane, a Device Details pane on the right displays all attributes assigned to the device.
You can also drag the respective printer(s) one by one from the Devices pane and drop into the Rules pane to associate with the rule you created.
You are allowed to drop a device to any hierarchy level of the rule.
If rule hierarchy is Country, City, Office, then any device or device group can be dragged and dropped into “Office” element in the rule. After dropping, appropriate rule attributes are assigned to a device. If device already contains attributes from current rule, then that attributes are replaced with new attributes chain.
PERMISSIONS
You, as an administrator, can search for a user and assign the Admin role to the user through Administration > PERMISSIONS tab. To change the role:
| 1 | Enter a user name, at least two letters, in the Add User search box. All matching users from the OM Service repository are displayed in the search box drop-down list. |
| 2 | Select the user, whose role is to be assigned as Admin, from the drop-down. |
| 3 | Click Add. |
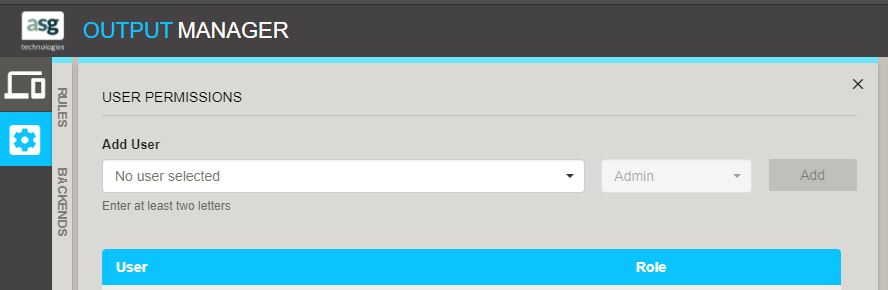
You can remove the Admin role assigned to a user using the Delete icon.
BACKEND
You, as an administrator, can view a list of available backend through Administration > BACKEND tab. You can also add a new Cypress backend to the list or remove a Cypress backend from the list.
| 1 | To add a new Cypress backend: |
Enter the URL value and a name in the corresponding fields.
| – | URL format should be: http|https://hostname:port/Service/api. |
| – | The Name field should start only with an alphabet. |
| – | You cannot add an existing URL or Name to the list. |
| 2 | Click Add. |
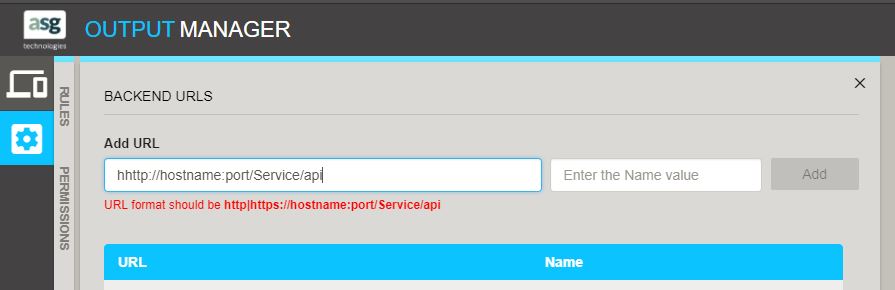
You can remove a Cypress backend from the list using the Delete icon.
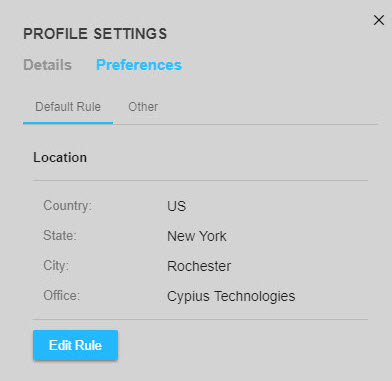
User Profile Rule Preferences
Setting and Editing Default Rules
As a user, you can set your default rule and the corresponding attribute values. To do this:
| 1 | Click the gear icon in the top-right corner of the OM UI screen. |
| 2 | Click Preferences > Select Rule. |
| 3 | Select a rule from the list of available rules in the Rule name drop-down menu. |
| 4 | Select the attribute value(s) for the selected rule from the subsequent drop-down menus, as suitable. |
| 5 | Click Save. |
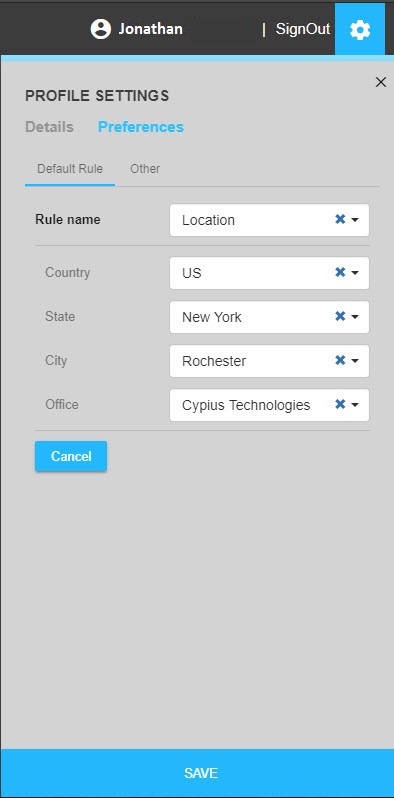
Click Edit Rule to edit the rules or their values if needed.
Scenarios
These scenarios are applicable when you access Jobs View > RULES:
| • | Jobs View> RULES―You can view all the available rules. |
| • | Jobs View> RULES > Click any attribute value―You can view only the devices and print jobs that correspond to the selected attributes. |
| • | Jobs View> RULES> All―You can view all the available devices and print jobs. |
| • | Jobs View> RULES> Default―You can view only the devices and print jobs that corresponds to the default rule and attributes you have set in the PROFILE SETTINGS pane. |
Introduction to Cypress Cloud Driver
The Cypress Cloud Driver, similar to the capture driver, creates a PDF of the document and sends it to the OM Service. The Cypress Cloud Driver also enables you to:
| • | Use printer properties to configure an endpoint. |
| • | Send the captured files to the OM Services as a print request. |
| • | Select a printer when a print request is created. |
| • | Select a virtual printer group as the destination when creating a print request. |
| • | Display your current location as the default printer when selecting a printer or virtual group for printing. |
See Cypress Cloud Driver topic for more information.