Print Services
This topic introduces the Printer Dashboard and its associated services.
Overview
The Print Services feature contains several modules:
|
•
|
Dashboard and Printer Manager UI—it can be configured to talk with either a Print Service or an on-premise Print Agent or a Cypress Print Stub. |
|
•
|
Print Service—it is a REST service that runs on one or multiple on-premise print agents. The Print Service offers more user-friendly features to identify and manage printers. |
|
•
|
On-Prem Print Agent—it is a REST service that is deployed on premise to communicate with printers on intranet. |
|
•
|
Cypress Stub—it is used for interface with a Cypress server to provide the same REST API as the print agent, for a Cypress customer. |
|
•
|
Cypress Server (optional)—when connecting with a Cypress Stub, Dashboard and new Printer Manager web UI will be available for a Cypress customer. |
|
•
|
The Output Dashboard—it is a Web UI application that presents dashboard for printer status with alerts on abnormal conditions, job status, and some limited printer management capabilities for alert situation.
|

Refer the What's New > Installation and Upgrade > Installing the Print Services topic to deploy the Print Service/ Print Agent/ Cypress Stub and the Printer Dashboard UI.
Once the required components are installed, ensure they are up and running. Open a browser and try to access the localhost. The Dashboard login page is displayed.
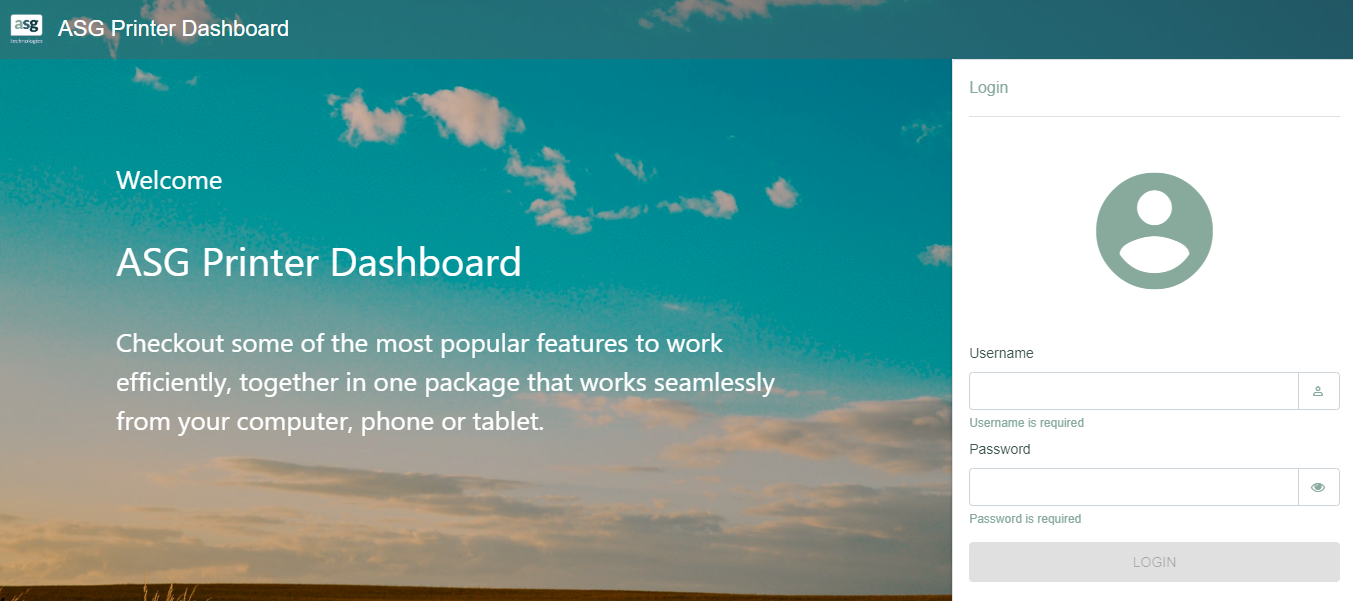
If you are an administrator or a controller, you can view the landing page when you log into this Dashboard UI. Else, User is not authorized message is displayed.
You can:
|
•
|
Specify the role for a user or several users. |
|
•
|
Configure the Dashboard UI to connect to either the on-premise print agent or the printer stub for Cypress. |
|
•
|
Access Cypress similar to accessing the on-premise print agent. |
|
•
|
Configure an interval so that the print agent periodically searches all subnets for new printers.
|
ASG Printer Dashboard
The ASG Printer Dashboard consists of:
Dashboard tab
The Dashboard tab supports these actions on a printer:
|
•
|
Number of printers with alerts (issue detected by SNMP query or printer is not reachable). |
|
•
|
Number of printers with warnings (status detected by SNMP query). |
|
•
|
Number of printers have attention status. |
|
–
|
Number of queued jobs exceeds a configurable threshold. |
|
–
|
Printer has some faulted jobs. |
|
•
|
Printers not being used for a configurable time period. |
|
•
|
Number of new printers detected from auto-discovery. |
Logging into Dashboard UI
When you log into the Dashboard UI application in a browser, the landing page is displayed containing five clickable widgets. The widgets show the count of the printers with their respective status:

|
•
|
New—A printer is newly discovered but has not been validated and accepted by an administrator. |
Note: This New widget is available for administrators only.
|
•
|
Alert—The physical printer is offline; no job can be printed to the printer. |
|
•
|
Attention—Attention is needed, the printer may have some issues related to software, such as too many jobs are queued, some jobs were failed, and so on. |
|
•
|
Warning—The physical printer has one or many warnings (for example, toner low), a job can still be printed. |
|
•
|
Inactive—No print job has been sent to the printer for a specific duration (default 30 days). |
When clicking on a widget, the list of printers that belongs to the category is displayed on the Printer panel. By default, all fields of the printer are displayed and in alphabetic order based on the name of the printer.
The UI updates the landing page and the printer panel automatically every 60 seconds by default; and a user will be able to manually refresh the page by clicking on the Refresh icon at the top-right corner of the panel.
If the printer list is empty, There are no printers to display message is displayed on the printer panel.
Alert Messages:
Alert messages are displayed in the Dashboard UI when:
|
•
|
Your Cypress license is due to expire in less than 10 days.
|
|
•
|
An Agent is down and is not communicating with Print Service. |
Printer Alerts and Warnings
Printers can report various conditions as Alerts (critical issues) and Warnings (non-critical issues).
Alert messages can be for conditions such as no paper, no toner, offline, front-door open, and paper jam.
Warning messages can be for conditions such as low paper, low toner, missing input tray, missing output tray, and empty input tray. These are conditions that need attention, but do not prevent the printer from printing documents.
To get printer status:
When you click on any widget you are redirected to the printers’ panel. The printer panel table displays only printers with appropriate status.
Printers tab
The Printers tab displays all the printers and their associated details. The details include: Agent name, Name, State, Printer Status, Queue Status, Address, Port, Print Language, Protocol, Duplex, Color, Creation Time, Last Print Time, Modification Time, Model, and Description.
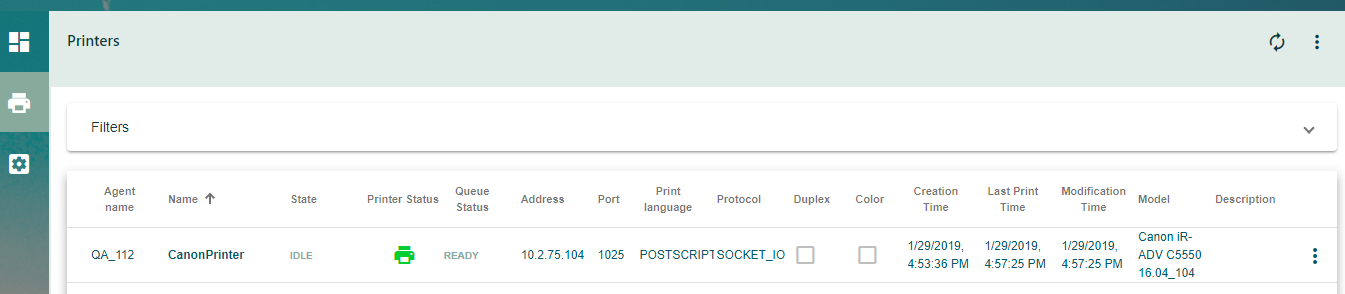
Click Actions context menu at the end of each printer row to perform these actions:
Some of the actions are role-dependent and may not be available.
|
•
|
Update status—Updates the status of the printer. |
|
•
|
Edit Printer—Edits the details of the printer (available only for the administrators). |
|
•
|
Open Jobs—Displays the details of jobs associated with each printer. |
|
•
|
Create Job—Creates a new print job. You can select a receiver from the list of users. By default, the receiver is set to 'self'. |
|
•
|
Suspend queue—Suspends print queue immediately or after current job (available only for the administrators and controllers). |
|
•
|
Resume queue—Resumes the print queue (available only for the administrators and controllers). |
|
•
|
Accept—Accepts a new printer (available only for the administrators). |
|
•
|
Delete—Deletes the printer (available only for the administrators). |
To get printers by filter:
The printer panel table displays all the printers available. Expand the Filters pane to view the options available under the Warning Type drop down.
You can check or uncheck the options available in these drop downs.
For example, when you check the Warning filter button (under Warning Type) the printer table displays only the printers that are in warning status. When you check the Warning and Attention filter buttons the printer table displays only the printers that are in warning and attention status.
Creating Jobs
From the Dashboard UI, you as an administrator or a controller, can create a new print job.
|
1.
|
Click Actions context menu at the end of the suitable printer row. |
|
3.
|
Browse to the desired pdf file and enter the other details in the relevant fields. |
The Dashboard UI can create a job for only one document at a time.
A print queue manages the jobs for a printer. The print queue sorts jobs by their priority and queued time, so that jobs are printed one by one from higher priority to lower priority, and from older to newer creation time.
If a job is created with a scheduled time in future, the job will not be printed until it reaches its scheduled time.
The first job in the queue will be printed on the printer, and the status of the job status is changed to 'printing', then to 'completed'.
A job can be created in 'suspended' status, which means the job will not be printed until it is resumed.
Both the Print Agent and Cypress provide a REST API so that the Dashboard UI or other applications can queue a job that contains a PDF file to a printer.
Managing Jobs
From the Dashboard UI, you as an administrator or a controller, can delete a job, change a job's status, and change a job's properties. Click on a printer to view the associated jobs.
Click Actions context menu at the end of the printer row to perform these actions:
|
•
|
Suspend—Puts a job into suspended status and it will not print until the job is resumed. |
|
•
|
Print now—Immediately prints a scheduled job. |
|
•
|
Update properties—Enables the user to update the properties of the job. |
|
•
|
Open document—Opens the pdf document in a new pane. |
|
•
|
Delete—Deletes the job if the job is not in 'printing' status. |
|
•
|
Resume—Resumes the print job if it is in suspended state. |
|
•
|
Repeat—Repeats the print job. |
In addition, you can copy and move the jobs from one printer to another within the same agent. You can copy the jobs between different agents but cannot move them.
Printing Jobs
After a job is created for a printer that is online, the job is scheduled for printing based on its schedule time.
When a Print Agent service starts up, it creates a queue for each printer. All jobs with 'ready' status are put in its print queue; and jobs are sorted first by priority from high to low, and then by whenCreated time from earlier to later.
If the printing of the job is interrupted while printing such as when the printer goes offline due to some error conditions, the status of the job will be changed to halted and it will remain in the top of the queue.
If there is a job in 'halted' status at the top of the queue, no job will be printed to this printer until the 'halted' job is either resumed or removed.
Administration tab
The Administration tab provides administrators the permissions to:
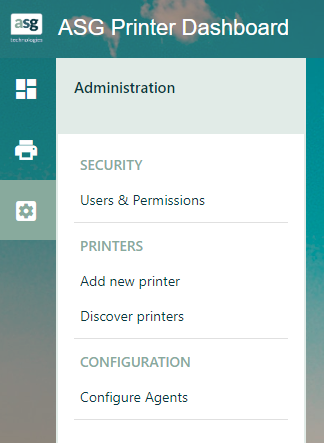
Security— Users & Permissions
Click Users & Permissions under the Administration icon to view the list of users, change their roles, and delete the users.
To edit the role of a user:
|
1.
|
Click the Edit icon under the Role column. |
|
2.
|
Check the appropriate radio button. |

To delete a user:
|
1
|
Click Actions context menu at the end of the suitable row. |
Printers—Adding New Printer
You, as an administrator, can add new printers through the ASG Printer Dashboard (click Administration > Add new printer. In the Create printer pane, enter the details in the respective fields and click Save.
Printers—Discovering Printers
The print service can be configured to detect new printers added to the network and automatically add them to the appropriate agent. Administrators can configure one or more subnets, using a pattern to specify which addresses in the network are to be polled for the new printers.
Discovering Printers
The Print Service, available for a user in the role of an administrator, goes through a serial of addresses based on a pattern defined in a subnet definition and checks whether a printer is associated with the address.
The Print Service skips an address in the specified subnet range if the address is currently used by one printer in the service. After discovering a printer in a new address, the printer is created by using a template that has the same model or the system default template.
Printer template is a set of predefined printer settings (such as color, duplex, printer language, and so on). Template is created when creating a printer and it can be applied when adding a new printer. The printer template is used to auto configure the newly discovered printers.
The printer should be available to accept print jobs after creation, although it is temporarily marked as 'new' until an administrator accepts it. The number of new printers is displayed in the 'New' printers’ widget on the dashboard UI landing page. After a new printer is accepted by an administrator, the printer's new status is cleared.
This functionality includes the following features:
|
•
|
Subnet management, including viewing, creation and deletion. Modification of a subnet is not supported. |
|
•
|
Ad-hoc discovery of a single subnet or all subnets. |
|
•
|
Periodic discovery of all subnets. |
|
•
|
Accept a new printer with modification or without modification of printer settings, which may also create a template for the model if it does not exist. |
You, as an administrator, can discover new printers through the ASG Printer Dashboard (click Administration > Discover printers). In the Subnets pane, click Add subnet drop-down. Enter the details in the respective fields and click ADD.
When you are upgrading a Cypress server from versions earlier than 9.0, the server retrieves the model of each printer through a SNMP call and sets a template printer for each model.
Working of Subnet Patterns
In general, the subnet needs to specify a range of IP addresses or DNS names. Various replacement strings can be used to describe the desired range.
An IP address is in the form of <number>.<number>.<number>.<number>, where each <number> is 0 through 255. Any of the <number> fields can be specified as a range, using several different patterns:
|
•
|
A single # is replaced by the digits 0 – 9. |
|
•
|
A double # is replaced by the digits 00 – 99. |
|
•
|
A # followed by braces containing a pair of numbers is replaced by that range of values. For example #{5,21} specifies the range of values from 5 to 21. |
Examples:
10.25.200.## will search from 10.25.200.00 to 10.25.200.99
10.25.200.4# will search from 10.25.200.40 to 10.25.200.49
10.25.200.#{3,56} will search from 10.25.200.3 to 10.25.200.56
A DNS name is a alphanumeric string giving the name of a system (in this case a printer). A range of alphanumeric substrings can be specified by separating them with the ‘|’ character within parentheses. For example, (abc|def|ghi) will be replaced first by abc, then by def, then by ghi. The numeric replacement strings described above can also be used.
Example:
us(ny|la|chic|bos|sf)printer# will search usnyprinter0 through usnyprinter9, then uslaprinter0 through uslaprinter9, then uschicprinter0 through uschicprinter9, and so forth.
Configuration—Configuring Agents
You, as an administrator, can add and configure an agent or multiple agents (click Administration > Configure Agents). In the Agents pane, enter:
|
–
|
URL format: https://<hostname/ip address of the server>: <port number>. |
|
–
|
Example: https://printserver:8443 |
|
•
|
Username (should be an administrator in the agent or stub). |
The Agent is linked and listed, only upon entering the valid URL and credentials.
You can also delete an agent. Click Actions context menu at the end of the suitable row and click Delete.
Refreshing Printers
The Print Agent and Cypress adopt different mechanism to update a printer's status and state automatically:
|
•
|
Cypress only updates a printer's status/ state when the printer is changing from idle to printing and from printing to idle. |
|
•
|
A Print Agent updates a printer's status periodically when the printer is idle and when the printer state is changing from printing to idle. |
You, as an administrator, can refresh the status of a selected printer or all printers.
|
•
|
When refreshing one printer, the user interface displays the updated status right away. |
|
•
|
When refreshing all printers, the server may take a while to refresh all printers. The UI may not update printer status until the refresh process finishes. The UI should display the last time when a Refresh All completes. |
