Using the Inbox Viewer
This topic provides instructions for using the Inbox Viewer thin client.
Overview
Your Inbox can be opened wherever you log in to the network; it is not tied to a physical workstation. Your Inbox can also be displayed within a Web browser if you are using Cypress.Web or the Cypress Inbox thin client (see Inbox Viewer Thin Client). This approach allows you to access documents and reports wherever you log in to the network.
Inboxes allow documents and knowledge to be delivered to end users more quickly, less expensively, and with greater portability than any other document delivery medium. Inboxes provide these advantages:
- Eliminating delays associated with printing. Documents and reports are delivered to the desktop as soon as they are created.
- Reducing printer and consumable costs. Inboxes eliminate unnecessary printing, resulting in less paper, toner, load, and maintenance on printers.
- Improving printer access and uptime. Decreased load results in less-congested queues and extends the life of the printer.
- Providing remote access to documents and reports.
Inboxes are created through the Cypress Address Book application. The Address Book is a directory of all recipients in your enterprise. A default Inbox is automatically created for every recipient you define. If you choose, you can create additional Inboxes for a recipient to help organize and group similar types of documents and reports.
Documents can be sent to Inboxes in these ways:
| • | End users can specify a recipient using one of the recipient InLine commands. |
| • | A CPF program can send a document to a recipient. |
Inbox Viewer Thin Client
In addition to the Inbox Viewer application that can be accessed from the Cypress Server main user interface, your Inbox can also be displayed within a Web browser by using the Cypress thin client. This approach allows documents and reports to follow you wherever you log in to the network.
See Getting Started for installation instructions to implement and access the Cypress thin clients. After completing your installation, you can access the Inbox Viewer thin client by using a URL on either your desktop or mobile device.
Two interfaces are provided for the Inbox Viewer client. One interface is intended to be used by sighted users, while the other interface is targeted towards visually-impaired individuals who require ADA-compliant technology.
To access the ADA-compliant interface from the regular client
| > | Select the Load Compliance version icon. |

Inbox Viewer User Interface
The Cypress Inbox feature provides an additional method of document delivery over printing, e-mailing, and faxing. Documents in a user’s Inbox can be viewed using the Inbox Viewer.
You can open the Inbox Viewer thin client by typing this URL in your Web browser:
http://{host name}:8080/DocumentViewer/Inbox.html
The Inbox Viewer application includes these features:
| • | A menu bar |
| • | A browser tree view that contains all documents sent to all Inboxes defined for the logged-on user |
| • | List View, which displays all documents within a specific Inbox |
| • | Document View, which displays the selected document for viewing |
The Inbox Viewer Menu Bar
The Inbox Viewer menu bar runs horizontally across the top of the Inbox Viewer window. This table describes the Inbox Viewer menu options in the order in which they appear.
|
Option |
Icon |
Description |
|
|
|
Prints the selected document(s) to a local printer on the system. |
|
Send to Device |
|
Sends the selected document(s) to a Cypress device. |
|
Open as PDF |
|
Launches a new browser window and displays the document as a PDF file. You can save the PDF document as a PDF file or print it in PDF format. |
|
Launch Modeler |
|
Launches Modeler for the active document. |
|
Download Document |
|
Allows you to download a document if the selected document is stored as a native file. Once downloaded, you can either open or save the document. |
|
Toggle List View |
|
Toggles between List View and Full Frame, which displays Document View within the entire Inbox Viewer window. |
|
Page Number |
|
Displays the current page number and the total number of pages in the selected document. |
|
Query |
|
Accesses the Query thin client. |
|
Load Compliance Version |
|
Accesses the ADA-compliant version of the Inbox Viewer thin client for visually-impaired users. |
|
Language |
|
Displays the language being used. |
|
Logout |
|
Logs you off of the Inbox Viewer thin client. |


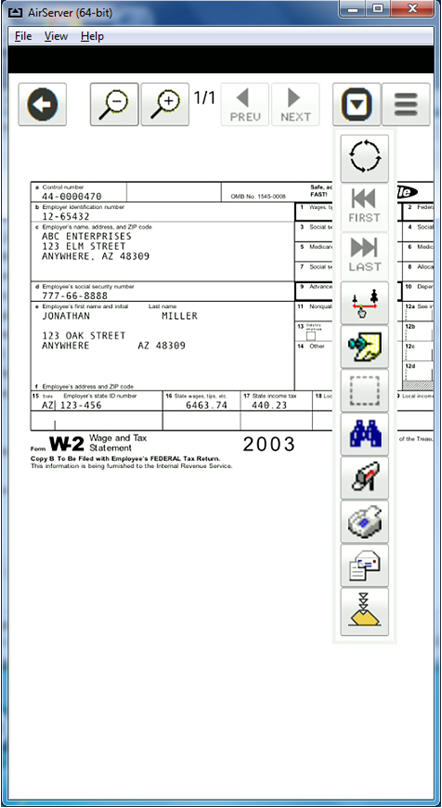
Document Menu
The Document menu runs vertically down the right side of the Inbox Viewer window. This table describes the Document menu options in the order in which they appear.
|
Option |
Icon |
Description |
|
First Page |
|
Displays the first page of the selected document. |
|
Previous Page |
|
Displays the previous page of the selected document. |
|
Next Page |
|
Displays the next page of the selected document. |
|
Last Page |
|
Displays the last page of the selected document. |
|
Scale |
|
Allows you to increase or reduce the scale of the displayed page using predefined or user-entered values. The predefined drop-down list also has a Whole Page option, which ensures that the entire page is always displayed, and a Page Width option, which ensures that the entire width of the page is always displayed. |
|
Zoom In |
|
Increases the scale of the displayed page. Increases are by percentages of ten. |
|
Zoom Out |
|
Reduces the scale of the displayed page. Reductions are by percentages of ten. |
|
Rotate |
|
Rotates the displayed page counterclockwise. |
|
Sticky Note |
|
Displays sticky notes that have been added to the document. This selection is a toggle that turns the display of individual sticky notes on and off. |
|
Enable Selection |
|
Allows you to select an area of the document where you can create a sticky note. |
|
Find |
|
Enables you to search the selected document(s). |
|
Send to Inbox |
|
Displays a send dialog, allowing you to send the selected document(s) to multiple recipient Inboxes. |
|
Send Fax |
|
Displays a fax dialog, allowing you to fax the selected document(s) to multiple recipients. |
|
Send Email |
|
Displays an e-mail dialog, allowing you to e-mail the selected document(s) to multiple recipients. |


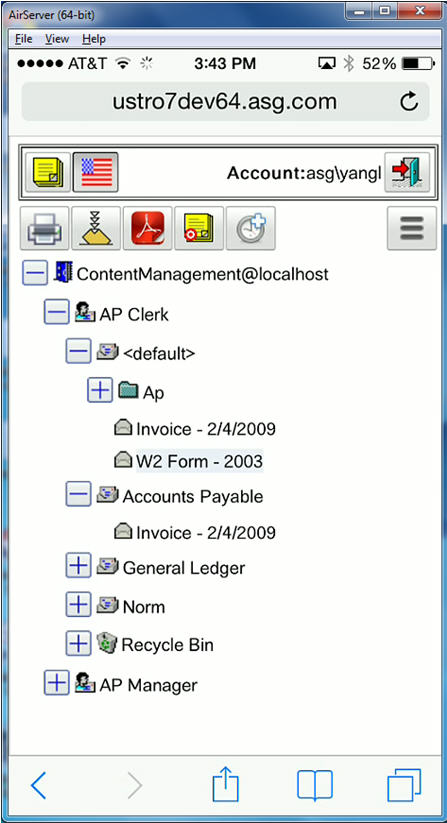
The Browser Tree View
The browser tree view displays all Inboxes associated with the currently logged-on user. Multiple recipients appear in the browser if multiple recipient definitions are associated with the user.
The browser can also display a list of all recipients and their associated Inbox or Inboxes defined in an Address Book.
To display the list of all recipients
| 1. | Right-click the browser tree view. |
| 2. | Check the Show All Recipients box. |
List View
List View displays all documents contained in the selected Inbox. Selecting a document from List View or the browser tree view displays it in Document View. By default, documents display in List View as unread and are highlighted in bold using a closed envelope icon. After a document has been displayed in Document View, it is marked as read within List View and is unbolded with an open envelope icon.
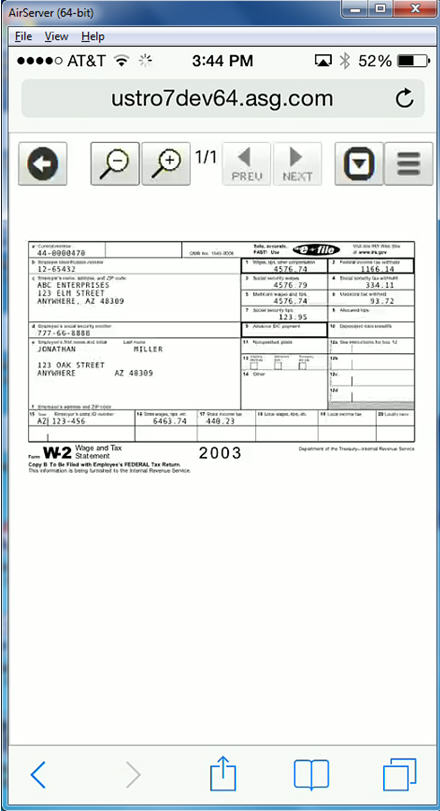
Document View
Document View displays the selected document, displays the title of the document as it appears in the browser, and provides a toggle control for Full Frame, which displays Document View within the entire Inbox Viewer window.

Additionally, select document information is provided at the bottom of Document View.
The Context Menu
Many document management options are available in the Inbox Viewer’s context menu. To see the document viewing options context menu, right-click the document.
Some options can be permanently grayed out due to security. In addition, a secondary menu with advanced options is available for some of the options.
This table explains the available options:.
|
Option |
Function |
|
Save As... |
Allows you to save the file on your local PC as it was originally captured by Cypress. Available only if the document is stored as a source file. |
|
Mark as Read |
Marks the selected document ticket as read. If you are executing this option at the Inbox level, all document tickets within the Inbox will be marked as read. The document tickets’ icons will be an opened envelope. |
|
Mark as Unread |
Marks the document ticket as unread. The document’s icon will be a closed envelope, and the subject text will be bolded. |
|
Send to Recycle Bin |
Moves the document ticket to the Recycle Bin. |
|
Delete |
Deletes the selected document ticket (not the document itself). If you are executing this option at the Inbox level, all document tickets within the Inbox will be deleted. |
|
Restore |
Returns document tickets to the Inbox from which they came. |
|
Copy Permanent Hyperlink |
Copies the permanent URL for the currently selected document to the clipboard. You must have Read permission to the document. |
|
Copy Inbox Hyperlink |
Allows users to select the link to the document ticket (DTIC) to display the document in their inbox. Users can link to the document in their inbox without having Read permissions for the document. If the DTIC is deleted, the link to the document will no longer work. |
|
New Inbox |
Creates a new Inbox. |
|
Rename Inbox |
Enables the user to rename the Inbox. |
|
Delete Inbox |
Deletes the Inbox along with its contents, if the current user has sufficient security permissions. |
|
Refresh |
Refreshes the content of the Inbox. |
|
Refresh All |
Refreshes the contents of all the recipient’s Inboxes. |
|
Show All Recipients |
Toggles between displaying all recipients and corresponding Inboxes that the current user has permission to view and displaying only the current user’s Inboxes. |
|
Show Recent Messages Only |
Toggles between loading all possible Inbox items for the selected recipient and loading only messages from the previous several days (you can configure the number of days in the Administration Tools module). |
|
Show Folder in Ascending |
Toggles between displaying folders inside an Inbox in ascending or descending order. The default setting (i.e., checked) displays folders in ascending order. |
|
Options |
Allows you to specify view and control options. |
|
Properties |
Displays the Properties dialog for the selected document ticket or Inbox. |
This table shows what options are available based on the object selected:
|
Type of Object |
|||
|
Context Menu Option |
Select Recipient Name |
Select Inbox Name |
Select Document Ticket (DTIC) Name |
|
Save As... |
N/A |
N/A |
Yes (Source File) |
|
Mark As Read |
N/A |
Yes |
Yes |
|
Mark As Unread |
N/A |
Yes |
Yes |
|
Send to Recycle Bin |
N/A |
Yes |
Yes |
|
Delete |
N/A |
Yes |
Yes |
|
Restore |
N/A |
Yes (Recycle Bin) |
Yes (Recycle Bin) |
|
Copy Permanent Hyperlink |
N/A |
N/A |
Yes |
|
Copy Inbox Hyperlink |
N/A |
N/A |
Yes |
|
New Inbox |
Yes |
N/A |
N/A |
|
Rename Inbox |
N/A |
Yes |
N/A |
|
Delete Inbox |
N/A |
Yes |
N/A |
|
Refresh |
Yes |
Yes |
Yes |
|
Refresh All |
Yes |
Yes |
Yes |
|
Show All Recipients |
Yes |
Yes |
Yes |
|
Show Recent Message Only |
Yes |
Yes |
Yes |
|
Sort Folder in Ascending |
|
|
|
|
Options |
Yes |
Yes |
Yes |
|
Properties |
Yes |
Yes |
Yes |
Displaying Only Recent Document Tickets
To see only recent document tickets in your Inbox
| 1. | Right-click the Inbox Viewer’s tree view. |
| 2. | If the Show Recent Messages Only menu option is not highlighted on the pop-up menu, select it: |
| • | When this option is selected, only the most recent document tickets will be displayed in the Inbox. By default, you will see the last 30 days of document tickets. You can, however, configure this number in the Administration Tools module. |
| • | When this option is not selected, Cypress displays all document tickets available. By default, you will see the last 120 days of document tickets. You can, however, configure this number in the Administration Tools module, and it is possible that deselecting this option will cause all document tickets ever received by the Inbox to be displayed. |
Managing Documents and Document Tickets
This topic describes methods you can use to manage documents and document tickets.
Reading Documents in the Inbox Viewer
When the Inbox Viewer opens, it displays all Inboxes for the current user by default.
To display the contents of an Inbox
| > | Select the desired Inbox in the browser. |
To sort Inbox document tickets by title, creator, or creation date
| > | Click the appropriate heading within the List View. The entries in the List View will be sorted in ascending order by the heading that you clicked. Click the same heading again to sort the documents in descending order. |
| > | Single-click a document in the list in the upper right quadrant of the screen or the browser tree view. Cypress displays it in the Document Viewer in the lower section of the screen. |
Viewing Document Ticket Properties
To view a document ticket’s properties in the Inbox Viewer
| > | Right-click the document’s name and select Properties from the context menu. The Document Ticket (DTIC) Properties dialog displays. |
The Inbox field indicates the Inbox in which the document is stored (Read Only).
The Creation Time field indicates when a document was created (Read Only).
The Deletion Time field specifies when a document is to be deleted.
To set a new document deletion time
| 1. | Select Never Delete to prevent the document from being deleted from the Inbox or clear it to set a specific deletion date. |
| 2. | If you cleared the Never Delete option, enter the new deletion time in the Deletion Time field. |
Sharing an Inbox with Multiple Users
When an Inbox is intended to be used by a number of people, such as a whole department, your Cypress Administrator can configure Cypress to perform refresh checks on the Inbox. This refresh function is useful, since it is likely that multiple people will be viewing the content at the same time and the Inbox will need to be refreshed often.
If you share an Inbox with other users, the Allow Delete By Owner box should not be checked for that Inbox in Address Book. When this box is unchecked, the refresh function is enabled and you cannot delete the shared Inbox. See the “Enabling Multiple Recipients to Share an Inbox” section in the ASG-Cypress Address Book Administrator’s topic for more information.
When the refresh function is enabled, Inbox Viewer checks the current status of a job ticket in the Cypress DocuVault when one of these conditions exist:
| • | The job ticket is highlighted. |
| • | An unread job is selected for five seconds and is going to be changed to Read status. |
If the current status of the job ticket is different from the status shown in the Inbox Viewer, a warning message is displayed.
| > | Click OK. |
The Inbox will automatically be refreshed and the current status of the selected job ticket will be updated.
Managing Inboxes
Creating additional Inboxes is helpful for organizing the documents and reports you receive in your Inbox Viewer. You can create Inboxes for particular types of documents (e.g., Sales Reports or Corporate Information).
To create an Inbox
| 1. | Select the appropriate recipient name within the browser if multiple recipients are displayed. |
| 2. | Right-click the Inbox tree view and select New Inbox from the context menu. |
A new Inbox dialog box will display in the browser.
| 3. | Enter the name for this Inbox and select OK. The Inbox will be placed in alphabetical order among any other user-created Inboxes. |
To set the priority of an Inbox
| 1. | Right-click the Inbox and select Properties from the context menu. |
| 2. | Select the General tab. |
| 3. | Enter the appropriate priority for the Inbox in the Priority field. The priority value is used by Cypress to determine delivery destinations. |
| 4. | Select Apply. |
| 1. | Select the Inbox that you want to rename. |
| 2. | Right-click and select Rename Inbox from the context menu. |
| 3. | Enter the new Inbox name and select OK. The Inbox will be placed in alphabetical order among any other user-created Inboxes. |
| 1. | Select the Inbox to be deleted. |
| 2. | Right-click and select Delete from the context menu. |
| 3. | Click Yes to confirm that you want to delete all document tickets in the selected Inbox. |
Viewing a Cypress Document in Other Applications or the Inbox Viewer
This section provides instructions for creating a hyperlink to a document currently being viewed in an Inbox Viewer, which allows you to display it in another application or within a user’s inbox. There are two types of hyperlinks that you can create:
| • | A Permanent Hyperlink copies the URL referencing the document to the clipboard. |
| • | An Inbox Hyperlink displays the document in the user’s inbox. |
Creating a Permanent Hyperlink to a Document
This topic provides the steps required to create a permanent hyperlink.
To create a permanent hyperlink to a document from an Inbox Viewer
| 1. | Select the document from the tree view at the left side of the screen. |
Or
Select the document from the Inbox List displayed on the right side of the screen.
| 2. | Right-click and select Copy Permanent Hyperlink from the context menu. |
| 3. | Click OK. |
To view the document
| 1. | From the application in which you want to view the document, select Paste or Ctrl+V to paste the hyperlink into the application (i.e., Microsoft OneNote). |
| 2. | Select the hyperlink to view your document in the application. |
Creating an Inbox Hyperlink to a Document
This topic provides the steps required to create an inbox hyperlink.
To create an inbox hyperlink to a document from an Inbox Viewer
| 1. | Select the document from the tree view at the left side of the screen. |
Or
Select the document from the Inbox List displayed on the right side of the screen.
| 2. | Right-click and select Copy Inbox Hyperlink from the context menu. |
| 3. | Click OK. |
To view the document
| 1. | From the application in which you want to view the document, select Paste or Ctrl+V to paste the hyperlink into the application (i.e., Microsoft OneNote). |
| 2. | Select the hyperlink to view your document in the Inbox Viewer. |
Mobile Client
These examples show the Inbox thin client interface on a mobile phone: