Compare Items
You can compare items when an item has the focus, either in the navigation tree, in a report, or in an editor view. The item comparison is limited to the current configuration, but there are no further limitations; you can compare items of any type.
Comparing items
- Select the items that you want to compare and then Query
 Compare Items from the main menu.
 - If you selected a single item, continue to step 2.
- If you selected multiple items, the first item (according to alphabetical sort order) is used as the primary item, and the others as secondary items. You can then skip the next step and proceed to step 4.
- Click the Add icon
 to open the Add Items to View page of the Search for Items dialog that lets you select one or more secondary items for the comparison:
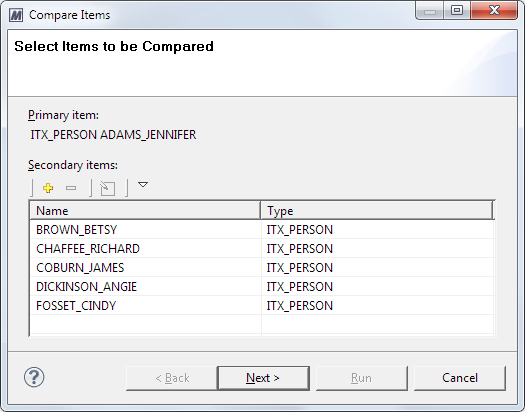
 - Select the secondary item or items and then click Add. You return to the Compare Items dialog, which displays the items you have selected in the list for secondary items:
- Click Next to proceed to the Define Scope of Comparison page of the Compare Items dialog.
- Leave the option button Compare all attributes selected if you want to include all available attributes in the selection.
- To compare only selected attributes, click the Select attributes to be compared option button. The list below the option button becomes active, and you can select the check boxes of the attributes that you want to compare:
- When you are finished, click Run.
Or
Right-click the items and then select Compare Items from the context menu.
The Compare Items dialog opens, listing the items you selected.
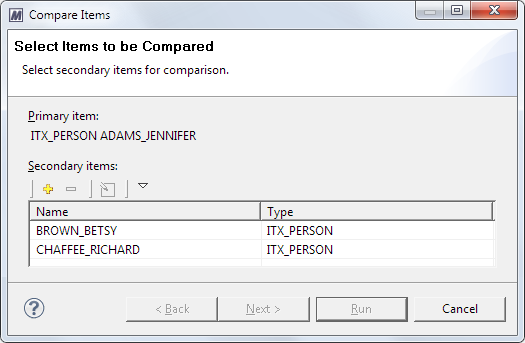
To select another item as the primary item, select it in the Secondary items list and then click the Set as Primary icon  .
.
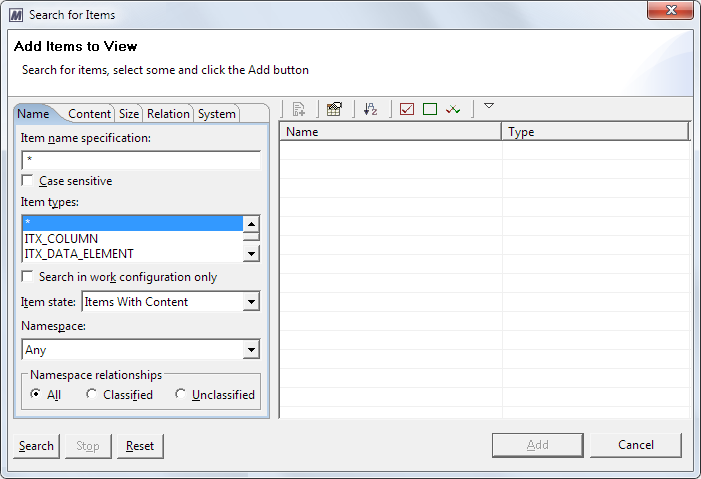
You can select items of all available types.
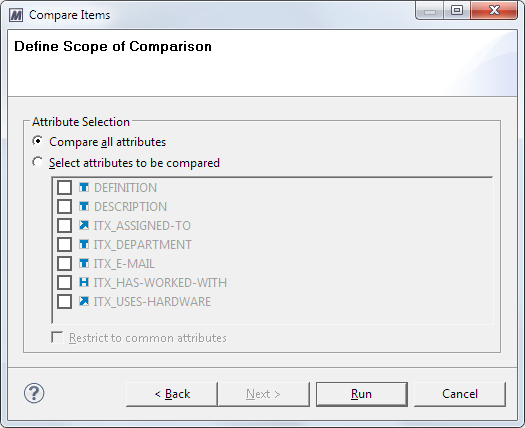

By selecting the Restrict to common attributes check box below the attribute list, you can reduce the attribute list to display only attributes that are defined for the types of all items that are included in the comparison.
The Compare Items view opens in the Editor frame. For details, see Working with the Compare Items View.
Working with the Compare Items View
The Compare Items view allows you to inspect all items that were selected for the comparison and compare their attribute contents. You cannot, however, edit the displayed attribute contents.
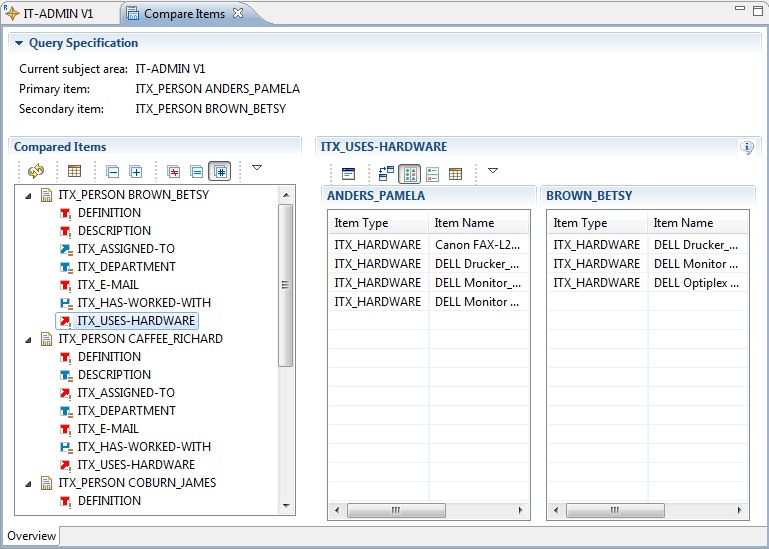
The view’s left area displays a comparison overview in item table format.
- At the top level, entries for all secondary items.
- The next level lists, for each secondary item, the attributes that are defined for the primary item, for the secondary item, or for both. Attributes that differ in content or are only present with one of the compared items display with red icons. If any attributes were excluded from the comparison step 4, they are not listed in the item table.
The view’s right area displays comparison details
- For the selected attribute:
- The attribute content if both attributes have different content
- An empty list, if the attributes are identical or empty.
- For the selected item, the item names.

You can change the sizes of the comparison overview and detail areas by positioning the mouse cursor over the invisible border between the areas and, when the cursor takes the form of a bidirectional horizontal arrow, dragging the border to the desired direction with the left mouse button held down:

In the same way, you can change the sizes of the two attribute areas that comprise the comparison detail area: Position the mouse cursor over the (invisible) border between the areas and, when the cursor takes the form of a bidirectional horizontal arrow (or vertical arrow, when the areas are arranged vertically), drag the border to the desired direction with the left mouse button held down.
The local toolbar buttons in the Compared Items area have these functions:
| Icon | Command | Function |
|---|---|---|
|
|
Re-execute Query |
Refreshes the comparison result by re-executing the item comparison. |
|
|
Display Attribute Comparison Information |
Toggles display of Comparison result column on and off (it is initially set to off). |
|
|
Collapse All |
Collapses the item table to the top level (that is, no attributes are displayed). |
|
|
Expand All |
Expands the item table to the attribute level. |
|
|
Show Attributes with Different Contents |
Limits the attribute display to attributes with different content. |
|
|
Show Attributes with Equal Contents |
Limits the attribute display to attributes with equal content. |
|
|
Show All Attributes |
Displays all attributes (the initial setting). |
The local toolbar buttons in the comparison details area have these functions:
| Icon | Command | Function |
|---|---|---|
|
|
Show Differences in Separate Dialog |
Compares the attribute content in a separate dialog window; available only when the Show Differences view is active. |
|
|
Show Differences |
Displays attributes content horizontally and points out correspondences and differences (the initial setting). |
|
|
Attribute Contents Horizontal |
Displays attributes content horizontally. |
|
|
Attribute Contents Vertical |
Displays attributes content vertically. |
|
|
Show Detailed Differences |
Lists all entries in the two attributes sequentially, specifying the comparison result for each attribute. The possible results are: Identical, Different qualifier, Only in primary, and Only in secondary. This button is present only when link or namespace attributes are compared. |
By clicking the Attribute Contents Horizontal and Attribute Contents Vertical icons, you can display the attributes either side by side or one above the other.
If you click the Show Differences icon, the correspondences and differences of the currently selected attribute are marked up.
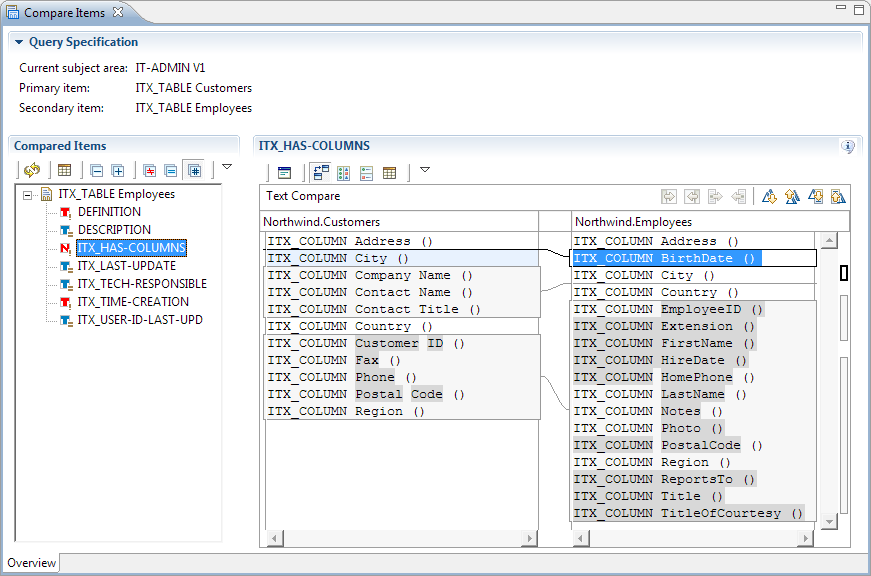
Entries that are present in both attributes are displayed on a white background, and entries that are present in only one attribute are displayed on a light gray background. The connecting lines between the attributes indicate where a block of entries that is present in only one attribute would have to go to in the other attribute.
The icons in this view have these functions:
| Icon | Command | Function |
|---|---|---|
|
|
This button is reserved for a future enhancement. |
|
|
|
This button is reserved for a future enhancement. |
|
|
|
This button is reserved for a future enhancement. |
|
|
|
This button is reserved for a future enhancement. |
|
|
|
Next Difference |
Highlights the next different block. |
|
|
Previous Difference |
Highlights the previous different block. |
|
|
Next Change |
Highlights the next different entry. |
|
|
Previous Change |
Highlights the previous different entry. |
When you compare link or namespace attributes, click the Show Detailed Differences icon to display the correspondences and differences in a single table.
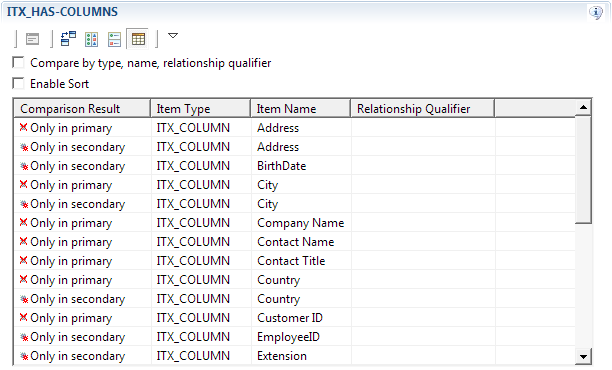
The table contains duplicate entries for items that are present in both subject areas. This is because the items reside in different namespaces, and have, therefore, also different item IDs. Select the Compare by type, name, relationship qualifier check box above the list to switch off the item ID comparison. The display will change as shown in this example:
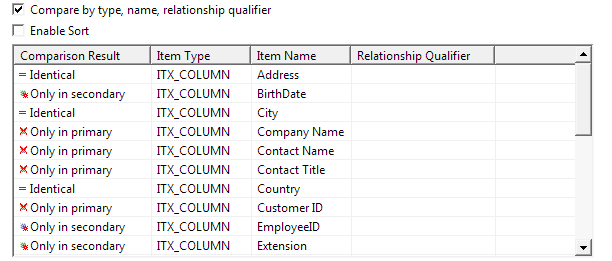
The items are sorted automatically by item type and name. If you want to change the sort order, select the Enable Sort check box. You can then click the buttons that comprise the list header to sort in ascending or descending alphabetical order, according to the corresponding column.


