Maintaining Audit Logs
- In the Administration tree, right-click the server connection for which you want to set up the audit log and then select Audit Log
 Set up from the context menu.
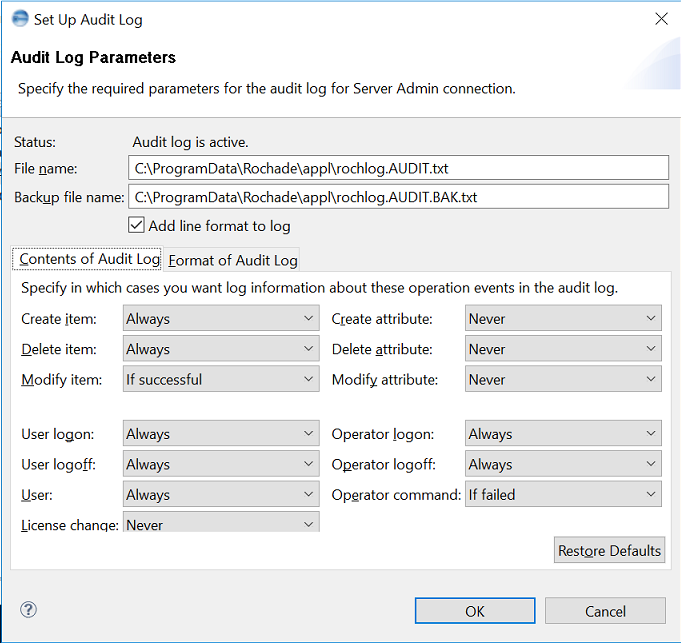
 - In the File name and Backup file name fields, specify a location and a name for the audit log file and its backup, respectively.
- Optional. Select the Add line format to log check box if you want to log any modification of the audit log file format (for example, separator character or escape symbol)
- On the Contents of Audit Log tab, specify which operation events you want to log. For example, the logon of a user, the logon of the operator, the creation of an item, and so on.
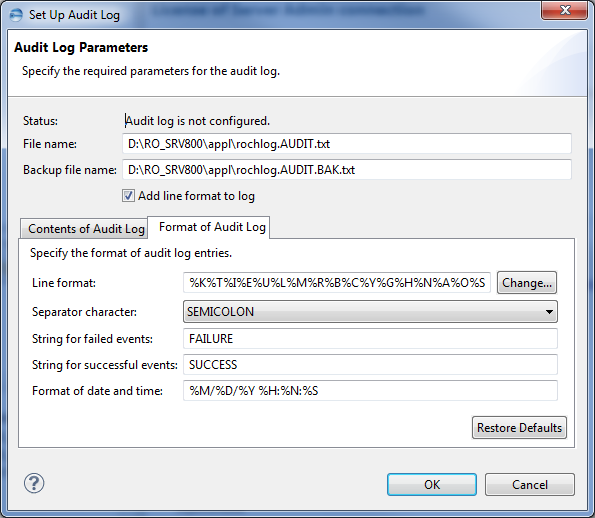
- Click the Format of Audit Log tab to bring it to the foreground:
- Click the Change button next to the Line format field.
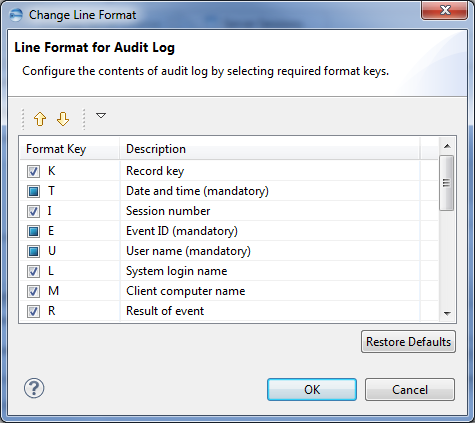
- Select the format key check boxes for the information that you want to log.
- Select a format key and then use the Up
 and Down
  arrows to move the key to the position in which you want the corresponding information to appear in the logs.
 - Click OK to close the dialog and fill the Line format field with the selected keys.
- From the Separator character drop-down list, select a character for separating the information types in the log. The following table lists the available settings:
- In the String for failed events field, specify a string that will be added to log entries that pertain to failed operation events (for example, FAILED).
- In the String for successful events field, specify a string that will be added to log entries that pertain to successfully completed operations (for example, SUCCESS).
- In the Format of date and time field, specify the format for date and time entries in the audit log. The following table lists the available time unit strings:
- Click Apply.
Or
Select Server Audit Log
 Set up from the main menu.
The Set Up Audit Log dialog appears:

You can specify in which cases you want to log a certain operation by selecting one of the following settings from the corresponding drop-down list:
| Options | Description |
|---|---|
|
Always |
All attempts to perform the operation are logged (that is, both successful and failed attempts). |
|
If successful |
The operation is logged only if it was completed successfully. |
|
If failed |
The operation is logged only if it failed. |
|
Never |
The operation is never logged. |

The Change Line Format dialog box appears:

The following table lists the available keys:
| Format Key | Information to be Logged |
|---|---|
|
%A |
Attribute name (only when an attribute is concerned) |
|
%B |
Database name |
|
%C |
Configuration number |
|
%D |
Application identifier (for example, RRT, METABILITY, or BROWSER) |
|
%E |
Mandatory. Event ID (for example, ITEM_MODIFY) |
|
%G |
Naming group |
|
%H |
Namespace |
|
%I |
Session number |
|
%K |
Record key (that is, a consecutive number for each log entry) |
|
%L |
System login name, value of system variable $OSACCT |
|
%M |
Name of the client computer, value of system variable $COMP |
|
%N |
Item name |
|
%O |
Item ID |
|
%P |
Client computer name (Web client) |
|
%Q |
System login name (Web client) |
|
%R |
Result of event (for example, SUCCESS) |
|
%S |
Cause |
|
%T |
Mandatory. Date and time |
|
%U |
Mandatory. User name (that is, the value of system variable $ACCT) |
|
%Y |
Item type number |
|
%Z |
License information |
| Settings | Description |
|---|---|
|
NONE |
No separator will be inserted between the information types. |
|
TAB |
A tab is inserted between the information types. |
|
SPACE |
A space is inserted between the information types. |
|
COMMA |
A comma is inserted between the information types. |
|
SEMICOLON |
A semicolon is inserted between the information types. |
|
SHELL |
A space is inserted between the information types; backslash characters (\) are escaped with a backslash character. |
| RPL | The rules for Rochade words are applied (that is, lowercase letters, the Rochade separator, and the escape symbol are escaped with the escape symbol). |
|
Strings for Time Units |
Description |
|---|---|
|
%M |
Month (two-digit value) |
|
%D |
Day (two-digit value) |
|
%Y |
Year (four-digit value) |
|
%H |
Hour (two-digit value) |
|
%N |
Minute (two-digit value) |
|
%S |
Second (two-digit value) |
For example, if you want to log time entries in the format year/month/day hours:minutes:seconds, enter %M/%D/%Y %H:%N:%S.
Start logging audit information
| > | In the Administration tree, right-click the server connection for which you want to start audit logging and then select Audit Log Start from the context menu. Start from the context menu. |
Or
Select Server Audit Log
 Start from the main menu.
The audit log file is created in the location that you specified in step 2.
| > | In the Administration tree, right-click the server connection for which you want to display the audit log and then select Audit Log Show from the context menu. Show from the context menu. |
Or
Select Server Audit Log
 List from the main menu.
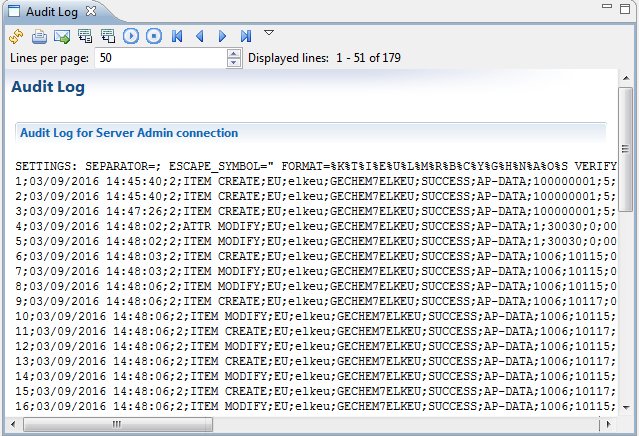
The Audit Log view opens in the Editor frame:

The local toolbar of the Audit Log view provides these controls:
|
Icon |
Command |
Function |
|
|
Refresh |
Reloads the page content. |
|
|
|
Opens a dialog to print the page content. |
|
|
Send Mail |
Opens a new e-mail in your standard mail program to send the page content through mail. |
|
|
Create a Backup of the Log File |
Creates a backup of the audit log. |
|
|
Create a Backup and Clean the Log File |
Creates a backup of the audit log and then empties the log. |
|
|
Start Audit Log |
Starts the logging of audit information. |
|
|
Stop Audit Log |
Stops the logging of audit information. |
|
|
First Page |
Opens the first page of the log. |
|
|
Previous Page |
Opens the previous page of the log. |
|
|
Next Page |
Opens the next page of the log. |
|
|
Last Page |
Opens the last page of the log. |
|
|
Specifies the number of lines to be displayed on a single page. |
|
|
|
Shows the current displayed number of lines. |
|
Creating a backup of the audit log
- Open the Audit Log view.
- Click the Create a backup of the log file icon in the local toolbar.
The backup file is created in the location that you specified in step 2. If the file already exists, it is overwritten.
Creating a backup of the audit log and start a new log
- Open the Audit Log view.
- Click the Create a backup and clean the log file icon in the local toolbar.
The backup file is created and the content of the audit log file is deleted.
Stop logging audit information
| > | In the Administration tree, right-click the server connection for which you want to stop audit logging and then select Audit Log  Stop from the context menu. Stop from the context menu. |
Or
Select Server Audit Log
 Stop from the main menu.
Or
Open the Audit Log view, and click the Stop Audit Log icon in the local toolbar.
Rochade stops writing audit information to the log file.


