Working on User Roles
When you have opened a user role, you can work on it in the Role Editor.
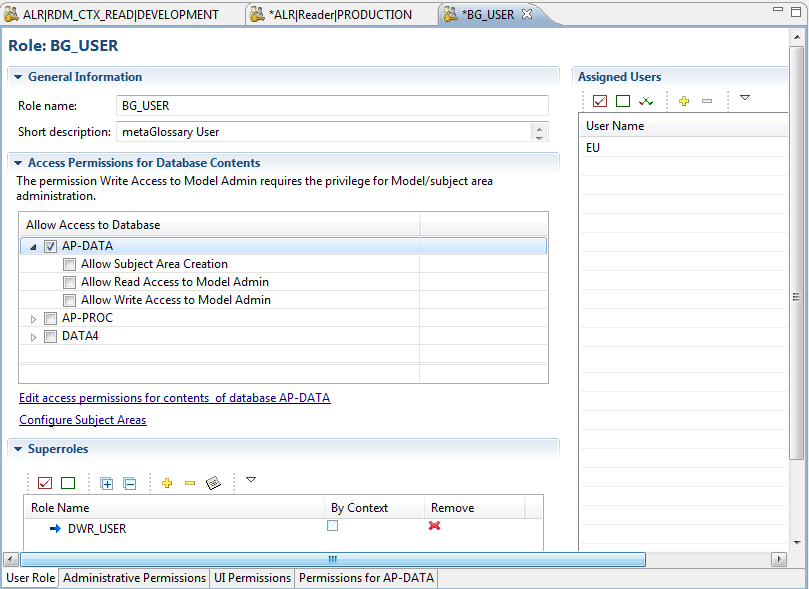
The User Role subpage of the Role Editor provides the following panels.
- General Information: Specifies the short description for the user role. You cannot modify the role name, however.
- Access Permissions for Database Contents: Specifies the databases to which the role applies. The subordinate check boxes have the following purpose:
- Allow Subject Area Creation: Enables the users of this role to create subject areas. It also requires full administrative permissions and the Naming mode setting privilege. To know more, see Specifying Administrative Permissions.
- Allow Read Access to Model Admin: Enables the users of this role to browse information models.
- Allow Write Access to Model Admin: Enables the users of this role to edit information models. It also requires the Naming mode setting privilege. To know more, see Specifying Administrative Permissions.
For each selected database, Permissions in database tab becomes available at the bottom of the Role Editor:

- Superroles: Specifies superroles. You can click the Add Users To Role icon
 to assign superroles.
 - Assigned Users: Specifies users. You can click the Add Users To Role icon
 to add additional users to the role.
Specifying Administrative Permissions
Click the Administrative Permissions tab at the bottom of the Role Editor. The Administrative Permissions subpage is displayed.
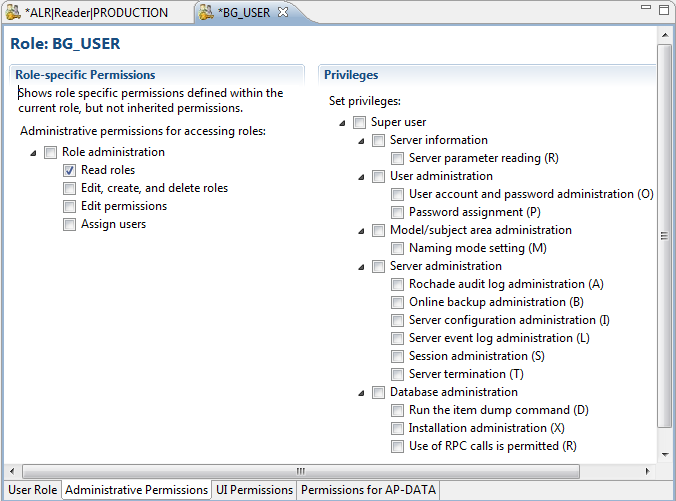
The Administrative Permissions subpage provides the following panels.
- Role Specific Permissions: Select the pertinent check boxes in this panel if you want the users to be able to perform the corresponding tasks.
- Read roles: Enables users to display role data.
- Edit, create, and delete roles: Enables users to create, edit, and delete roles.
- Edit permissions: Enables users to edit role permissions.
- Assign users: Enables users to edit the user assignments of roles.
- Privileges: Specifies the privileges for the users of this role.
The table lists the available privileges.
| Privilege | Description | ||
|---|---|---|---|
|
Super user |
Assigns all privileges to the users. |
||
|
|
Server information |
Assigns all subordinate privileges to the users. |
|
|
|
|
Server parameter reading |
Enables the users to read server configuration parameters. |
|
|
User administration |
Assigns all subordinate privileges to the users. |
|
|
|
|
User account and password administration |
Enables the users to administer account and password settings. |
|
|
|
Password assignment |
Enables the users to assign passwords to user accounts. |
|
|
Model/subject area administration |
Assigns all subordinate privileges to the users. |
|
|
|
|
Naming mode setting |
Enables to users to change the naming mode setting. |
|
|
Server administration |
Assigns all subordinate privileges to the users. |
|
|
|
|
Rochade audit log administration |
Enables the users to set up the audit log if they also have the Server configuration administration privilege. |
|
|
|
Online backup administration |
Enables the users to perform an online backup of the server databases. |
|
|
|
Server configuration administration |
Enables the users to read and edit the configuration of the server (that is, the settings in the server initialization file). |
|
|
|
Server event log administration |
Enables the users to display, back up, and empty the server event log. |
|
|
|
Session administration |
Enables the users to display a list of the current server sessions and to terminate sessions. |
|
|
|
Server termination |
Enables the users to shut down the server. |
|
|
Database administration |
Assigns all subordinate privileges to the users. |
|
|
|
|
Run the item dump command |
Enables the users to create item dumps. |
|
|
|
Installation administration |
Enables the users to install new components into the server databases. |
|
|
|
Use of RPC calls is permitted |
Enables the users to run RPC calls. |
Specifying UI Permissions
Click the UI Permissions tab at the bottom of the Role Editor. The UI Permissions Administration subpage is displayed.
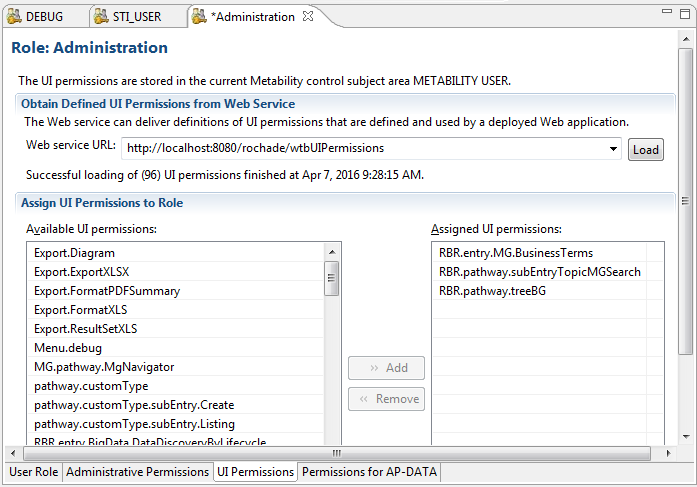
The UI Permissions Administration subpage provides the following panels.
- Obtained UI Permissions from Web Service: Specify the URL of a Web application’s wtbUIPermissions service and then click Load to obtain a list of available UI permissions for that application.
- host is the logical name of the computer where the application server is running.
- port is the number of the port where the application server can be reached.
- context is the name under which DI Browser can be accessed (that is, the document root or Web application context). Ask your Web administrator for the correct name.
- Assign UI Permissions to Role:
- From the Available UI permissions list, select the permissions that you want to assign to the current role and then click Add.
- From the Assigned UI permissions list, select the permissions that you want to remove for the current role and then click Remove.
For DI Browser, for example, enter the following URL:
http://host:port/context/wtbUIPermissions
where,
Specifying Database-specific Permissions
Click the Permissions in database tab at the bottom of the Role Editor. The Permissions in database tab subpage is displayed
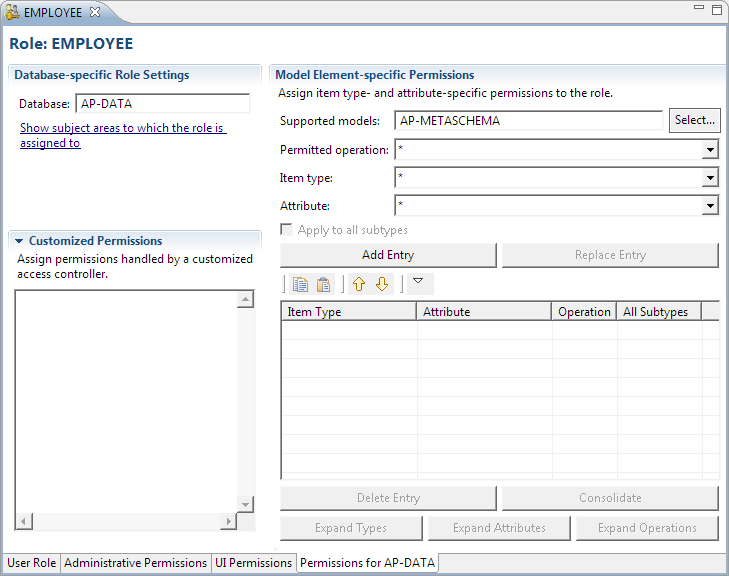
The Permissions in database subpage provides the following panels.
- Database-specific Role Settings: Displays the database to which the specified permissions pertain and provides a hyperlink that you can click to display a list of the subject areas of that database to which the role is assigned.
- Customized Permissions: Provides an input field where you can specify additional permissions that will be interpreted by a custom access controller.
- Model Element-specific Permissions: Enables you to specify permissions for operating on the item types and attributes defined by selected models.
Specifying a permission for an item type or an attribute
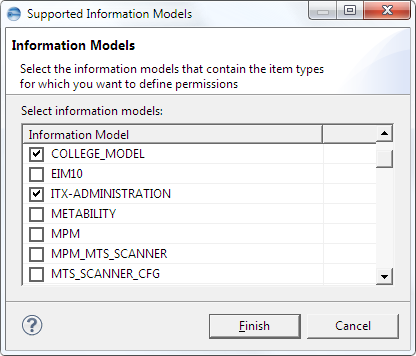
- Click the Select button next to the Support models field.
- Select the model that defines the item type or attribute for which you want to specify the permissions and then click Finish.
- From the Permitted operation drop-down list, select an operation.
- From the Item type drop-down list, select an item type.
- From the Attribute drop-down list, select an attribute.
- To apply the permission also to subtypes and corresponding attributes of the selected item type, select the Apply to all subtypes check box.
- Click Add Entry to add the new permission to the role.
- Click the Save icon
 in the Metability toolbar to save your changes.
The Supported Information Models dialog box is displayed.
Or
Select an existing permissions from the permissions table and then click Replace Entry to replace it with the new permission.
The new permission is added to the permissions table.

 .
.