Creating a Policy
You use the Policy Editor window to create, edit, import, and save policies. After you create or update a policy, you are ready to create archives and their associated indexes using the policy in either attended or unattended mode.
Defining Index Entries
You can create index entries for an entire document or set of documents by defining areas on a document page that exist on one or more pages or in one or more documents. Each time Archive Creator identifies one of these areas, it creates an index entry that enables you to locate information.
For example, you might have a document that contains a series of sales reports. Department names appear in the same position of each report page. You can request that Archive Creator identify the department name as an index entry. When Archive Creator creates an archive, you are able to access document pages that contain specific department names.
Index entries can consist of extracted fields of data and combinations of fields called groups. Fields can contain Report IDs, Section IDs, topic items, department names, etc. Regions help Archive Creator locate field positions.
You can customize page and region contents and extracted data by creating and implementing an exit routine.
To define the index entries
|
1.
|
Display a report that contains sample data – that is, a report of a specific type that has data in the same format of other reports of that type. The sample data helps you locate the index items. |
|
2.
|
Define index entry fields. Directions for defining index entry fields depend on the type of sample report you opened. Optionally, you can define index entry fields from the metadata of an external report. This topic includes directions for defining index entry fields from each of these: text reports, LPFDs, scanned images, XML pages, and external metadata. |
|
3.
|
Determine if you can use an index entry field to define a pageset. A pageset is a contiguous set of pages within a section of a report whose content is related. A pageset has a common index entry (or Topic ID) that logically links the pages together. Breaking archive files into pagesets can improve performance by reducing retrieval time. If you determine that the report contains pagesets, you can use AdminCentral to define which Topic ID to use as the index. |
|
4.
|
Combine fields to create the index entries. |
Displaying a Report that Contains Sample Data
To display a report that contains the sample data used for locating index entries
|
1.
|
In AdminCentral, expand the document server link folder.
|
If you are prompted for a Recipient ID, enter a Recipient ID and the password for that recipient. The recipient must have permission to define policies.
|
3.
|
In the tree, select Policies. Right-click any empty area in the list pane and from the context menu, select New Policy. The New Policy window is displayed.
|
This window is sectioned into several areas or smaller windows.
|
•
|
If one or more of the smaller windows on the bottom are not displayed, and you need to work within that window, click the appropriate button on the toolbar.
|
|
•
|
You can display or hide these smaller windows: Region, Internal Metadata, External Metadata, Field, Group, and Sample.
|
|
4.
|
Click the Browse button.
|
|
5.
|
Navigate to and select the report. |
Policy processing analyzes the pages in the report file and displays the appropriate Page Settings dialog box. Typically you do not need to modify the displayed settings. However, depending on the type of page, you might need to enter some information. For details on each setting, see Policy Editor Field References.
|
6.
|
When you are satisfied with the page setting values, click OK. |
The first page of the report is displayed in the top portion of the window.
Now you can create index entry fields and groups.
Defining Index Entries for Text Reports
Text reports are reports in EBCDIC or ASCII format. Within text reports you can define fields of data to extract as index entries. You can also define regions in which those fields can be located. Regions enable you to limit the scope of fields. For example, you can define a region to contain multiple rows in a column by simply selecting the column, rather than defining multiple instances of rows. Regions can overlap and can span multiple pages.
When you define a Section ID, then set Processing Scope to Section, Archive Creator processes the pages in the section as a single page and assigns the topic and page metadata groups from each page to every page in the section. In that way, you can create fields and regions that span pages, and establish field dependencies that also span multiple pages.
To define data as index entries in open text reports, you must define fields or regions, or both.
You can define fields inside or outside of a region in one of two ways:
|
•
|
Select the field and accept the default definition. |
|
•
|
Provide information about the fields on a series of dialog boxes. |
If you are defining fields identified by labels or you are defining columns as fields, you can accept the default field definition as described in Automatically Defining Fields in Text Reports. If the default field definitions do not provide the desired results, or you are creating more complex field definitions, follow the procedure in Manually Defining Fields in Text Reports.
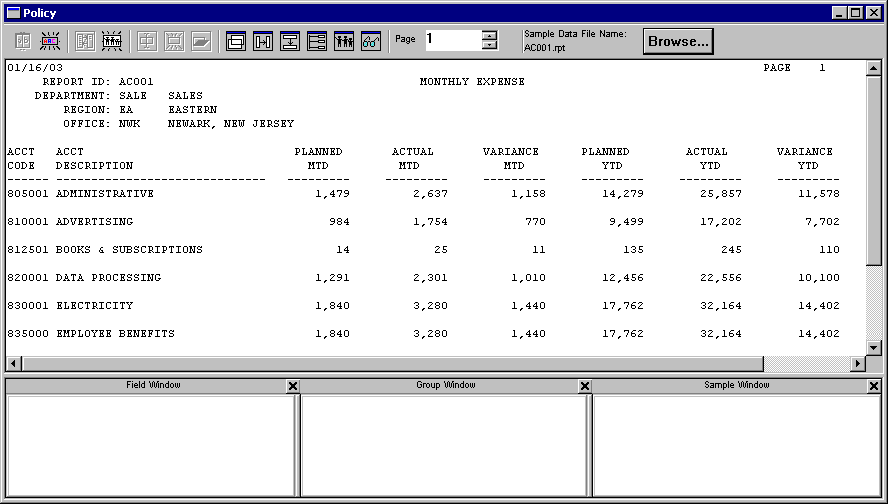
Here is a sample text report page displayed in the top portion of the Policy Editor window.
Defining Regions in Text Reports
To define a region in an open text report
|
1.
|
In the Policy Editor window, position the cursor where you want one corner of the region. Click and drag the mouse until all the data you want to be included in the region is within the region boundaries. |
|
2.
|
Click the Add Region button. The Region Settings dialog box is displayed.
|
|
3.
|
Enter a name for the region. If the data to be included in the region appears in different positions on different pages, specify a start or a start and end anchor. Anchors position the region in relation to specified text strings. |
If you specify both a start and end anchor, the region size can change to meet the positions of both text strings.
|
5.
|
If necessary, adjust the region’s position or change its size by selecting and dragging its sizing handles. |
Automatically Defining Fields in Text Reports
To automatically define fields to be used as Report IDs, Section IDs, or index entries by accepting the default definition, the field must be one of these objects:
|
•
|
Identified by a label, either ending with a colon in the same row or right above the field in a previous row. Note that rows between the label and field must be blank. |
To automatically define fields
|
1.
|
Highlight the field that you want to extract.
|
|
2.
|
Click Create Automatically on the Edit menu.
|
|
a.
|
If the field is within the boundaries of a region, select Field by Region from the submenu. Otherwise, select Field and Group, Report ID, or Section ID.
|
Field and Group defines a field and displays a dialog box through which you assign a group. Report ID and Section ID define the field as a Report ID or Section ID, respectively, and automatically assign a group.
|
b.
|
Depending on the field you highlight: |
|
–
|
If you have selected a column as a field, the Region Settings dialog box is displayed so that a region can be created. Enter or select the appropriate options to name the region and click OK. |
|
–
|
If you have highlighted a field without its label and you have selected Field and Group, the Group Name dialog box appears. Enter a group name (typically the label) and click OK. |
|
–
|
If you have highlighted a field with its label or you have selected Report ID or Section ID, the Policy Editor automatically assigns the field to a group with the label name. |
The Summary panel is displayed. It displays all of the position information and extract criteria associated with the field.
|
3.
|
If you defined a field as a Section ID, you can change the processing scope that Archive Creator uses from page to section. To request that Archive Creator process the document by section, that is, process all pages within a section as a single page, select the Section option from the Processing Scope item on the Edit menu. You can continue defining fields by performing step 1 again. |
|
4.
|
Click Finish. The Policy Editor window is displayed.
|
Manually Defining Fields in Text Reports
The steps in this topic describe how to define fields to be used as index entries in text reports. You define fields on a series of dialog boxes accessed either through individual tabs or sequentially. These steps assume you are displaying the Field Settings dialog boxes sequentially, rather than as a tabbed dialog box.
To manually define fields
|
1.
|
In the report or in the region, either click the Add Field button on the Policy toolbar, or highlight the field that you want to use as a Report ID, Section ID, or index entry, then click the Add Field button. The General panel is displayed. |
|
2.
|
Assign a name to the field, indicate the type of data contained in the field, and enter the region to which this field belongs. If you did not define a region, the Region Name is shaded. |
|
3.
|
Click Next. The Attributes panel is displayed. The version of the Attributes panel that is displayed depends on the Field Data Type you selected. |
|
4.
|
Enter or select the appropriate options to define field length, values, and format on the Attributes panel. When specifying character strings, add as many unique details as possible. This narrows the search and prevents Mobius from trying to match the string against every character position on every page, which can impact system performance. For example, specifying “Account ID” rather than just “Account” prevents unwanted matches such as “Account Name” or “Account Balance”. |
|
5.
|
Click Next. The version of the Formatting panel associated with the type of data that you specified is displayed. |
|
6.
|
Select options to format the extracted data appropriately. See Formatting Panel for a further explanation of each option.
|
|
7.
|
Click Next. The Dependencies panel is displayed. |
|
8.
|
Enter or select the appropriate options to define the position of the field on the report. |
|
9.
|
Click Next. The Level panel is displayed. |
|
10.
|
Enter or select the level number to define the relative hierarchical relationship of this field to other fields in the policy. |
|
11.
|
Click Next. The Summary panel is displayed. It displays all of the position information and extract criteria associated with the field. |
|
12.
|
Click Finish. The Policy Editor window is displayed. |
|
13.
|
To add or delete levels, or move fields to different levels, in the Field Window, click the level or field to select it. With the cursor still on the level or field, right-click and select the appropriate Field Window context menu item.
|
Defining Index Entries for LPFDs
LPFDs are reports in IBM AFP, Xerox DJDE/Metacode, Adobe PostScript and PDF, and Hewlett-Packard PCL formats. LPFD reports can contain both text and resources, such as graphics and font information. They can also contain different fonts and rotated data. It is, therefore, difficult to define fields for specific positions on these pages. However, you can define regions, which delineate areas on an LPFD page or pages that contain related data. You can create LPFD regions and text regions within LPFD regions. Within each region, you can define fields to use as index entries. Regions can overlap and can span multiple pages.
When creating archives that consist of a subset of pages of an LPFD report, ensure that resources referenced on archive pages are present in the archive.
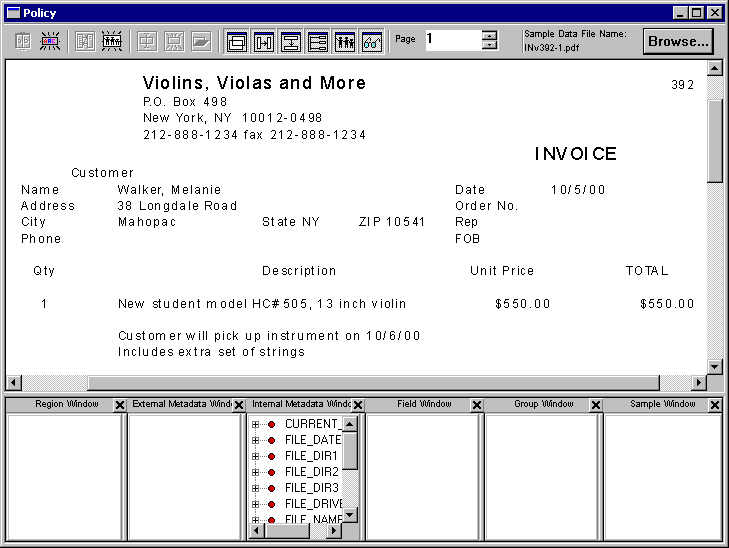
Here is a sample LPFD page displayed in the top portion of the Policy Editor window:
When you define a Section ID, then set Processing Scope to Section, Archive Creator processes the pages in the section as a single page and assigns the topic and page metadata groups from each page to every page in the section. In that way, you can create fields and regions that span pages, and establish field dependencies that also span multiple pages.
To define data as index entries for LPFDs, you must first open a report, then define regions and fields. You can open a report in text mode, that is, display the report without graphics and font information. Unless you are in text mode, you must define all fields, except metadata fields, within regions. In text mode, you need only define fields. You can define fields in one of two ways:
|
•
|
Select the field and accept the default definition. |
|
•
|
Provide information about the fields on a series of dialog boxes. |
If you are defining fields identified by labels or you are defining columns as fields, you can accept the default field definition as described in Automatically Defining Fields in LPFDs.
If the default field definitions do not provide the desired results, or you are creating more complex field definitions, follow the procedure in Manually Defining Fields in LPFDs.
Defining Regions in LPFDs
Define an LPFD region in an open document
|
1.
|
In the Policy Editor window, position the cursor where you want one corner of the region. Click and drag the mouse until all the data you want to be included in the region is within the region boundaries. Click the Add Region button. The Region Settings dialog box is displayed. |
|
2.
|
Enter or select the appropriate options to name the region. If the data to be included in the region appears in different positions on different pages, specify a start or a start and end anchor. Anchors position the region in relation to specified text strings. Note that if you specify both a start and end anchor, the region size can change to meet the positions of both text strings. |
|
4.
|
If necessary, adjust the region’s position by selecting it, holding down the mouse button, and moving the region. Change its size by selecting and dragging its sizing handles. |
|
5.
|
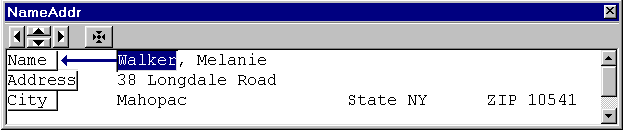
Right-click in the region and select Open Region from the context menu. The Floating window is displayed. |
|
6.
|
Adjust the character spacing and vertical alignment of the window contents using the buttons on the Floating window toolbar. |
Defining Text Regions within LPFD Regions
LPFD regions can contain multiple fields, for example, the fields of a table. To define a subset of those fields in a text area, such as column headers, you can create one or more text regions within the LPFD region.
To define a text region within an LPFD region
|
1.
|
In the Policy Editor window, within a defined LPFD region, position the cursor where you want one corner of the text region. Click and drag the mouse until all the data you want to be included in the text region is within the region boundaries. |
|
2.
|
Click the Add Region button. The Region Settings dialog box is displayed. |
|
3.
|
Enter or select the appropriate options to name the region. If the data to be included in the region appears in different positions on different pages, specify a start or a start and end anchor. Anchors position the region in relation to specified text strings. Note that if you specify both a start and end anchor, the region size can change to meet the positions of both text strings. |
|
5.
|
If necessary, adjust the region’s position or change its size by selecting and dragging its sizing handles. |
Automatically Defining Fields in LPFDs
To automatically define fields of data to use as Report IDs, Section IDs, or index entries by accepting the default definition, the field must have one of these properties:
|
•
|
Identified by a label, either ending with a colon in the same row or right above the field in a previous row. Note that rows between the label and field must be blank. |
To automatically define fields
|
1.
|
Highlight the field that you want to extract. Click Create Automatically on the Edit menu. |
If the field is within the boundaries of a region, select Field by Region from the submenu. Otherwise, select Field and Group, Report ID, or Section ID. Field and Group defines a field and displays a dialog box through which you assign a group. Report ID and Section ID define the field as a Report ID or Section ID, respectively, and automatically assign a group.
Depending on the field you highlight:
|
•
|
If you selected a column as a field, the Region Settings dialog box is displayed so that a region can be created. Enter or select the appropriate options to name the region and click OK. |
|
•
|
If you highlighted a field without its label and you selected Field and Group, the Group Name dialog box appears. Enter a group name (typically the label) and click OK. |
|
•
|
If you highlighted a field with its label or you selected Report ID or Section ID, the Policy Editor automatically assigns the field to a group with the label name. |
The Summary panel is displayed. It displays all of the position information and extract criteria associated with the field.
|
2.
|
If you defined a field as a Section ID, you can change the processing scope that Archive Creator uses from page to section. To request that Archive Creator process the document by section, that is, process all pages within a section as a single page, select the Section option from the Processing Scope item on the Edit menu. You can continue defining fields by performing step 1 again. |
|
3.
|
Click Finish. The Policy Editor window is displayed. |
Manually Defining Fields in LPFDs
The steps in this topic describe how to define fields to be used as index entries in LPFD reports. You define fields on a series of dialog boxes accessed either through individual tabs or sequentially. These steps assume you are displaying the Field Settings dialog boxes sequentially, rather than as a tabbed dialog box.
To manually define fields in LPFDs
|
1.
|
In the region, highlight the field that you want use as a Report ID, Section ID, or index entry, then click the Add Field button on the Policy toolbar. The General panel is displayed. |
|
2.
|
Assign a name to the field and indicate the type of data contained in the field. |
|
3.
|
Click Next. The Attributes panel is displayed. The version of the Attributes panel that is displayed depends on the Field Data Type you selected. For example here is the Variable Length Text Attributes panel. |
|
4.
|
Enter or select the appropriate options to define field length, values, and format on the Attributes panel. When specifying character strings, add as many unique details as possible. This narrows the search and prevents Mobius from trying to match the string against every character position on every page, which can impact system performance. For example, specifying “Account ID” rather than just “Account” prevents unwanted matches such as “Account Name” or “Account Balance”. |
|
5.
|
Click Next. The version of the Formatting panel associated with the type of data that you specified is displayed. |
|
6.
|
Select options to appropriately format the extracted data. See Formatting Panel for a further explanation of each option. |
|
7.
|
Click Next. The Dependencies panel is displayed. |
If the field you are adding is a metadata field, the Dependencies panel does not appear; skip to
step 9.
|
8.
|
Enter or select the appropriate options to define the position of the field on the report. |
|
9.
|
Click Next. The Level panel is displayed. |
|
10.
|
Enter or select the level number to define the relative hierarchical relationship of this field to other fields in the policy. |
|
11.
|
Click Next. The Summary panel is displayed. |
It displays all of the position information and extract criteria associated with the field.
|
12.
|
Click Finish. The Policy Editor window is displayed. |
|
13.
|
Close the Floating window, if applicable. |
|
14.
|
To add or delete levels, or move fields to different levels, in the Field Window, click the level or field to select it. With the cursor still on the level or field, right-click and select the appropriate Field Window context menu item. |
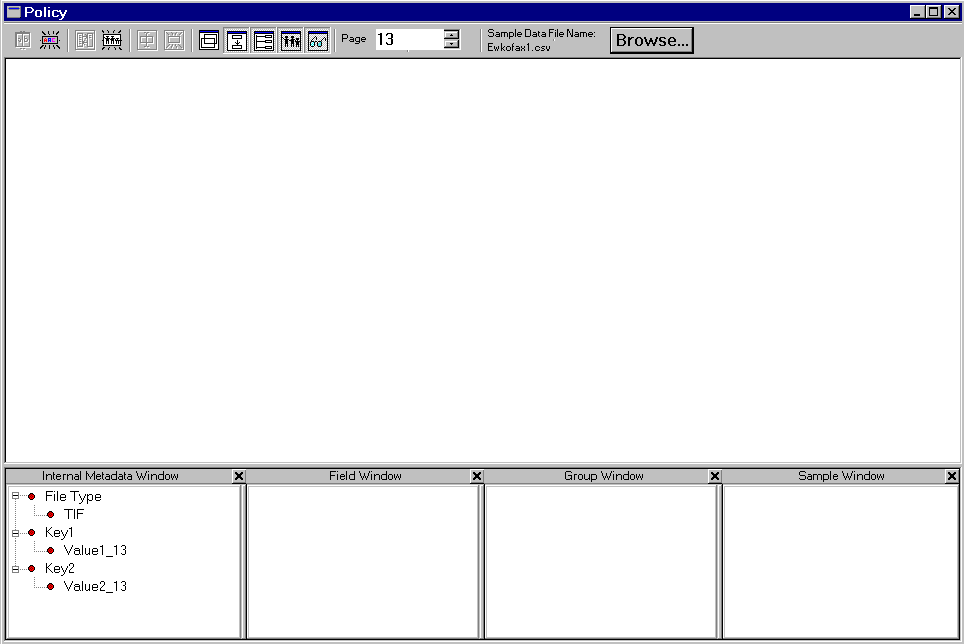
Defining Index Entries for Scanned Images
The steps in this topic describe how to create fields and define the extract criteria for each field in a policy used to archive scanned images. You can archive scanned images using a Configuration Profile or a Kofax Ascent Capture text release script file. The Configuration Profile and release script file contain information on the location and format of a binary image index file, as well as on the image files to be archived.
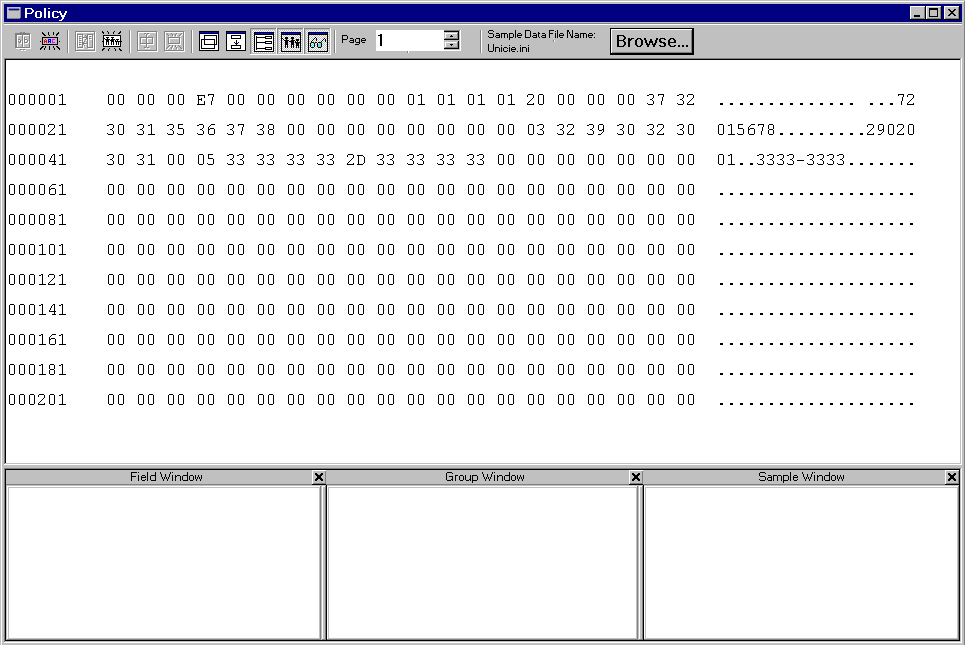
Here is an example that illustrates a sample binary image index file displayed in the top portion of the Policy Editor window.
When working with Kofax Ascent Capture images, the top portion of the Policy Editor window is empty, and metadata fields appear in the Internal Metadata Window.
To define index entries for scanned images
|
1.
|
When working with Kofax images, right-click in the Internal Metadata Window, select Create All Metadata Fields, and see Combining Fields to Create Index Entries for instructions on creating the appropriate groups. |
When the contents of a binary image index file is displayed in the top portion of the Policy Editor window, the steps in this topic describe how to add a field to a policy and define the extract criteria for the field.
|
2.
|
In the right-most, ASCII display portion of the Policy Editor window, highlight the data in the index file that you want to extract, then click the Add Field button on the Policy toolbar. The General panel is displayed. |
|
3.
|
Assign a name to the field and indicate the type of data contained in the field. See General Panel for more information. |
|
4.
|
Click Next. The Attributes panel is displayed. |
The version of the Attributes panel that is displayed depends on the Field Data Type you selected.
|
5.
|
Enter or select the appropriate options to define field length, values, and format on the Attributes panel. For detailed explanations of the data attributes related to each Field Data Type and information about the options on each Attributes panel, see: |
|
6.
|
Click Next. The version of the Formatting panel associated with the type of data that you specified is displayed. It illustrates the Formatting panel for a number/currency field. |
|
7.
|
Select options to appropriately format the extracted data. See Formatting Panel for a further explanation of each option. |
|
8.
|
Click Next. The Dependencies panel is displayed. |
|
9.
|
Enter or select the appropriate options to define the position of the field on the report. The Dependencies panel does not appear if the field you are adding is a metadata field. See Dependencies Panel for an explanation of dependencies and information about the options on this panel. |
|
10.
|
Click Next. The Level panel is displayed. |
|
11.
|
Enter or select the appropriate options to define the relative hierarchical relationship of this field to other fields in the policy. See Level Panel for a detailed explanation of levels and information about the options on this panel. |
|
12.
|
Click Next. The Summary panel is displayed. It displays all of the position information and extract criteria associated with the field. See Summary Panel for information about this panel. |
|
13.
|
Click Finish. The Policy Editor window is displayed. |
|
14.
|
Repeat steps 1 through 13 for each field to be added to the policy. |
|
15.
|
To add or delete levels, or move fields to different levels, in the Field Window, click the level or field to select it. With the cursor still on the level or field, right-click and select the appropriate Field Window context menu item. See Field Window Context Menu for a detailed explanation of the Field Window context menu. |
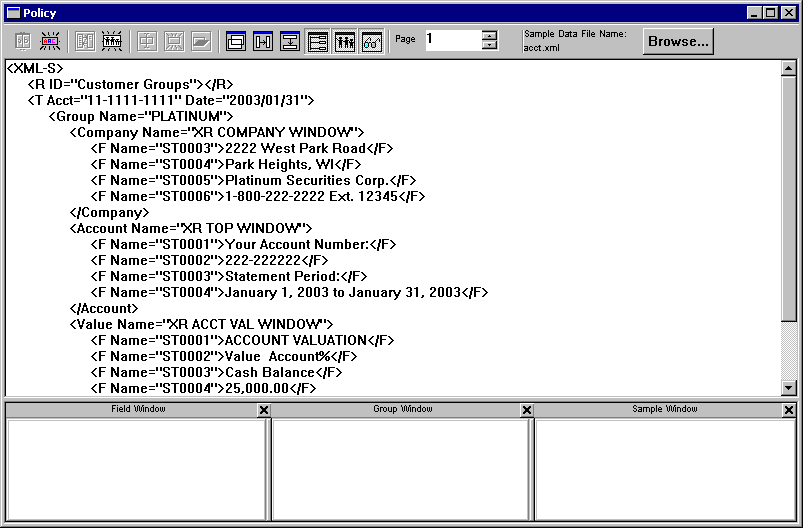
Defining Index Entries for XML Pages
The steps in this topic describe how to create fields and define the extract criteria for each field in a policy used to archive XML pages.
This figure illustrates a sample XML page displayed in the top portion of the Policy Editor window.
To define index entries for XML pages
|
1.
|
In the Policy Editor window, click the XML element name, element value, attribute name, or attribute value associated with the data you want to extract. The cursor changes to a hand when you move it over a valid selection. |
|
2.
|
Click the Add Field button on the Policy toolbar. The General panel for XML pages is displayed. |
|
3.
|
Complete the Field Name and XML Element Name fields. |
|
4.
|
Add, modify, or remove attribute-value pairs as follows: |
|
•
|
To add attribute-value pairs to the list: |
|
a.
|
Click the Attribute drop-down list and select the name of the attribute you want to add. |
|
b.
|
Enter the value that the attribute must have, then click the Add button. |
|
•
|
To modify attribute-value pairs already in the list: |
|
c.
|
Select the attribute you want to change, then click the Modify button. The attribute name and value appear in the fields below the list. |
|
d.
|
Enter the value that the attribute must have, then click the Add button. |
|
•
|
To remove attribute-value pairs from the list: |
|
e.
|
Select the attribute you want to remove from the list. |
|
f.
|
Click the Remove button. |
|
5.
|
Click Next. The Data Type panel is displayed. |
|
7.
|
Click Next. The Attributes panel is displayed. |
The version of the Attributes panel that is displayed depends on the field data type you selected. This panel shows the Variable Length Text Attributes panel.
|
8.
|
Enter or select the appropriate options to define field lengths, values, and format on the Attributes panel. When specifying character strings, add as many unique details as possible. This narrows the search and prevents Mobius from trying to match the string against every character position on every page, which can impact system performance. For example, specifying “Account ID” rather than just “Account” prevents unwanted matches such as “Account Name” or “Account Balance.” |
|
9.
|
Click Next. The version of the Formatting panel associated with the type of data that you specified is displayed. |
|
10.
|
Select options to appropriately format the extracted data. See Formatting Panel for a further explanation of each option. |
|
11.
|
Click Next. The Dependencies panel for XML fields is displayed. |
|
12.
|
Enter or select the appropriate options to extract data depending on the presence or absence of XML parent elements on the page. |
|
13.
|
Add or remove parent fields as follows: |
|
•
|
To add parent fields to the Selected Fields list, select the appropriate field name in the Available Fields list, then click the Add button. |
|
•
|
To remove parent fields from the list, select the field you want to remove, then click the Remove button. |
|
14.
|
Click Next. The Level panel is displayed. |
|
15.
|
Specify the hierarchical level of the field in the Level Number field. |
|
16.
|
Click Next. The Summary panel is displayed. It displays all of the position information and extract criteria associated with the field. |
|
17.
|
Click Finish. The Policy Editor window is displayed. |
|
18.
|
Repeat steps 1 through 17 for each field to be added to the policy. |
|
19.
|
To add or delete levels, or move fields to different levels, in the Field Window, click the level or field to select it. With the cursor still on the level or field, right-click and select the appropriate Field Window context menu item. See Field Window Context Menu for a detailed explanation of the Field Window context menu. |
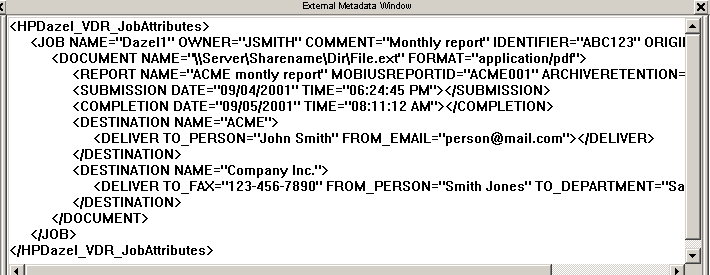
Defining Index Entry Fields from External Metadata
In addition to defining index entry fields from data within the file, you can also define the index entry fields from the metadata of an external file.
To define index entry fields
|
1.
|
If the External Metadata window is not already open, click the External Metadata button on the Policy toolbar. |
|
2.
|
From the Edit menu, click Metadata Options. The Metadata Options dialog box is displayed. |
|
3.
|
Complete this dialog box as follows: |
|
a.
|
Check Select Include metadata from an external file. |
|
b.
|
Browse to or enter the path and name of the external file. |
The contents of the specified file are displayed in the External Metadata Window.
|
4.
|
Highlight the XML attribute associated with the data you want to extract and click Add Field on the Policy toolbar. The General tab of the Field Settings dialog box is displayed. This tab and the subsequent tabs are the same as the tabs that are displayed when you create a field from an XML page. See Defining Index Entries for XML Pages for the sequence of tabs. |
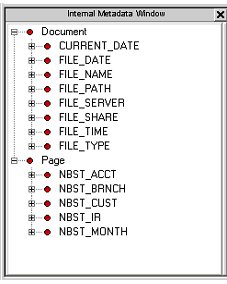
Defining Index Entry Fields from Internal Metadata
In addition to defining index entry fields from data shown in a report, you can define index entry fields from internal document-level and page-level metadata associated with reports, such as AFP indexes (TLEs). You can use these fields as they appear in the Internal Metadata Window, or you can create other fields and field groups as needed. For example, you could use NBST_ACCT to create a field called ACCOUNT_NUMBER.
Here is an example showing the internal metadata from an archived report in the Internal Metadata Window.
Mobius can be configured to automatically define index entry fields for page-level metadata.
To configure Mobius to automatically define index entry fields
|
1.
|
From the Edit menu, click Metadata Options. The Metadata Options dialog box is displayed. |
|
2.
|
Select Dynamically create topics from page metadata, then click OK. |
Defining Index Entry Fields from a User Exit
In addition to defining index entry fields from data within the file, you can also define index entry fields from a binary file you created. Access this binary file by invoking a user exit routine. See Customizing Mobius.
To invoke a user exit routine
|
1.
|
From the Edit menu, click Invoke User Exit. The Invoke User Exit dialog box is displayed. |
|
2.
|
Complete this dialog box as follows: |
|
•
|
Check Enable Custom Parsing. |
|
•
|
Browse to or enter the path and name of the external binary file. |
Combining Fields to Create Index Entries
A group defines a set of fields to be used as index entries – and specifies the type of index entry. You can create an index entry to be used as a Report ID, a Section ID, a topic, page metadata, or a Report Version ID. The steps in this topic describe how to define a group. Each group contains fields, the contents of which become one or more index entries. The sequence of fields in the group determines the structure of the index entry.
To create a policy group
|
1.
|
Click the Add Group button on the Policy toolbar. The Group Settings dialog box is displayed. |
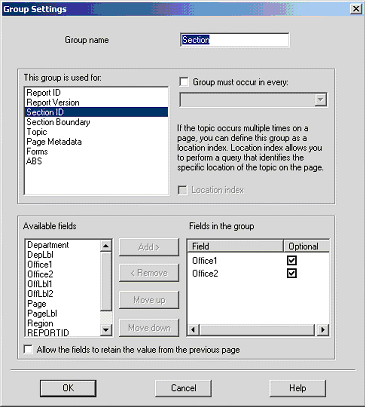
|
2.
|
Complete the group settings as follows: |
Do not assign these reserved IDs as the group name: HORGRPTID, HORGSECTID, and HORGVERSID.
|
b.
|
In the Group Usage field, select the types of index entries you want the fields in this group to generate. For information about each group type, see Group Usage Definitions. |
|
c.
|
If you want the archiving method to determine whether this group exists in the report, select Group must occur in every, and select where in the document the group must occur for Archive Creator to successfully create an archive. Note that Archive Creator creates the archive regardless of the presence of the selected group. If an exception occurs, Archive Creator issues a notification message on the Archive Creation Processing Status dialog box. |
|
d.
|
For groups used as topics that appear more than once in a page or section, you can identify the topic’s specific location by selecting the Location index check box. |
Users of Mobius View or any of our legacy viewing clients can navigate directly to a topic’s specific location within a page.
|
e.
|
Add, delete, and reposition fields in the group as necessary. |
|
f.
|
If a value for a field in this group applies to successive pages of a report, but the value appears on only the first page in the succession, by default Mobius creates an index entry only for the first page. However, you can force Mobius to create an index entry for all of the pages by selecting Allow the fields to retain the value from the previous page. |
For example, suppose you have a monthly expense report that is sorted by account number and you defined a field to create an index entry for each account number. If account number “223344” has 100 transactions and there are 20 transactions per page, the report contains 5 pages of transactions for this account. The report is set up so that the account number is displayed only on the first page of the transactions. In this situation, Mobius creates an index entry for only the first page, because that is the only page on which account number is actually displayed. If you want to create an index entry for each of the four successive pages, you must select Allow the fields to retain the value from the previous page.
|
3.
|
Click OK. The new group appears in the Group Window. As soon as you create a group, the Sample Window displays the index entries generated from that group. See Group Window for a detailed explanation of this window. |
|
4.
|
Repeat steps 1 through 3 to add additional groups. |
|
5.
|
To reorder the sequence of the fields within a group and change the structure of the index entry, in the Group Window, click the field you want to move. With the cursor still on the field, right-click and select the appropriate Group Window context menu item. |
|
6.
|
To remove a field from a group, in the Group Window, click the field, then press the Delete key. |
|
7.
|
To delete a group, in the Group Window, select it and then press the Delete key. |
|
8.
|
If you defined a group as a section ID or section boundary in step 2, you can process all contiguous pages containing the same section ID or section boundary as a single page. When Mobius archives the section, it assigns all of the topics and page metadata in the section to every page in the section. For example, bank statements might contain several pages of transactions. If a user searches for a transaction located on page four and you want the user to view the statement from the beginning, you must have processed the statement as a single page. |
By default, you can concatenate up to 20 contiguous pages. If a section contains more than 20 pages, an error occurs and the section is not archived. To modify the number of pages allowed in a section, see
Customizing Mobius.
|
9.
|
To process multiple pages as a single page: |
If the Section ID appears at the beginning of each section, select Section ID from the Processing Scope item on the Edit menu.
Or
If the Section ID is not located at the beginning of each section, repeat step 2 to define a group as a section boundary. This group identifies the beginning of each section. Then select Section Boundary from the Processing Scope item on the Edit menu.
|
10.
|
When you are satisfied with the index entry samples displayed in the Sample Window, click OK. The Save Policy As dialog box opens. |
|
11.
|
Enter the policy name and click OK. |
