
Employee Expense Claim Process Application
John is a sales manager at ASG Technologies. He has more than 20 employees reporting to him. Each employee can incur certain expenditure while performing their duties as sales executives. As per organization policy, the employees submit their expense claims for John's approval duly attaching the receipts for the expenses they incurred. These claims are submitted as forms and John need to manually validate them and approve or reject certain expenses. The submission of expense claims, validation of the claims, and approving the claims has become tedious and time consuming for both John and his employees.
John approached Tom who is a business analyst at ASG Technologies for a solution. Tom has decided to develop a process app that solves the problems of John and his team. To solve this problem Tom suggested John to have a process app which allows the employees to submit their expense claims on the go and enables John to quickly approve or reject the expense claims and notify the employees about his action immediately. They have chosen ASG-Studio to design the Expense Claim process app.
Business objective for the employee expense claim process app is as follows:
The Expense Claim process app contains only two screens. One for the employees to enter their expense details and the other for manager to approve or reject the claim. This app works based on the process flow that includes only two user tasks and a few system tasks that performs certain data validation and sends notifications. This process app requires only two app roles - employee and manager. This process app connects to datasource to capture and provide the employee details and claim details. In run time, the process app allows the employees to submit expense claim and the manager to approve or reject the claim.
This example illustrates how to design the employee expense claim process app as per the defined business objective.
Verify Prerequisites
ASG-Studio must have installed and a database is available with the necessary data. For this example:
- ASG-Studio is installed and is accessible through the URL - http://localhost:8080/index.html.
- PostgreSQL database is installed on the local computer and is accessible at http://localhost:5432/ExpenseClaim. The database details are as follows:
- Database name: ExpenseClaim
- User name: postgres
- Password: p@ssW0rd
- The public.Employee table contains the following columns and data:
- The public.Claims table contains the following columns:
- empid (bigint)
- managerid (bigint)
- claimamount (bigint)
- claimdescription (character varying)
- claimstatus (integer)
- claimid [pk] (bigserial)
|
empid [pk] (bigint) |
firstname (character varying) |
lastname (character varying) |
(character varying) |
managerid (bigint) |
|---|---|---|---|---|
| 1 | John | Smith | john.smith@myorg.com | 1 |
| 2 | Richard | Brown | richard.brown@myorg.com | 1 |
| 3 | Michael | Williams | michael.williams@myorg.com | 1 |
| 4 | Mary | Clark | mary.clark@myorg.com | 1 |
| 5 | Sarah | George | sarah.george@myorg.com | 1 |
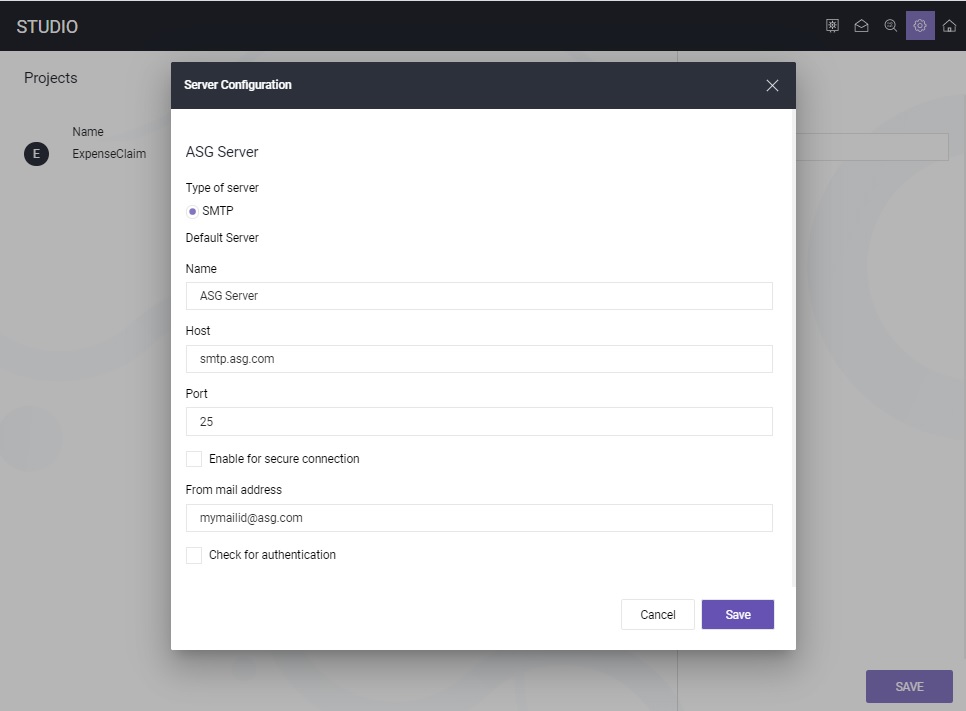
Configure Server
The expense claim process app requires an SMTP server configuration to send notifications to the users of the process app.
Perform the following steps:
- Launch ASG Studio.
- Click Server from the menu.
- On the Server Configuration screen, enter the below details and click Save.
Select SMTP as Type of server.
Enter ASG Server as Name.
- Enter smtp.asg.com as Host.
- Enter 25 as Port.
Enter arunkumar.s@asg.com as From mail address.
Create Project
The employee expense process app requires a project to contain the UI screens and process flow.
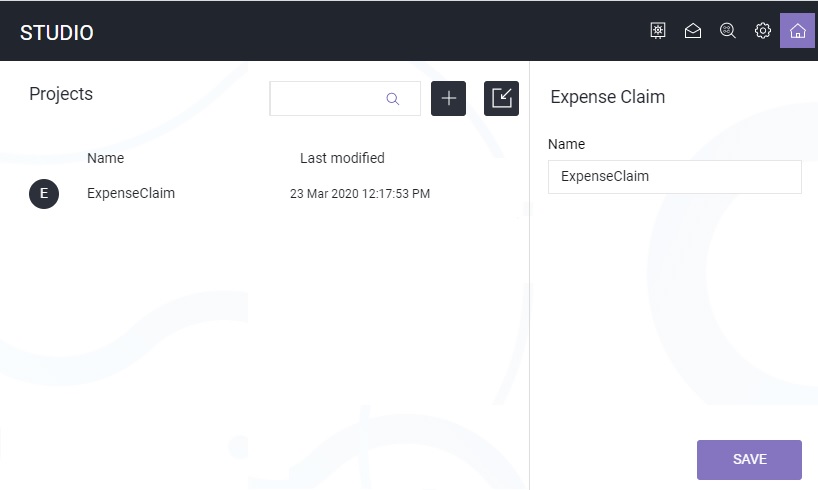
Perform the following steps:
- Launch ASG-Studio.
- On the Projects screen, click ADD. If you are creating your first project, click Create Now.
- Enter ExpenseClaim as Name and click Save.
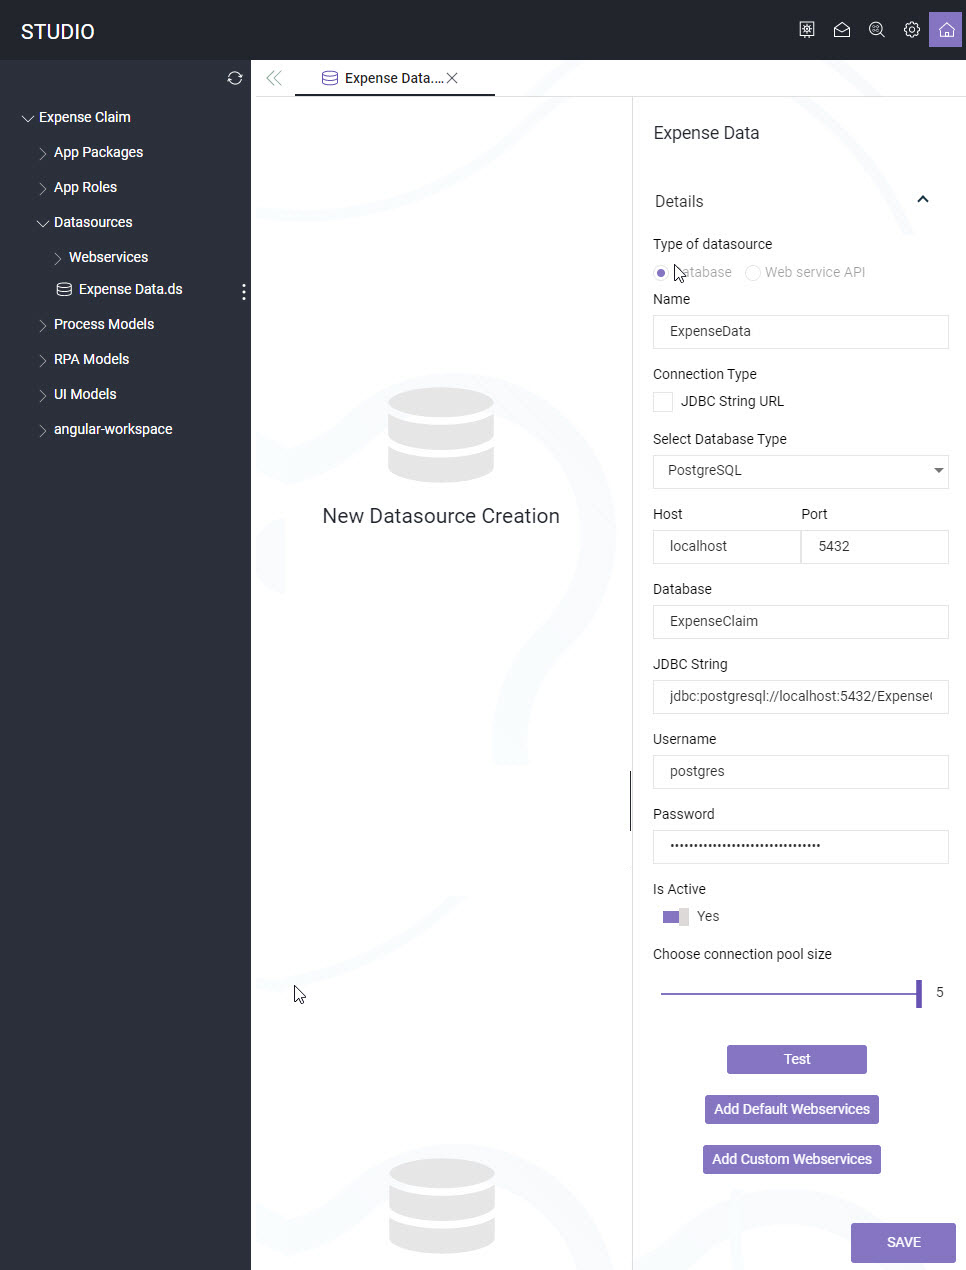
Create Datasource
The expense claim process app requires to validate employee details, store and retrieve the claim details, and store the claim process information.
Perform the following steps:
- Open the Expense Claim project.
- Navigate to the Datasources folder, click New and then click Datasources from the context menu.
- Enter the following details:
- Select Database as Type of datasource.
- Enter ExpenseData as Name.
- Select PostgreSQL as Database Type.
- Enter Localhost as Host.
- Enter 5432 as Port.
- Enter ExpenseClaim as Database.
- Enter postgres as Username.
- Enter p@ssW0rd as Password.
- Set Is Active to Yes.
- Set Choose connection pool size to 5.
- Click Test to ensure that the database connection is working.
- Click Save.
- Click Add Custom Webservices and generate the following methods:
| Required settings | Values to enter |
|---|---|
| Method Name |
getEmpById |
| Query Type |
Standard |
|
Operation |
Select |
| Table |
public.Employee |
| Columns | empid, firstname, lastname, email, managerid |
| Filters | empid (EQ) |
| Required settings | Values to enter |
|---|---|
| Method Name |
getAllEmp |
| Query Type |
Standard |
| Operation | Select |
|
Table |
public.Employee |
| Columns |
empid, firstname, lastname, email, managerid |
| Required settings | Values to enter |
|---|---|
| Method Name |
insertClaim |
| Query Type |
Standard |
|
Operation |
Insert |
| Table |
public.Claims |
| Columns | managerid, empid, claimamount, claimdescription, claimstatus |
| Required settings | Values to enter |
|---|---|
| Method Name | getClaimById |
| Query Type | custom |
| Custom Query | Select * from public."Claims" where public."Claims"."claimid"=? |
| Parameters | claimid (BIGINT) |
| Required settings | Values to enter |
|---|---|
| Method Name | updateClaimStatus |
| Query Type | Standard |
| Operation | Update |
| Table | public.Claims |
| Columns | claimstatus |
| Filters | claimid (EQ) |
Create UI Models and Process Model
The expense claim process app requires two UI models and one process model. While designing the UI models, you have to provide the reference to process model and while defining the process model the reference to UI model is required. So it is a recommended practice to create all the required UI models and process models before you start designing them.
Perform the following steps:
- Open the Expense Claim project.
- Navigate to UI Models and click New.
- Enter ClaimR as the File Name and click OK.
- Click New again to create one more UI Model.
- Enter ClaimD as the File Name and click OK.
- Navigate to Process Models and click New.
- Enter ExpenseClaimProcessModel as Name and click Save.
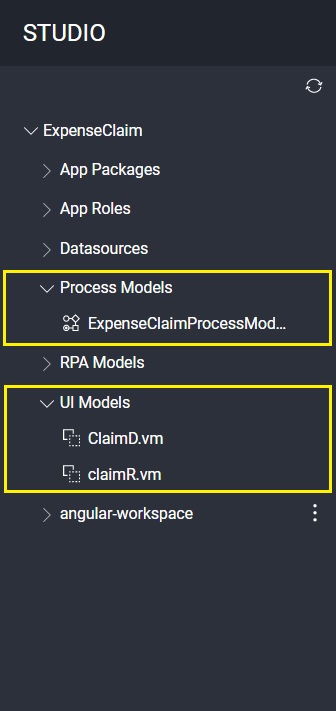
The UI models and process model are successfully created. After creating the required files, the folder structure looks as shown in the above image.
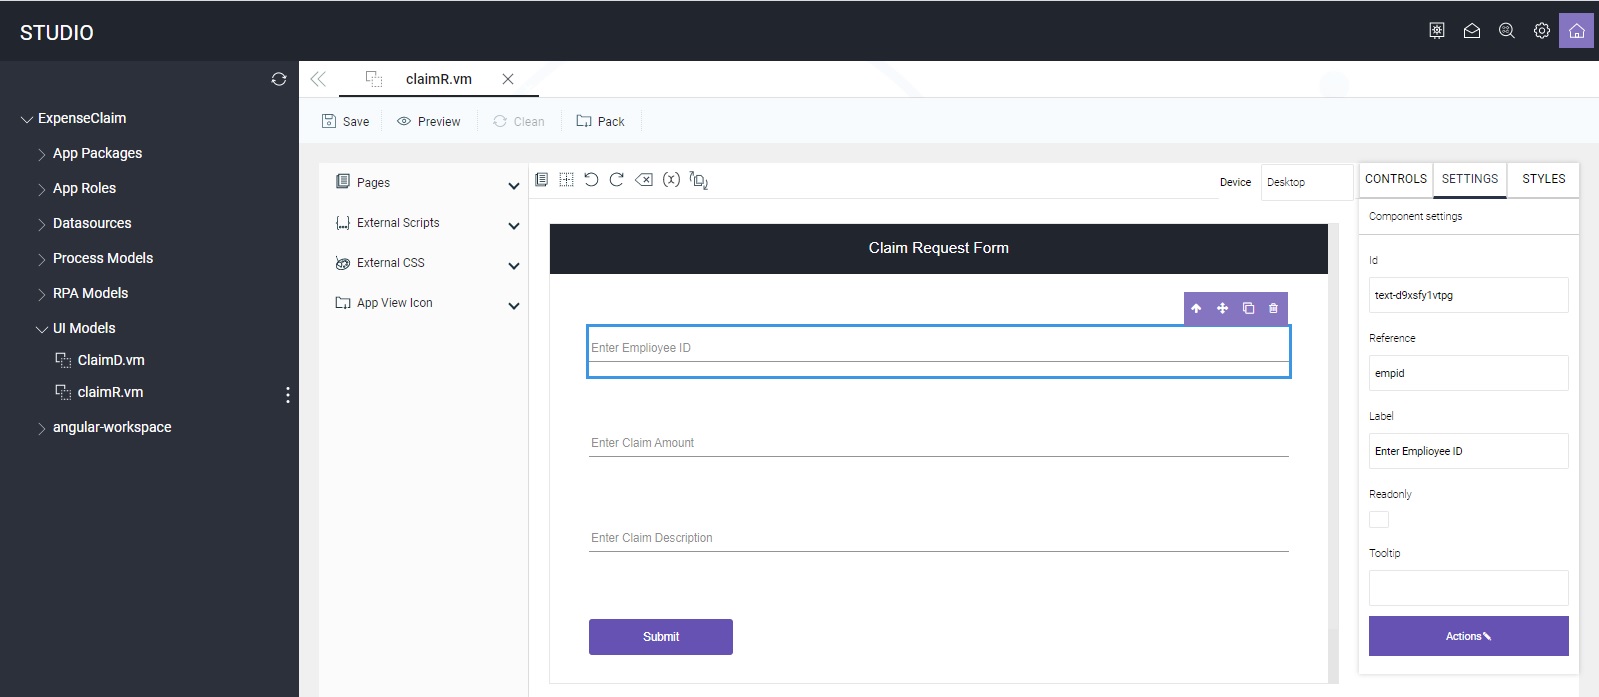
Design Claim Request Form
The expense claim process app requires claim request form for employees to submit the expense claim details for manager's approval.
Perform the following steps:
- Open the Expense Claim project.
- Navigate to UI Models and click ClaimR.vm.
- Add the UI controls and configure the settings of each control as below and save the file.
- Enter Start Process as Name.
- Select ExpenseClaimProcessModel.pm from the Select Process drop-down
- Enter the following key-value pairs as parameters:
- empid - empid
- claimreason - claimreason
- claimamount - claimamout
- Click Preview to see how the ClaimR view looks like after publishing.
- Click Pack.
| Required settings | Values to enter |
|---|---|
| UI Control | Header (Every page that you add in UI model, by default includes a header control. Select the header control and navigate to Settings tab to modify the label) |
| Label |
Claim Request Form |
| Required settings | Values to enter |
|---|---|
| UI Control | Text-Input |
| Label |
Enter Employee ID |
| Reference |
empid |
| Required settings | Values to enter |
|---|---|
| UI Control | Text-Input |
| Label |
Enter Claim Amount |
| Reference |
claimamount |
| Required settings | Values to enter |
|---|---|
| UI Control | Text-Input |
| Label |
Enter Claim Description |
| Reference |
claimreason |
| Required settings | Values to enter |
|---|---|
| UI Control | Button Single |
| Label | Submit |
| Script Model |
Select the button and click Actions under the Settings tab to launch script editor. 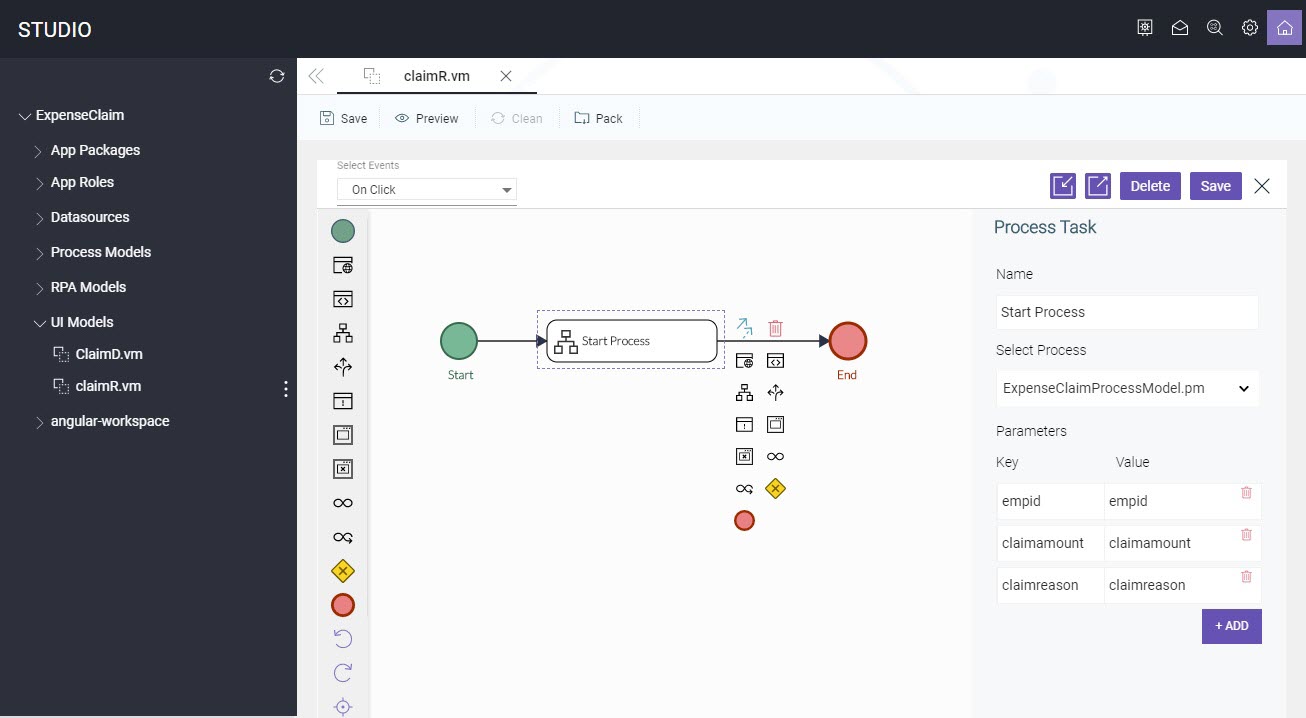
|
| Script Model - Select Events | On Click |
| Script Model - Start Event | Enter Start as Name. |
| Script Model - Process Task |
|
| Script Model - End Event | Enter End as Name. |
A new file with the name ClaimR.rp is created under the folder angular-workspace, dist, prod, ClaimR.
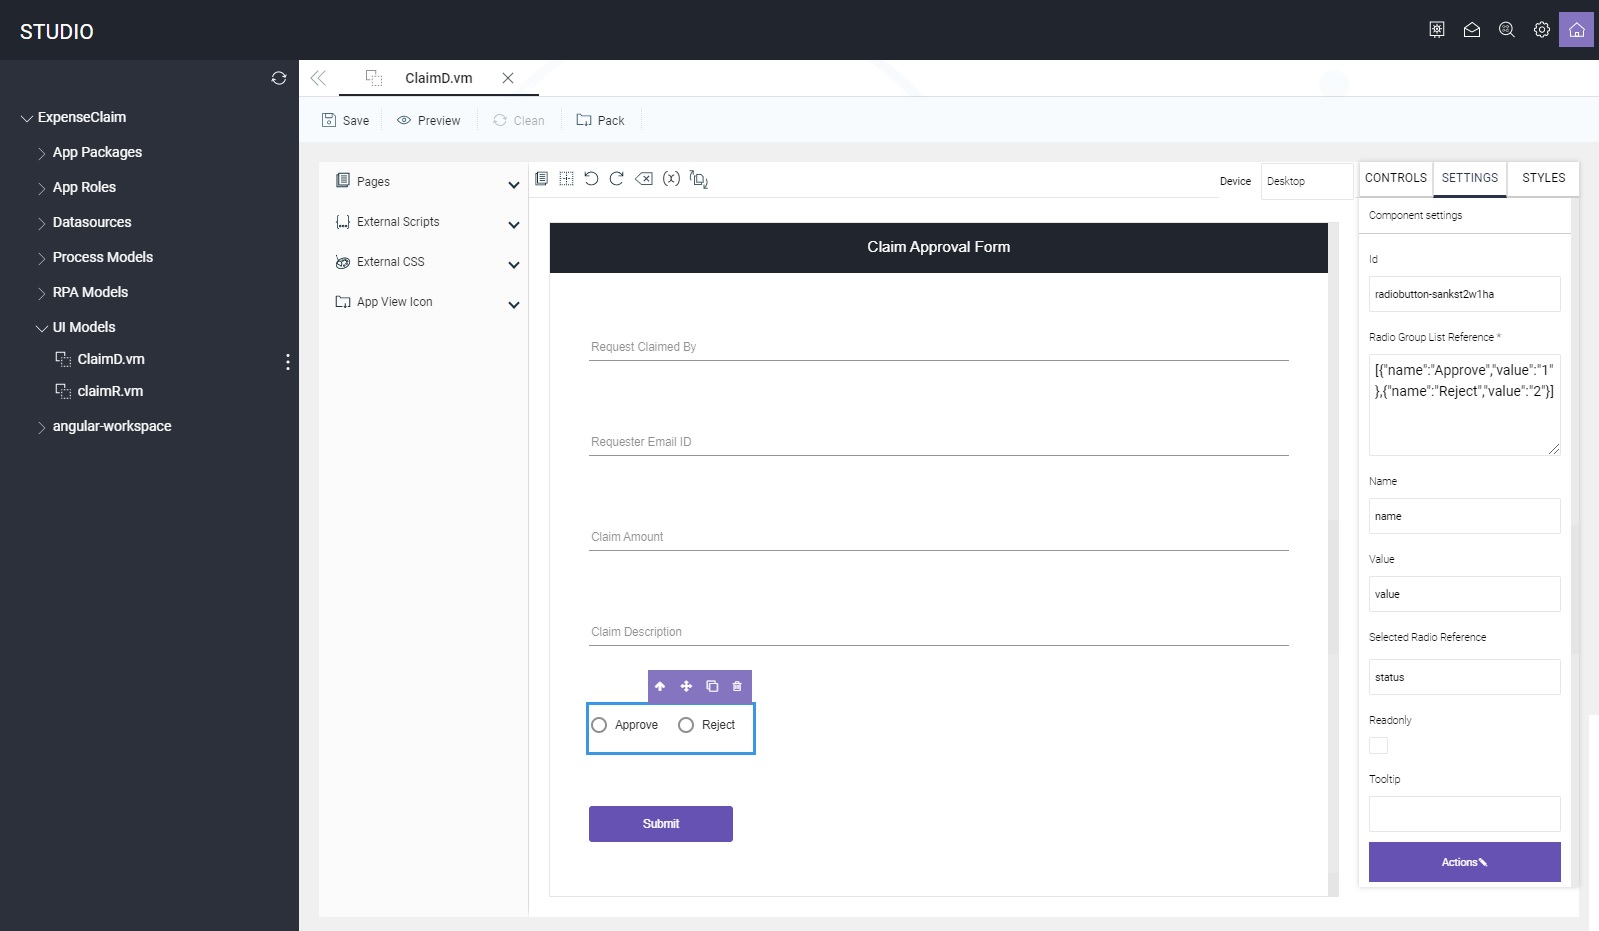
Design Claim Approval Form
The expense claim process app requires claim approval form for managers to approve the expense claim submitted by employees.
Perform the following steps:
- Open the Expense Claim project.
- Navigate to UI Models and click ClaimD.vm.
- Add the UI controls and configure the settings of each control as below and save the file.
- Enter Start Process as Name.
- Select ExpenseClaimProcessModel.pm from the Select Process drop-down
- Enter the following key-value pair as parameters:
- status - status
- Click Preview to see how the ClaimD view looks like after publishing.
- Click Pack.
| Required settings | Values to enter |
|---|---|
| UI Control | Header (Every page that you add in UI model, by default includes a header control. Select the header control and navigate to Settings tab to modify the label.) |
| Label |
Claim Approval Form |
| Required settings | Values to enter |
|---|---|
| UI Control | Text-Input |
| Label |
Request Claimed by |
| Reference |
empfirstname |
| Required settings | Values to enter |
|---|---|
| UI Control | Text-Input |
| Label |
Requester Email ID |
| Reference |
empemail |
| Required settings | Values to enter |
|---|---|
| UI Control | Text-Input |
| Label |
Claim Amount |
| Reference |
claimamount |
| Required settings | Values to enter |
|---|---|
| UI Control | Text-Input |
| Label |
Claim Description |
| Button Type |
claimreason |
| Required settings | Values to enter |
|---|---|
| UI Control | Selector-Radio Group |
| Radio Group List Reference |
[{"name":"Approve","value":"1"},{"name":"Reject","value":"2"}] |
| Value | value |
| Name | name |
| Selected Radio Reference | status |
| Required settings | Values to enter |
|---|---|
| Button Type | Button Single |
| Label |
Submit |
| Script Model |
Select the button and click Actions under the Settings tab to launch script editor. 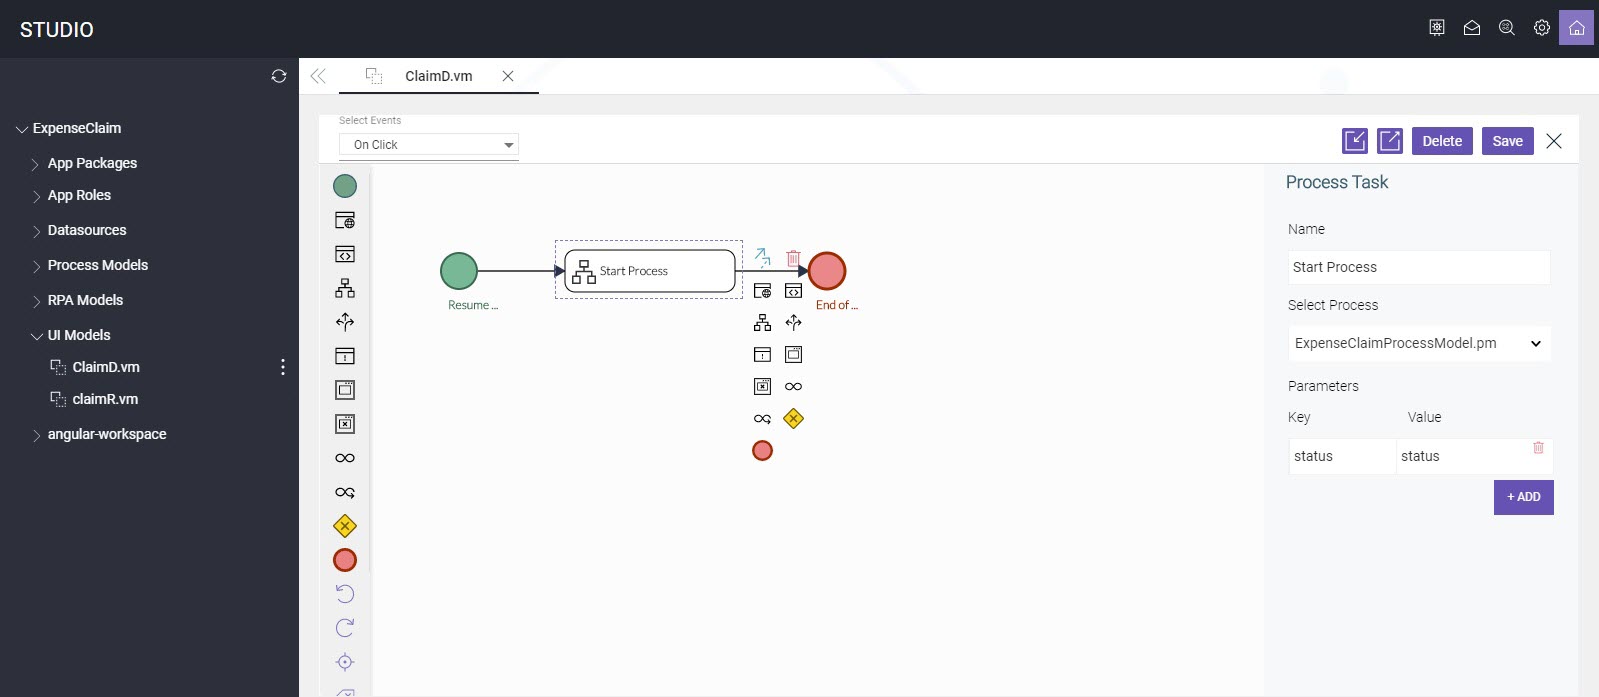
|
| Script Model - Select Events |
On Click |
| Script Model - Start Event | Enter Resume Process as Name. |
| Script Model - Process Task |
|
| Script Model - End Event | Enter End of Process as Name |
A new file with the name ClaimD.rp is created under the folder angular-workspace, dist, prod, ClaimD.
Define Process Flow
The expense claim process app requires a process model to enable the flow of expense claim form through different states. For this example, the process model with the name is defined as shown in the below diagram:
Perform the following steps:
- Open the Expense Claim project.
- Navigate to Process Models and click ExpenseClaimProcessModel.pm.
- Draw the process model as shown in the image.
- Configure each element in the process model as below and save the file.

| Required settings | Values to enter |
|---|---|
| Name |
Start Claim Process |
| List of References and Reference Type |
empid (Number, Mandatory), claimamount (Number, Mandatory), claimreason (String, Mandatory) |
| Required settings | Values to enter |
|---|---|
| Name |
Employee Details |
| Datasource |
ExpenseData |
| Method | getEmpById |
| Attributes - empid | empid |
| Response | employeedetails |
| Advanced - Custom Script - On After |
$pm.addMemVariable("empfirstname", employeedetails.data.results[0].firstname); $pm.addMemVariable("empemail", employeedetails.data.results[0].email); |
| Required settings | Values to enter |
|---|---|
| Name |
Insert Details |
| Datasource |
ExpenseData |
| Method | insertClaim |
| Attributes - managerid | employeedetails.data.results[0].managerid |
| Attributes - empid |
empid |
| Attributes - claimamount | claimamount |
| Attributes - claimdescription | claimreason |
| Attributes - claimstatus | "0" |
| Response | insertresp |
| Required settings | Values to enter |
|---|---|
| Name |
Get Manager Details |
| Datasource |
ExpenseData |
| Method | getEmpById |
| Attributes - empid | employeedetails.data.results[0].managerid |
| Response | empdetresp |
| Advanced - Custom Script - On After | $pm.addMemVariable("toname", empdetresp.data.results[0].firstname); |
| Required settings | Values to enter |
|---|---|
| Name |
Notify Manager |
| Type of Notification |
With Action |
| Form - From User | empfirstname |
| Assignee - Expression | toname |
| Form - Select One | Existing |
| Form - Choose File | ClaimD.vm |
| Form - List of References | claimamount, claimreason, status, empemail, empfirstname |
| Required settings | Values to enter |
|---|---|
| Name |
Update Status |
| Datasource |
ExpenseData |
| Method | updateClaimStatus |
| Attributes - claimid | insertresp.data.System_Generated_Properties.claimid |
| Attributes - claimstatus | status |
| Response | updatestatus |
| Required settings | Values to enter |
|---|---|
| Name |
Claim Status |
| Required settings | Values to enter |
|---|---|
| Name |
Approve |
| Condition | status==1 |
| Required settings | Values to enter |
|---|---|
| Name |
Reject |
| Condition | status==2 |
| Required settings | Values to enter |
|---|---|
| Name |
Notify Employee Approve |
| Type of Notification |
Message Only |
| Form - From User | "Manager" |
| Form - Assignee - Expression | empfirstname |
| Channel - From | empdetresp.data.results[0].email |
| Channel - Subject | "Claim Approved" |
| Channel - To | empemail |
|
Body Note: It is recommended to manually enter the text of body to avoid possible errors that may occur due to copy and paste. |
Hi User,
Your expense claim with ID - claimid has been approved.
Regards, manager |
| Replace Word - With |
User - empfirstname manager - empdetresp.data.results[0].firstname claimid - insertresp.data.System_Generated_Properties.claimid |
| Required settings | Values to enter |
|---|---|
| Name |
Notify Employee Reject |
| Type of Notification |
Message Only |
| Form - From Uer | "Manager" |
| Form - Assignee - Expression | empfirstname |
| Channel - From | empdetresp.data.results[0].email |
| Channel - Subject | "Claim Rejected" |
| Channel - To | empemail |
|
Body Note: It is recommended to manually enter the text of body to avoid possible errors that may occur due to copy and paste. |
Hi User,
Your expense claim with ID - claimid has been rejected .
Regards, manager |
| Replace Word - With |
User - empfirstname manager - empdetresp.data.results[0].firstname claimid - insertresp.data.System_Generated_Properties.claimid |
| Required settings | Values to enter |
|---|---|
| Name |
End of Process |
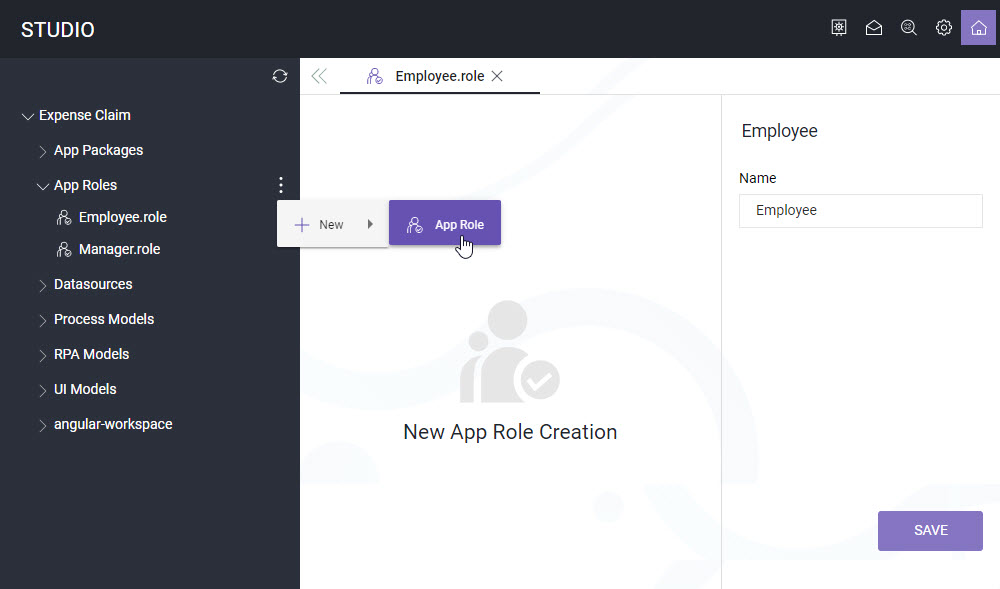
Create App Roles
The expense claim process app involves two user roles - one is employee and the second is manager.
Perform the following steps:
- Open the Expense Claim project.
- Navigate to App Roles and click Create.
- Enter Employee as Name and click Save.
- Click Create to add another app role.
- Enter Manager as Name and click Save.
Create App Package
Perform the following steps:
- Open the Expense Claim project.
- Navigate to the angular-wrokspace, dist, prod, ClaimR folder.
- Perform the following steps:
- Click the ClaimR.rp file.
- Click +ASSIGN ROLE.
- Select Employee and click Save.
- Navigate to the angular-wrokspace, dist, prod, ClaimD folder.
- Click the ClaimD.rp file.
- Click +ASSIGN ROLE.
- Select Manager and click Save.
- Navigate to App Packages and click New.
- Enter ExpenseClaim as Name.
- Enter 1.0 as Version.
- Select App Views, App Roles, Process Model and Datasources that you created above.
- Click Save.
- Navigate to the app package and click Download.
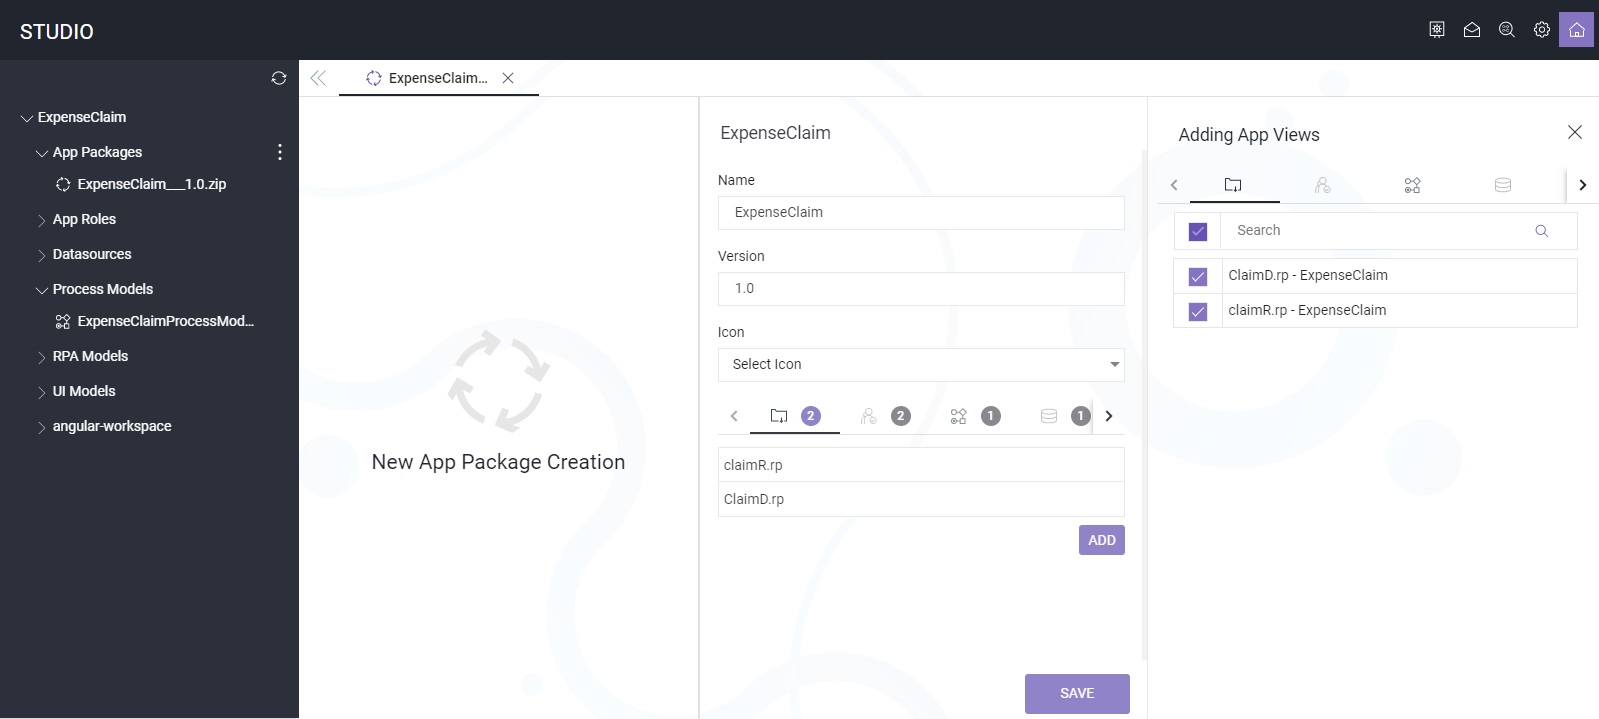
The app package is created with the name ExpenseClaim_1.0.zip under the App Packages folder.
The ExpenseClaim_1.0.zip file downloads to your local computer. You can now deploy this application in ASG-Zenith Portal (On-Premises) or ASG-Zenith Portal (SaaS).