
Leave Request Process with Timer Event
This tutorial walks you through the process of designing leave request process application with timer event. This application includes the process of an employee applying for leave, submitting the request to the manager, and the manager approving or rejecting the request. Additionally this application includes a timer event to facilitate the organization policy of auto approving the employee leave request if the manager does not respond within twenty four hours.
This tutorial illustrates how to design the leave request process app through the following steps:
Verify Prerequisites
ASG-Studio must have installed and a database is available with the necessary data. For this example:
- ASG-Studio is installed and is accessible through the URL - http://localhost:8080/index.html.
- PostgreSQL is installed on the local computer and a database is created for this tutorial as per the following details:
- Database name: LeaveManagement
- User name: postgres
- Password: p@ssW0rd
- The public.Employee table contains the following columns and data:
- The public.LeaveRecords table contains the following columns:
- empid (bigint)
- fromdate (character varying)
- todate (character varying)
- leavetype (character varying)
- leaveid [PK] (bigserial)
- managerid (bigint)
- status (character varying)
|
empid [pk] (bigint) |
firstname (character varying) |
lastname (character varying) |
(character varying) |
managerid (bigint) |
|---|---|---|---|---|
| 1 | John | Smith | john.smith@myorg.com | 1 |
| 2 | Richard | Brown | richard.brown@myorg.com | 1 |
| 3 | Michael | Williams | michael.williams@myorg.com | 1 |
| 4 | Mary | Clark | mary.clark@myorg.com | 1 |
| 5 | Sarah | George | sarah.george@myorg.com | 1 |
Configure Server
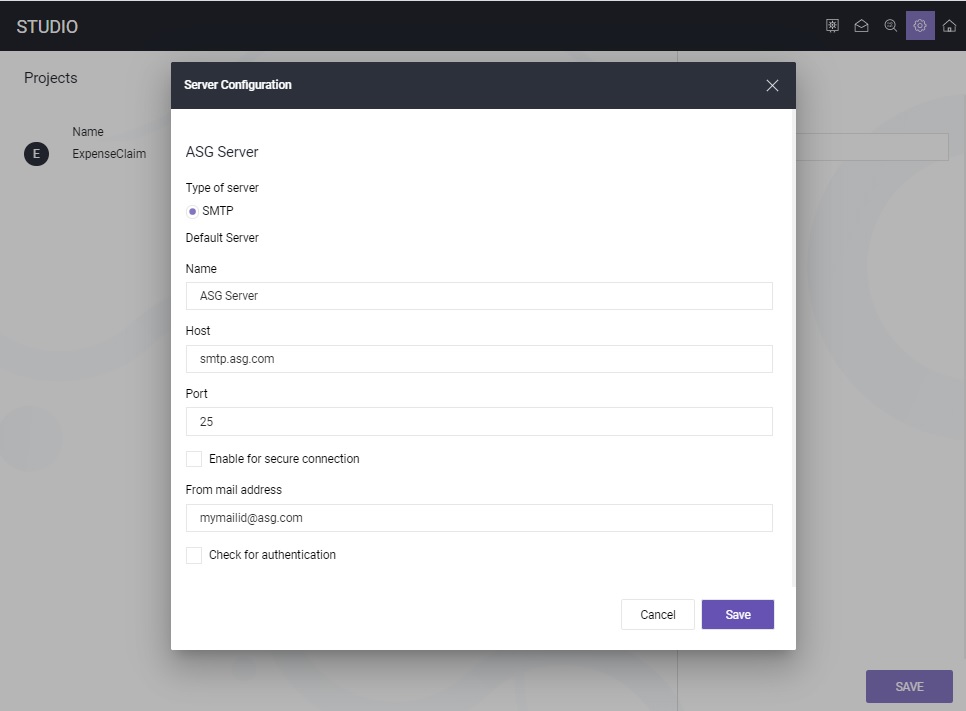
The leave request process app requires an SMTP server configuration to send notifications to the users of the process app.
Perform the following steps:
- Launch ASG Studio.
- Click Server from the menu.
- On the Server Configuration screen, enter the below details and click Save.
Select SMTP as Type of server.
Enter ASG Server as Name.
- Enter smtp.asg.com as Host.
- Enter 25 as Port.
Enter arunkumar.s@asg.com as From mail address.
Create Project
The leave request process app requires a project to contain the UI screens and process flow.

Perform the following steps:
- Launch ASG-Studio.
- On the Projects screen, click ADD. If you are creating your first project, click Create Now.
- Enter LeaveManagement as Name and click Save.
Create Datasource
The leave request process app requires to validate employee details and store the leave records.
Perform the following steps:
- Open the LeaveManagement project.
- Navigate to Datasources and click Create.
- Enter the following details:
- Select Database as Type of datasource.
- Enter Leave Management as Name.
- Select PostgreSQL as Database Type.
- Enter Localhost as Host.
- Enter 5432 as Port.
- Enter postgres as Username.
- Enter LeaveManagement as Database.
- Enter p@ssW0rd as Password.
- Set Is Active to Yes.
- Set Choose connection pool size to 5.
- Click Test to ensure that the database connection is working.
- Click Save.
- Click Add Custom Webservices and generate the following methods:

| Required settings | Values to enter |
|---|---|
| Method Name |
getEmployeeDetails |
| Query |
Standard |
|
Operation |
Select |
| Table |
public.Employee |
| Columns | empid, firstname, lastname, email, managerid |
| Filters | empid (EQ) |
| Required settings | Values to enter |
|---|---|
| Method Name |
getManagerDetails |
| Query |
Standard |
| Operation | Select |
|
Table |
public.Employee |
| Columns | empid, firstname, lastname, email |
| Filters | empid (EQ) |
| Required settings | Values to enter |
|---|---|
| Method Name |
insertLeave |
| Query |
Standard |
|
Operation |
Insert |
| Table |
public.LeaveRecords |
| Columns | empid, managerid, leavetype, fromdate, todate |
| Required settings | Values to enter |
|---|---|
| Method Name |
updateLeaveStatus |
| Query |
Standard |
|
Operation |
Update |
| Table |
public.LeaveRecords |
| Columns | status |
| Filters | leaveid (EQ) |
Create UI Models and Process Model
The leave request process app requires two UI models and one process model. While designing the UI models, you have to provide the reference to process model and while defining the process model the reference to UI model is required. So it is a recommended practice to create all the required UI models and process models before you start designing them.
Perform the following steps:
- Open the LeaveManagement project.
- Navigate to UI Models and click New.
- Enter LeaveRequest as the File Name and click OK.
- Click New again to create one more UI Model.
- Enter LeaveApproval as the File Name and click OK.
- Navigate to Process Models and click New.
- Enter LeaveRequestProcess as Name and click Save.

The UI models and process model are successfully created. After creating the required files, the folder structure looks as shown in the image.
Design Leave Request Form
The leave request process app requires leave request form for employees to submit the leave details for manager's approval.
Perform the following steps:
- Open the Leave Management project.
- Navigate to UI Models and click LeaveRequest.vm.
- Add the UI controls and configure the settings of each control as below and save the file.
- Enter Start Process as Name.
- Select LeaveRequestProcess.pm from the Select Process drop-down
- Enter the following key-value pairs as parameters:
- empid - empid
- fromdate - fromdate
- todate - todate
- leavetype - leavetype
- Click Build to generate the application build.
- A new folder with the name LeaveRequest is created under the angular-workspace, dist folder.
- Click Preview to see how the LeaveRequest view looks like after deploying.
- Click Pack.

| Required settings | Values to enter |
|---|---|
| UI Control | Header (Every page that you add in UI model, by default includes a header control. Select the header control and navigate to Settings tab to modify the label) |
| Label |
Leave Request Form |
| Required settings | Values to enter |
|---|---|
| UI Control | Text Input |
| Label |
Enter Employee Id |
| Reference |
empid |
| Required settings | Values to enter |
|---|---|
| UI Control | Text-Date |
| Label |
Select From Date |
| Reference |
fromdate |
| Required settings | Values to enter |
|---|---|
| UI Control | Text-Date |
| Label |
Select To Date |
| Reference |
todate |
| Required settings | Values to enter |
|---|---|
| UI Control | Selector-Selectbox |
| Label |
Select Leave Type |
| Selected Option Reference |
leavetype |
| Options List Reference | [{"key":"Casual","value":"Casual Leave"},{"key":"Sick","value":"Sick Leave"},{"key":"Vacation","value":"Vacation Leave"}] |
| Name | key |
| Value | value |
| Select Option Reference | leavetype |
| Required settings | Values to enter |
|---|---|
| UI Control |
Button Single |
| Label |
Submit |
| Script Model |
Select the button and click Actions under the Settings tab to launch script designer.
|
| Script Model - Select Events |
On Click |
| Script Model - Start Event | Enter Start as Name. |
| Script Model - Process Task |
Select the Process Task and enter the following details: |
| Script Model - End Event | Enter End as Name. |

A new file with the name LeaveRequest.rp is created under the folder angular-workspace, dist, prod, LeaveRequest.
Design Leave Approval Form
The leave request process app requires leave approval form for for manager's to view the employee request and approve or reject the request.
Perform the following steps:
- Open the Leave Management project.
- Navigate to UI Models and click New.
- Enter LeaveApproval as the File Name and click OK.
- Add the UI controls as shown in the below image.
- Configure the settings of each control as follows:
- Enter Start Process as Name.
- Select LeaveRequestProcess.pm from the Select Process drop-down
- Enter the following key-value pair as parameters:
- status - status
- Click Preview to see how the LeaveApproval view looks like after publishing.
- Click Pack.

| Required settings | Values to enter |
|---|---|
| UI Control | Header (Every page that you add in UI model, by default includes a header control. Select the header control and navigate to Settings tab to modify the label) |
| Label |
Leave Approval Form |
| Required settings | Values to enter |
|---|---|
| UI Control | Text-Input |
| Label |
Employee ID |
| Reference |
empid |
| Required settings | Values to enter |
|---|---|
| UI Control | Text-Input |
| Label |
First Name |
| Reference |
employeedetails.firstname |
| Required settings | Value to enter |
|---|---|
| UI Control | Text-Input |
| Label |
Last Name |
| Reference |
employeedetails.lastname |
| Required settings | Value to enter |
|---|---|
| UI Control | Text-Input |
| Label |
From Date |
| Reference |
fromdate |
| Read only | Yes |
| Required settings | Value to enter |
|---|---|
| UI Control | Text-Input |
| Label |
To Date |
| Reference |
todate |
| Read only | Yes |
| Required settings | Value to enter |
|---|---|
| UI Control | Text-Input |
| Label |
Leave Type |
| Reference |
leavetype |
| Required settings | Value to enter |
|---|---|
| UI Control | Selector-Radio Group |
| Selected Radio Reference |
status |
| Radio Group List Reference |
[{"name":"Approve", "value": "Approved"},{"name":"Reject", "value": "Rejected"}] |
| Name | name |
| Value | value |
| Required settings | Value to enter |
|---|---|
| UI Control |
Button Single |
| Label |
Submit |
| Script Model |
Select the button and click Actions under the Settings tab to launch script designer.
|
| Script Model - Select Events | On Click |
| Script Model - Start Event | Enter Start as Name. |
| Script Model - Process Task |
|
| Script Model - End Event | Enter End as Name |

A new file with the name LeaveApproval.rp is created under the folder angular-workspace, dist, prod, LeaveApproval.
Define Process Flow
The leave request process app requires a process model to enable the flow of leave request through different states.
Perform the following steps:
- Open the Leave Request project.
- Navigate to Process Models and click New.
- Specify LeaveRequestProcess as Name and click Save.
- Draw the process model as shown in the image.
- Configure each element in the process model as follows:
- Drag the Intermediate Event element on the Notify Manager user task. The user task element boundaries get highlighted.
- Drop the Intermediate Event on one of the boundaries.
- Select the Intermediate Event, click Type and then click Timer Boundary Event. The tasks that you route from this Timer Boundary Event will be executed as per the timer event conditions.
- In the Timer Boundary Event properties panel, enter the following details:
Required settings Values to enter Name Auto Approve
Due In Day(s) - 1; Hour(s) - 0; Minute(s) - 0

| Required settings | Values to enter |
|---|---|
| Name |
Submit Leave Request |
| List of References and Reference Type |
empid (Number, Mandatory), leavetype (String, Mandatory), fromdate (String, Mandatory), todate (String, Mandatory) |
| Required settings | Values to enter |
|---|---|
| Name |
Get Employee Details |
| Datasource |
Leave Management |
| Method | getEmployeeDetails |
| Attributes Parameters - empid | empid |
| Response | employeedetails |
| Advanced - Custom Script - On After |
employeedetails = employeedetails.data.results[0]; |
| Required settings | Values to enter |
|---|---|
| Name |
Insert Leave |
| Datasource |
Leave Management |
| Method | insertLeave |
| Attributes Body - managerid | employeedetails.managerid |
| Attributes Body - empid |
empid |
| Attributes Body - leavetype | leavetype |
| Attributes Body - fromdate | fromdate |
| Attributes Body - todate | todate |
| Response | insertresp |
| Required settings | Values to enter |
|---|---|
| Name |
Get Manager Details |
| Datasource |
LeaveManagement |
| Method | getEmployeeDetails |
| Attributes Parameters - empid | employeedetails.managerid |
| Response | managerdetails |
| Advanced - Custom Script - On After |
managerdetails = managerdetails.data.results[0]; $pm.addMemVariable("test", "a"); |
| Required settings | Values to enter |
|---|---|
| Name |
Notify Manager |
| Type of Notification | With Action |
| Form-From User | employeedetails.firstname |
| Form - Assignee - Expression | managerdetails.firstname |
| Form - Select One | Existing |
| Form - Choose File | LeaveApproval.vm |
| Form - List of References | empid, employeedetails, leavetype, fromdate, todate |
| Channel - From | employeedetails.email |
| Channel - Subject | "Leave Request" |
| Channel - To | managerdetails.email |
| Channel - Body | New Leave Request |
Perform the following steps:
| Required settings | Values to enter |
|---|---|
| Name |
Update Status |
| Datasource |
Leave Management |
| Method | updateLeaveStatus |
| Attributes Parameters - leaveid |
insertresp.data.System_Generated_Properties.leaveid |
| Attributes Body - status | status |
| Response | updateStatusResponse |
| Required settings | Values to enter |
|---|---|
| Name |
Auto Update Status |
| Datasource |
Leave Management |
| Method | updateLeaveStatus |
| Attributes Parameters - leaveid |
insertresp.data.System_Generated_Properties.leaveid |
| Attributes Body - status | status |
| Response | updateStatusResponse |
| Advanced - Custom Script - On Before | $pm.addMemVariable("status", "Auto Approved") |
| Required settings | Values to enter |
|---|---|
| Name |
Notify Employee |
| Type of Notification |
Message Only |
| Form - From Uer | managerdetails.firstname |
| Form - Assignee - Expression | employeedetails.firstname |
| Channel - From | managerdetails.email |
| Channel - Subject | "Leave Request Status" |
| Channel - To | employeedetails.email |
|
Body Note: It is recommended to enter the text of body manually to avoid possible errors that may occur due to copy and paste. |
Dear employee, Your leave application from fromdate to todate is status. Regards, manager |
| Replace Word - With |
employee - employeedetails.firstname manager - managerdetails.firstname fromdate - fromdate todate - todate status - status |
| Required settings | Values to enter |
|---|---|
| Name |
End of Leave Request Process |
Create App Roles
The leave request process app involves to user roles - one is employee and the other is manager.
Perform the following steps:
- Open the LeaveManagement project.
- Navigate to App Roles and click Create.
- Enter Employee as Name and click Save.
- Click Create to add another app role.
- Enter Manager as Name and click Save.

The app role is created.
Create App Package
Perform the following steps:
- Open the LeaveManagement project.
- Navigate to the angular-wrokspace, dist, prod, LeaveRequest folder.
- Perform the following steps:
- Click the LeaveRequest.rp file.
- Click +ASSIGN ROLE.
- Select Employee and click Save.
- Navigate to the angular-wrokspace, dist, prod, LeaveApproval folder.
- Perform the following steps:
- Click the LeaveApproval.rp file.
- Click +ASSIGN ROLE.
- Select Manager and click Save.
- Navigate to App Packages and click New.
- Enter LeaveManagement as Name.
- Enter 1.0 as Version.
- Select App Views, App Roles, Process Model and Datasources that you created above.
- Click Save.
- Navigate to the app package and click Download.

The app package is created with the name LeaveManagement_1.0.zip under the App Packages folder.
The LeaveManagement_1.0.zip file downloads to your local computer. You can now deploy this application in ASG-Zenith Portal (On-Premises) or ASG-Zenith Portal (SaaS).