Create and Design RPA Model
The RPA Model is the a graphical representation of business process and enables you to automate the collection of related and structured activities or tasks that are part of the business process. The RPA Model also allows you to take full control of the execution sequence and the relationship between each activity.
Create RPA Model
Perform the following steps:
- Launch ASG-Studio.
- Go to the Projects page and select a project in which you want to design an RPA bot.
- Alternatively, you can create a new project and then add a new RPA Model.
- Click the context menu of the project and select Open.
- Click the expand collapse icon (>) of the project folder and then go to the RPA Models folder.
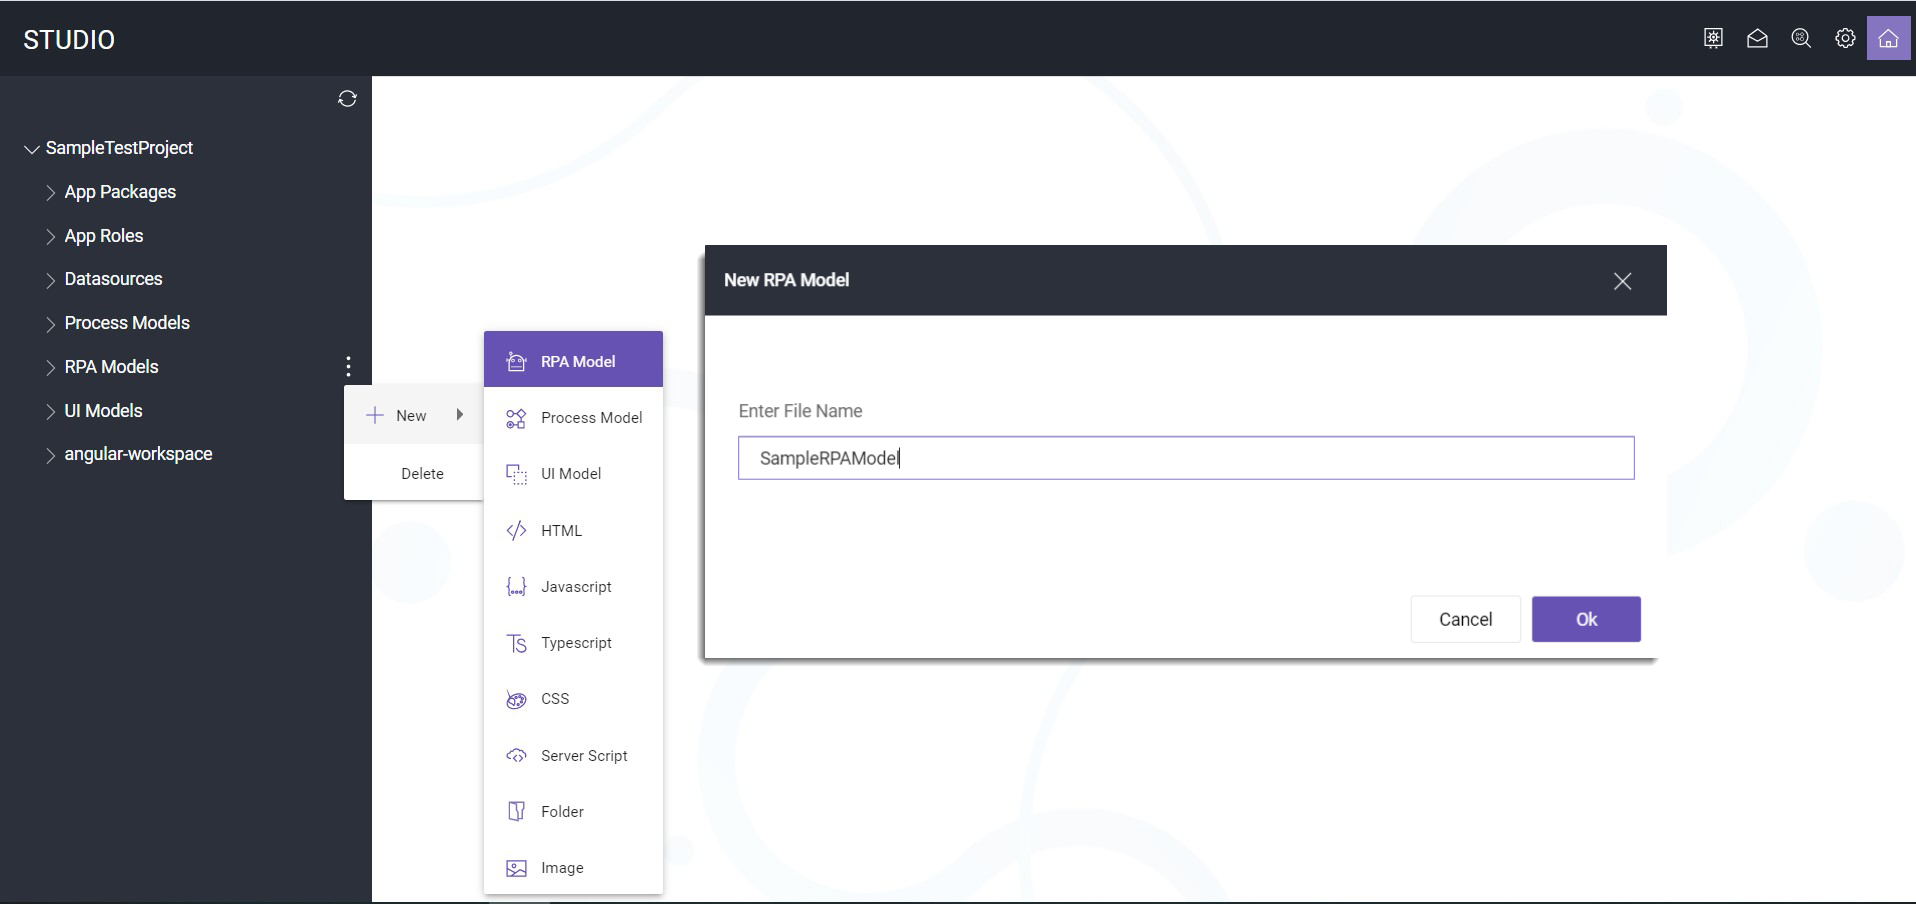
- Click the context menu icon of the RPA Models folder and select + New, then click RPA Model.
- Alternatively, click the context menu icon of the project folder and select + New, then click the RPA Model.
- Enter the filename of the RPA Model you want to design and click OK.
- The RPA model is saved with .bot file format. You can now see the RPA Modeler UI.

Provide a unique file name to identify it later quickly. You can both rename and delete the RPA Model file.
Design RPA Model
You can design the RPA Model using the activities available in the Activates Panel.
Perform the following steps:
- Create an RPA Model. Alternatively, you can open an existing RPA Model.
- You can add activities to an RPA Model using the following options:
- If you are working on a new RPA Model, then do the following:
- Drag Start Event from the Element Toolbar and drop it on the visual designer. Keep or change the default action Name.
- In the Activates Panel area, expand an Activity Group, then drag an activity and drop them onto the visual designer.
Keep or change the default display name of the activities.
- If you are working on an existing RPA Model, then expand an activity group, drag an activity and drop them onto the visual designer.
- If you are working on a new RPA Model, then do the following:
- Drag and drop more activities from the Activates Panel onto the visual designer and start building your RPA Model.
- To connect the action shapes, select the first action shape, click and hold the Sequence Flow or Association arrow icon, drag the arrow to the other shape, and then click the second action shape.
- Select an activity you have added to the visual designer and do the following:
- Properties Panel: View, enter, or adjust the properties in the context of the selected activity. The number or complexity of the properties you have to define depends on the complexity level of the activity.
- Variables Tab: Manage and add the variables you want to use in the RPA Model.
- After you finish adding all the activities and adjust their properties, do the following:
- Drag End Event from the Element Toolbar and drop it on the visual designer.
- In the Properties Panel, keep or change the default action Name.
- Connect the last activity to the End Event.
- Click Save. The RPA Model is created successfully.
- Optionally, click Validate Process in the Element Toolbar to validates each activity you have added to the RPA Model and check any related errors.
- Optionally, in the General Toolbar click Export to save the RPA Model in your local folder in JSON file format. Do the following:
- In the File Details dialog, enter the name and description of the RPA Model.
- Click Publish and then in the Save As dialog specify a location to save the JSON file.
- Click Save.

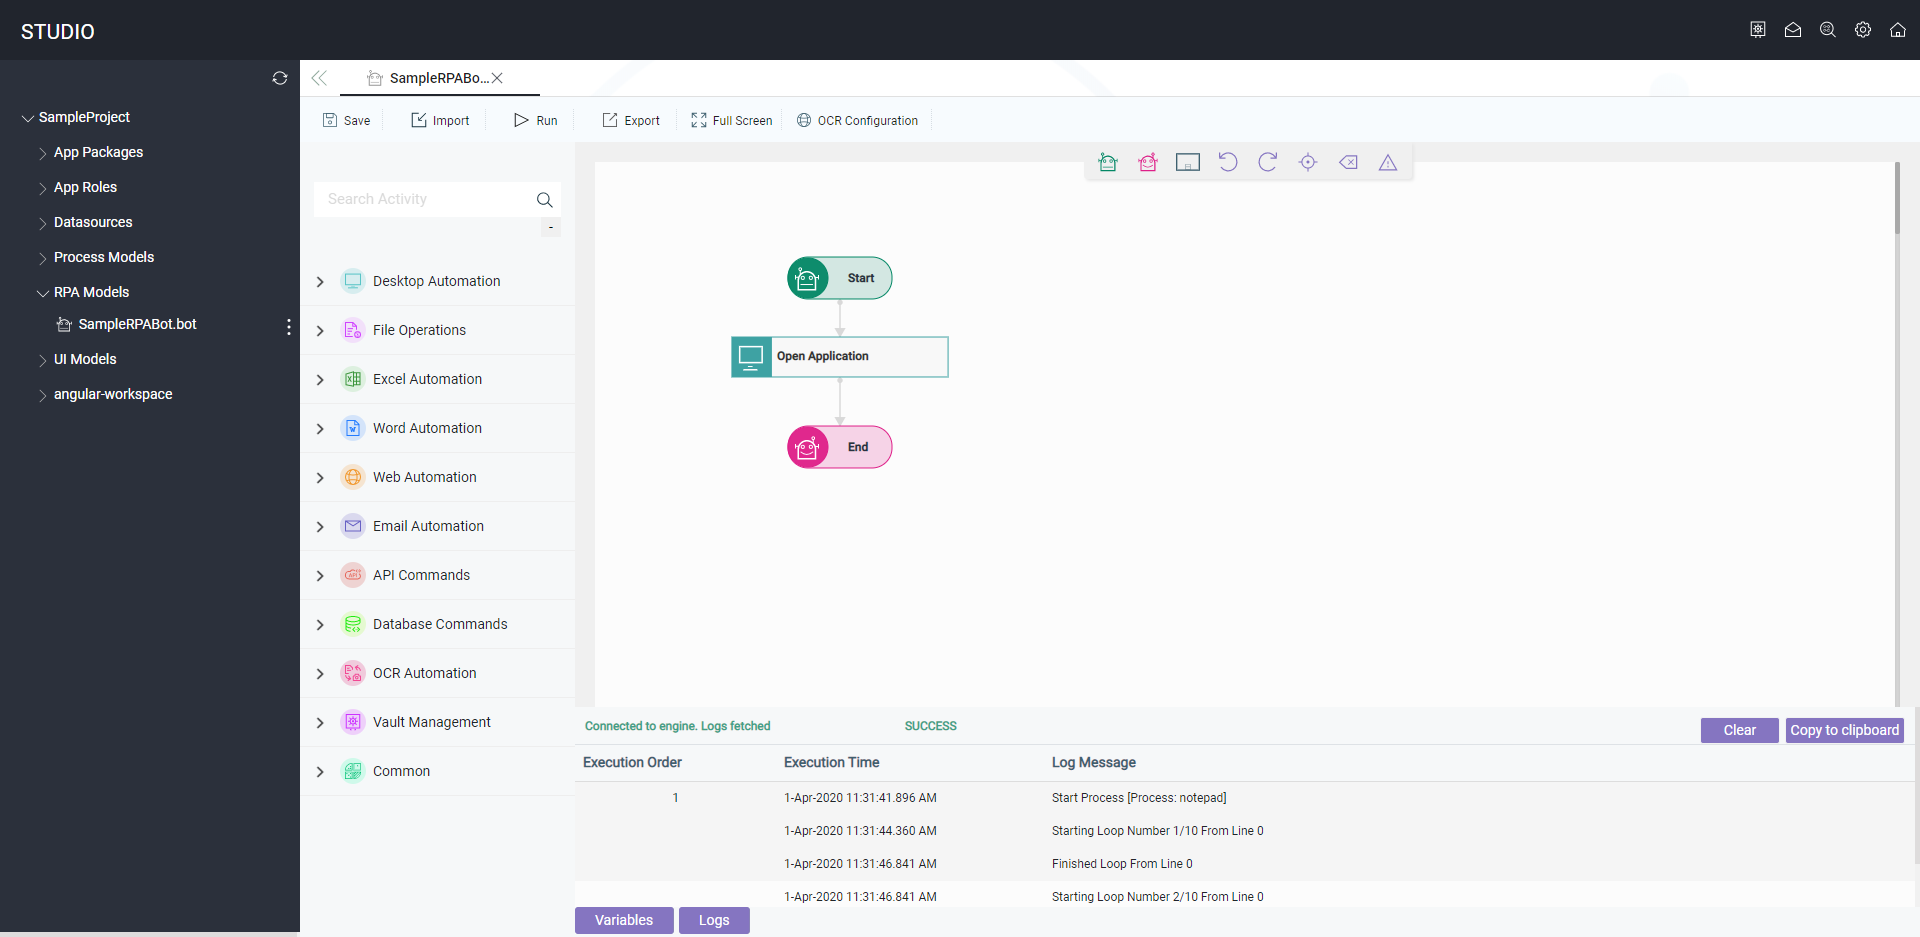
The visual designer available to create an RPA Model is divided into the following sections Activity Panel, Activites Group, General and Element Toolbar, and Logs or Variables Tab. When you add an action to the visual designer, a Properties Panel is also displayed.
The RPA visual designer provides you all the tools necessary to design an RPA Model. It provides you powerful features to validate the workflow, test a bot, debug any issues, and export the bot.
You can also use the visual designer to edit a RPA Model or select an action to check the related specified properties.
The Activity Panel shows all the available activities and the related activities that you can add to a RPA Model. A search field is also provided to search for any specific action. You can use the (+) plus, (-) minus or (>) expand button to show or hide the activities available in the activities panel. To design your RPA Model, drag activities from the activities panel and drop them directly onto the visual designer.
An activity can be defined as the basic building block of anRPA Model. You need to connect multiple activities to design a comprehensive RPA Model and should represent the sequence of related steps of a business process you want to automate. The activities are designed to help you in automating both simple and complex process tasks.
The activities available in the RPA visual designer are organized into groups based on the type of automation or the applications that the activity would interact with. The activity groups also help you to quickly navigate through all the available activities you can use to design an RPA Model.
|
Activity Set |
Description |
|---|---|
|
Automate any process that involves computer applications, such as:
|
|
|
Automate processes related to the file-related tasks, such as renaming, copying, or deleting files. |
|
|
Helps you to input, read, manipulate, extract, and analyze data in Microsoft Excel. |
|
|
Automate the task and activities performed in Microsoft Word. |
|
|
Automate process related to the task performed on web-based systems, such as screen scraping, data extraction, form filling, opening and closing a browser, or report generation. |
|
|
Automate email-related tasks performed in Microsoft Outlook. |
|
| API Commands Automation | Execute API command such as execute DLL files and REST APIs. |
| Database Commands Automation |
Create a connection to a database and then create a table. You can also insert, update, and delete the records in the database tables. |
| OCR Automation | Extract data from an image, PDF file, web location, or web element (such as captcha) and then transfer the data to a variable or another application. |
|
Automate process related to different types of tasks, such as system or Microsoft Windows GUI, error handing, loop, variables, and PDF. |
You can use the following types of the toolbar in (Undefined variable: General.ComponentRPAModeler) to perform various task:
The general toolbar provides you with the activities you need to run, debug, or publish a RPA Model.
The following table provides the list of all the available buttons in the toolbar.
| Button Name | Description |
|---|---|
|
Run |
Execute the bot you have built in your machine using the ASG Bot Engine. It helps you to test the execution of the process flow activities and compare it with the requirements. Check that the ASG Bot Engine is installed and running in your
machine before you click Run.
The process flow undergoes error validation when you run the bot. If an error is detected, the properties of the action which is faulted is highlighted, the execution is not started, and a pop-up validation error message is displayed. You must resolve any validation error and then run the bot. |
|
Save |
Save the RPA bot (JSON file) in your local repository or other specified location despite of validation error. You can later modify the process flow or deploy the bot in a computer. |
|
Import |
Import a bot JSON file in the RPA Model visual designer. |
|
Full Screen |
Make the visual designer enter full-screen mode. This feature helps you to visualize complex and broad RPA Model. To exit full-screen mode, click Esc button. |
|
Export |
Export an RPA bot to the target machine for execution of
the process automation. In the File Details dialog provide a unique name and
description, then click Publish to export the .json and ASG Bot Engine
to a specified location.
|
An Element Toolbar is also available to the visual designer to perform or add specific steps and events.
The following table provides the list of all the available buttons in the Element Toolbar.
| Button Name | Description |
|---|---|
| Start Event |
Indicates the initiating event or point of the process. In an RPA Model terminology this is labeled as Start Event. This should be the first step in the (Undefined variable: General.ComponentRPAModel)l. Properties
|
| End Event |
Indicates the ending of the process after a series of activities. Each RPA Model must start with a Start Event and after specific activities must lead to an End Event. If there is a process loop, a RPA Model can have multiple End Event. Properties
|
| Sub Process |
Split a complex process into multiple levels, which helps you to focus on a specific area of the RPA Model. A Sub Process is a type of compound activity that represents a collection of activities and any other sub-processes. |
| Undo and Redo |
Undo your last action in the visual designer or redo it if you require it. |
| Reset Scroll |
Helps you to navigate back to the start area of the complex process with several activities and events. Reset Scroll helps you to visualize complicated and broad RPA Model. |
| Clear |
Removes all the activities you have added to the visual designer. |
| Validate Process | Validates each action to run the bot and shows any related errors. It helps you to edit your RPA Model and fix any validation errors. Actions which are invalid, missing specific property items, or incorrect step order are marked with red highlight. When you select this button, a list of all the action with validation errors is displayed. |
The Logs Tab shows the log messages that are generated every time a bot is executed.
The log messages helps you to fix any issues or errors with the RPA Model. You can clear the Log Tab before running a new bot execution.
The Variables Tab enables you to manage and add variables. The variables are used to store multiple types of data associated with or used by the RPA activities .
The following table list the controls available in the Variables Tab:
| Field Name | Description |
|---|---|
| Add | Create a new variable and then add value to it. |
| Name |
Enter the name of the variable. |
| Set Text to Variable |
Specify the text or value of the variable. |
| Action | Enables you to edit, save, or delete the variables you have defined. |
When you add or select an action in the visual designer, a Properties Panel area is displayed. You can use the Properties Panel area to view, enter, or adjust the properties in the context of the selected action. When no action is selected, the Properties Panel is hidden.
The following button is available in Properties Panel area to enter or adjust properties if applicable:
- +ADD button: Define a new property value, action, or key.
- Dustbin icon: Delete a property value, action, or key.
