
Design your first Decision Services application
This tutorial explains how to use decision model in a simple process application where a hypothetical insurance company "ABC Motor Insurance Corporation" provides an application for their customers to enter a few basic details such as the vehicle type, vehicle value and certain additional covers as input to evaluate and provide the insurance premium amount as output.
This tutorial illustrates how to design the insurance premium finder decision services application through the following steps:
Verify Prerequisites
ASG-Studio must have installed and a database is available with the necessary data. For this example:
- ASG-Studio is installed and is accessible through the URL - http://localhost:8080/index.html.
- PostgreSQL database is installed on the local computer and is accessible at http://localhost:5432/InsurancePremium. The database details are as follows:
- Database name: InsurancePremium
- User name: postgres
- Password: p@ssW0rd
- The public.insurancePremium table contains the following columns:
- requestId [pk] (bigserial)
- vehicleType (character varying)
- vahicleValue (bigint)
- nilDepreciation (character varying)
- ncbProtection (character varying)
- premiumAmount (numeric)
Create Project
The insurance premium finder app requires a project to contain the datasource, UI screens, process model, and decision model.
Perform the following steps:
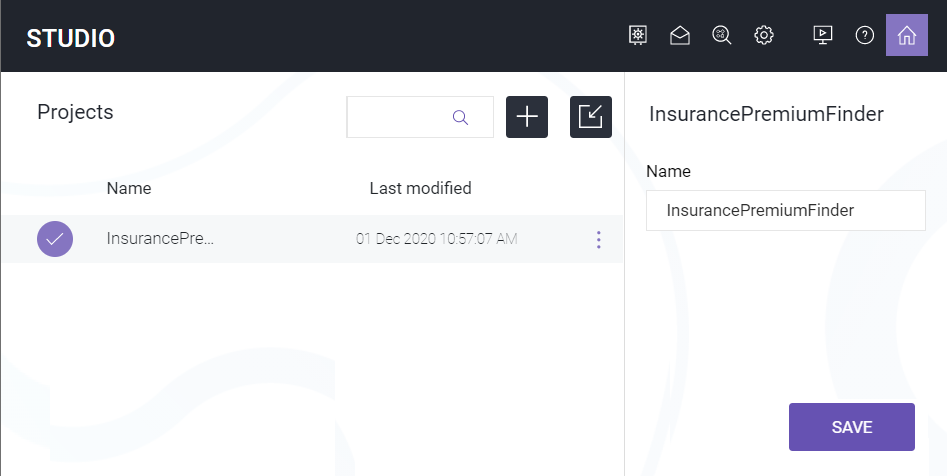
- Launch ASG-Studio.
- On the Projects screen, click ADD.
- Enter InsurancePremiumFinder as Name and click Save.
Create Datasource
The insurance premium finder app requires datasource to store the details that the user enters and the premium amount offered in a database for future reference.
Perform the following steps:
- Open the InsurancePremiumFinder project.
- Navigate to the Datasources folder, click New from the context menu and then click Datasources.
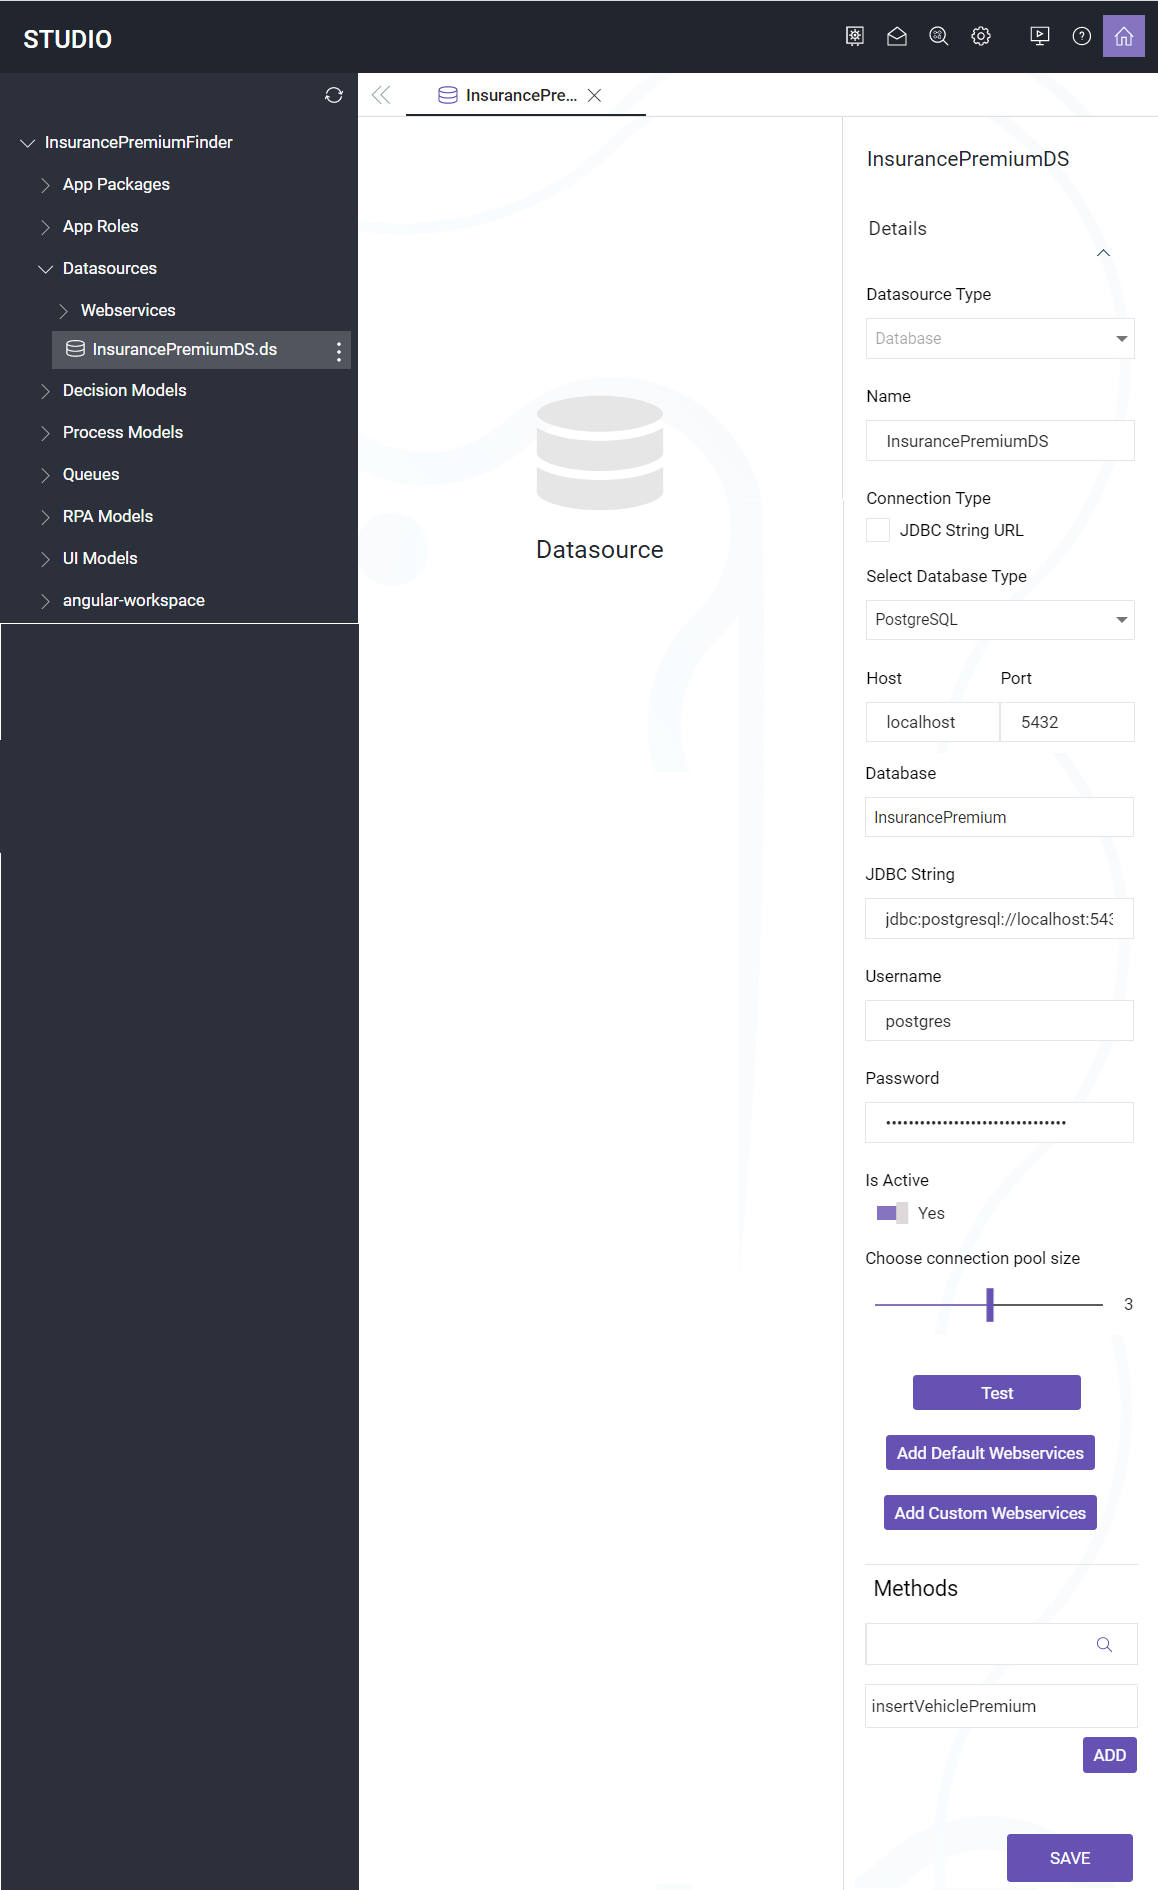
- Enter the following details:
- Select Database as Type of datasource.
- Enter InsurancePremiumDS as Name.
- Select PostgreSQL as Database Type.
- Enter Localhost as Host.
- Enter 5432 as Port.
- Enter InsurancePremium as Database.
- Enter postgres as Username.
- Enter p@ssW0rd as Password.
- Set Is Active to Yes.
- Set Choose connection pool size to 3.
- Click Test to ensure that the database connection is working.
- Click Save.
- Click Add Custom Webservices and generate a webservice method as follows:
| Required settings | Values to enter |
|---|---|
| Method Name |
insertVehiclePremium |
| Query Type |
Standard |
|
Operation |
insert |
| Table |
public.insurancePremium |
| Columns |
vehicleType, vehicleValue, nilDepreciation, ncbProtection, premiumAmount |
Create UI Models, Decision Model, Process Model, and App Role
The insurance premium finder app requires UI model, decision model and process model. While designing the UI model, you have to provide the reference to process model and while defining the process model the reference to UI model and decision model is required. So it is a recommended practice to create all the required UI models, decision models and process models before you start designing them.
Perform the following steps:
- Open the InsurancePremiumFinder project.
- Navigate to UI Models, click New from context menu and then click UI Model.
- Enter premiumfinder as the File Name and click OK.
- Navigate to Process Models, click New from context menu and then click Process Model.
- Enter InsurancePremiumPM as Name and click Save.
- Navigate to Decision Model, click New from context menu and then click Decision Model.
- Enter InsurancePremiumDM in both Enter Namespace and Enter File Name fields and then click Save.
- Navigate to App Roles, click New from context menu and then click App Role.
- Enter PremiumRequester as Name and click Save.
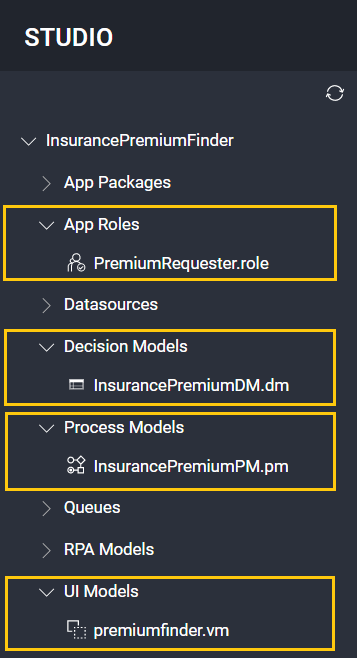
After creating the required files, the folder structure looks as shown in the image below.
Design Premium Finder Form
The insurance premium finder app requires a form for users to enter their vehicle details to be evaluated to find the premium amount.
Perform the following steps:
- Navigate to the UI model that you created with the name premiumfinder.
- Add the UI controls and configure the settings of each control as below and Save the file.
- Select the Header control and enter ABC Motor Insurance Premium Finder as Label.
- Add a Layout-Column 1/2 control and design as follows:
- In the left cell add a Text-Label control and enter Vehicle Type as Reference.
- In the right cell add a Selector-Radio Group control and specify the settings as follows:
- Radio Group List Reference: [{"name":"Two wheeler", "value": "Two wheeler"},{"name":"Four wheeler", "value": "Four wheeler"}]
- Name: name
- Value: value
- Selected Radio Reference: vtype
- Actions: Design a script model as shown in the image below and specify the settings as follows:
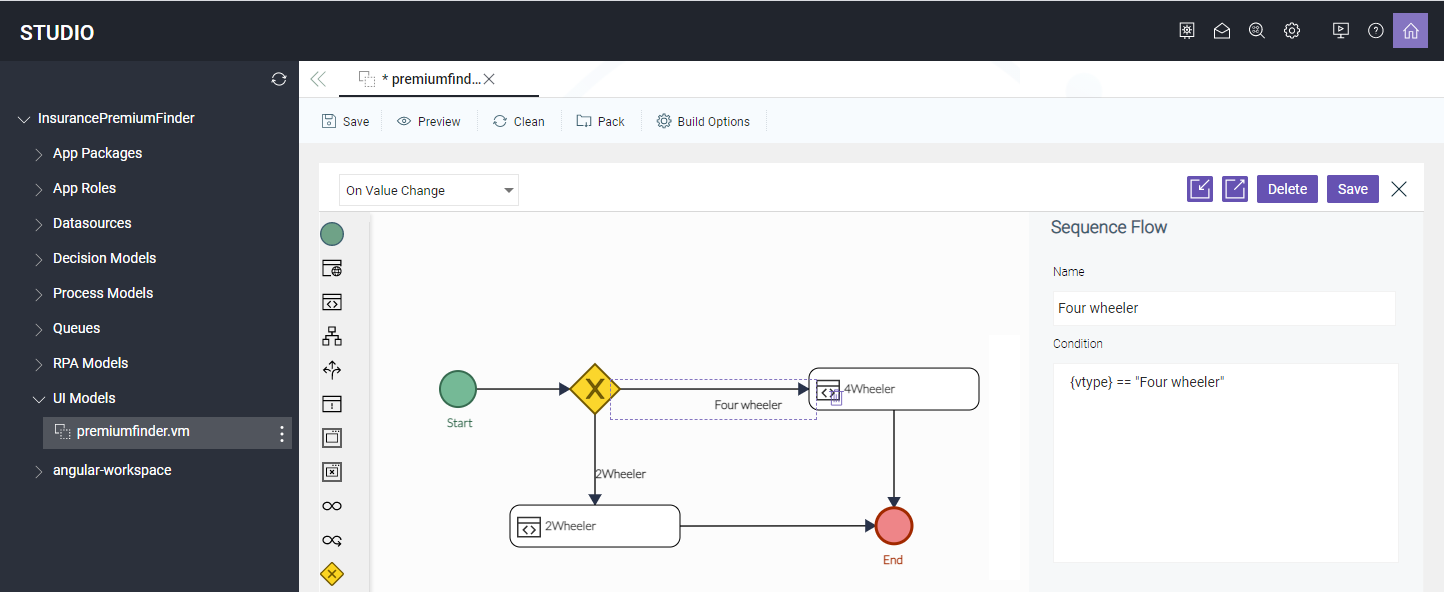
- Select Start event and enter Start as Name.
- Select Sequence Flow going from Exclusive Gateway to 4Wheeler Functional Task and specify the following details:
- Enter Four wheeler as Name.
- Enter {vtype} == "Four wheeler" as Condition.
- Select 4Wheeler Functional Task and specify the following details:
- Enter 4Wheeler as Name.
- Click Function Body, enter the following script and Save.
{maxAmount}=1200000;
{minAmount}=400000;
{range} = "400000 - 1200000";
- Select Sequence Flow going from Exclusive Gateway to 2Wheeler Functional Task and specify the following details:
- Enter Two wheeler as Name.
- Enter {vtype} == "Two wheeler" as Condition.
- Select 2Wheeler Functional Task and specify the following details:
- Enter 2Wheeler as Name.
- Click Function Body, enter the following script and Save.
{maxAmount}=100000;
{minAmount}=20000;
{range} = "20000 - 100000";
- Select End event and enter End as Name.
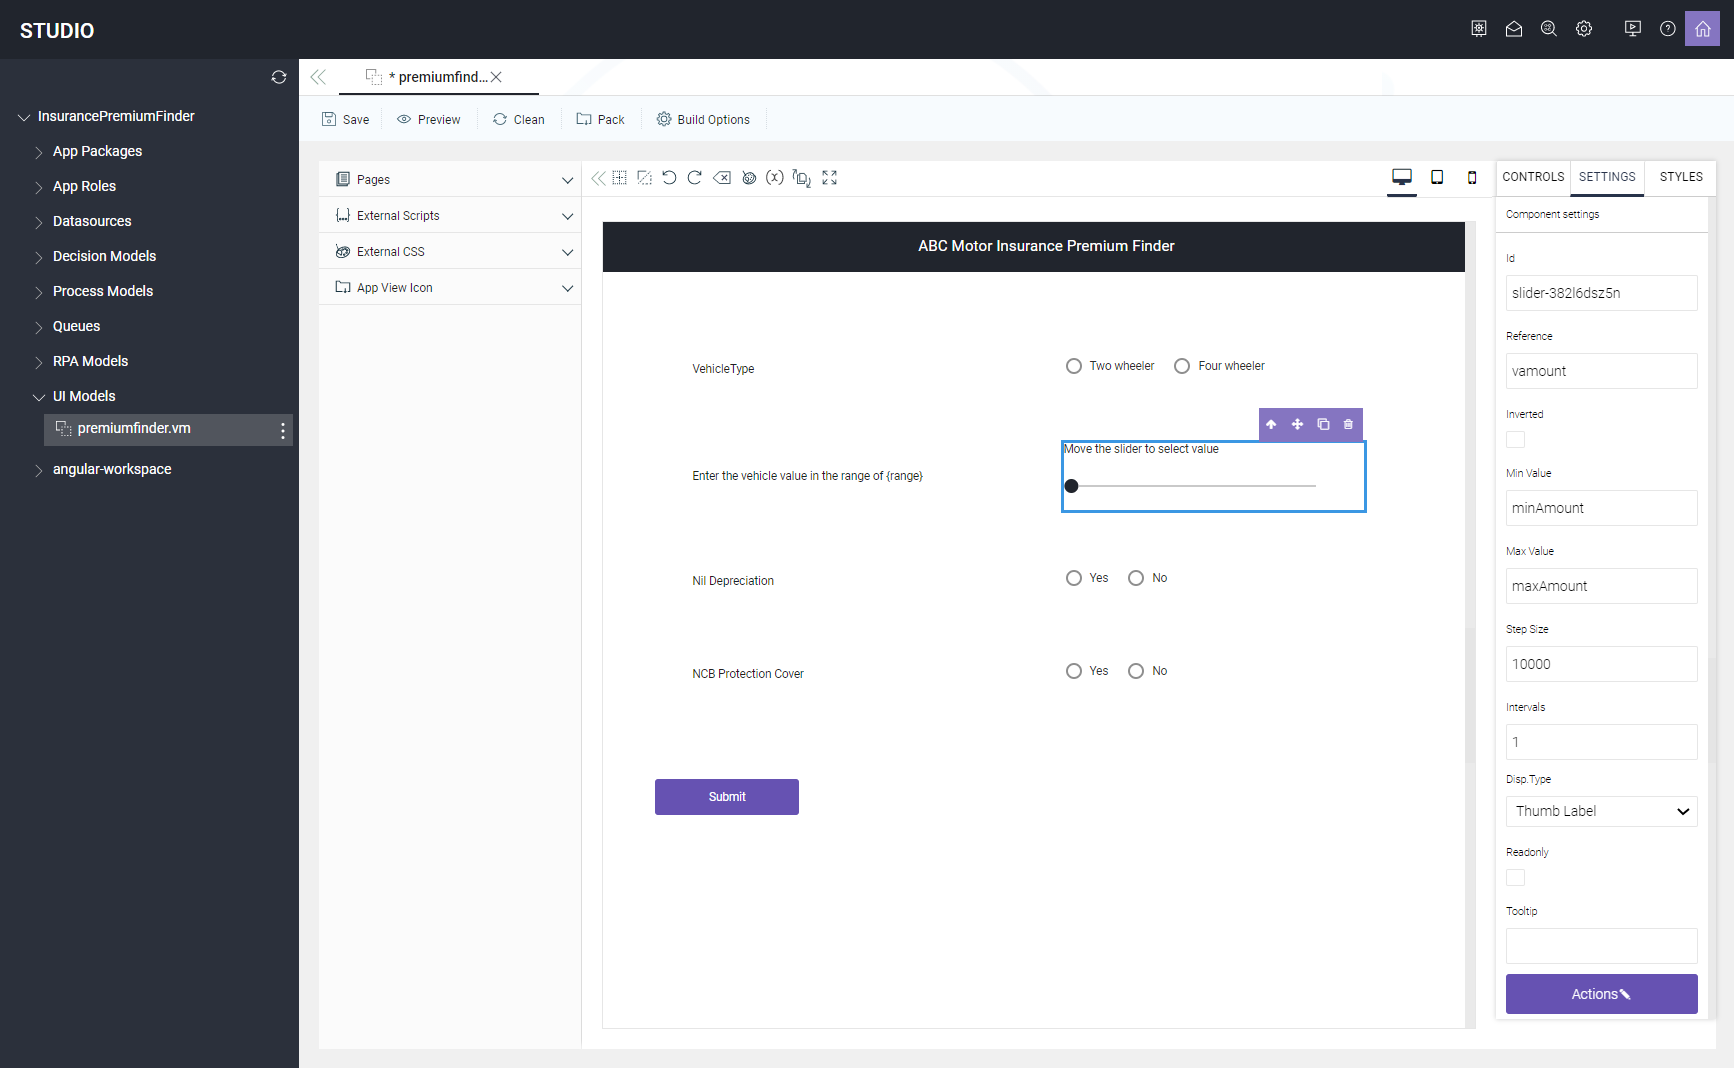
- Add one more Layout-Column 1/2 control and design as follows:
- In the left cell add a Text-Label control and enter 'Enter the vehicle value in the range of {range}' as Reference.
- In the right cell add a Selector-Slider control and specify the settings as follows:
- Reference: vamount
- Min Value: minAmount
- Max Value: maxAmount
- Step Size: 10000
- Intervals: 1
- Disp.Type: Thumb Label
- Select the Slider Label component and enter Move the slider to select value as Label.
- Add the third Layout-Column 1/2 control and design as follows:
- In the left cell add a Text-Label control and enter 'Nil Depreciation' as Reference.
- In the right cell add a Selector-Radio Group control and specify the settings as follows:
- Radio Group List Reference: [{"name":"Yes", "value": "Yes"},{"name":"No", "value": "No"}]
- Name: name
- Value: value
- Selected Radio Reference: nildepreciation
- Add the fourth Layout-Column 1/2 control and design as follows:
- In the left cell add a Text-Label control and enter 'NCB Protection Cover' as Reference.
- In the right cell add a Selector-Radio Group control and specify the settings as follows:
- Radio Group List Reference: [{"name":"Yes", "value": "Yes"},{"name":"No", "value": "No"}]
- Name: name
- Value: value
- Selected Radio Reference: ncbcover
- Add a Button-Single control and specify the settings as follows:
- Enter Submit as Label.
- Click Actions and design a script model as shown in the image below and specify the settings as follows:
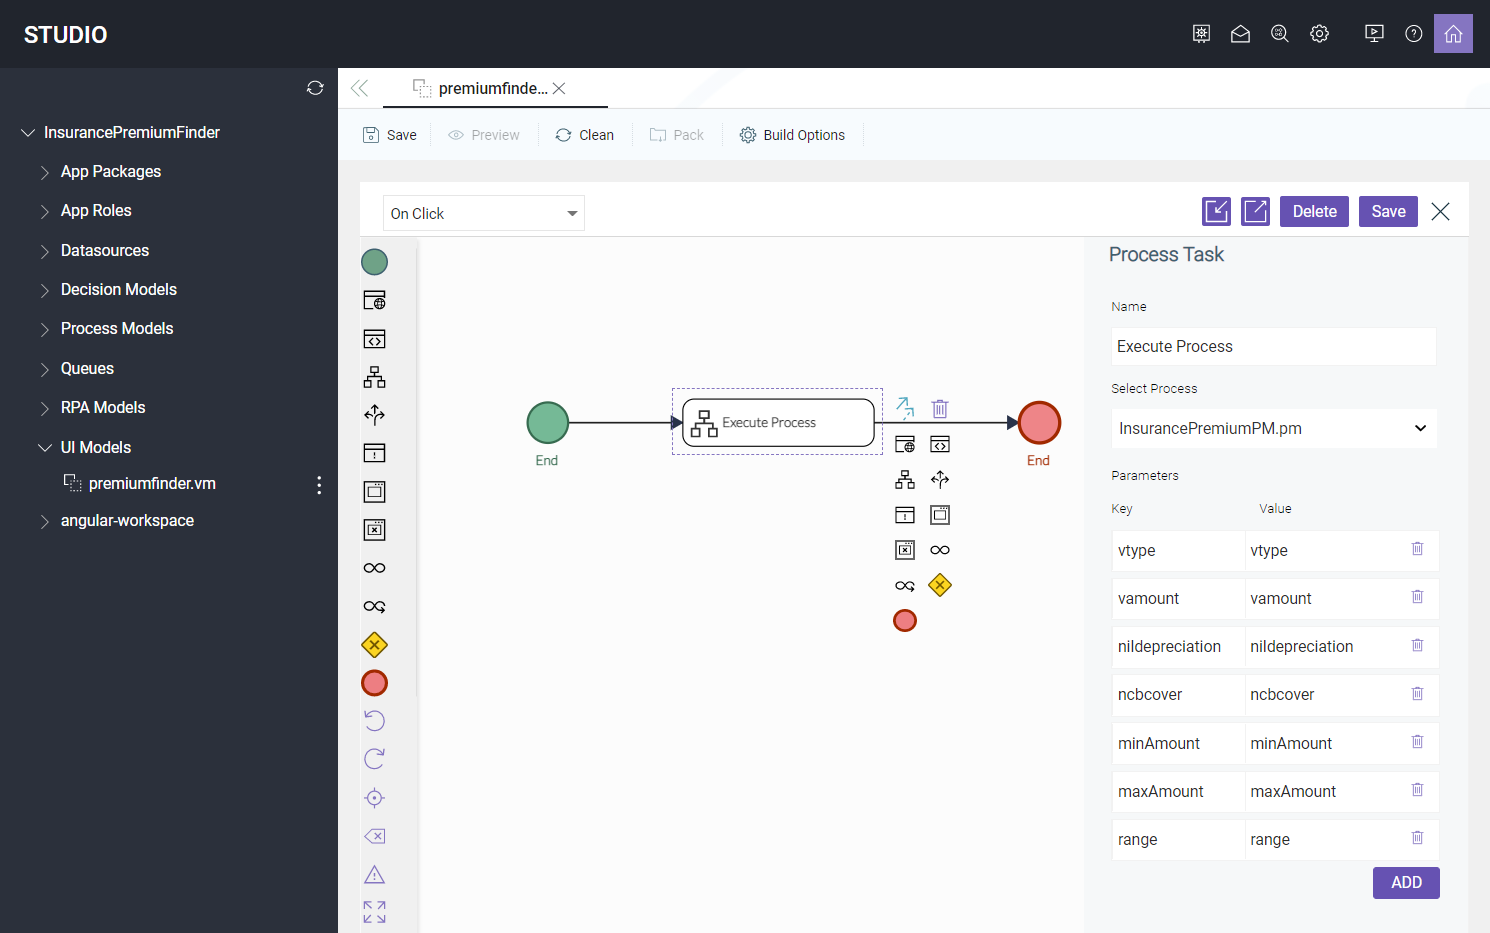
- Select Start event and enter Start as Name.
- Select the Process Task and specify the following details:
- Enter Execute Process as Name.
- Select InsurancePremiumPM as Process.
- Enter following key-value pairs as Parameters:
- vtype - vtype
- vamount - vamount
- nildepreciation - nildepreciation
- ncbcover - ncbcover
- minAmount - minAmount
- maxAmount - maxAmount
- range - range
- Select End event and enter End as Name.
- Click Preview to see how the premiumfinder view looks like after publishing.
- Click Pack.
In the left hand navigation, you can now see a new angular-workspace folder created. A new file with the name premiumfinder.rp is created under the folder angular-workspace, dist, prod, premiumfinder.
Design Premium Results Form
The insurance premium finder app requires a form for users to enter their vehicle details to be evaluated to find the premium amount.
Perform the following steps:
- Navigate to the UI model that you created with the name premiumfinder.
- Select the file premiumfinder.vm and click Save As from the context menu.
- In the New UI Model dialog, enter premiumresults as File Name and click OK. You can see a new file created with the name premiumresults.vm.
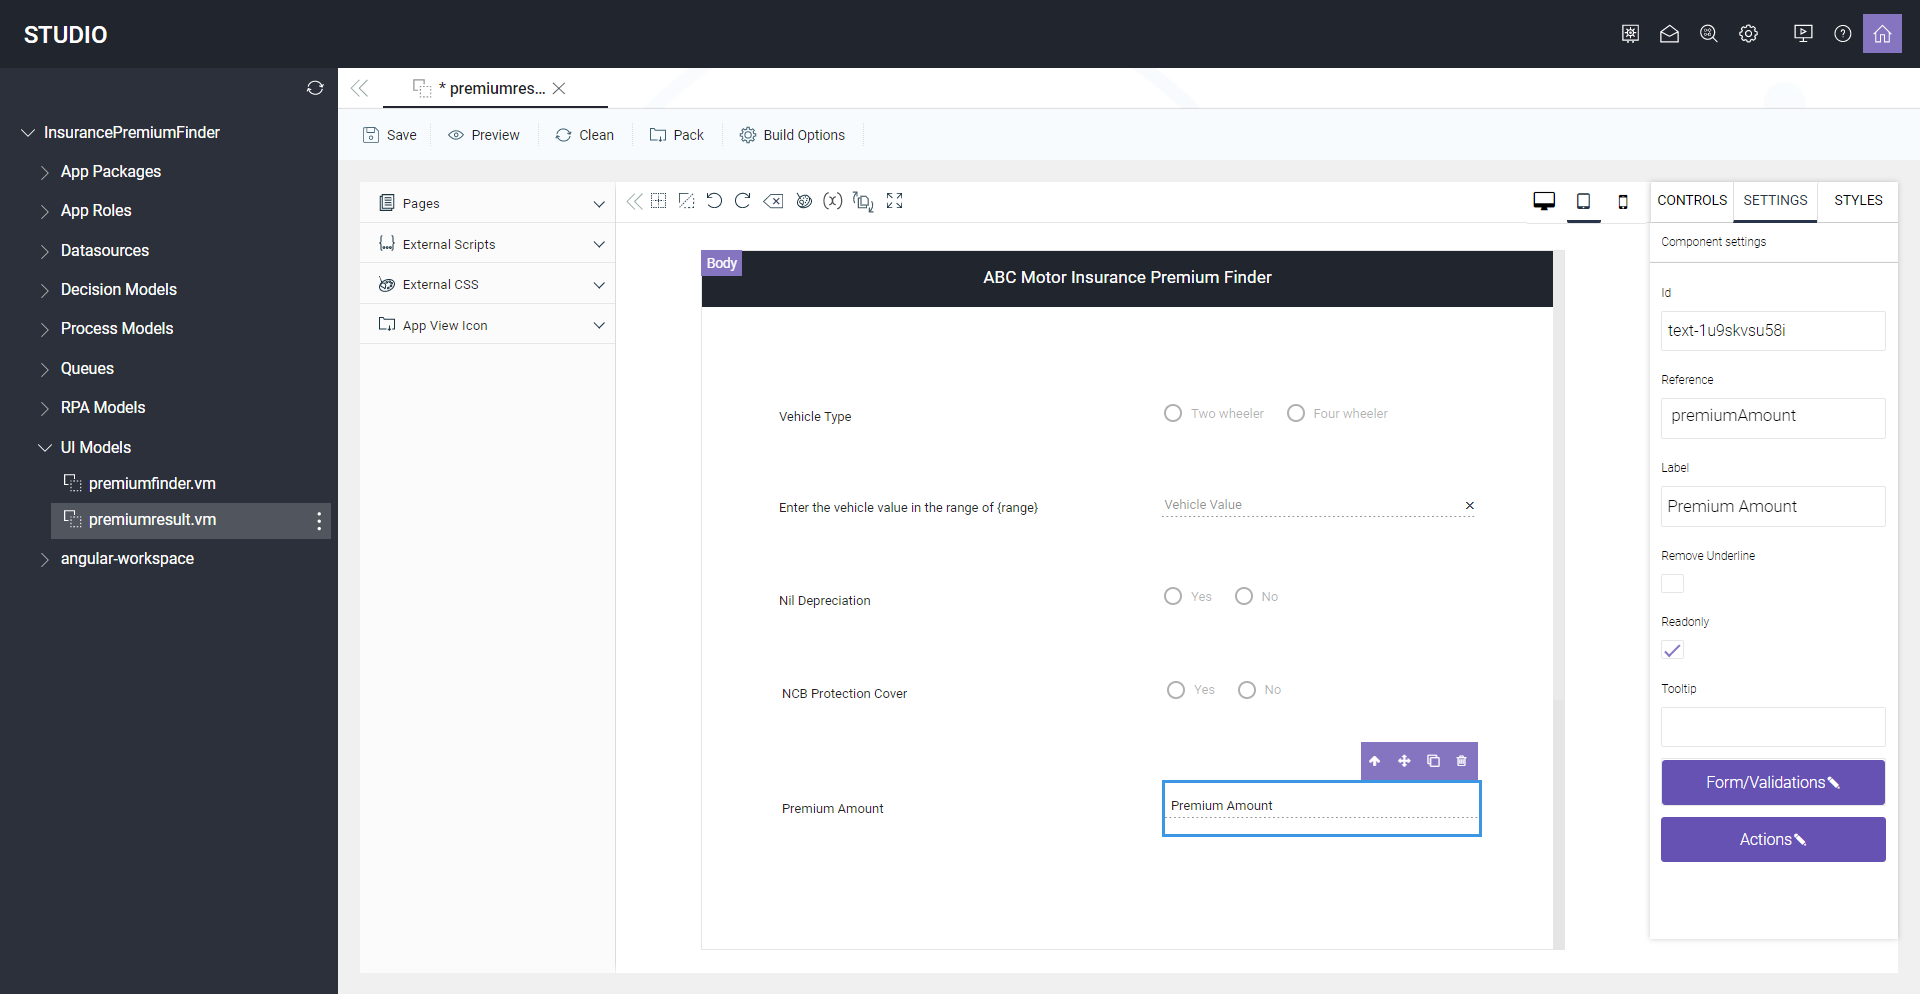
- Double click premiumresults.vm to open the UI model and modify the design as follows:
- Select each control available in the form and select the Readonly checkbox in SETTINGS. Do not modify the values in any other field.
- Delete the Submit button including its container.
- Add a Layout-Column 1/2 control at the end of the page and design as follows:
- In the left cell add a Text-Label control and enter 'Premium Amount' as Reference.
- In the right cell add a Text-Input control and specify the settings as follows:
- Reference: premiumAmount
- Label: Premium Amount
- Read Only: Yes
- Save the form and click Preview to see how the premiumresults view looks like after publishing.
- Click Pack.
A new file with the name premiumresults.rp is created under the folder angular-workspace, dist, prod, premiumresults.
Design Decision Model
This application uses a decision model to define the business logic and validate the input values to provide insurance premium amount as output.
Perform the following steps:
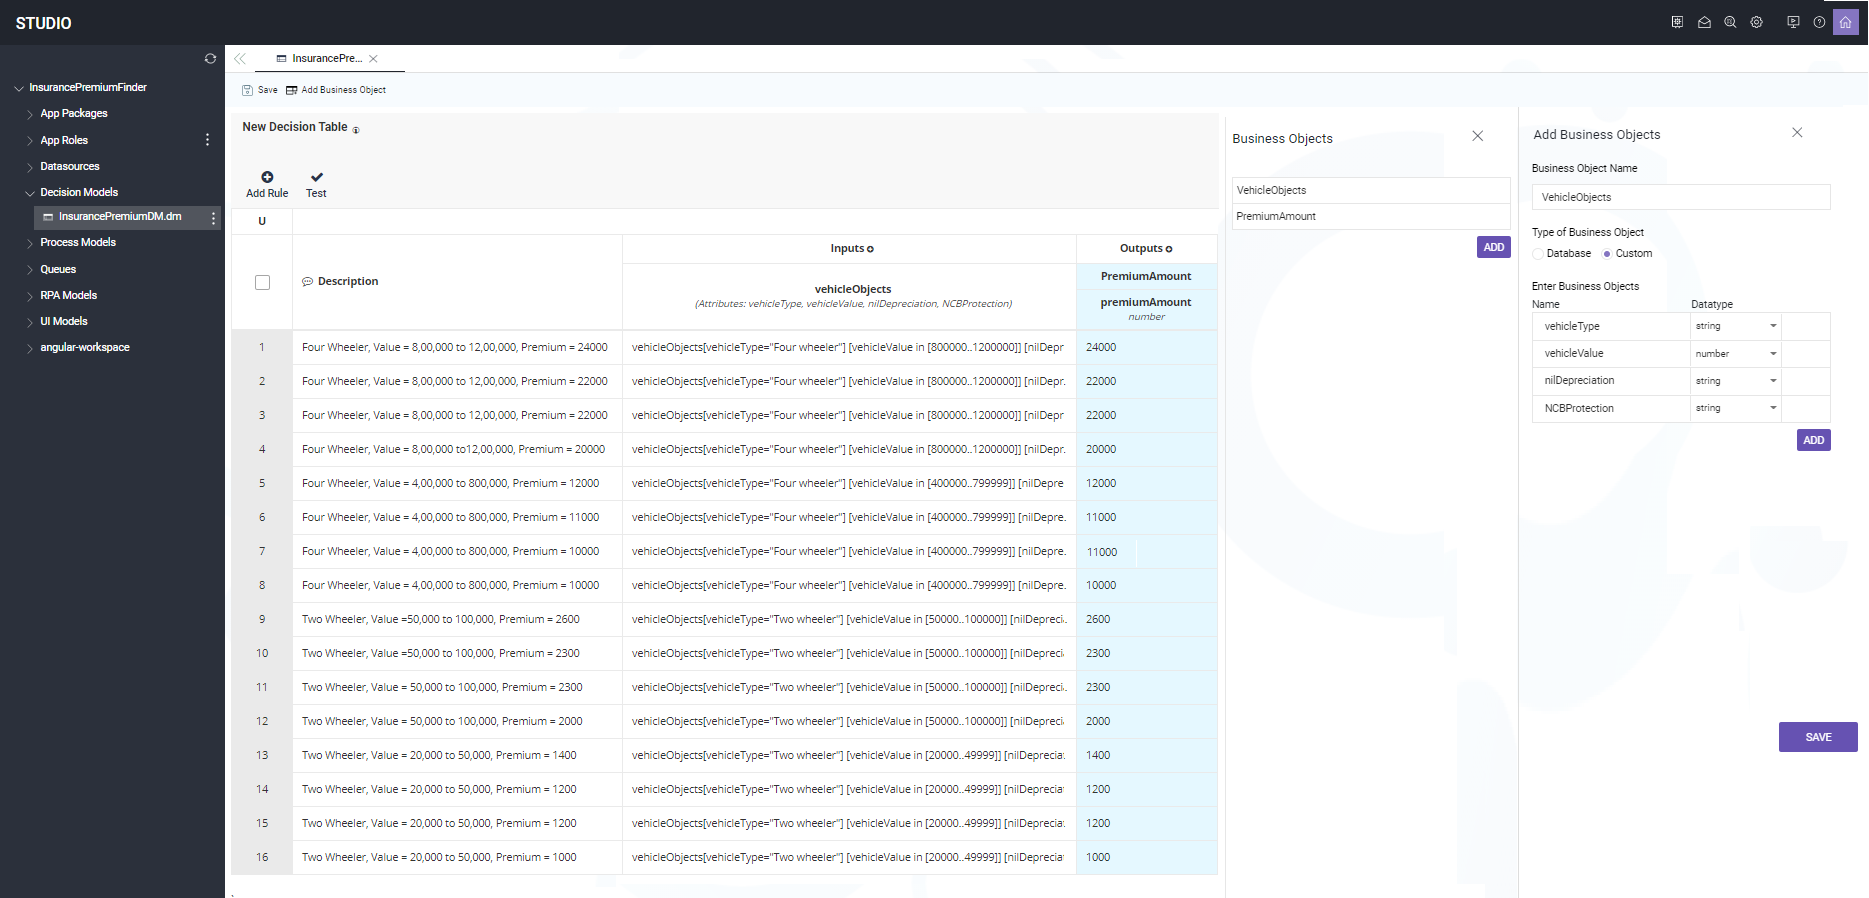
- Navigate to the UI model that you created with the name InsurancePremiumDM.
- Click Add Business Objects, specify the following details and click Save.
- Business Object Name: VehicleObjects
- Type of Business Object: Custom
- Click Add under Enter Business Objects and specify the following values:
- Click ADD in Business Objects panel, specify the following details for second business object and click Save.
- Business Object Name: PremiumAmount
- Type of Business Object: Database
- Select Datasource: InsurancePremiumDS
- Select Table Name: insurancePremium
- Column Name: premiumAmount (number)
- In the Decision Table click Inputs, select InsurancePremiumDM from the Namespace drop-down and then select vehicleObjects.
- In the Decision Table click Outputs, select InsurancePremiumDM from the Namespace drop-down and then select PremiumAmount.
- Click vehicleObjects drop-down under Inputs and click Toggle Input Mode.
- Click Add Rule and specify the Rule Details as follows. Repeat this step to add all the rules as given in the table below and in the same order. The rule number is auto populated in the decision table.
- Select Unique as Hit Policy.
- Click Save.
| Name | Data Type |
|---|---|
| vehicleType | String |
| vehicleValue | number |
| nilDepreciation | String |
| NCBProtection | String |
| Rule No. | Description | Input | Output |
|---|---|---|---|
|
VehicleObjects (Attributes: vehicleType, vehicleValue, nilDepreciation, NCBProtection) |
PremiumAmount | ||
| 1 | Four Wheeler, Value = 8,00,000 to 12,00,000, Premium = 24000 | vehicleObjects[vehicleType="Four wheeler"] [vehicleValue in [800000..1200000]] [nilDepreciation="Yes"][NCBProtection="Yes"] | 24000 |
| 2 | Four Wheeler, Value = 8,00,000 to 12,00,000, Premium = 22000 | vehicleObjects[vehicleType="Four wheeler"] [vehicleValue in [800000..1200000]] [nilDepreciation="No"][NCBProtection="Yes"] | 22000 |
| 3 | Four Wheeler, Value = 8,00,000 to 12,00,000, Premium = 22000 | vehicleObjects[vehicleType="Four wheeler"] [vehicleValue in [800000..1200000]] [nilDepreciation="Yes"][NCBProtection="No"] | 22000 |
| 4 | Four Wheeler, Value = 8,00,000 to 12,00,000, Premium = 20000 | vehicleObjects[vehicleType="Four wheeler"] [vehicleValue in [800000..1200000]] [nilDepreciation="No"][NCBProtection="No"] | 20000 |
| 5 | Four Wheeler, Value = 4,00,000 to 800,000, Premium = 12000 | vehicleObjects[vehicleType="Four wheeler"] [vehicleValue in [400000..799999]] [nilDepreciation="Yes"][NCBProtection="Yes"] | 12000 |
| 6 | Four Wheeler, Value = 4,00,000 to 800,000, Premium = 11000 | vehicleObjects[vehicleType="Four wheeler"] [vehicleValue in [400000..799999]] [nilDepreciation="No"][NCBProtection="Yes"] | 11000 |
| 7 | Four Wheeler, Value = 4,00,000 to 800,000, Premium = 11000 | vehicleObjects[vehicleType="Four wheeler"] [vehicleValue in [400000..799999]] [nilDepreciation="Yes"][NCBProtection="No"] | 11000 |
| 8 | Four Wheeler, Value = 4,00,000 to 800,000, Premium = 10000 | vehicleObjects[vehicleType="Four wheeler"] [vehicleValue in [400000..799999]] [nilDepreciation="No"][NCBProtection="No"] | 10000 |
| 9 | Two Wheeler, Value = 50,000 to 100,000, Premium is 2600 | vehicleObjects[vehicleType="Two wheeler"] [vehicleValue in [50000..100000]] [nilDepreciation="Yes"][NCBProtection="Yes"] | 2600 |
| 10 | Two Wheeler, Value = 50,000 to 100,000, Premium = 2300 | vehicleObjects[vehicleType="Two wheeler"] [vehicleValue in [50000..100000]] [nilDepreciation="No"][NCBProtection="Yes"] | 2300 |
| 11 | Two Wheeler, Value = 50,000 to 100,000, Premium = 2300 | vehicleObjects[vehicleType="Two wheeler"] [vehicleValue in [50000..100000]] [nilDepreciation="Yes"][NCBProtection="No"] | 2300 |
| 12 | Two Wheeler, Value = 50,000 to 100,000, Premium = 2000 | vehicleObjects[vehicleType="Two wheeler"] [vehicleValue in [50000..100000]] [nilDepreciation="No"][NCBProtection="No"] | 2000 |
| 13 | Two Wheeler, Value = 20,000 to 50,000, Premium = 1400 | vehicleObjects[vehicleType="Two wheeler"] [vehicleValue in [20000..49999]] [nilDepreciation="Yes"][NCBProtection="Yes"] | 1400 |
| 14 | Two Wheeler, Value = 20,000 to 50,000, Premium = 1200 | vehicleObjects[vehicleType="Two wheeler"] [vehicleValue in [20000..49999]] [nilDepreciation="No"][NCBProtection="Yes"] | 1200 |
| 15 | Two Wheeler, Value = 20,000 to 50,000, Premium = 1200 | vehicleObjects[vehicleType="Two wheeler"] [vehicleValue in [20000..49999]] [nilDepreciation="Yes"][NCBProtection="No"] | 1200 |
| 16 | Two Wheeler, Value = 20,000 to 50,000, Premium = 1000 | vehicleObjects[vehicleType="Two wheeler"] [vehicleValue in [20000..49999]] [nilDepreciation="No"][NCBProtection="No"] | 1000 |
The decision model is designed with the required business objects and decision table.
Define Process Model
This application uses a process to initiate the decision task, to insert the input and output data in database, and notify the users by sending the form to their inbox.
Perform the following steps:
- Navigate to Process Models folder and open the InsurancePremiumPM process model.
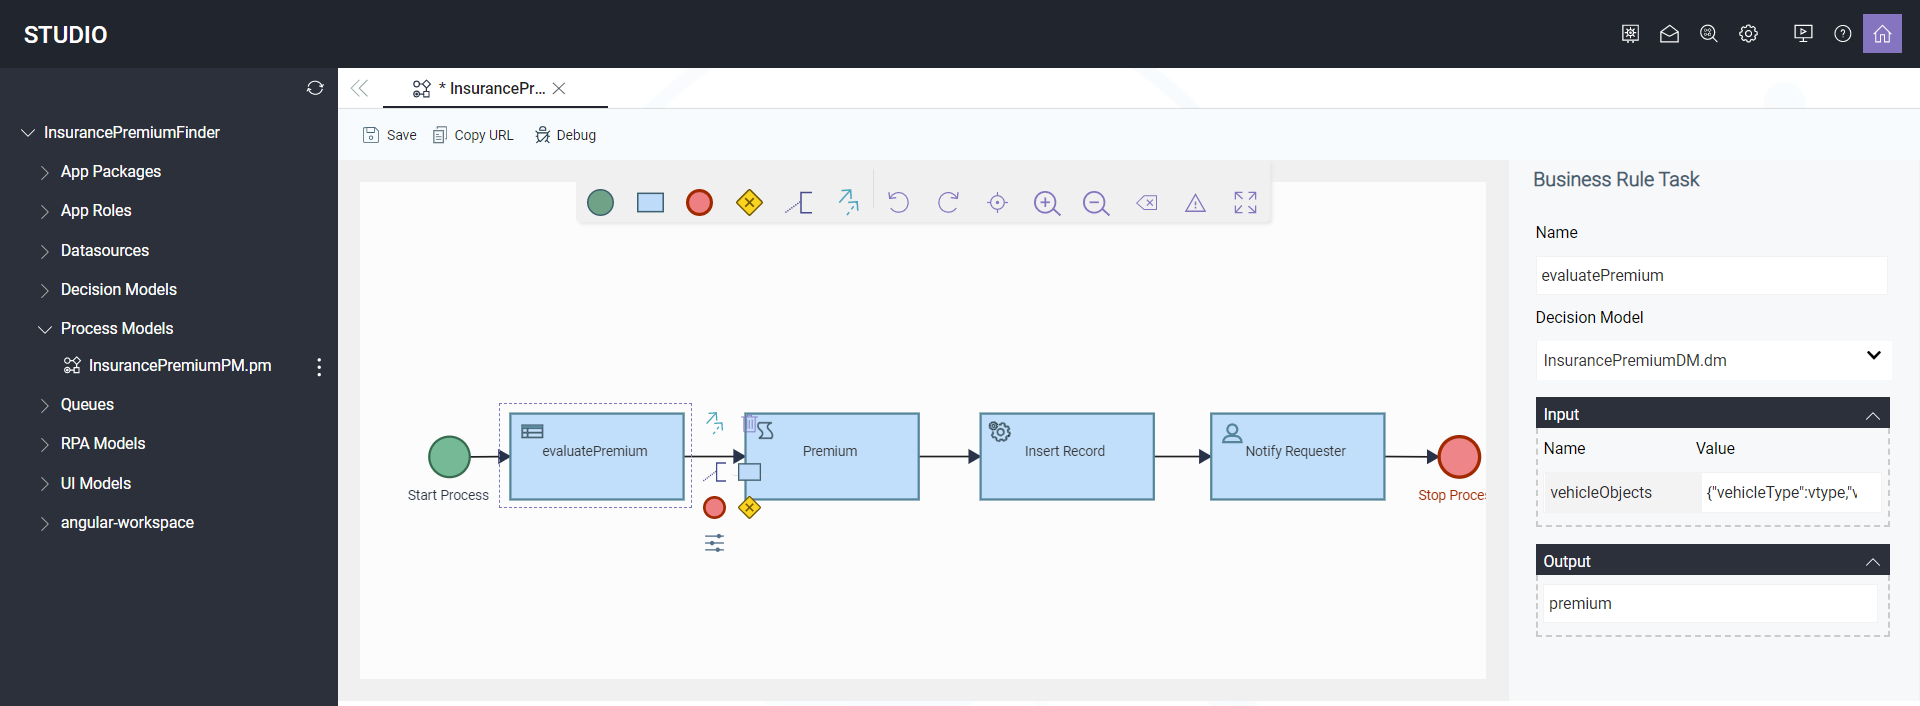
- Draw the process model as shown in the image.
- Configure each element in the process model as follows:
| Required settings | Values to enter |
|---|---|
| Name |
Start Process |
| Required settings | Values to enter |
|---|---|
| Name |
EvaluatePremium |
| Decision Model |
InsurancePremiumDM.dm |
| Input - Name | vehicleObjects |
| Input - Value | {"vehicleType":vtype,"vehicleValue":vamount,"nilDepreciation":nildepreciation,"NCBProtection":ncbcover} |
| Output | premium |
| Required settings | Values to enter |
|---|---|
| Name |
Read Premium |
|
Script |
$pm.addMemVariable("premiumAmount",JSON.parse(premium.data.data).decisiontable); |
| Required settings | Values to enter |
|---|---|
| Name |
Insert Record |
| Datasource |
InsurancePremiumDS |
| Method | insertVehiclePremium |
| Body (Key-Value) |
vehicleType - vtype vehiclevalue - vamount nilDepreciation - nildepreciation NCBProtection - ncbcover premiumAmount - premiumAmount |
| Attributes - Response | response |
| Required settings | Values to enter |
|---|---|
| Name |
Notify Requester |
| Type of Notification | Message Only |
| Form-From User | "" |
| Form - Assignee - Role | PremiumRequester |
| Form - Select One | Existing |
| Form - Choose File | premiumresult.vm |
| Form - List of References | vtype, vamount, nildepreciation, ncbcover, premiumAmount, range, maxAmount, minAmount |
| Required settings | Values to enter |
|---|---|
| Name |
Stop Process |
Test your App
Before creating the app package, you can test your app to confirm that the business rules in your decision model are working as expecting.
Perform the following steps:
- Navigate to UI Models and open premiumfinder.vm file.
- Click Preview.
The form opens in new tab. - For this example, select the values as follows:
- Click Submit.
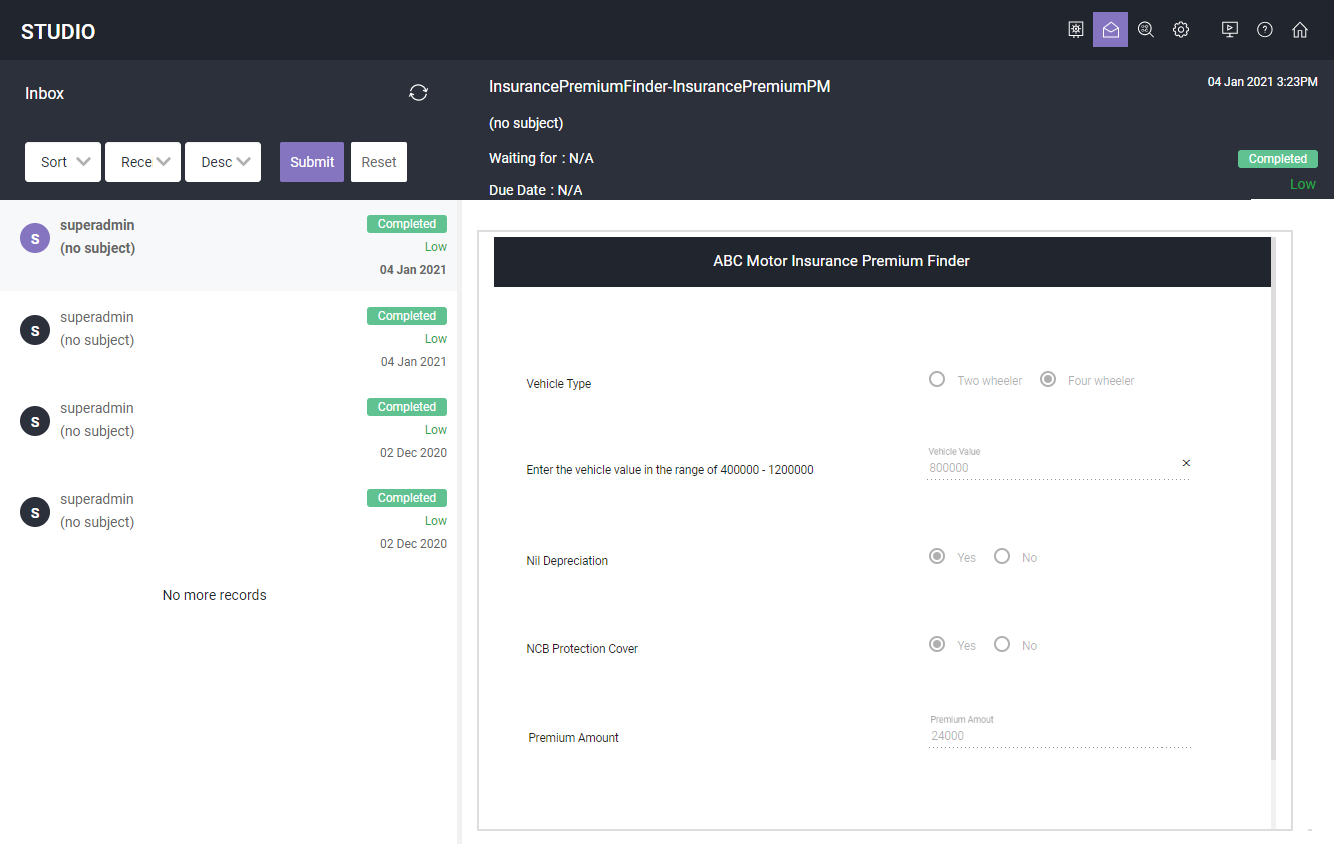
You can see a notification received in Inbox. - Click the notification to see the form as shown in the image below displaying the Premium Amount.
For this example, the Premium Amount field displays 24000 as value.
| Filed | Value |
|---|---|
| Vehicle Type | Four Wheeler |
| Enter the vehicle value in the range of 400000 - 1200000 | 800000 |
| Nil Depreciation | Yes |
| NCB Protection Cover | Yes |
You can submit the form selecting different values each time and verify that the premium amount is shown as specified in your business rules.
Create App Package
Perform the following steps:
- Navigate to the angular-workspace > dist > premiumfinder folder and perform the following steps:
- Click the premiumfinder.rp file.
- Click +ASSIGN ROLE.
- Select Premium Requester and click Save.
- Navigate to App Packages and click New.
- Enter InsurancePremiumFinder as Name.
- Enter 1.0 as Version.
- Select App Views, App Roles, Datasource, Decision Model and Process Model that you created above.
- Click Save.
- Navigate to the app package and click Download.
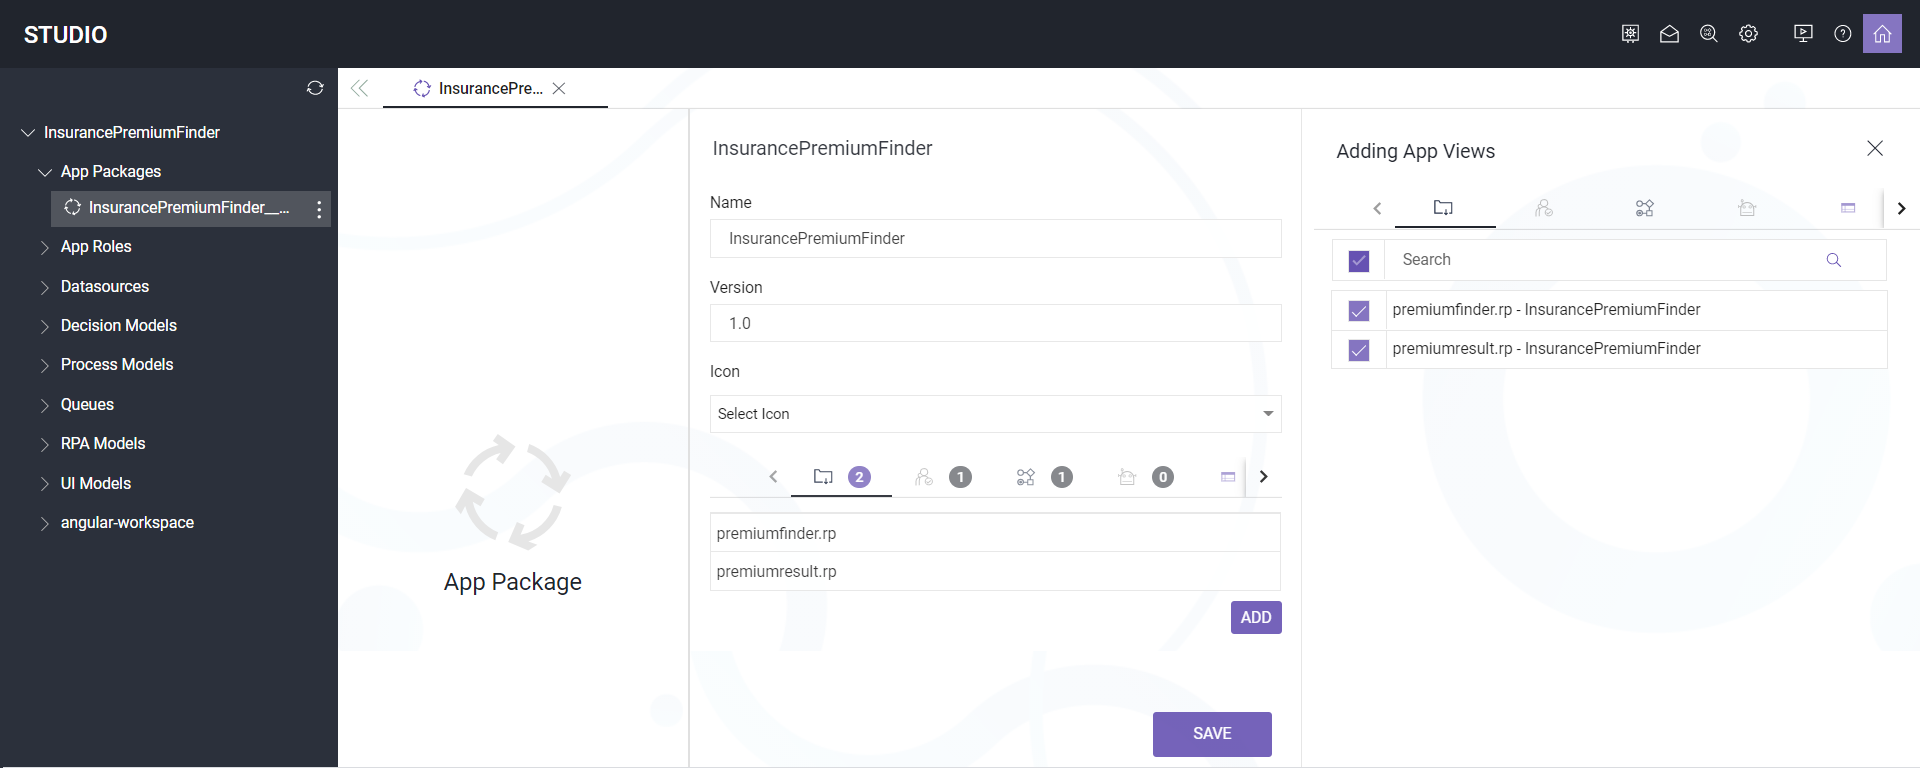
The app package is created with the name InsurancePremiumFinder_1.0.zip under the App Packages folder.
The InsurancePremiumFinder_1.0.zip file downloads to your local computer. You can now deploy this application in ASG-Zenith Portal.