
Create and Design UI Model
The UI model visual designer provides you everything to design your application. It has been designed to make your application development more efficient and faster with a no-code or low-code builder.
The UI Model visual designer that you use comes with a collection of widely used ready made controls which you can drag and drop onto the canvas to quickly design the application and its user interface. Controls are a type of user interface elements that the user would use when interacting with the application and perform a specific task. Based on your requirement, configure the actions performed by them using control settings. You can also bind the UI controls with custom scripts to invoke web service task, function calls, process tasks, and route tasks. You can use CSS to customize how each control is displayed on the user interface. The UI Model visual designer also provides you the options to define the application page life cycle, for example, you call a specific data table when a page is loaded or trigger particular action at a specific point of the page lifecycle.
After you have completed designing the application, you can build and test the application user interface and the actions triggered by each control. You can then assign app roles to your app views and create the packs of UI model, so that you can add your UI models to app packages along with all the other required resources for your app.
This section explains how to create and design UI model.
Create UI Model
With UI Model visual designer you can quickly design your application and its user interface.
Perform the following steps:
- Launch ASG-Studio.
- Open the project in which you want to create UI model.
- Navigate to the UI Models folder.
- Click New from context menu and click UI Model.
- Enter a name for the UI model in the Name field and click Ok. Once created you cannot rename the file but you can delete it.
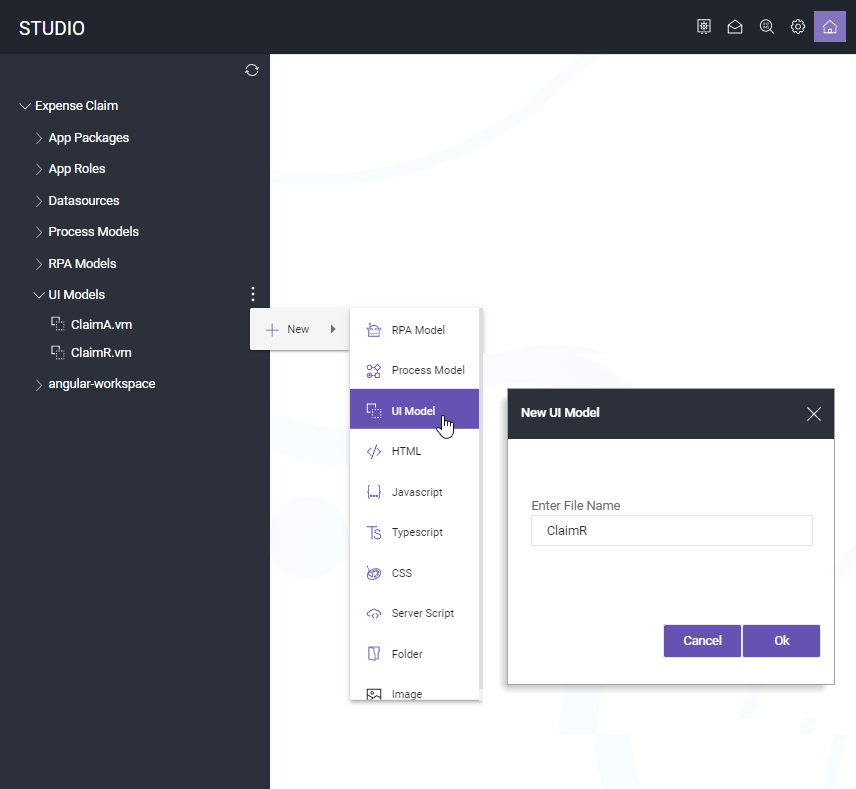
The UI model is successfully created.
Design UI Model
You can create single or multiple pages for your application and then add a wide range of readymade user interface controls to it.
A page is a view or UI screen of your app that the target user accesses to perform a specific task within a process app.
A control refers to the graphical user interface elements that construct an application, such as input controls, navigational components, and information components. You can drag and drop various controls to the UI model to design your application. The user uses these controls to provide input or perform specific tasks within the app.
You can also specify the settings of each control that you have added to a view. Each control settings are set to default values when you add them to a view. You can always modify these values to match the requirements of your app.
Perform the following steps:
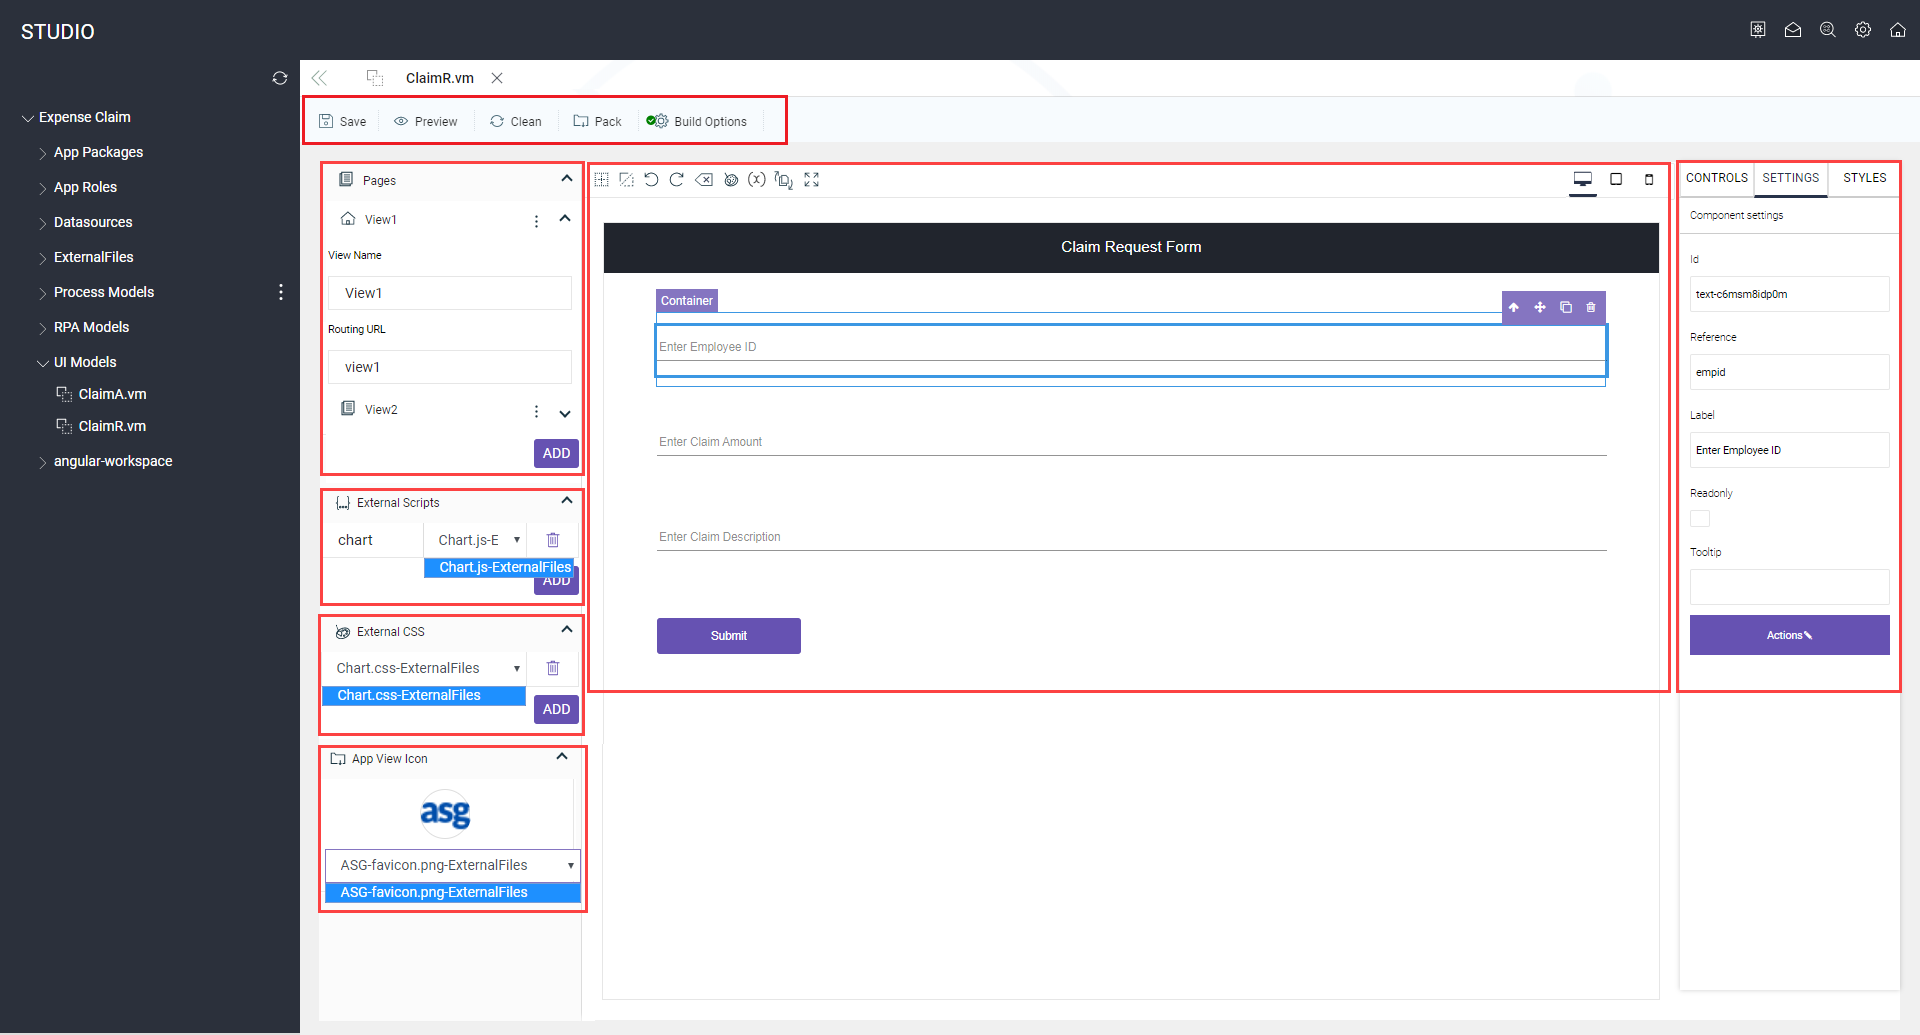
- Navigate to the project, UI models folder and click the <UI model name>.vm file.
- From the Pages drop-down, add as many views as you need in the current UI model and specify the following for each view:
- View Name: Enter a name for the view. The view name cannot be left empty.
- Routing URL: Enter the name of a view in the current UI model which should open when the user navigates to the current view through a routing task. Generally the same view name is used as routing URL. You can also specify another view name within the same UI model.
The view name can have only alphabet or a combination of alphanumeric characters alongwith special characters. The view name cannot contain only numbers or only special characters or the combination numbers and special characters only. The generic names such as 'app', 'test', and 'new' are not valid.You can create copy of a page or export a page to reuse your current page design as a base for other pages.
- If you want to reuse the current page as a base to create more pages within the same UI model, click Duplicate from the context menu of a page.
- If you want to reuse the current page as a base to create pages in other UI models, click Export to download the current page as a .JSON file.
- If you want to create a new page based on previously downloaded .JSON file, click ADD to create new page and then click Import and select the .JSON file that you downloaded before.
- Select one of the views to set as home page of your app, click the context menu and then click Home Page.
- Select one of the views to set as side navigation menu of your app, click the context menu and then click Side Nav. See Side Navigation Menu to learn about how to add and design side navigation menu.
- Select the Device option to set the view to one of the following modes:
- Desktop
- Tablet
- Mobile
- Navigate to the ELEMENTS tab and add the required UI controls to each view. Use the following options to construct your view:
- Show/Hide View: Shows or hides the Views panel to expand the canvas for ease of use.
- Grid: Shows the grid lines of each element within every UI control.
- Disable Container: Disables the container that surrounds the UI control. Click the Disable Container icon to exclude the container component when you add UI controls to canvas.
- Undo and Redo: Undo and redo your last or previous action or edit. You can use this option only if you have not saved the view since making the last changes.
- Clear All: Removes all the elements added to the canvas.
- Copy CSS: Allows to copy the CSS code of the selected UI control. You can copy the CSS code to clipboard and reuse it to define more style classes or external CSS files.
- Full Screen: Allows to expand the view to full window for better visibility and ease of use.
- Select each UI control that you added, navigate to SETTINGS tab, and specify the appropriate values for each control setting. See UI Controls and Settings, to understand the required settings for each control.
- Select each UI control that you added, navigate to STYLES tab, and define how you want the corresponding control appear to the users of the app. See UI Controls Styles, to understand how to create style classes and apply styles.
- Click Page Life Cycle to specify the details about invocation of life cycle methods of certain activities. See Script Model, to define your script with a low code / zero code approach that can be executed in the event of page load.
- Click Reference Lookup to see all the References that you created across the pages of the corresponding UI model. You can add custom References by clicking Add under the Add References option. Specify Name, Type and Value of the reference. You can create the references with the following data types:
- Static JSON
- Number
- String
- Boolean
- Date
The variables you create using Reference Lookup are considered as global variables and you can reference these variables across your current project. To see the usage of variables, click the variable listed under Control References to see the details of the pages and controls in which the respective variables is referenced.
- Expand App View Icon drop-down and select an image to display the app as an icon to the users of your app. See App View Icon to understand how to add images to your project and add them as app view icons.
- Select Build Options.
- After designing your UI model as you desire, click Save.
- The preview is not updated with your latest changes in the UI model.
- The UI model does not work as expected in the preview.
- The errors similar to one of the following examples:
- Error in VMname.vm
ERROR in projects/VMname/src/app/view4/view4.component.ts(346,13): error TS2339: Property 'gridColumns_edf07b6f500c4f6e9' does not exist on type 'Data'. - Error in VMname.vm ERROR
inprojects/VMname/src/app/view4/view4.component.ts(346,13): error TS2339: Property 'cbGroup_edf07b6f500c4f6e9' does not exist on type 'Data'. - ERROR in ./src/app/view4/view4.component.ts
Module build failed (from C:/Users/TestUser/Downloads/Studio-55/Studio_Workspace/Workspace/default_user/Projects/bugvalidationstudio55/angular-workspace/node_modules/@ngtools/webpack/src/index.js): - Error: C:\Users\TestUsera\Downloads\Studio-55\Studio_Workspace\Workspace\default_user\Projects\bugvalidationstudio55\angular-workspace\projects\largevm\src\app\view1\view1.component.ts is missing from the TypeScript compilation. Please make sure it is in your tsconfig via the 'files' or 'include' property at AngularCompilerPlugin.getCompiledFile (C:\Users\TestUser\Downloads\Studio-55\Studio_Workspace\Workspace\default_user\Projects\bugvalidationstudio55\angular-workspace\node_modules\@ngtools\webpack\src\angular_compiler_plugin.js:752:23) at plugin.done.then (C:\Users\TestUser\Downloads\Studio-55\Studio_Workspace\Workspace\default_user\Projects\bugvalidationstudio55\angular-workspace\node_modules\@ngtools\webpack\src\loader.js:41:31) at process._tickCallback (internal/process/next_tick.js:68:7)
- Error in VMname.vm
- Click Preview to see how your UI model looks like to the application users. You can review the UI model design and test how the UI controls and actions used in the UI model are working. Based on your observations, update the design as necessary and save again. You can simply refresh your preview window to see the saved changes. You must click Preview only from the home page of your application. If you try to refresh from any other page, the application does not render the preview and displays an error.
- Click Pack to package the application after you save, preview and test your UI model.
The UI model is designed and packed to add to your app package.
Some controls allow you to bind a custom script that is executed in the event of certain actions. See Script Model, to define your script with a low code / zero code approach.
You can also add external scripts to define actions for various UI controls. See External Scripts, to understand how to add external scripts to your project.
You can also add external style sheets to your project and use the custom styles to design your UI controls. See External CSS, to understand how to add the external style sheets to your projects.
You can choose one of the following two build options whenever you save your UI model:
The Incremental / Delta Build option is selected by default, which saves all the pages in the UI model which are changed since you last saved the UI model.
You can select individual pages to save the changes applied only in that page. You can select multiple pages to save at a time.
When you are saving your UI model for the first time, if you select individual views from Build Options, you must select the views that are set as Home Page and Side Navigation Menu . If not selected the Preview does not work. This is applicable to imported projects also.
Do not perform any other operation while saving the UI model is in progress.
The Clean button is activated while saving or packing the UI model is in progress. If you notice any errors while saving the UI build, click the Clean button to clear the application cache and terminate the existing build process. Update the UI model to fix the errors and Save again.
Export UI Model
After designing UI Model, you can export the model as a file so that you can import it into another ASG-Studio environment or export to another project within the current ASG-Studio environment.
Perform the following steps:
- Navigate to the project, UI models folder and select the <UI model name>.vm file.
- Click Export form the context menu.
- Select the following options as required and click Export.
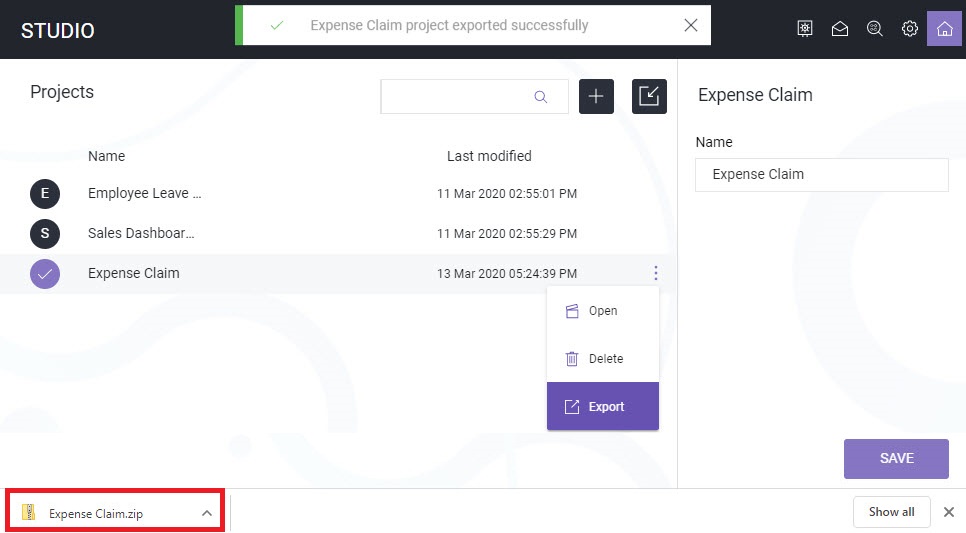
Save as File: Exports the UI model and downloads <UI model name>.vm file to your local computer.
Export to other Project: Exports the UI model and saves the <UI model name>.vm file under the UI Models folder of the selected project.
You can also select both the options to perform export as a file and export to other project at a time.
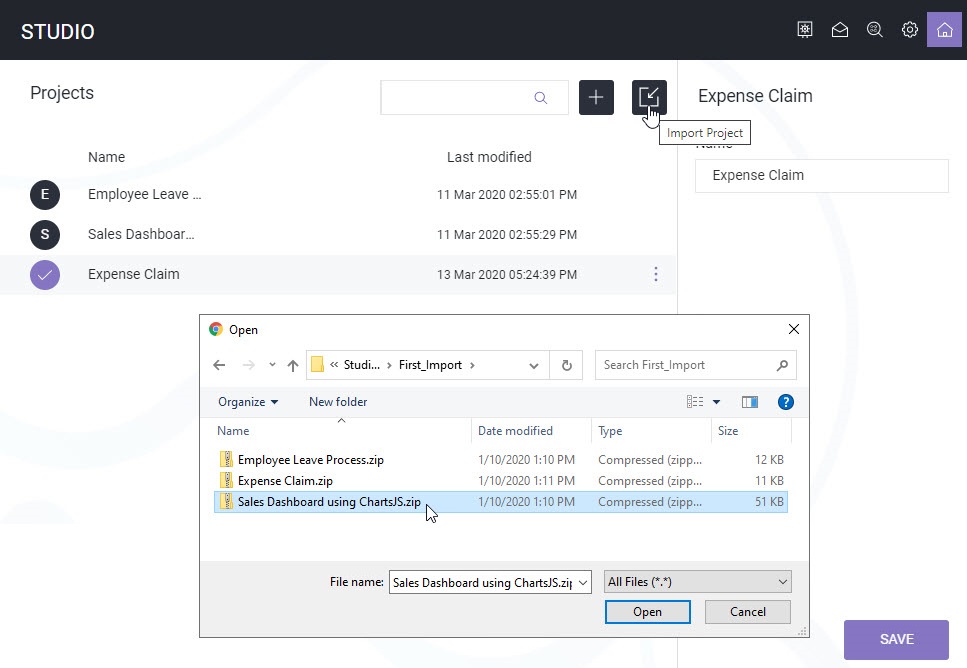
Import UI Model
After exporting and downloading the UI model as file, you can import the same UI model into another ASG-Studio environment and reuse or modify the UI model design as required.
Perform the following steps:
- Navigate to the project, UI models folder.
- Navigate to the UI Models folder.
- Click New from context menu and click UI Model.
- Enter a name for the UI model in the Name field and click Ok.
- Click Import from the context menu of the new UI model.
- Select one of the following options and click Import:
- Import from File: Select this option to import the UI model that you have already exported as file from other projects.
- Import from other Project: Select this option to import the UI model from another project. Select the project name and UI model name.
Save the UI model after importing is complete. You can now modify the UI design as required.
Create Copy of UI Model
After designing the UI model, you can create a copy of the same UI model so that you can reuse it within the same project.
Perform the following steps:
- Navigate to the project, UI models folder and select the <UI model name>.vm file.
- Click Save As form the context menu.
- Enter a name for the new UI model and click OK.
Copy of the UI model is created. You can modify the design of the UI model.