
Setting Up Your Output Environment
The Enterprise Output Manager module simplifies the task of managing print jobs and output devices within an enterprise. Specifically, it enables you to perform these tasks:
- Using a single source of control and management for all printers and destinations in your output environment
- Job control and queue management for any document submitted to any Cypress device
- Tracking and displaying all information related to your document and output management environment
- Viewing documents before, during, and after printing, without requiring the application that created the document
This topic provides information on the devices that you can define to work with Cypress.
Overview
When implementing Cypress, you must create an output environment to be used by you and your users to print documents, obtain printer status, view job queues, etc. To create your output environment, you must define devices, device attributes, and relationships between devices.
The term device applies to both physical and logical devices available to you for implementing and organizing your output environment. All devices are defined to a particular DocuVault, which is the central repository for all information related to your document and output management environment.
Device Types
These are the types of devices that you can define in your output environment:
| • | Group |
| • | Hold queue |
| • | Printer |
| • | Fax device |
| • | E-mail device |
| • | RDM processor |
| • | Windows GDI device |
| • | CPF device |
| • | End node |
A group is the highest-level device that you can define. It is a logical device, not a physical device like a printer. Groups cannot print or store documents, but are used to create pools of other devices that help you organize your output environment and route documents. For example, a company that has a pool of printers for each of its departments could create groups of printers based on each department.
Groups can contain subgroups, which you can use to further break down and organize your output environment. But avoid creating an excessive number of subgroups as it can make locating devices and documents more difficult.
A hold queue is a logical device that stores documents (print files) as either a temporary or permanent alternative to printing. The Cypress-supplied hold queue, Undeliverable Hold, is used as a depository for all documents that cannot be delivered (e.g., documents that have been sent to an undefined device). Hold queues cannot have any other devices subordinate to them.
A printer is a physical device. Printers cannot have any other devices subordinate to them.
A fax device is a physical device to which fax_out jobs are sent. Fax devices cannot have any other devices subordinate to them.
An e-mail device is a logical device to which email_out jobs are sent. E-mail devices cannot have any other devices subordinate to them.
An RDM processor is a logical device to which report processing jobs are sent. Jobs sent to these devices are processed by the Cypress Report Distribution Manager (RDM). RDM processors cannot have any other devices subordinate to them.
A Windows GDI device is a logical device that is configured to use the printer’s driver rather than one of Cypress’s drivers. Windows GDI devices cannot have any other devices subordinate to them.
A CPF device is a logical device to which Cypress Content Processing Facility (CPF) jobs are sent. Jobs sent to these devices are processed by the Cypress Content Processing Facility. CPF devices cannot have any other devices subordinate to them.
An end node is a logical device with no attached devices. Hold queues, faxes, printers, etc. are end nodes in that they are “at the end of the line” – nothing can be subordinate to them. For example, you cannot create a hierarchical library solely composed of hold queues.
Defining a Device
You use the controls on a device’s General tab through the Cypress Administration Tools module to define these settings, as applicable:
| • | A device’s name and description |
| • | The dynamic link libraries (DLLs) it will use to process documents |
| • | Memory management settings |
| • | Stock substitution table |
| • | Format |
| • | Dialects |
| • | Basic property settings |
This table lists the fields and options available on the device’s General tab:
|
Field |
Description |
||||||||||||||||||||||||
|
The name of the device as it will appear in Cypress. This value can be up to 31 characters long. |
|||||||||||||||||||||||||
|
Model |
The printer models configured in the Printer Feature Control data file. |
||||||||||||||||||||||||
|
Style |
For informational use only. |
||||||||||||||||||||||||
|
Description |
For informational use only. For Desktop_print devices only: This field displays the IP/DNS Name specified in the Select Desktop Printer dialog. See Configuring a Cypress DesktopPrint Device for more information.
|
||||||||||||||||||||||||
|
In most cases, the IP address or DNS name of the device. For Desktop_print devices only: This field displays the Computer Name specified in the Select Desktop Printer dialog. See Configuring a Cypress DesktopPrint Device for more information.
|
|||||||||||||||||||||||||
|
The identifier of the host port to which the device communicates, with these exceptions:
|
|||||||||||||||||||||||||
|
The existing stock substitution table to be associated with this device. If you do not want to use stock substitution with this device, leave this field set to <None>, the default. |
|||||||||||||||||||||||||
|
The default page layout definition applied to any LPD In, FT In, or DDI job printed to the device. To dynamically choose a format to apply using Format Identify Criteria, leave this field set to <None>—the default—and select Use Auto-Format. |
|||||||||||||||||||||||||
|
The default banner associated with the device. Select Always use this banner to apply the banner to every document that the device processes. If you do not want to associate a banner with this device, leave this field set to <None>, the default. |
|||||||||||||||||||||||||
|
The name of the library that contains the procedures for formatting output to a specified device. |
|||||||||||||||||||||||||
|
The name of the library that contains the procedures for communicating with the device. |
|||||||||||||||||||||||||
|
A set of parameters added to a device to handle special device-specific features or issues. |
|||||||||||||||||||||||||
|
The number of print buffers that Cypress queues before it sends data to the printer. Do not change this value unless ASG Customer Support instructs you to do so.
|
|||||||||||||||||||||||||
|
The number of individual print buffers. Do not change this value unless ASG Customer Support instructs you to do so.
|
|||||||||||||||||||||||||
|
The maximum number of pages that Cypress can queue to the device before receiving acknowledgement from the device. |
|||||||||||||||||||||||||
|
Enables the display of the Printer Properties dialog, which allows you to set printer-specific features. |
|||||||||||||||||||||||||
|
The print option for black-and-white documents. |
|||||||||||||||||||||||||
|
The print option for color documents. |
|||||||||||||||||||||||||
|
The print option if the device you choose can print in color, but you want documents submitted to it to print in black and white. |
|||||||||||||||||||||||||
|
The print option for single-sided documents. |
|||||||||||||||||||||||||
|
The print option for double-sided documents. |
|||||||||||||||||||||||||
|
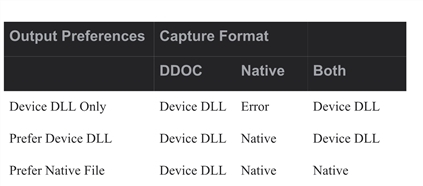
|
A document can be captured and stored in DDOC, the internal Cypress format, or native file format, its original source format (e.g., Microsoft Excel). The format used to store the document and the specified output preference determines how the document is output. |
||||||||||||||||||||||||
|
These are the output preferences: |
|||||||||||||||||||||||||
|
This table shows the resulting output when you select each of the options, based on how the document is stored:
|
Edit Mode of Device Viewer
Entering Edit Mode
The Device Viewer in Cypress UI's Administration Window has been enhanced with a new Edit button and a new Device(s) in Edit Mode menu item. The Edit button is visible and enabled when you select a device and you have the Write or Delete or Owner permission on the selected device.
When you click the button, the Device Viewer tries to check out the selected device record from the Cypress DocuVault, and set the Device Viewer in the Edit mode. This allows you to modify or delete the Device record based on the respective permissions.
If the device record has been checked out by someone else, a message is displayed to indicate the status, and the Device Viewer remains in the read-only status.
Exiting Edit Mode
You can exit from the Edit mode and return to the read-only status in these scenarios:
| • | If you have the Write or Owner permission on the Device record, and you have modified the record, and clicked the Apply button. The Device Viewer prompts you for a modification note (if the Cypress logging service is enabled), and the modification to the Device record is saved in the DocuVault. |
| • | If you have the Write or Owner permission on the Device record, and you have modified the record, then clicked the Reset button to discard the modification to the device record in the DocuVault. |
| • | If you have the Delete permission on the device record, and you clicked on the Delete button. The Device Viewer prompts you for a deletion note (if the Cypress logging service is enabled), and the device record is deleted from the DocuVault. |
| • | If you have the Write or Delete or Owner permission on the device record, but instead of modifying or deleting the record, you clicked on the Reset button. |
Viewing Device(s) in Edit Mode
The Device(s) in Edit Mode menu item under the View > Resource(s) in Edit Mode menu is enabled for Super Role members with Write permission.
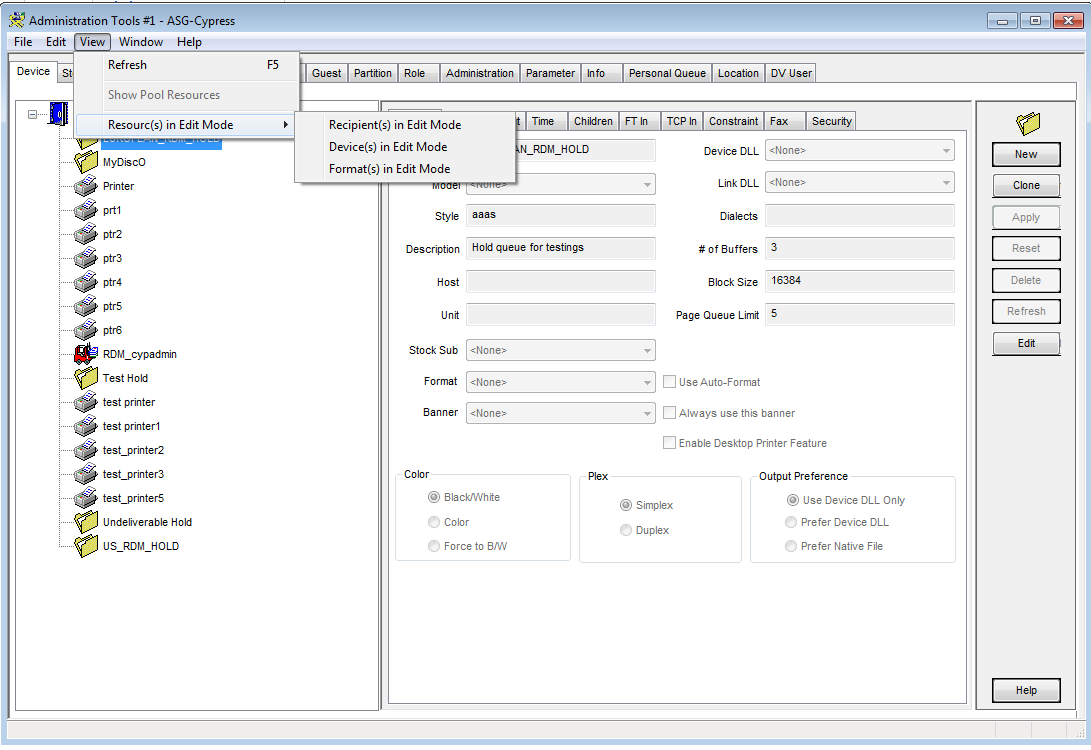
When the Super Role user clicks the menu item, a pop-up dialog displays a list of the devices that are currently in Edit mode. This dialog includes information about the name of the device and who checked out this device item.
The Super Role user can view and undo the checkout on any of the device in the list (select a device and click Undo Checkout), so that the released device can be modified by other authorized users.
Device Change History
The Device Change History and Reload Record feature enables you to:
| • | View the change history on a selected device in the Device Viewer. |
| • | Reload, if you have the Write permission, the previous change record to the selected device in the Device Viewer for modification. |
| • | Reload, if you are a Super Role member with Append permission, the deleted device, from any one of its previous records, back to the Device Viewer. |
When this feature is enabled, activities such as creation, modification, or deletion of the devices are logged, either to the local DocuVault or through the new Cypress Log Service. If you are a Cypress administrator, you should be able to set whether to store the change history in the logging service or in the local DocuVault or turn off the logging service.
You are prompted to describe the change activity when this feature is enabled and you click the Apply or Delete button.
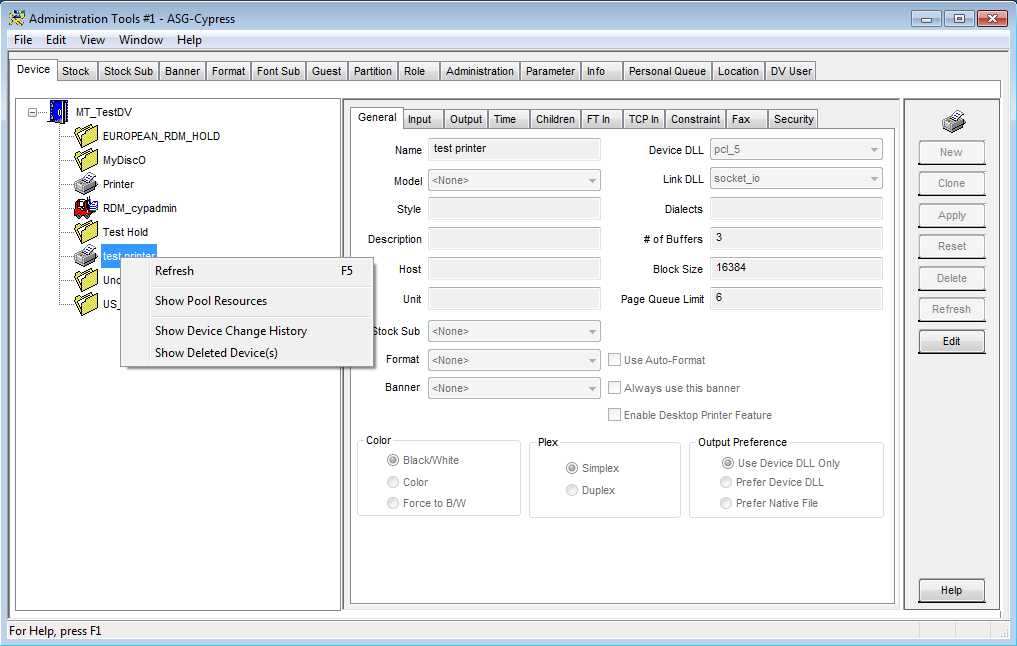
Show Device Change History
A new context menu item Show Device Change History (select a device and right-click Show Recipient Change History) enables you to view the change history for an existing device. This menu item is enabled when the Cypress logging service is turned on and you, with a Read permission, select a device in the Device Viewer in Cypress UI’s Administration window.
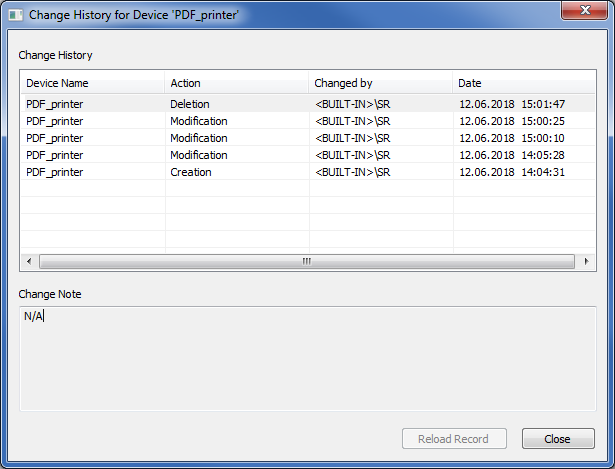
When you click Show Device Change History, a Device Change History dialog displays a list of changes made to the selected device at the top portion of the dialog. Selecting an item in the change list displays the detailed changes in the Change Note field at the bottom portion of the dialog.. This dialog can also be used to reload a previous change record.
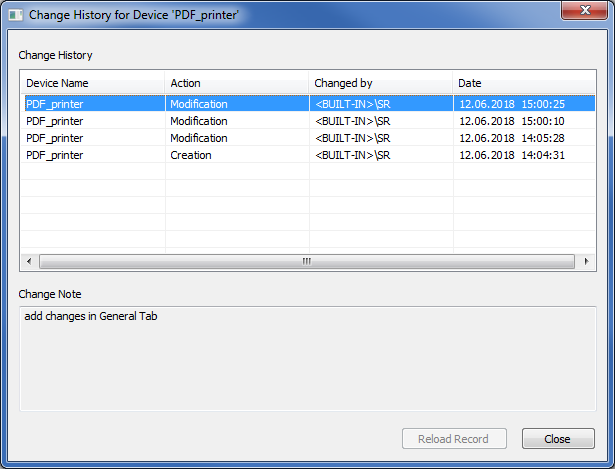
If you have the Write permission on the device and selected a re-loadable record from the dialog list, the Reload Record button on the Device Change History dialog is enabled. If you click Reload Record button, then click the OK button on the pop-up informational message box, the selected device record is reloaded to the Device Viewer for viewing and modifying. You must click the Apply button to commit the current device data (including the modification, if any, on top of the reloaded device data) in the Device Viewer. Else, click Reset to discard the current device data and the device data just before the reloading is displayed.
Deleted Device(s)
A new context menu item Show Deleted Device(s) for the Device Viewer (right-click on Device Tree Viewer) in Cypress UI’s Administration window enables you, as a Super Role member with Append permission, to view a list of deleted devices. You can also reload a deleted device, from any one of its previous records, back to the Device Viewer in the Cypress UI - Administration module.
When you click Show Deleted Device(s), a Deleted Device(s) dialog displays a list of the deleted devices in the DocuVault. Select a deleted device in the list, and click Show History as shown in the figure below. The Device Change History dialog for the deleted device is displayed.
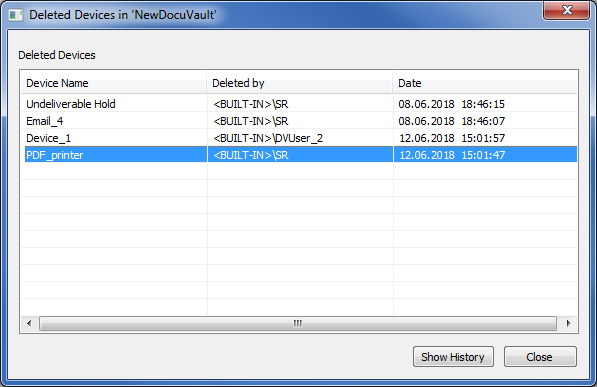
The Reload Record button on the Device Change History dialog can be used to reload any selected “re-loadable record” in the list back to the Device Viewer, with the Edit mode enabled automatically.
You must click the Apply button to commit the changes to the DocuVault. Else, click Reset to discard the changes and exit from the Edit mode.
Turning On and Turning Off Logging Service
Ensure that these prerequisites are met before you run the db_prog commands to turn on or turn off the logging service.
| • | You must be a member of the local Administrators or Power Users group. |
| • | The ASG-Cypress hub service must be stopped. |
db_prog Commands
| • | Enable logging service at local DV |
| – | db_prog logging_service enable localDV |
| • | Disable logging service |
| – | db_prog logging_service disable |
You can check the details about the commands by using the db_prog help:
| – | db_prog ? logging_service |
Specifying Security for Devices
You can use the controls on the Security tab through Cypress’s Administration Tools module to define who can use a specific device and how they can use it. You can effectively determine if users can see that a printer exists, print to it, or have any change control over documents in a device queue. Typically, end users require only Read and Append—and, in some cases, Control—security permissions.
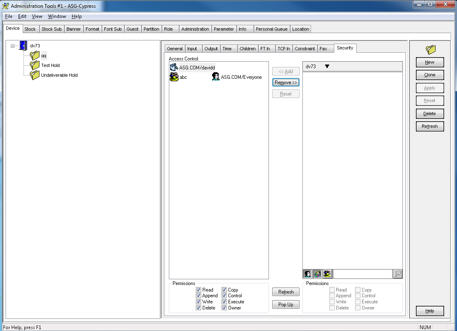
This table describes the available security permissions for devices:
| Permission |
Description |
|
The user can see the device in Cypress applications. |
|
|
The user can queue jobs to the device. |
|
|
The user can modify defined attributes of the device in the Administration Tools module. |
|
|
The user can delete the device definition. |
|
|
The user can clone the device definition. |
|
|
The user can suspend, resume, disable, enable, and change stock on the device and can modify the job tickets (JTICs) associated with the device, including deleting them. |
|
|
The user can copy JTICs queued to a device and paste the copies to a device. |
|
|
The user can modify the security defined for the device. |
See the ASG-Cypress System Administrator’s topic for more information on Cypress security.
Planning Your Output Environment
This topic provides a high-level overview of the basic steps required to plan your output environment. For detailed steps, see the related material cross-referenced in the steps.
Defining printers, hold queues, and other devices is perhaps the most important administrative task you will perform when configuring Cypress. Before you begin, it is important to plan your output environment; careful planning now can prevent you from having to redo your work later. First, make a list of all the groups and devices that you want to create.
Before you begin mapping out the environment, ASG strongly recommends that you print out and complete the Printer Definition Worksheet and Stock Definition Worksheet in Printer and Stock Definition Worksheets.
To plan your output environment
| 1. | Choose a naming convention for your output environment. |
Your naming convention should be meaningful to your end users. Avoid conventions that embrace cartoon characters, mythology, etc. For example, “Zeus” and “Spock” do not tell users much. Focus on meaningful names that can help your users understand where they are sending their documents. Depending your site’s needs, you might want to name devices based on location or the unique capabilities of a printer. For example, you might name your printers “Accounting,” “HR” and “Sales” or “Color” and “Black-and-White.”
Devices display in alphabetical order (either for all devices or by device type) within the Enterprise Output Manager. Take this into account if you want to control the order in which devices are displayed. Also, all device names must be unique.
See Choosing a Naming Convention for more information.
| 2. | Define all top-level groups and sub-groups (if any). |
Choose the names of your top-level groups, then choose the names of all sub-groups for each top-level group. There is no practical limit to the number of sub-groups that you can define, however, ASG generally discourages excessive use of them.
See Defining Hold Queues for more information.
| 3. | Define hold queues. |
You can define hold queues to any DocuVault, group, or sub-group. Because a hold queue is an end node, it cannot have any devices attached to it.
See Defining Hold Queues for more information.
| 4. | Define stocks. |
Before you can define printers, you must define some or all of the stocks that will be used in your output environment. The stock definitions you create will eventually be assigned to input trays when you create printer definitions.
See Defining Cypress Stocks for more information.
| 5. | Define printers. |
You can define printers to any DocuVault, group, or sub-group.A printer is an end node, so it cannot have any devices attached to it.
See Defining Printers for more information.
| 6. | Review your strategy with key users. |
Even though you probably have talked to your users as you were collecting information, ASG strongly recommends that you share with them your plan for creating their output environment.
| • | Some users will print through their Windows applications as they always have through their Windows applications and will be unaware that Cypress even exists. |
| • | Other users will want to use Cypress to obtain job status and printer status and will need to work within the framework you create. Get their reaction! Major changes are better made now than later. |
Choosing a Naming Convention
This table lists Cypress Administration object types and naming convention guidelines:
|
Object Type |
Naming Guidelines |
Example |
|
DocuVault |
Similar to other database names in the organization. Do not put the Cypress version or build in the name. |
Cypress_1 |
|
Printer Device |
The DNS name or printer serial number. In most cases printers are physically labeled with this name or code. End users are typically familiar with this name. This will help desk personnel in retrieving a status of the printer during a trouble call. Additionally, ASG recommends that the underscore (_) character be used in place of blank spaces, as some external systems that may need to connect to Cypress do not support blank characters. |
XJ7592 |
|
Fax Output Device |
Fax Out. This allows Cypress capture driver users to quickly identify the mode of distribution. In addition, if the fax modem supports multiple lines, the line number may be appended to the name, and a group device named Fax Out created to contain the multiple fax out line devices. |
Fax Out Fax Out Line 1 |
|
Email Output Device |
Email Out. This allows Cypress capture driver users to quickly identify the mode of distribution. |
Email Out |
|
Hold Queue Device |
Named for the function it serves with the words Hold Queue or HQ appended or prepended. |
Mainframe Hold Queue |
|
RDM Device |
There are two common naming conventions: the related sending application or the functional area. In addition, you should append or prepend RDM to the name. Usually one RDM device correlates to one end user point of contact for document distribution, retention, and security rules. |
SAP RDM
RDM Human Resources |
|
CPF Device |
Named after the CPF program name with CPF either appended or prepended to the name. |
CPF Statement Assembly |
|
Group Device |
The group device name should reflect the device types that are children of the group or give a meaningful name to printers that typically have DNS names/serial number names assigned to them. For example, the Cost Center 123 Printer group may have a child printer device of XJ7592. |
Dept 123 Printers Cost Center 123 Printer |
|
Stock |
If the stock type will be used by Windows applications, the stock type must have Win prepended to the name. If Cypress must select the stock size based on the image size, the name must have _## appended to the name (where ## is a number such as 01). |
Win Legal CheckStock_01 |
|
Stock Substitution Table |
A printer type or “from” and “to” stock types. |
HP5si Legal to Letter |
|
Banner |
The banner type. Can be used as a fax cover sheet. |
Main Frame Banner Company Fax Cover Sheet |
|
Format |
The document type or document layout. |
Payroll Checks Landscape |
|
Font Substitution Table |
The document type. |
Invoices |
|
Guest |
This name is dictated by the sending Host system. |
OS390A |
|
Role |
Can be named after functional areas or have group indicators built into the name. |
Print Operators Cost Center 123 |
Defining Hold Queues
Cypress is installed with two predefined hold queues:
| • | The Test Hold is provided to enable you to test Cypress prior to implementation. You can delete the Test Hold if you wish. |
| • | The Undeliverable Hold is provided as a depository for any documents that are unable to be delivered (e.g., documents that have been sent to an undefined device). The Undeliverable Hold cannot be deleted. |
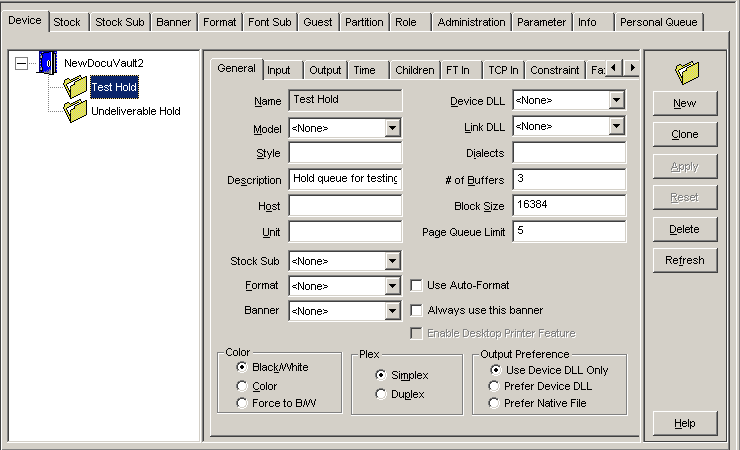
To create new hold queues
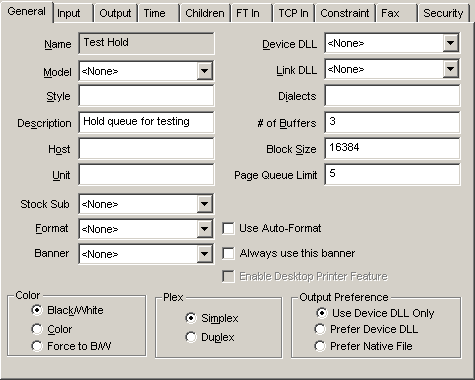
| 1. | From the Administration Tools module, select the Device tab if it is not already selected. |
The Device tab contains additional tabs that hold the configuration information for device definitions (i.e., printers, hold queues, and groups). You use the General, Time, and Security tabs to create a hold queue.
Once defined, any device definitions are listed in the device list in alphabetical order by user-defined or predefined device name.
| 2. | Click the New button at the right of the Administrations Tools window to create a new hold queue. |
| 3. | Select the General tab if it is not already the active tab. |

Then, provide the information required to define a hold queue.
| a. | Enter the name of the hold queue in the Name input field. |
ASG encourages you to create hold queues with descriptive names that convey their purpose or the type of information that is going to be stored in them.
| b. | Optional. Enter a description of the hold queue in the Description input field. You can use the description to further identify the function or intended contents of the hold queue. |
See Defining a Device for a description of each field on the General tab.
| 4. | Click the Add button at the right side of the Administration Tools window to add the device definition to the DocuVault. |
The name of the new hold queue appears in the device list.
| 5. | Select the Time tab, which provides controls for job and device timeouts. |

| a. | Skip the Retain For input field in the Job Timeouts section because it does not pertain to hold queues. |
| b. | Enter the purge time—in hours and minutes—in the Purge After input field in the Job Timeouts section. |
The purge time is the maximum length of time that a job can wait in a hold queue without being processed.
This definition has special nuances for hold queues. Since they do not print documents, the purge time is the length of time that a job is available (or appears) in a hold queue.
Or
Select the Never check box if you want documents in the hold queue never to be deleted. By default, Never is selected. Clear the check box if you have entered a purge time.
| a. | Skip the Device Timeouts section because it does not affect hold queues. |
| 6. | Click the Apply button at the right side of the Administration Tools window. |
| 7. | Select the Security tab, which provides controls for defining who can use a hold queue definition and how they can use it. See for more information. |
| 8. | Click Apply at the right side of the Administration Tools window to save your changes. |
| 9. | Optional. Define your Cypress hold queues as printers in Windows so that your users can access them. |
Create a Cypress printer for each Cypress device using the Windows Add Printer Wizard, then modify its properties (in the Device Settings tab) to point to the corresponding Cypress device.
Or
Create a single dynamic printer that eliminates the need to define a Windows printer for every Cypress device.
If you choose to create a single dynamic printer, users must select the dynamic printer from the File } Print menu, then select the actual output device from a secondary Dynamic Printer Settings dialog.
Defining Cypress Stocks
Before you can define devices, you must define some or all of the stocks that will be used in your output environment. The stock definitions you create will eventually be assigned to input trays when you create printer definitions.
For your convenience, Cypress comes with a few predefined stocks. Clone or delete these stocks as you wish.
When you are ready to define stocks for a new implementation of Cypress, begin with the first stock on your Stock Definition Worksheet (see Printer and Stock Definition Worksheets) and complete these steps. Note that some input fields are optional, but ASG encourages you to fill out the stock definitions completely as they can help Cypress to better match job requirements.
To define a new stock
| 1. | Open the Administration Tools module, and select the Stock tab. |
The Stock tab contains additional tabs, General, Details, and Security, that hold the configuration information for stock definitions. Stock definitions are listed in the Stock list in alphabetical order by user-defined or predefined stock name. Each stock name is automatically appended with the name of the DocuVault under which it was created as well as a unique reference number.
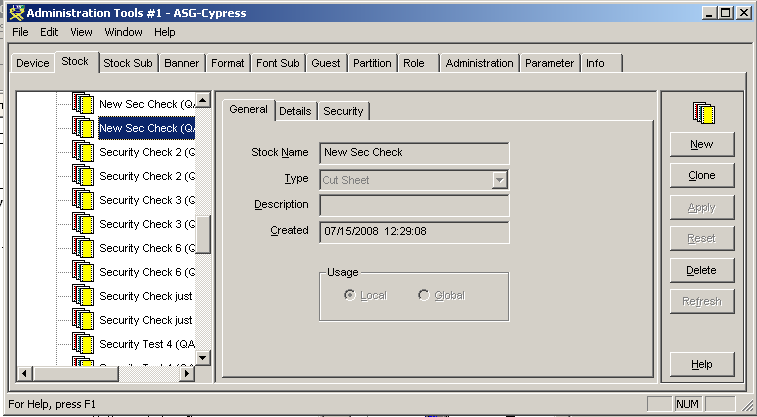
| 2. | Click the New button at the right of the Administration Tools window to create a new stock definition. |
| 3. | Select the General tab if it is not already the active tab. It contains controls and parameters for creating stock definitions. |
| a. | Enter the name of the stock in the Stock Name input field. |
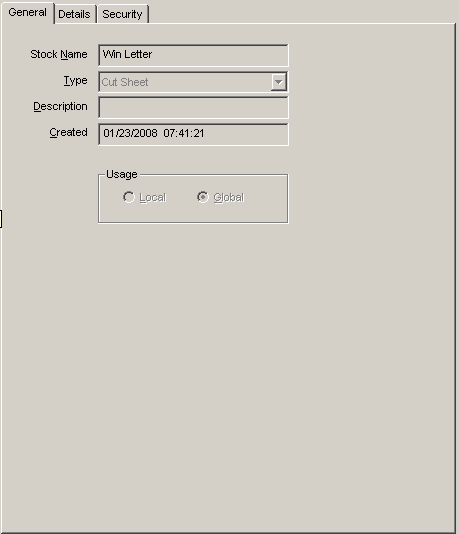
ASG encourages you to use names that are meaningful to your users rather than stock reorder numbers or form IDs. For Windows applications, the stock name should be “Win” followed by the Windows form name (e.g., “Win Letter”).
| b. | Select the stock type (i.e., Cut Sheet, Fan Fold, or Roll) from the list in the Type drop-down list. |
| c. | Optional. Enter the stock description in the Description input field. |
| d. | Identify the stock as a Local or Global definition in the Usage section. This parameter is used when copying and moving a job between DocuVaults in the Enterprise Output Manager. |
| • | If a stock is defined as Global, the two stocks are assumed to be identical on both DocuVaults and the stock definition on the destination DocuVault will be used. |
| • | If a stock is defined as Local, the stocks are assumed to be different and the stock definition on the source DocuVault will be used. |
| 4. | Select the Details tab, which contains details about each stock definition. |
| a. | Optional. Enter the color of the stock in the Paper Color input field and be specific. For example, if you have stocks that are three different shades of blue, use “sky blue,” “aqua,” and “teal.” |
| b. | Optional. Enter the weight of the stock in the Paper Weight input field. You can find this information on the label of each stock package. You can enter the weight in pounds (U.S.) or grams (metric). |
| c. | Enter the dimensions of the stock in the Short and Long input fields. Dimensions can be entered only in inches. The default dimensions are 8.5 by 11.0 inches. |
For the convenience of customers who use metrics, this table shows A-series sizes in inches:
|
A-series Stock |
Dimensions in Inches |
|
A0 |
33.1 x 46.8 |
|
A1 |
23.4 x 33.1 |
|
A2 |
16.5 x 23.4 |
|
A3 |
11.7 x 16.5 |
|
A4 |
8.3 x 11.7 |
|
A5 |
5.8 x 8.3 |
| d. | Optional. Select the Paper Type if appropriate. If the stock is plain, make no selection. |
| e. | Review your stock definition for accuracy in the Details tab and General tab. Click the Add button to add the stock definition to the DocuVault. The name of the new stock will appear in the Stock list. |
| 5. | Select the Security tab, which provides controls for defining who can use a stock definition and how they can use it. See for more information. |
| 6. | Repeat steps 1 through 5 for each stock you need to add to your output environment. |
| 7. | Define each custom stock created in Cypress as a form in Windows so your users can access them. |
| a. | Open the Windows Control Panel. |
| b. | Click the Printers and Faxes icon to open the Printers window. |
| c. | Select File } Server Properties to open the properties dialog. |
| d. | Click the Forms tab. |
| e. | Select the Create a New Form check box. |
| f. | Enter the name of the stock in the Form name input field. |
| g. | Click the Save Form button. You do not need to enter measurement information; Cypress does not use it. |
Defining Printers
To define a new printer
| 1. | From the Administration Tools module, select the Device tab. |
The Device tab contains additional tabs that hold the configuration information for device definitions (i.e., for printers, hold queues, and groups). You use the General, Input, Output, Time, Constraint, and Security tabs to define a printer. You also may want to further define the printer using the Children, FT In, and TCP In tabs.
Device definitions are listed in the Navigation frame on the left side of the dialog in alphabetical order by user-defined or predefined device name, as shown in this example:
| 2. | Click the New button at the right of the Administration Tools window to create a new printer definition. |
| 3. | Select the General tab if it is not already selected. It enables you to specify basic information for each printer. |

See Defining a Device for a description of each field on the General tab.
| 4. | When you have completed the General tab, click the Add button to add the device definition to the DocuVault. |
The name of the new printer will appear in the device list.
| 5. | Select the Input tab. Cypress needs to know the input capabilities of each printer (i.e., the number of trays, loaded stocks, etc.). The more information you enter, the better Cypress will be able to manage your output environment. |
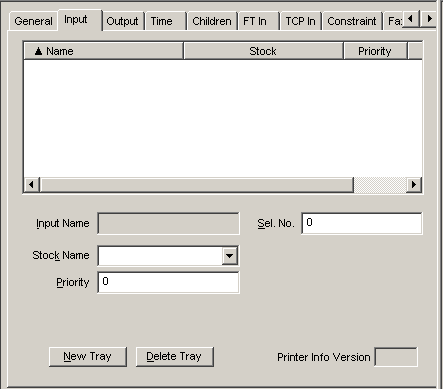
| 6. | Create an input tray for your printer by clicking the New Tray button located at the bottom left of the Input tab. |
| 7. | Enter the name of the tray in the Input Name input field (e.g., Tray 1). |
| 8. | Select the stock to be loaded in the input tray in the Stock Name drop-down list. The list includes all previously defined stocks as well as the stocks that are automatically installed with Cypress. |
| 9. | Enter the printer’s priority in the Priority field. The priority value is used by Cypress when the same stock is loaded in multiple trays: the tray with the higher priority value is selected as the input tray. ASG recommends that you assign high-priority values to large input trays and lower priority values to smaller input trays. Then Cypress will select the tray that probably has the most paper to print the job. The default priority value is 50. The priority can range from 1 to 100. |
| 10. | Enter the selection number for the tray in the Sel. No. input field. The selection number identifies the order in which paper will be pulled from printers that have multiple input trays. Even if the trays are physically numbered, the printer uses the number you specify in this field as the selection number. |
| 11. | Click the Apply button to the right of the Device tab to add the input tray to the selected printer definition. |
| 12. | Repeat steps 6 through 14 for each additional input tray. |
Make sure that you create the same number of trays as there are input trays available on the printer.
| 13. | Select the Output tab. Cypress also needs to know the output capabilities of each printer (e.g., the different types of destinations). An output destination is the name of the area to which a printer can deliver paper. These areas are typically called trays or bins. |
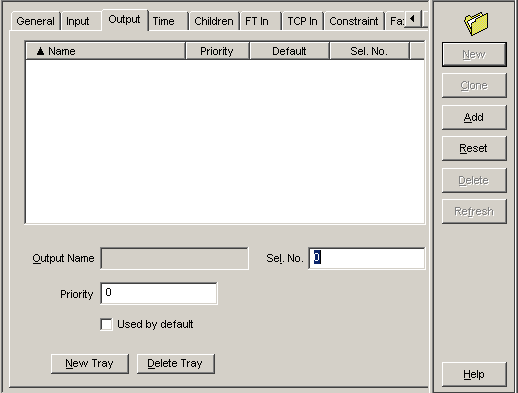
| 14. | Create an output bin for your printer by clicking the New Tray button located at the bottom of the Output tab. |
| 15. | Enter the name of the bin in the Output Name input field (e.g., Bin 1). |
| 16. | If this output bin is the default, select the Used by default check box. Otherwise, leave the check box cleared. |
| 17. | Enter the priority in the Priority input field. Again, the priority can range from 1 to 100 and defaults to 50. |
| 18. | Enter the selection number for the selected bin in the Sel. No. input field. The selection number identifies the order in which paper should be delivered among multiple destinations. |
| 19. | Click the Apply button at the right side of the Administration Tools window to add the output bin to the selected printer definition. |
| 20. | Repeat steps 17 through 27 for each additional output bin. |
Make sure that you create the same number of trays as there are output trays available on the printer.
| 21. | Select the Time tab. This tab allows you to control retention and purge times for job tickets sent to this device. |
| a. | Specify the retention time in the Retain For field of the Job Timeouts section. |
The retention time is the length of time the job is available in a device queue after it has finished processing. This allows users to see the completed job in the device queue. Completed jobs displayed in the queue also can be reprinted without resending them from the client.
The default retention time is 24 hours. You can alter this setting either by entering a new setting (in hours and minutes) or by selecting the Forever check box.
| b. | Enter the purge time in the Purge After field of the Job Timeouts section. |
The purge time is the maximum length of time that the job can wait in a device queue without being processed. For example, a job that is submitted to a printer that is not able to print because of missing resources is deleted from the queue when this timeout is reached.
The default purge time is Never. Clear the Never check box to enter hours and minutes in the input field.
| c. | In the Device Timeouts section, specify the time a job will be moved to an alternate device if it has not been processed successfully. You can accept the default time of two hours or enter a different time in the Switch After input field. |
You can select the alternate device from the To Alt. Device drop-down list.
| d. | Click the Apply button to apply the job timeouts and document archive settings to the device definition. |
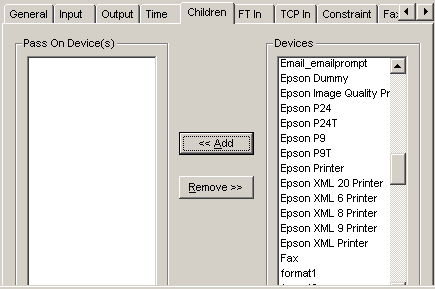
| 22. | Optional. If you are creating a printer group, select the Children tab. This tab allows you to specify the contents of a printer group. |
| 23. | Optional. Select the FT In tab. This tab is applicable only if you use the FT In component of Cypress, which allows users to print documents via network file transfer. Cypress regularly scans specific directories searching for files, then retrieves, captures, and prints the files when found. |
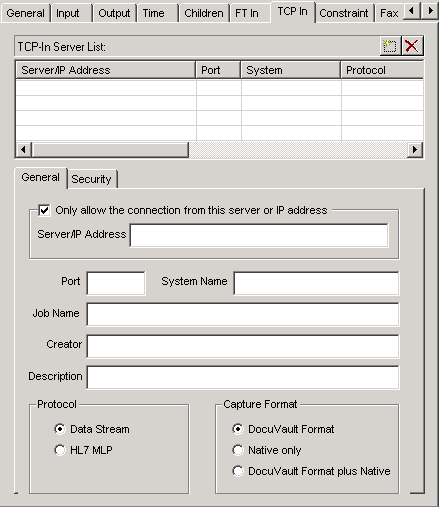
| 24. | If your device needs to support print data streamed directly to Cypress from a TCP/IP port, select the TCP In tab. See Using TCP/IP Devices for more information. |
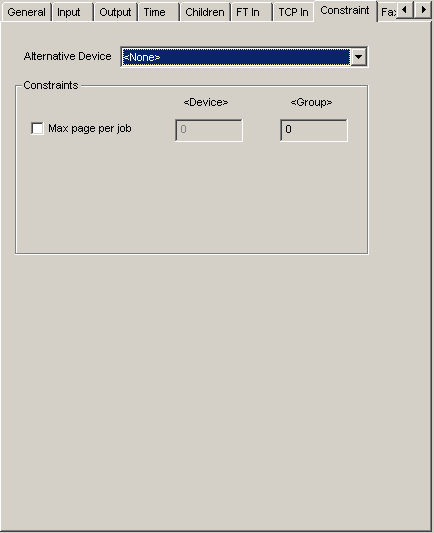
| 25. | Select the Constraint tab. This tab allows you to limit the number of pages (i.e., total pages, including copies) that can be printed to a device. When the maximum value is reached, the job is redirected automatically to an alternate device. |
See Specifying an Alternative Device for Large Print Jobs for information on defining an alternate device.
| 26. | Select the Security tab. This tab provides controls for specifying which users can use a printer and how they can use it. See for more information. |
| 27. | Click the Apply button at the right side of the Administration Tools window to save all changes. |
Specifying an Alternative Device for Large Print Jobs
Overflow printer control gives Cypress administrators the option to place a constraint on the maximum number of pages a defined device can print per print job. If the number of pages in the print job exceeds the defined constraint, the job is re-routed to an alternate printer, as specified.
For example, if you have a small, low-speed printer that is not well-suited to large print jobs, you can specify that print jobs greater than a maximum number of pages be moved to a different device.
To specify an alternate device for large print jobs
| 1. | Open the Administrative Tools module, and select the Device tab. |
| 2. | Select the device for which you want to set up an alternate device from the tree view at the left side of the window. |
| 3. | Select the Constraint tab. |
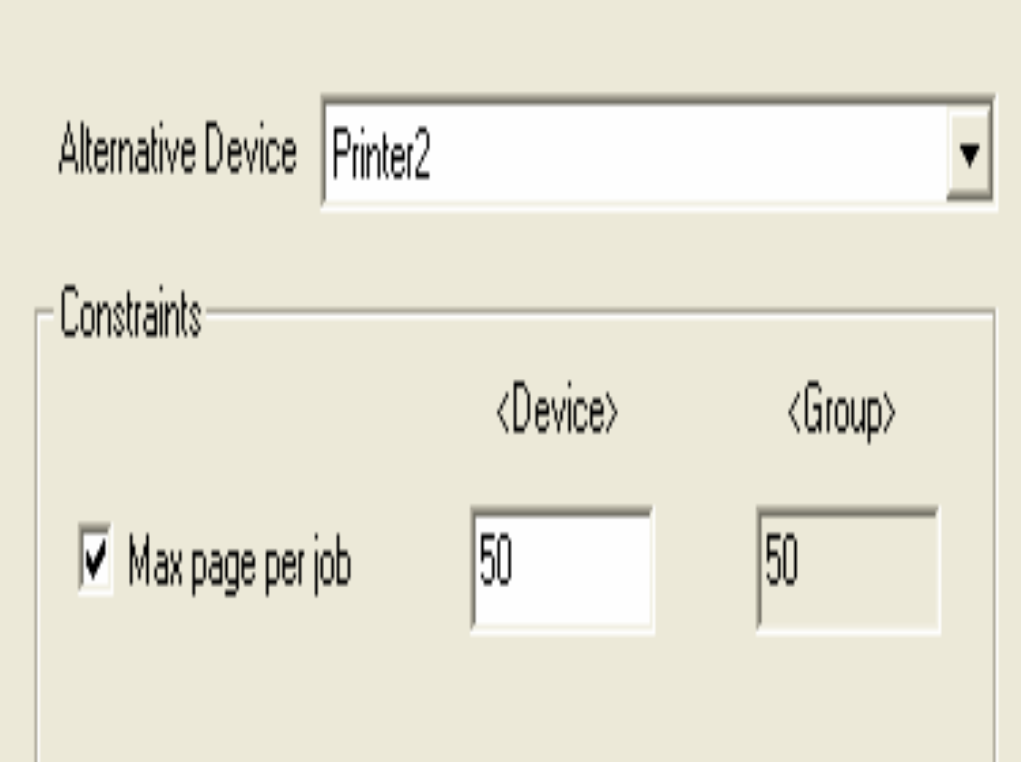
| 4. | From the Alternative Device drop-down list, select the device to which you want to move large print jobs. |
| 5. | Select the Max page per job check box. |
| 6. | Enter the maximum number of pages that the original device should accept in the <Device> field. Any jobs larger than the number of pages you have specified are moved to the alternative device. |
| 7. | Click Apply. |
The <Group> field is for display only.
| • | If the device is not part of a group, the <Group> field is always set to the same value as the <Device> field. |
| • | If the device is part of a group, the <Group> field will display the largest Max page per job value within the group. For example, assume that Printer A and Printer B both belong to the ABC_Printers group. If Printer A’s Max page per job field is set to 50 and Printer B’s Max page per job field is set to 25, each of them will show 50 in the <Group> field. |
If a job is queued to a specific device, it will be sent to an alternate device if its page count is greater than the value in the <Device> field. If a job is queued to a group of devices, it will only be sent to an alternate device if its page count is greater than the value in the <Group> field.
Defining Device Groups
This topic describes the steps required to define device groups.
Defining a Device Group
To create new device groups
| 1. | From the Administration Tools module, select the Device tab if it is not already selected. |
The Device tab contains additional tabs that hold the configuration information for device definitions (i.e., printers, hold queues, and groups). You use the General, Children, and Security tabs to create device groups.
Device definitions are listed in the device list in alphabetical order by user-defined or predefined device name.
| 2. | Click the New button to create a new group definition. |
| 3. | Select the General tab if it is not already at the front. |
| a. | Enter the name of the group in the Name input field. We encourage you to create groups with descriptive names that convey the purpose of the group or its location. |
| b. | Optional. Enter a description of the group in the Description input field. The description may be used to further identify the function or members of the group. |
| 4. | Click the Add button to add the device definition to the DocuVault. The name of the group you just created will appear in the device list. |
| 5. | Select the Children tab. Here you will specify the contents of this group. |
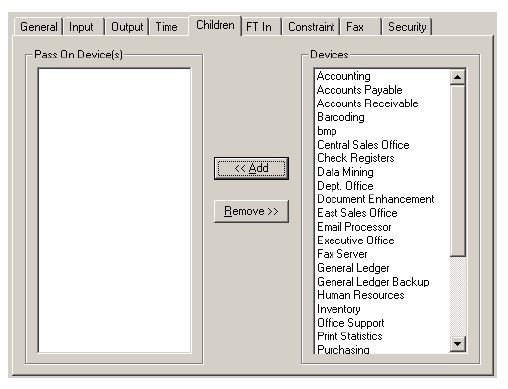
The Devices list in the Children tab (to the right of the window) displays all available devices that can be added to your group. Of course, this list does not contain the group to which you are adding devices.
| 6. | From the Devices list, select the device you want to add to the group and click the <<Add button. |
| • | You can add multiple contiguous devices by selecting the first device, and then selecting the last device while holding down the Shift key. |
| • | Select multiple non-contiguous devices by selecting each device while holding down the Ctrl key. |
Although groups may contain other groups, ASG discourages creating excessive sub-groups unless your output environment is complex.
| 7. | Select the Security tab. This tab provides controls for defining who can use a device group definition, and how they can use it. See for more information. |
| 8. | Click the Apply button. Your group should now appear in the device list with a group icon instead of a hold queue icon. |
Defining Devices to More Than One Group
You can define a sub-group, hold queue, or printer as a member of more than one group. This enables you to create different groupings to better facilitate how your users print their documents.
For example, assume that CompanyABC owns several color printers that are located in Department C, but not all employees know about them. To make these printers easy to access by all employees, you can wish create a group called Color and add the color printers to the group.
Printing to a Group Or Sub-group
Printing to a group or sub-group causes Cypress to queue the document to every device defined in that group. However, only the first available device in that group will print the document.