Compare Item Versions
You can compare item versions when an item has the focus, either in the navigation tree, in a report, or in an editor view.
To compare versions of an item
- Right-click an item, and select Compare Item Versions from the context menu.
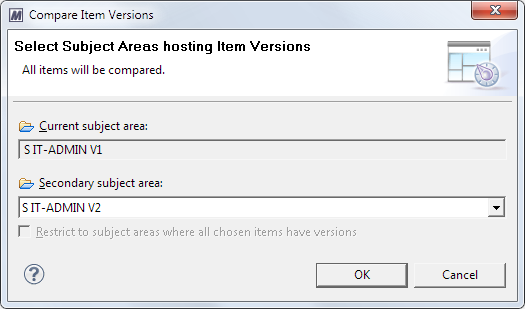
- Select the secondary subject area for the version comparison.
- After you have made your selections, click the OK button.
This opens a dialog that lets you select the subject area of the item that you want to compare with the item in the current subject area (that is, the secondary subject area):

When you use this approach, the current subject area is always the subject area of the item that has the focus. If you want another subject area to be the current subject area, you can take this approach:
Select the items to be compared in the navigation tree (or in a report) and then right-click them, and select Item Versions from the context menu. In the Item Versions report that opens in the Editor frame, click the Selected item in Item Versions tree hyperlink on the Compare Item Versions panel. You get the same dialog as described above, except you can also select the current subject area. If you selected multiple items in a report or in the navigation tree, you can compare two versions of all selected items by clicking the All available items in Item Versions tree hyperlink.
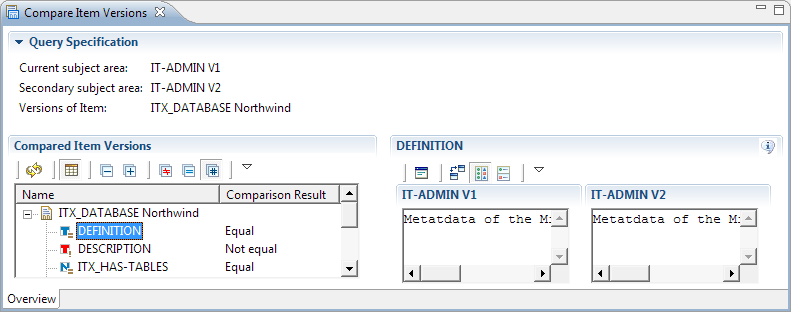
The Compare Item Versions view will open in the Editor frame. To know more, see Working with the Compare Item Versions View.
Working with the Compare Item Versions View
The Compare Item Versions view allows you to inspect two versions of an item. The contents of the compared item versions are displayed in read-only mode.

The Compare Item Versions view has the same layout and provides the same functions as the Compare Items view. See Working with the Compare Items View for a description of this view.
Interpreting Compare with Transaction Query Results
The query result lists only items of the transaction that will affect items of the current subject area during commit of the transaction.
If the transaction is used by several subject areas, only the subject area-relevant items are not considered in the query result but during commit of the transaction all items of the transaction are considered.
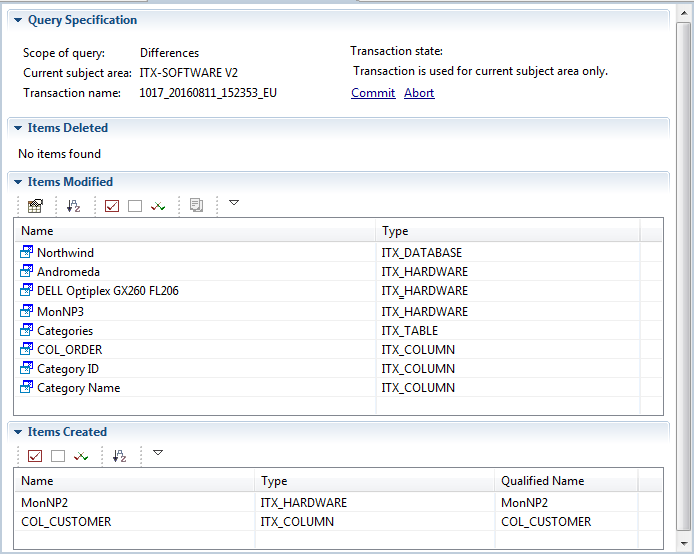
The following example shows the result of a Compare with Transaction query of an XML import transaction.

The query result displays the following panels.
- Query Specification
- If the transaction is not shared, the Commit and Abort hyperlink are available. After checking the query result, you can click the Commit hyperlink to execute the commit for the items in the transaction. Clicking the Abort hyperlink deletes the transaction including all items contained in it.
- If the transaction is shared, you must open an Administration connection and follow the steps described in the topic Maintaining Database Transactions.
- Items Deleted
- Items Modified
- Items Created
Next to the names of the compared subject area and transaction, this panel also lists the transaction state.
This panel lists items that would be deleted during the commit (that is, deleted in the transaction).
This panel lists items that would overwrite the corresponding items in the current subject area during the commit (that is, contained in the transaction and in the current subject area).
This panel lists items that would created during the commit (that is, contained in the transaction but not in the current subject area).
You can click the controls at the left side of the area headers ( and
and  ) to collapse or expand the results. The table lists the functions of the local toolbar buttons on the panels.
| Icon | Command | Function |
|---|---|---|
|
|
Customize Columns |
Opens the Select Table Columns dialog, which lets you select the columns that should be displayed. |
|
|
Enable Sort by Columns |
Enables/disables the table’s sort buttons. |
|
|
Select All Items |
Selects all items in the table. |
|
|
Deselect All Items |
Clears all selected items. |
|
|
Invert Selection |
Clears all selected items and selects all unselected items. |
|
|
Compare Item Versions |
Opens the Compare Item Versions view for the selected item. |


