Path Queries
Like the item environment options, a Path query starts with a seed item, but instead of exploring the immediate relationship vicinity of the item, it can follow relationships to a greater depth, using a predefined path that specifies between items of which types, and in which direction, relationships should be taken into account.
Example of a Path Query Result
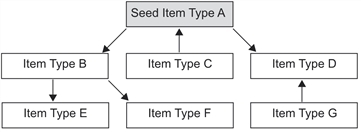
This path goes to a depth of three levels, and includes forward relationships going from seed item type A to item types B and D, and from item type B to item types E and F. Also, it includes backward relationships from seed item type A to item type C and from item type D to item type G.
With Metability, you also have the option of defining masks. Using this feature, you can hide items of particular item types in the query result while still preserving indirect relationships between the visible items that involve a hidden item. Therefore, these query paths are referred to as maskable query paths, and the queries that use these paths, as maskable Path queries.
Example of a Maskable Path Query Result
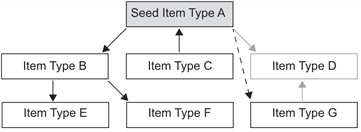
In this predefined path, item type D is masked (that is, items of this type are not displayed in the query result, and any indirect relationships between the seed item of type A and items of type G will be shown as virtual relationships, symbolized by the dotted line arrow).
In Metability, you can define different masks for a query path, where each mask can hide specific item types. For detailed instructions on defining masks, see Defining a Query Path.
- Select Query
 Path Query from the main menu bar.
 - Click the Compute option to create a query path on the fly and then run a query on that path. To know more, see Running a computed Path query.
Or
Right-click the item, and select Path Query from the context menu. A submenu is displayed.

Or
Click the Select option to specify additional settings before running a Path query. To know more, see Running a Path query using the Path Query dialog.
Or
Click a query path entry to run the query:

Or
If masks have been defined for the query path, click a path entry and then a mask entry in the cascading submenu to run the query with the selected mask:
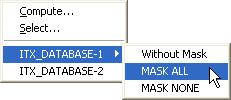
The Path query executes and its result opens in a report view in the Editor frame.
See Defining a Query Path for an explanation of the masks concept and for instructions on how to create masks.
- Select Query
 Path Query from the main menu bar.
 - From the cascading menu, select the Compute option.
- Select the target item type from the Target type drop-down list.
- Select the Forward recursion and Backward recursion check boxes to specify whether the query should consider recursive link structures (that is, link structures where items of the same type can occur again on deeper levels). This is an optional step.
- Click the Compute button.
- Click the Plus button (
 ) to calculate the paths that also connect source and target item type but are one step (that is, intermediate item type) longer.
 - When the Computed paths list contains the path you are interested in, select it.
- Click Run to run the Path query and create a query result view in the Editor frame.
Or
Right-click the item, and select Path Query from the context menu.
The Path Query dialog opens the Run a Computed Path Query page.
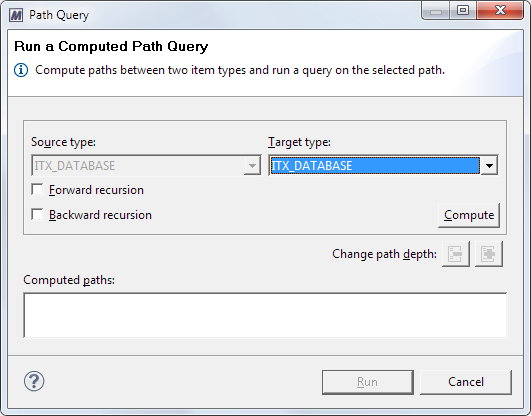
The Source type drop-down list displays the source item type (which is the type of the source item and cannot be changed).
Source and target type do not need to be connected directly. Metability analyzes the information model and uses that information to compute any indirect connections (that is, link or namespace relation structures) between source and target type.
The initial path definitions, which are the shortest possible paths connecting source and target item type, are displayed in the Computed paths list:

Clicking the Minus button ( ), which becomes active now, would bring you back to the previous level.
Using these two buttons, you can click forward and backward through all possible levels. By clicking the Plus button again and again, you can step by step calculate even longer and more indirect path definitions that connect source and target item type, as shown in this example:
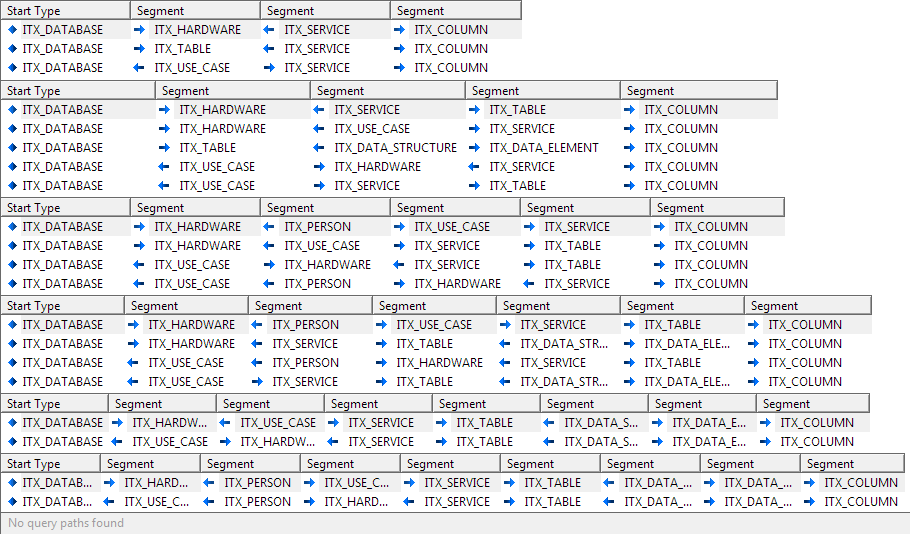
If you exceed the maximum level, the Computed paths list contains displays the message No query paths found. In this case, use the Minus button to go back a step.
Running a Path query using the Path Query dialog
- Proceed as described in step 1.
- In the cascading menu, click the Select option.
- From the Owner drop-down list, select or enter the name of the owner of the paths you want to list. You can type in any user ID that is known to you.
- From the Query type drop-down list, select whether all available query paths, only maskable query paths, or only non-maskable paths should be listed.
- In the Path name filter field, enter a search string for the query paths that you want to list. You can enter wildcard characters.
- Adjust the query settings in the Run Settings table. The available settings are identical to the settings provided in the Queries subnode on the Preferences dialog (to know more, see Subnode Queries). This is an optional step.
- Click Run. The query result is displayed in the Editor frame.
The Path Query dialog opens to the Select a Query Path page:
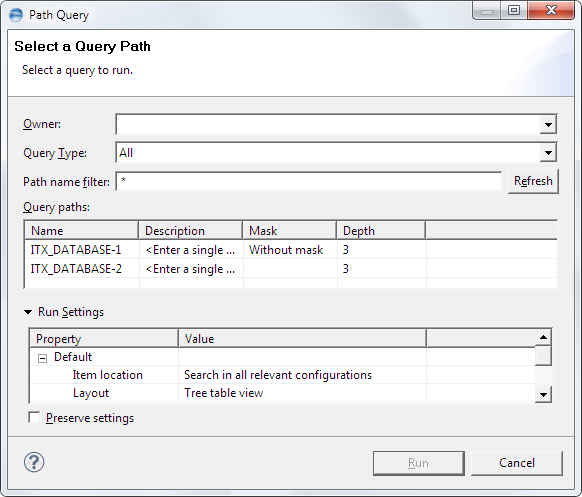
Select a query path from the list. If you want to filter the list so that only some of the available query paths are shown, you can use the following options.
After you have made changes in the fields, click the Refresh button to update the Query paths list.
If a mask has been defined for one of the listed queries, a Without mask entry displays in the Mask column for that query.
If you want to run the query with a specific mask, click the Without mask entry to display a drop-down list button and then select the mask you want to use:

If you want to save the specified settings for future queries, select the Preserve settings check box.
