Working on Profiles
Working on item type profiles can be divided into the following types of operation.
- Operations which influence the view, that is, the activation/deactivation of text, value, and binary attributes and specifying processing rules. To know more, see Profile Details.
- Operations which affect access rules for items of that type. This includes right for creating, deleting, and renaming items. To know more, see Type Specific Permissions.
- General item permissions apply to all users no matter if they are owner or non-owner of the items of that type.
- Non-Owner item access constrains the general item permissions to non-owners of items of that type. Except for the leader or administrators of a subject area Metability ignores non-owner constrains.
- Operations that define predefined entry points for accessing items of this type.
These operation apply to all users that access items of that type no matter if they are owner or non-owner of the items of that type.
These operations have the following two aspects.
These operation apply to all users who can access items of that type; there is no exception for any user. To know more, see Item Operation User Exits and Item Naming User Exits.
To open the Profile subpage
- Open the item type to which the profile applies in the Type Editor. To know more, see Opening Item Types.
- Click the Profile page tab to open the Profile subpage.
- The left part is the overview area, where a tree displays the profile structure. The overview area is the constant element in the Profile subpage.
- The right part is the detail area. Its content changes, depending on the element you select in the overview area.
- Initially, the Master Profile node is open in the overview area and profile information pertaining to the item type for which you opened the Profile subpage is displayed in the detail area.
- When a top level node (for example, the Master Profile node) is selected, the detail area is completely empty.
- When the second level node (that is, a node that designates the item type) is selected, the information pertaining to the profile is displayed in the detail area.
- When a third level node (that is, a particular attribute) is selected, an attribute details section for that attribute is displayed in the detail area.
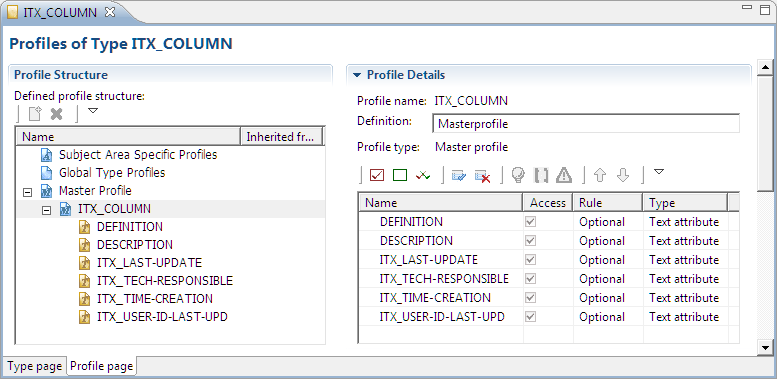
The Profile subpage breaks into two main parts.
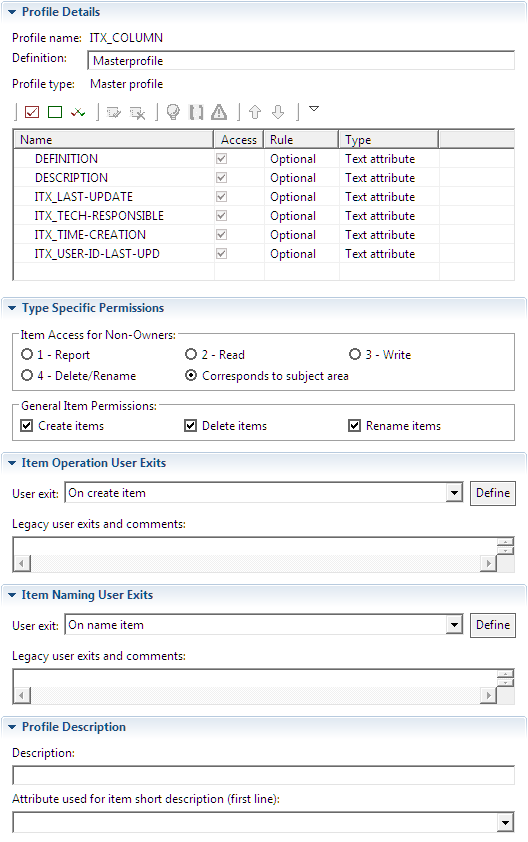
Profile Information
Profile Details
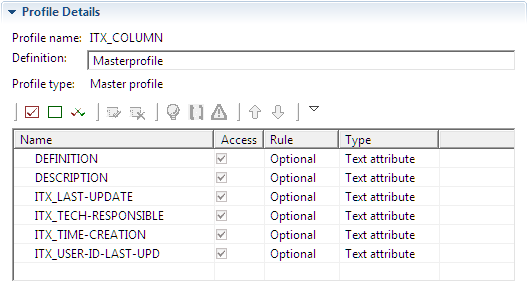
The profile name cannot be modified. You can modify the following properties.
- Definition: You can edit the profile definition.
- The list under Profile type contains all attributes of the item type. The attributes that are accessible to the user are selected in the Access column, and the Rule column lists the editing rule for the attributes. The editing rule can have one of the following values:
- Optional: Editing the attribute is optional (that is, you are free to assign content to the attribute or leave it empty).
- MAND: The attribute must not remain empty.
- INFO: You can only read the attribute but not edit it.
- The order of the attributes determines their order in any standard dialog of Metability (or WebAccess) in which an item is listed with its attributes.
- In the list under Profile type, you can use the toolbar icons to modify profile properties for specific attributes.
The table lists the functions of the toolbar icons.
| Icon | Command | Function |
|---|---|---|
|
|
Select All |
Selects all attributes in the attribute list. |
|
|
Deselect All |
Deselects all attributes in the attribute. |
|
|
Invert Selection |
Inverts the current attribute selection. |
|
|
Allow Access |
Allows access to the attribute (Check boxes in the Access column are selected). |
|
|
Deny Access |
Denies access to the attribute (Check boxes in the Access column are deselected). |
|
|
Set to Info |
Sets the selected attributes to type Info. |
|
|
Set to Optional |
Sets the selected attributes to type Optional. |
|
|
Set to Mandatory |
Sets the selected attributes to type Mandatory. |
|
|
Move Up |
Moves the selected attributes up in the attribute sequence. |
|
|
Move Down |
Moves the selected attributes down in the attribute sequence. |
|
|
Menu |
Provides the options described in this table in a drop-down menu. |
Type Specific Permissions

- Item access for non-owners: Report is the lowest permission level, Delete/Rename is the highest level. Each permission level automatically includes the lower levels. Select Corresponds to subject area to specify that the access rights for non-owners corresponds to those subject area members.
- General item permissions: These permissions apply generally to the item type and override all other access rules.
Item Operation User Exits and Item Naming User Exits
User exits are predefined entry points in Rochade’s logical structure for accessing and processing data, enabling users to customize and modify Rochade’s standard behavior according to their preferences and requirements.
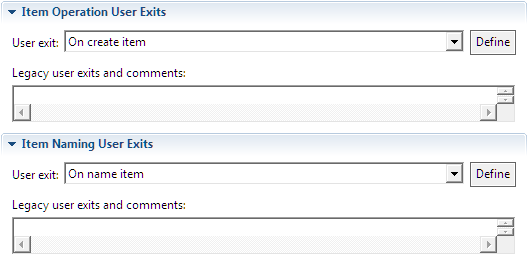
You can define two kinds of user exits:
- Item-operation user exits modify standard behavior for various item actions (for example, opening, saving, and deleting). The allowed actions are listed in the drop-down list of the Item Operation User Exits panel.
- Item-naming user exits allow you to specify conditions for item naming (a predefined list of available names or name prefixes) and to check if an entered name satisfies those conditions.
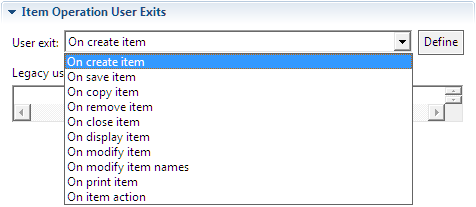
To define a user exit, you can select the user exit in the Define list box and then click the Define button to open the fields that allow you to describe the user exit.
For all types of exits, you enter the name of the Java class or RO_EXECUTABLE item that implements the user exit in the edit field. Under keys and values, you can enter parameters that should be submitted to the interface.
To view an example of how to set the keys and values in the parameter table, see Common Attribute Information.
In the edit field under Comments, you can enter additional information on the user exits that are specified here.
Profile Description

- Description: You can enter a short description for the profile
- Attribute used for item short description (first line): From the drop-down list, you can select an existing text or value attribute that should be used for the short description of items of this type.
Attribute Information
In the Attribute Details Section panel that is displayed when you select an attribute on the Profile subpage, you can work on the attribute-specific profile information.

The attribute type, name, base name, and definition cannot be modified.
From the Attribute rule drop-down list, you can select one of the following rules.
- Info: Means that the content of the attribute cannot be changed; it only can be displayed.
- Optional: Means that editing the attribute is optional. The attribute may be filled with content, but it also may remain empty.
- Mandatory: Means that the attribute must have content.
Further, you can select the check box if you want the first line of the attribute to be used for a short description of items of this type. This check box corresponds to the Attribute used for item short description (first line) drop-down list on the Profile Description panel.


