
Configuring DocuVault Parameters
This topic provides the default DocuVault settings established when you first installed Cypress as well as step-by-step instructions for configuring them.
Overview
The Parameter tab in Cypress’s Administration Tools module enables you to configure many DocuVault parameters to suit the needs of your particular site. It provides 12 additional tabs that enable you to define specific capabilities for your environment. The settings on the Parameter tab affect all documents that Cypress captures.
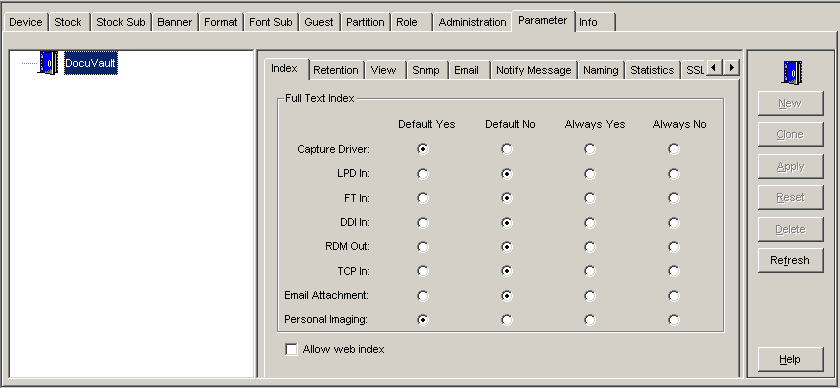
The Index Tab
The Index tab provides controls for configuring how documents received from each supported input source are to be indexed. This tab only affects full-text indexing requirements. Any data indexing requirements that can be defined are unaffected by these settings.
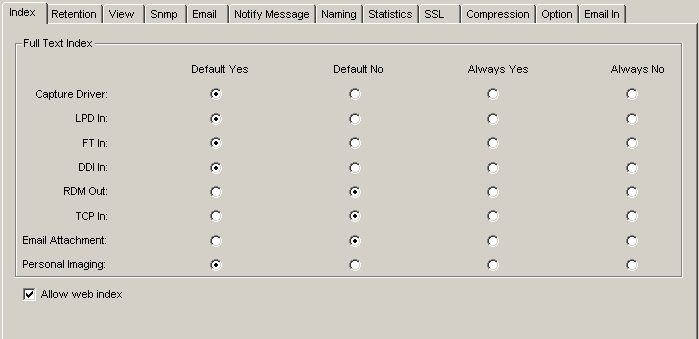
This table shows the Index tab’s Full Text Index default settings:
|
Parameter |
Setting |
|
Default Yes |
|
|
Default No |
|
|
Default No |
|
|
Default No |
|
|
Default No |
|
|
Default No |
|
|
Default No |
|
|
Default Yes |
|
|
Unchecked |
See the Using > Knowledge Builder topic for more information on indexing.
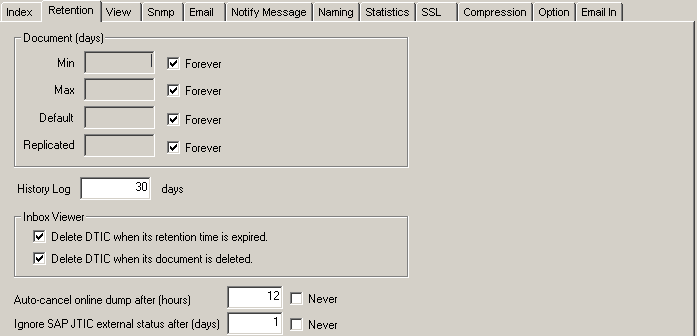
The Retention Tab
The Retention tab enables you to define retention settings for Cypress. Retention attributes control the length of time that a document is archived in a DocuVault, as well as the length of time that Cypress stores document data in the selected DocuVault’s History Log. This table shows the Retention tab’s default settings:
|
Area |
Field |
Setting |
|
Document (days) |
Min |
0 |
|
Max |
Forever |
|
|
Default |
30 |
|
|
Replicated |
Forever |
|
|
History Log |
Days |
10 |
|
Inbox Viewer |
Delete DTIC when its retention time is expired. |
Selected |
|
Delete DTIC when its document is deleted. |
Clear |
|
|
Auto-cancel online dump after (hours) |
|
12 |
|
Ignore SAP JTIC external status after (days) |
|
48 |
To configure document retention attributes
| 1. | From the Administration Tools module, select the Parameter tab. |
| 2. | Select the desired DocuVault from the tree view on the left side of the window. |
| 3. | Select the Retention tab if it is not already selected. |
| 4. | In the Min field in the Document (days) area, enter the minimum number of days that a document should be stored in the selected DocuVault. |
Or
Select the Forever check box next to the field if all documents should be stored indefinitely.
| 5. | In the Max field in the Document (days) area, enter the maximum number of days a document should be stored in the selected DocuVault. |
Or
Select the Forever check box next to the field if you want to have the option to retain documents indefinitely.
Keep in mind that the Forever check box affects the Min and Max fields differently:
| • | If you select the Forever check box next to the Min field, Cypress will retain all documents indefinitely. |
| • | If you select the Forever check box next to the Max field, Cypress will allow you to retain documents indefinitely, but you will also be able to retain documents for shorter periods of time, if needed. |
| 6. | In the Default field in the Document (days) section, enter the default retention time to be applied to any document without a defined retention time. |
Or
Select the Forever check box to retain documents indefinitely by default.
| 7. | In the Replicated field in the Document (days) section, enter the default retention time to be applied to any document that originated in a different DocuVault. |
Or
Select the Forever check box to retain replicated documents indefinitely.
| 8. | Enter the number of days to store audit trail logs in the History Log input field. |
| 9. | In the Inbox Viewer section, select the Delete DTIC when its retention time is expired check box for the document ticket (DTIC) to be deleted when the Retain For (Days) value specified for the Inbox in the Address Book has expired. By default, this option is not selected. |
| 10. | In the Inbox Viewer section, select Delete DTIC when its document is deleted check box for the DTIC to automatically be deleted if its document is deleted. By default, this option is not selected. |
| 11. | To automatically cancel online dump mode after a specified amount of time has passed, enter the number of hours Cypress should wait before canceling the dump in the Auto-cancel online dump after (hours) field. |
Or
Select Never to prevent the automatic cancellation of online dump mode.
| 12. | To delete unpolled SAP job tickets (JTICs) after a certain amount of time has passed, enter the number of days Cypress should wait before deleting them in the Ignore SAP JTIC external status after (days) field. |
Or
Select Never to retain SAP JTICs.
| 13. | Click the Apply button on the button panel on the right side of the Administration Tools window to save your changes. |
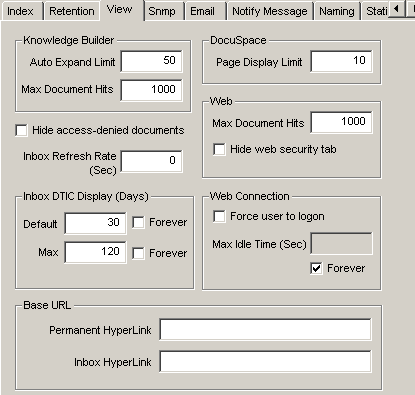
The View Tab
The View tab allows you to specify settings that control the auto-expand limit, page limit,
maximum document hits, and access-denied document view. See Pooling DocuVaults for more information on defining these settings.
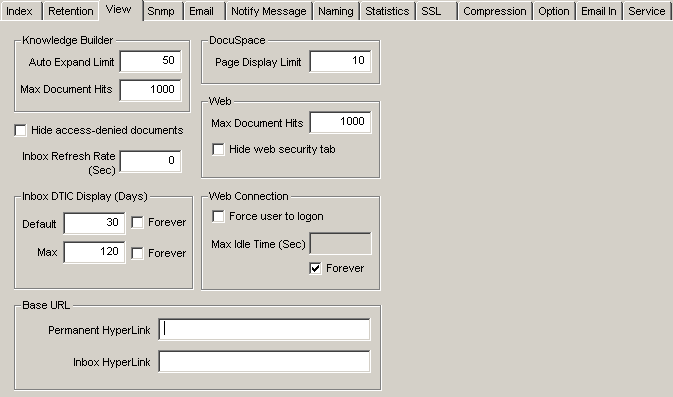
This table shows the View tab’s default settings:
|
Area |
Parameter |
Setting |
|
Knowledge Builder |
Auto Expand Limit |
50 |
|
Max Document Hits |
1000 |
|
|
Hide access-denied documents |
Clear |
|
|
Inbox Refresh Rate (Sec) |
Default |
15 |
|
Inbox DTIC Display (Days) |
Default |
30 |
|
Max |
120 |
|
|
DocuSpace |
Page Display Limit |
10 |
|
Web |
Max Document Hits |
1000 |
|
Hide web security tab |
Clear |
|
|
Web Connection |
Force user to logon |
Clear |
|
Max Idle Time (Sec) |
Forever |
|
|
Base URL |
Permanent HyperLink |
Clear |
|
|
Inbox HyperLink |
Clear |
To configure the DocuVault parameters that affect DocuSpace viewers
| 1. | Open the Administration Tools module, and select the Parameter tab. |
| 2. | Select the Parameter dialog’s View tab. |
| • | If the number of documents returned is less than or equal to this value, the results folder will automatically expand to show all hits. |
| • | If the number of documents is greater than this value, the results folder will not expand and must be expanded manually by the user. |
| 4. | Set the Max Document Hits value in the Knowledge Builder area. The maximum document hits value specifies the maximum number of documents that can be found before a results folder can be presented to the user. Essentially, this control is a ceiling for the number of documents that can be returned for a query to be valid. |
| • | If the number of documents returned by a query is less than or equal to the maximum document hits value, the results folder will appear in the Knowledge Builder results window (and might auto-expand, depending on the number of documents returned and the auto-expand limit). |
| • | If the number of documents is greater than this value, no results will be returned and the user will be presented with a message asking that the query be redefined. |
| 5. | In the DocuSpace area, set the Page Display Limit value. The page limit specifies the number of hit pages that can be displayed for a single document within the tree window of a DocuSpace. If the number of hit pages within a document exceeds the specified value, the maximum number of hit pages are displayed, along with up and down arrows that enable the user to scroll up or down through the document to access the additional hit pages. |
| 6. | Select the Hide access-denied documents check box if desired. |
| • | If selected, this feature will hide any document for which the user does not have permission to view. |
| • | If not selected, the title of a document will be displayed along with a heading of No Access in the results window. The user will not be able to open the document. |
Base the use of this feature on the security requirements of your site, the sensitive nature of your documents, and other site-specific factors. Most often, this feature is used when the document titles themselves contain sensitive information or can otherwise be used to discover sensitive information.
| 7. | Specify the number of seconds that Inbox Viewer should wait between reloads in the Inbox Refresh Rate input field. The minimum wait value that you can specify is five seconds. Enter 0 (default) in the input field to disable automatic refresh. |
| 8. | Set the Max Document Hits value in the Web area. This value has the same function as the Max Document Hits value in the Knowledge Builder area, except it is specific to document delivery to ASG-Cypress.Web-enabled browsers. |
| 9. | Specify the number of days that a document ticket should be displayed in an Inbox when Show Recent Messages Only is enabled by entering the appropriate value in the Default field. |
To disable the Show Recent Messages Only option, select the Forever check box.
| 10. | Specify the number of days that a document ticket should be displayed in an Inbox when Show Recent Messages Only is not enabled by entering the appropriate value in the Max field. |
To display all document tickets when Show Recent Messages Only is disabled, select the Forever check box.
| 11. | Set the Max Document Hits value in the Web Connection section. This value has the same function as the Max Document Hits value in the Knowledge Builder section, but it is specific to document delivery to ASG-Cypress.Web-enabled browsers. |
| 12. | In the Base URL area, specify the URL for Permanent HyperLink and Inbox HyperLink: |
| • | Specify the URL for Permanent HyperLink that points to a page that contains the Cypress Query control. |
| • | Specify the URL for Inbox HyperLink that points to a page that contains the Cypress Inbox control. |
| 13. | Click Apply to save your changes. |
The Snmp Tab
Cypress can work in conjunction with an existing SNMP Agent to send out to selected workstations messages (also called traps or alerts) about the performance of Cypress. Cypress reports all fatal errors and assurance failures in db_prog through SNMP as well as missing file and out-of-disk-space errors.
The Snmp tab enables you to configure Cypress to work with an SNMP Agent.
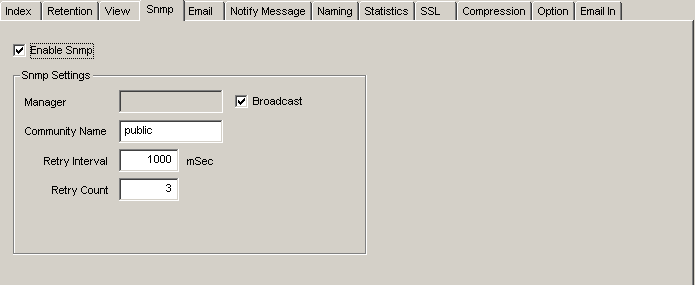
By default, the Enable Snmp check box is clear and all other controls are disabled.
If Enable Snmp is selected, these defaults in the Snmp Settings section apply:
|
Parameter |
Setting |
|
<blank> |
|
|
Checked |
|
|
Public |
|
|
1000 |
|
|
3 |
To configure Cypress to work with an SNMP agent
| 1. | Open the Administration Tools module, and select the Parameter tab to display the Parameter dialog. |
| 2. | Select the Parameter dialog’s Snmp tab. |
| 3. | Select the Enable Snmp check box. |
| 4. | Enter an IP address in the Manager field to target a specific manager, or select Broadcast to broadcast the messages generally. |
| 5. | Enter the community name in the Community Name field. |
| 6. | Enter the number of milliseconds between each retry attempt in the Retry Interval xxxx mSec field. |
| 7. | Enter the number of times the message should be re-broadcast in the Retry Count field. |
| 8. | Click Apply on the button panel at the far right side of the application window to save your changes. |
| 9. | Copy the cypress.mib file from the Cypress Server directory to the appropriate directory for the SNMP manager being used. |
| 10. | Open the SNMP manager. Load the cypress.mib file, and configure an appropriate action for each message that you want to track. |
The Email Tab
To ensure that users have immediate access to their documents and reports, Cypress can generate and deliver an e-mail message with document attachment(s) and e-mail messages to a recipient notifying them of specific document processing events. Provided that the Email Out option is purchased, batch or ad-hoc e-mail of a document can be implemented in any of the currently supported Cypress device formats.
See the Administering > Output Environment topic for instructions on creating an e-mail device.
The Email tab enables you to configure the Cypress server to handle e-mail notification.
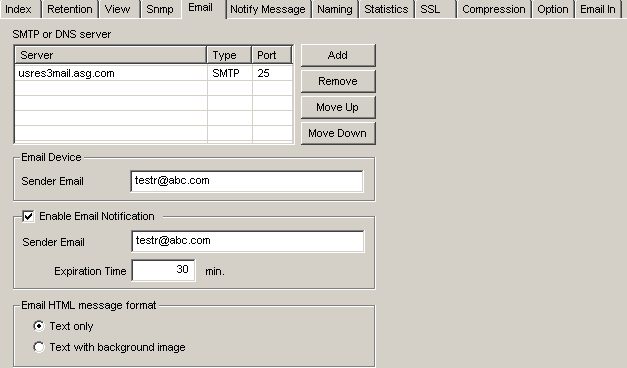
By default, the Text only radio button in the Email HMTL message format area is selected.
To set up e-mail notification
| 1. | Open the Administration Tools module, and select the Parameter tab. |
| 2. | Select the Parameter dialog’s Email tab. |
| 3. | Click Add to display the Add SMTP or DNS Server dialog. |
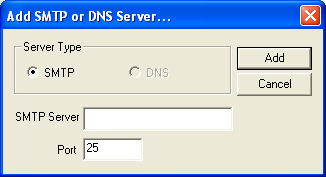
| 4. | Click the SMTP or DNS option button, and enter the server information in the SMTP Server and Port fields. |
| 5. | Click Add to return to the Email tab. |
| 6. | Repeat steps 3 through 5 for each SMTP and DNS server that you wish to add. |
| 7. | In the Email Device area, enter an e-mail address in the Sender Email field. This address will be used in the “From” field of e-mail messages that are sent from e-mail devices. |
| 8. | Optional. Select the Enable Exchange Email Service box so that the Cypress email out service uses MS Exchange server by default to send e-mails. You, as an administrator, can set a username and password if the Exchange server requires user authentication depending on the Exchange server security setting and other IT settings. Otherwise, skip to step 9. |
You need not configure the SMTP or DNS Server if you select this box.
| 9. | Optional. Select the Enable Email Notification check box if you plan to use sender notification from Report Distribution Manager (RDM) or the Capture Driver. Otherwise, skip to step 12. |
| 10. | Below the Enable Email Notification check box, enter an e-mail address in the Sender Email field. This address will be used in the “From” field of e-mail notification messages. |
The two Sender Email fields on this dialog on the Email tab contain different information:
| • | The Sender Email field in the Email Device area governs e-mail messages only from e-mail devices. |
| • | The Sender Email field in the Enable Email Notification area governs e-mail messages sent to notify the sender, recipient, or administrator of a job’s status. In many cases, both fields will contain the same address; but if the addresses should be different, make sure that you enter the correct address into each field. |
| 11. | In the Expiration Time field, enter the number of minutes that Cypress should attempt to communicate with the e-mail server. If Cypress cannot successfully send the notification message to the e-mail server after the specified period of time, it will stop attempting to send it. |
| 12. | Select the appropriate option in the Email HTML Message Format area: |
| • | To display the e-mail body as text, select the Text only radio button. |
| • | To display the e-mail body with both text and graphics, select the Text with background image radio button. |
| 13. | Click Apply to save your changes. |
The Notify Message Tab
The Notify Message tab contains the content for each type of notification message. You can change the content as you wish. The body of the message is constructed using parameters that are replaced with job ticket information when the actual notification message is generated.
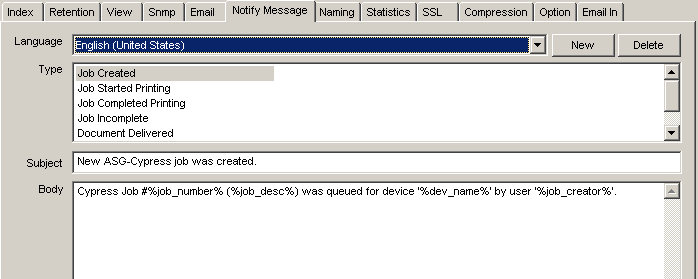
This table shows the default settings in the Subject and Body fields for each of the selections in the Type drop-down list:
|
Type |
Subject |
Body |
|
Job Created |
New ASG-Cypress job was created. |
Cypress Job #%job_number% (%job_desc%) was queued for device '%dev_name%' by user '%job_creator%'. |
|
Job Started Printing |
ASG-Cypress job started printing. |
Cypress Job #%job_number% (%job_desc%) has started printing on device '%dev_name%'. |
|
Job Completed Printing |
ASG-Cypress job completed printing. |
Cypress Job #%job_number% (%job_desc%) has completed printing successfully on device '%dev_name%'. |
|
Job Incomplete |
ASG-Cypress job failed to print. |
Cypress Job #%job_number% (%job_desc%) has terminated printing before completion on device '%dev_name%'. |
|
Document Delivered |
ASG-Cypress document was delivered. |
Cypress Document (%job_desc%) was delivered to inbox '%inbox_name%' for recipient '%recip_name%'. |
|
Job Failed (To Sender) |
To Sender: ASG-Cypress job failed. |
Cypress Job #%job_number% (%job_desc%) has failed to send to %dest_addr% on device '%dev_name%'. |
|
Job Completed (To Sender) |
To Sender: ASG-Cypress job completed. |
Cypress Job #%job_number% (%job_desc%) has successfully sent to %dest_addr% on device '%dev_name%'. |
|
Job Waiting for Stock |
ASG-Cypress job waiting for paper stock. |
Cypress Job #%job_number% (%job_desc%) is waiting for paper stock on device '%dev_name%'. |
To set up e-mail notification
| 1. | Open the Administration Tools module, and select the Parameter tab. |
| 2. | Select the Notify Message tab. |
| 3. | Select the language for the e-mail notification message from the Language drop-down list. |
| • | To add a new language, click New. |
| • | To delete the language that is currently displayed in the drop-down list, click Delete. |
| 4. | Select the type of e-mail notification message that you want to customize from the Type list (see the table earlier in this section). |
| 5. | In the Subject field, enter the text that should appear in the e-mail message’s subject line. |
| 6. | In the Body field, enter the text that should appear in the e-mail message’s body. |
If you choose to modify the Body field, you can use any of the replacement parameters listed in this table:
|
Description |
Replacement Parameter |
|
Device name. |
%dev_name% |
|
Inbox name. |
%inbox_name% |
|
Job creator. |
%job_creator% |
|
Job description. |
%job_desc% |
|
Job number. |
%job_number% |
|
Recipient name. |
%recip_name% |
|
Document ticket URL. |
%dtic_addr% |
|
Date and time of the event. |
%timestamp% |
|
When a JTic or DTic is routed through the Address Book (i.e. through a recipient), the recipient name is inserted. However, if the JTic was queued to a Fax or E-mail device, the fax number or e-mail address is inserted for the Job Complete, Incomplete or Job Failed messages. The fax number/e-mail address is not available for the Job Queued or Job Started notify messages because those values have not yet been determined at the time these messages are created. These messages will continue to insert the recipient name. |
%dest_addr% |
Some email systems require an email message to be in HTML format for external links to work correctly. To send a notification email as HTML, begin the body of the message with <html> and end it with </html>. For example:
<html>Cypress Document (%job_desc%) was delivered to inbox '%inbox_name%'
for recipient '%recip_name%'.
Click this link to open the document in the inbox viewer:
http://cypressweb/inbox.asp%dtic_addr%</html>
| 7. | Click Apply to save your changes. |
The Naming Tab
The Naming tab enables you to modify the title of a document, description of a job ticket (JTIC), and the structure and content of a JTIC name using predefined variables and functions. See the Administering > Document Capture topic for instruction on customizing the documents and job tickets.
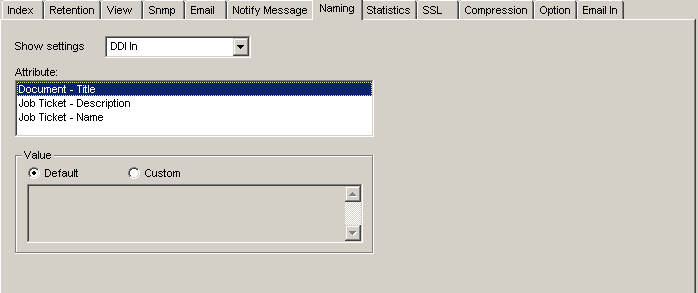
All attributes for the Naming tab are set to Default.
The Statistics Tab
The settings on the Statistics tab enables Cypress to gather the statistics that the stat_prog utility returns. You can use the Print Statistics and Inbox Statistics areas of the tab to specify whether the statistics should be acquired and how long the statistic data should be retained in the DocuVault. Cypress stores the data as records in the DocuVault.
View statistics are stored as a log of activity and written to a disk file. Using the View Statistics area of the tab, you can enable the collection of the data, set the directory location of the disk files, and specify the maximum size of a file before Cypress starts a new file.
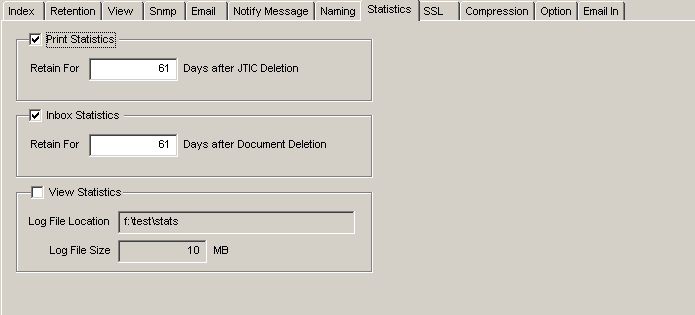
By default, the Print Statistics, Inbox Statistics, and View Statistics check boxes on the Statistics tab are clear. These are the default values when you select the check boxes:
| • | Print Statistics. The Retain For xx Days after JTIC Deletion field defaults to 60. |
| • | Inbox Statistics. The Retain For xx Days after Document Deletion field defaults to 60. |
| • | View Statistics. The Log File Location is the location in which you want to save your log file. The Log File Size field defaults to 10. |
The SSL Tab
You can use the SSL tab to enable the Secure Socket Layer (SSL) in Cypress to ensure that all communication between the Cypress client and Cypress server is encrypted.
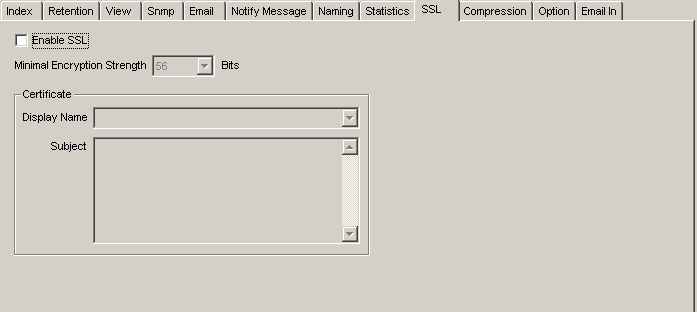
By default, the Enable SSL check box on the SSL tab is clear. If you select it, the value of Minimal Encryption Strength defaults to 56 bits.
See Installing the X.509 Certificate for Cypress Server for the steps necessary to ensure the proper functionality of this feature.
The Compression Tab
The Compression tab allows you to specify whether Cypress will give preference to image size or image quality when compressing color images.
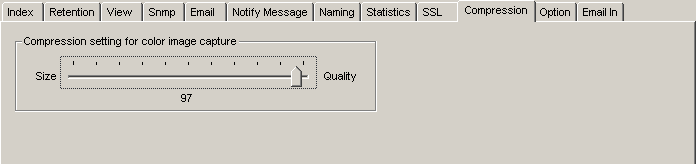
The Compression setting for color image capture value on the Compression tab defaults to 65.
To configure color image compression
| 1. | Open the Administration Tools module, and select the Parameter tab. |
| 2. | Select the Compression tab. |
| 3. | Move the slider to indicate whether image size or image quality should be given preference. The higher number, the higher the preference that will be given to quality. |
The closer the slider is to Size, the faster the image will load. However, you may notice some loss in image fidelity. Conversely, the closer the slider is to Quality, the greater image fidelity will be kept. However, images may load more slowly.
| 4. | Click Apply to save your changes. |
The Option Tab
The Option tab enables you to define parameters for how Cypress handles Adobe Type-1 fonts and native file conversions. You also can specify global dialects that control mechanisms within Cypress.
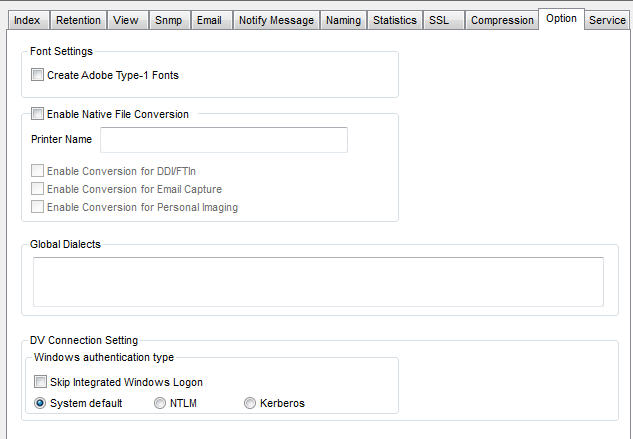
By default, the Create Adobe Type-1 Fonts and Enable Native File Conversion check boxes are clear.
If Enable Native File Conversion is selected, these defaults apply:
|
Parameter |
Setting |
|
Printer Name |
<blank> |
|
Enable Conversion for DDI/FTIn |
Unchecked |
|
Enable Conversion for Email Capture |
Unchecked |
|
Enable Conversion for Personal Imaging |
Unchecked |
For more information about configuring specific parameters on this tab, refer to the appropriate documentation listed in this table:
|
Parameter |
Documentation |
|
Create Adobe Type-1 Fonts check box |
Administering > Output Environment |
|
Enable Native File Conversion check box |
Administering > Document Capture |
|
Global Dialects |
Administering > System Admin See Global Dialects. |
DocuVault Connection Settings
You can also specify these settings in the DV Connection Setting section at the bottom of the Option tab:
|
Option |
Description |
|
Windows authentication type: |
|
|
Skip Integrated Windows Logon |
This setting bypasses the Integrated Windows logon so that a user will always be prompted to log on the first time that he/she connects to the DocuVault. |
|
System default |
Use the default system authentication to connect to the DocuVault. This can be either NTLM or Kerberos, depending on the Windows system. |
|
NTLM |
Always use NTLM authentication to connect to the DocuVault. |
|
Kerberos |
Always use Kerberos authentication to connect to the DocuVault. |
The Email In Tab
The Email In tab allows you to set the retention time, source to use for determining user permissions, and any custom filters or index plugins to apply to your incoming e-mails.

These are the default settings for the Email In tab:
|
Parameter |
Setting |
|
Retain Time (days) |
Forever |
|
Security Lookup |
Active Directory Only |
|
Filter/Index Plugins |
<blank> |
|
Save the raw message check box |
Unchecked |
The Service Tab
The Service tab allows you to enter the XML code to configure the Authentication Service and IPP Input Service interfaces.
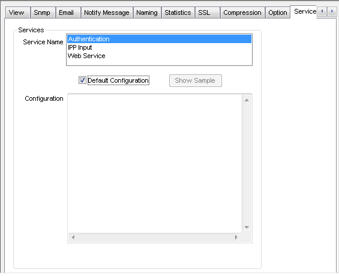
Each Cypress Service has a default configuration, which is indicated by a check in the Default Configuration check box. The default for Authentication is blank (no XML configuration).
Configuring the Authentication Service
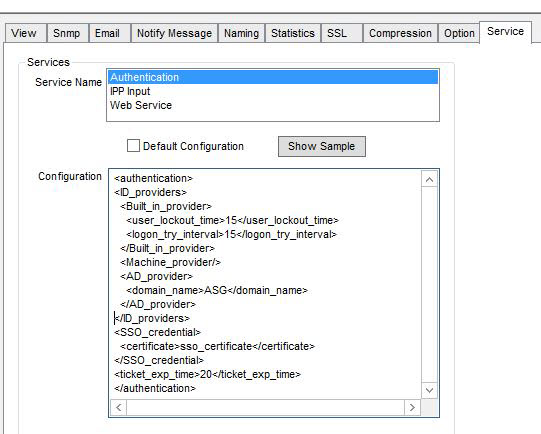
To customize the Authentication Service configuration
| 1. | Open the Administration Tools module, and select the Parameter tab to display the Parameter dialog. |
| 2. | Select the Parameter dialog’s Service tab. |
| 3. | Select Authentication from the Service Name list. |
| 4. | Uncheck the Default Configuration checkbox. |
| 5. | Type your XML configuration in the Configuration edit box. For example: |
Or
Click the Show Sample button to copy a sample configuration snippet into the Configuration edit box, then modify the sample (recommended).
| 6. | Click Apply to save your changes. |
When you launch the Cypress UI and enter your credentials:
| • | If there is only one ID provider defined in the XML configuration, this ID provider (could be Active Directory, LDAP, Machine or Cypress Built-in ID provider) is used as the default ID provider in the Cypress Authentication Service. As a result, you do not have to specify the domain information. You can use any of these name formats: user_name, or domain\user_name, machine\user_name or <Built-in>\user_name, based on the default ID provider type used for authentication. |
| • | If there are more than one ID provider defined in the XML configuration, no default ID provider is set in the Cypress Authentication Service. As a result, you must explicitly specify the domain information. You must use one of these name formats: domain\user_name, machine\user_name or <Built-in>\user_name, based on the ID provider type to be used for authentication. |
| • | The user domain user ID, if the computer is connecting to the domain. |
| • | The user machine ID, if the computer is not part of any domain. |
In both the cases where you do not configure the XML, the connected Active Directory or the local machine ID provider is selected as the default ID provider in the Cypress Authentication Service.
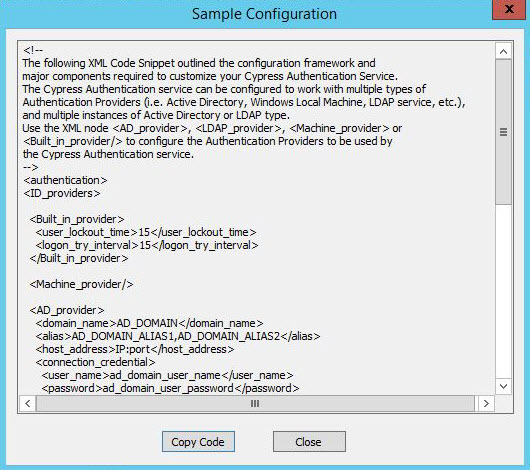
Sample XML Code
<authentication>
<ID_providers>
<Built_in_provider>
<user_lockout_time>15</user_lockout_time>
<logon_try_interval>15</logon_try_interval>
</Built_in_provider>
<Machine_provider/>
<AD_provider>
<domain_name>asg</domain_name>
<alias>asg.com,asg_alias1, asg_alias2</alias>
<host_address>asg.com</host_address>
</AD_provider>
<LDAP_provider>
<domain_name>USNAPCYPRESS03V</domain_name>
<host_address>10.2.2.63:389</host_address>
<user_name>cn=Manager,dc=maxcrc,dc=com</user_name>
<password>secret</password>
</LDAP_provider>
</ID_providers>
<SSO>
<certificate>sso_certificate</certificate>
</SSO>
<ticket_exp_time>20</ticket_exp_time>
</authentication>
where:
| • | <Built_in_provider> is used for the built-in user ID provider. |
| • | <AD_provider> is used for the Windows Active Directory provider. |
| • | <Machine_provider/> is used for the local machine provider. |
| • | <LDAP_provider> is used for the LDAP provider. |
For <AD_provider>, the <domain_name> is mandatory. Other specifications are optional:
| • | If <alias> is used, multiple domain aliases can be defined, separated by commas. All the aliases are mapped to the same ID provider as the domain specified by the <domain_name>. |
| • | If <host_address> is used, it will be used as the address of the ID provider. Otherwise, <domain_name> will be used as the target domain. |
| • | The user account running the Cypress Server will be used to connect to the ID provider for verifying other users and getting user’s information. |
For <Machine_provider>, the user account running the Cypress Server will be used to connect to the ID provider for verifying other users and getting user’s information.
For <LDAP_provider>, specify these mandatory parameters:
| • | domain_name |
This name will be used in Cypress clients to log inside the corresponding domain.
| • | host_address |
This parameter specifies the address of the LDAP server in this format: <address>:<port>.
| • | connection_user_name |
This parameter specifies the LDAP administrator user name, which is used to connect to the LDAP server from the Admin panel. It is used when querying for different objects.
| • | connection_user_password |
This parameter specifies the LDAP administrator password.
This example shows the minimum version of the LDAP provider configuration with only the mandatory parameters specified:
<LDAP_provider>
<domain_name>USNAPCYPRESS03V</domain_name>
<host_address>10.2.2.63:389</host_address>
<user_name>cn=Manager,dc=maxcrc,dc=com</user_name>
<password>secret</password>
</LDAP_provider>
You can also specify these optional parameters for <LDAP_provider>:
| • | authentication_type |
This parameter specifies the type of connection to the LDAP server:
| • | None — for common usage (default) |
| • | Secure — if an SSL connection is enabled on the LDAP server |
| • | domain_search_base |
This Distinguished Name (DN) will be used when searching for domain objects. The user query will be added to this DN. For example, if you are searching for any objects inside the People organizational unit, then the query will look like this:
ou=People,dc=maxcrc,dc=com
The default value is the namingContexts server attribute; it is obtained from the server during initialization.
| • | user_search_base |
This DN will be used for user validation. The default value is the same as the value for domain_search_base.
| • | user_search_filter |
This parameter specifies the filter for the user search when getting groups of users. The default value is (&(objectClass=person)(cn=?)).
| • | user_object_class |
Currently this parameter is not used. The default value is (objectClass=person).
| • | username_attribute |
The value of this attribute will be treated as the user name. The default value is cn.
| • | group_search_base |
This DN will be used when getting groups of the particular user. The default value is the same as the value for domain_search_base.
| • | group_search_filter |
Currently this parameter is not used. The default value is (&(objectClass=groupOfNames)(cn=?)).
| • | group_object_class |
Currently this parameter is not used. The default value is (objectClass=groupOfNames).
| • | group_name_attribute |
The value of this attribute will be treated as the group name. The default value is cn.
| • | membership_attribute |
This parameter is used for searching groups of users when the memberof_attribute parameter is not defined. The default value is member.
| • | memberof_attribute |
This parameter is used when trying to search for groups of users. The default value is null. This means that the value specified for the membership_attribute parameter will be used for searching groups.
This example shows the full LDAP provider configuration with all parameters specified:
<LDAP_provider>
<domain_name>USNAPCYPRESS03V</domain_name>
<host_address>10.2.2.63:389</host_address>
<authentication_type>None</authentication_type>
<domain_search_base>dc=maxcrc,dc=com</domain_search_base>
<user_search_base>dc=maxcrc,dc=com</user_search_base>
<user_object_class>(objectClass=person)</user_object_class>
<username_attribute>cn</username_attribute>
<user_search_filter>(&(objectClass=person)(cn=?))
</user_search_filter>
<group_search_base>dc=maxcrc,dc=com</group_search_base>
<group_object_class>(objectClass=groupOfNames)</group_object_class>
<group_search_filter>(&(objectClass=groupOfNames)(cn=?))
</group_search_filter>
<group_name_attribute>cn</group_name_attribute>
<membership_attribute>member</membership_attribute>
<memberof_attribute>memberOf</memberof_attribute>
<user_name>cn=Manager,dc=maxcrc,dc=com</user_name>
<password>secret</password>
</LDAP_provider>
Configuring the IPP Input Service
To customize the IPP Input Service configuration
| 1. | Open the Administration Tools module, and select the Parameter tab to display the Parameter dialog. |
| 2. | Select the Parameter dialog’s Service tab. |
| 3. | Select IPP Input from the Service Name list. |
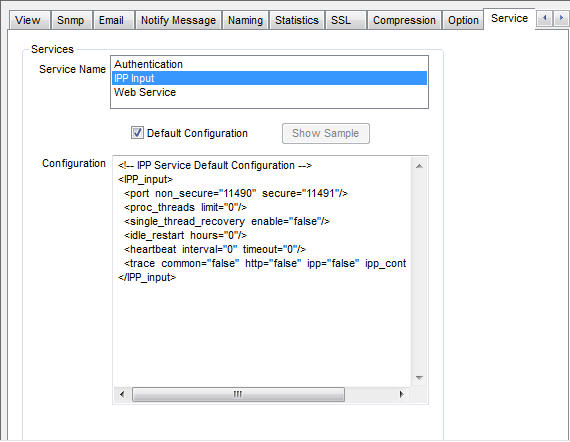
| 4. | Uncheck the Default Configuration checkbox. |
| 5. | Type your XML configuration in the Configuration edit box. |
Or
Click the Show Sample button to copy a sample configuration snippet into the Configuration edit box, then modify the sample (recommended).
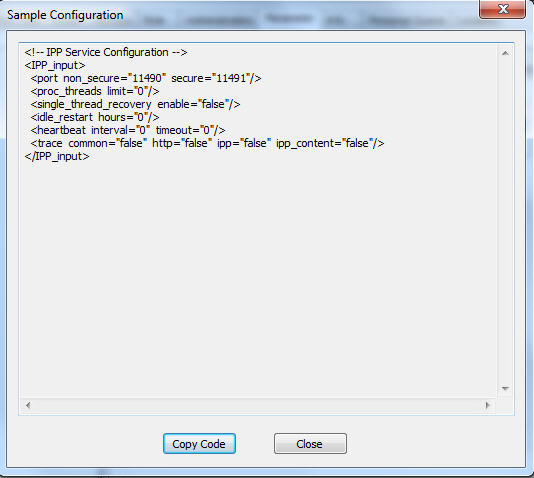
| 6. | Click Apply to save your changes. |