Compare Subject Areas
The Compare Subject Areas option is available when the focus is anywhere outside the Repository Portfolio. This query provides an item-by-item configuration comparison between two different configurations, known as the current and secondary subject areas.
Comparing subject areas
- Select Query
 Compare Subject Areas from the main menu bar.
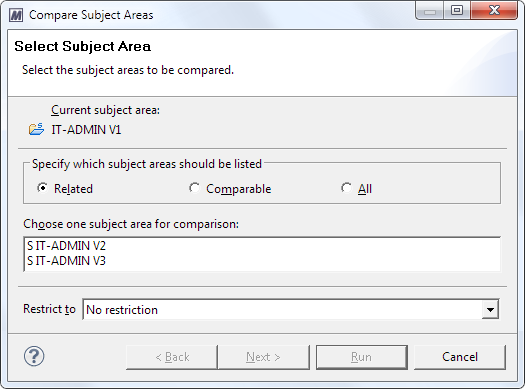
 - Click one of these option buttons to narrow down the list of subject areas available for comparison:
- Related—Show only different versions of the same subject area
- Comparable—Show only subject areas that use the same information model
- All—Show all available subject areas
- From the list of available subject areas, select the subject area with which the current subject area should be compared.
- In the Restrict to drop-down list, specify if the query should consider the work configuration of only the current subject area, only the secondary subject area, or both.
- Click Next.
- Items are found in both subject areas with equal content (Consistent)
- Items are found in both subject areas with different content (Different contents)
- Items are found in both subject areas with different versions (Different version)
- Items are found in both subject areas with equal versions (Equal version)
- Items are found in any of the two subject areas (All items)
- Items are found in any of the two subject areas, and with different content if found in both (Inconsistent)
- Items are found only in the current subject area (Supplement)
- Items are found only in the secondary subject area (Deficit)
- Items are found in the secondary subject area but are hidden in current (Hidden)
- Click Next.
- Click the Run button to run the query.
The Compare Subject Areas dialog is displayed.
The Scope of Query page of the Compare Subject Areas dialog is displayed.
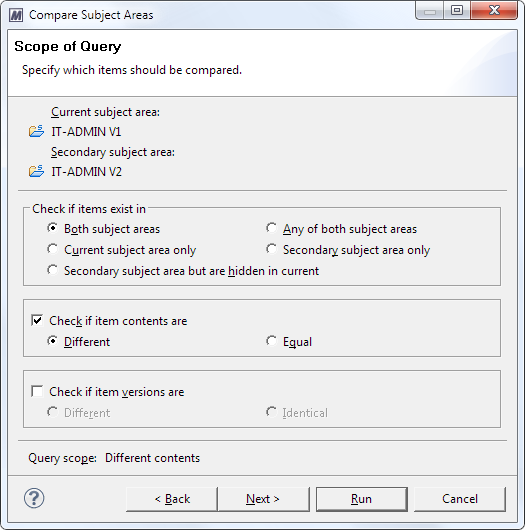
Use these scope options to specify how the two subject areas should be compared:
| Option | Sub Option | Description |
|---|---|---|
|
Check if items exist in |
Both subject areas |
Reports on items in both subject areas. |
|
|
Any of both subject areas |
Reports on items in either of the subject areas. |
|
|
Current subject area only |
Reports on items in the current subject area only. |
|
|
Secondary subject area only |
Reports on items in the secondary subject area only. |
|
|
Secondary subject area, but are hidden in current |
Reports on items that are visible in the secondary subject area, but hidden in the current subject area. |
|
Check if item contents are* |
Equal |
Reports on items that have equal content. |
|
|
Different |
Reports on items that have different content. |
|
Check if item versions are** |
Different |
Reports only on item versions that are different. |
|
|
Identical |
Reports only on identical item versions (that is, the item is shared or the item in the secondary subject area is visible in the current subject area and vice versa when both subject areas are in the same subject area hierarchy). |
* Available only when the Both subject areas or Any of both subject areas option is selected.
** Available only when the Both subject areas option is selected.
Depending on the combination of scope options you set, items will be displayed in the query result when they fulfill one of these conditions:
The terms in parentheses are the short characterizations for the respective query as displayed in the dialog’s bottom line Query scope.
The Item Filter page of the Compare Subject Areas dialog is displayed.
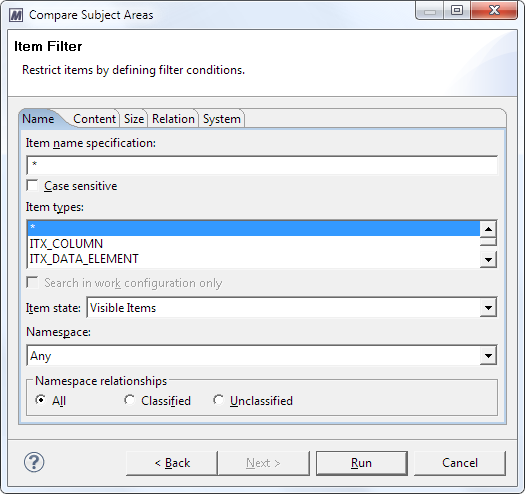
This page offers the same options as the Search view, which is described in detail inItem Search Queries.
The query result opens in a report view in the Editor frame. For details, see Interpreting Subject Area Comparison Query Results.
Interpreting Subject Area Comparison Query Results
The following example shows the result of a Subject Area Comparison query.
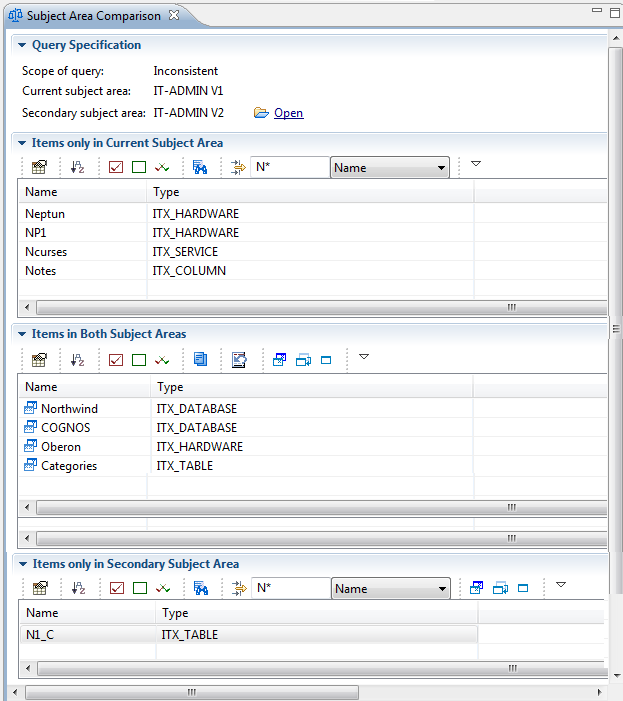
The items found in the query are displayed on three panels:
- Items only in Current Subject Area
- Items in Both Subject Areas
- Items only in Secondary Subject Area
You can click the controls at the left side of the area headers ( and
and  ) to collapse or expand the results. The local toolbar buttons on the panels have these functions:
| Icon | Command | Function |
|---|---|---|
|
|
Customize Columns |
Opens the Select Table Columns dialog, which lets you select the columns that should be displayed. |
|
|
Enable Sort by Columns |
Enables/disables the table’s sort buttons. |
|
|
Select All Items |
Selects all items in the table. |
|
|
Deselect All Items |
Clears all selected items. |
|
|
Invert Selection |
Clears all selected items and selects all unselected items. |
|
|
Search for Items in List |
Runs an item search within the set of selected items. |
|
|
Compare Item Versions |
Opens the Compare Item Versions view for the selected item. |
|
|
Work on Items of Secondary Subject Area |
Displays the context menu for the selected item’s version in the secondary subject area. |
|
|
Filter Items |
Opens the Filter Items dialog, which is explained in detail in Filtering Items. |
|
|
(Search string field) |
Limits the visible items when a search string is entered. The search string can contain wildcards. |
|
|
(Filter Column drop-down list) |
Specifies the column to which the filter applies. |
The entries on the Items in Both Subject Areas panel have icons that show whether the item content is the same or different, whether the item version is identical, and so on:
| Description | |
|---|---|
|
|
Different contents |
|
|
Different versions |
|
|
Different versions, but identical contents |
|
|
Identical version (that is, item is shared or the item in a secondary subject area is visible in the current subject area [and vice versa] when both subject areas are in the same hierarchy) |
If you want to inspect or edit two item versions, you can use the following methods.
To open two item versions with different content
- Double-click an item on the Items in Both Subject Areas panel.
- Click the tab of the Subject Area Comparison report to bring it forward.
- Select the same item as in step 1, click the Work on Items of Secondary Subject Area icon in the local toolbar and then select Open from the context menu.
The primary version of the item opens in a tabbed page in the Editor frame.
The secondary version of the item opens in a tabbed page in the Editor frame.
To inspect two item versions with different content
| > | Select an item on the Items in Both Subject Areas panel and then click the Compare Item Versions icon in the local toolbar. |
A Compare Item Versions report opens for the item versions. For details, see Compare Item Versions.
The information in the Subject Area Comparison report is presented in a dynamic table. You can add further columns to the table by using the Customize Columns dialog that opens when you click the Customize Columns icon in the local toolbar:
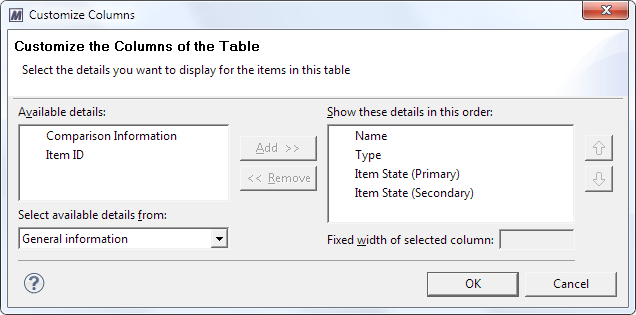
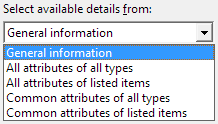
The content of the Available details list depends on which list entry you select in the Select available details from drop-down list.
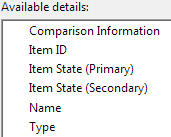
Depending on which group of items you are looking at, different sets of general details are available.
- For Items only in Current Subject Area and Items only in Secondary Subject Area, these general detail columns are available:
- For Items in Both Subject Areas, these general detail columns are available:
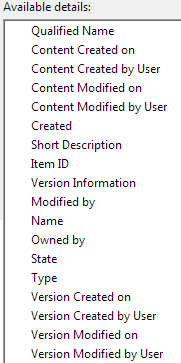
You also can display the content of text and value attributes in additional columns (that is, the part of the text that will fit into the column). The range of attributes from which you can select depends on the specific option you select in the drop-down box:
- All attributes of all types
- All attributes of listed items
- Common attributes of all types
- Common attributes of listed items


