Working with the Navigation Tree
Navigation in a subject area is done in its navigation tree. There are several different ways to open a navigation tree:
- If you have specified the navigation tree as an initial view in Window
 Preferences, it opens automatically whenever you open a subject area. To know more, see Specifying Other User-defined Settings.
 - When the Subject Area Portal is open, you can click the Navigate Subject Area hyperlink to open the navigation tree.
- If you have specified the navigation tree as an initial view in Window
 Preferences, but have closed it in the meantime, you can reopen it by right-clicking the subject area in the Repository Portfolio and selecting Open Initial Views from the context menu that opens.
 - In the Window menu in the main menu bar, select Show View
 Navigation View.
When a subject area opens in the navigation tree, its name and version are shown as the top level of a relationship tree.
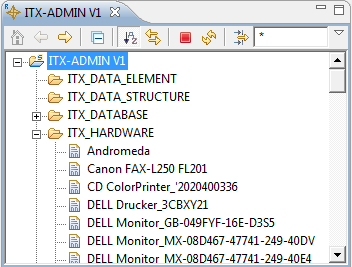
The next level in the tree contains item type nodes. You can expand and collapse the individual nodes by clicking the plus and minus icons. The next level in the relationship tree contains items. In subject areas that use hierarchical names, item nodes can contain item type nodes, which can in turn contain item nodes, and so on.
You can open several subject areas at the same time. Navigation trees actually reside in a tab group, and when a navigation tree is opened for a subject area, a tabbed page is inserted in the foreground; any other tabbed pages that are already present for other open subject areas’ navigation trees are hidden behind it. Tabs at the top of the tab group indicate which open subject areas have navigation trees opened for them. You can make active any subject area’s navigation tree by clicking its page tab.
The navigation tree shows you the items and item types in a subject area. If you want to work with individual items and their attributes, you can open the items in the Editor frame. For more information, see Editing Items.
Displaying in the navigation tree only item types for which items exist
| > | Clear the Show item types without items check box under the Metability Explorer node of the Preferences dialog. |
Displaying for each item type the number of items that exist
| > | Select the Deliver the number of children check box under the Metability Explorer node of the Preferences dialog. |
If an item type contains a great number of items, that number may exceed the limit set in Preferences Metability
 Queries under Absolute query limit. In this case, not all items are listed and an error message will be displayed.

To list all items, change the query limit to an appropriate value. To avoid just the error message, clear either the check box in this dialog or the Show dialog when maximum is exceeded check box in the Preferences dialog.
Expanding a subject area to item level in the navigation tree
- Open the desired subject area in the navigation tree, as described in Opening a subject area.
- Expand an item type node to list the items of that particular type:

You now can access individual items, either by double-clicking them to edit them, by right-clicking them to get access to the context menu for items, or by accessing the Item menu options.
When you expand an item type with many items, the loading process can take considerable time. You can click the Stop Loading Data icon  in the local toolbar to interrupt the loading of items from the database.
Namespace Items in the Navigation Tree
For subject areas with a hierarchical naming structure, an item can define a namespace for other items. For items that have other items in the namespace they span, the relationship tree in the navigation tree can expand down to even deeper levels. When you work with a subject area of this type, the navigation tree could look like this:
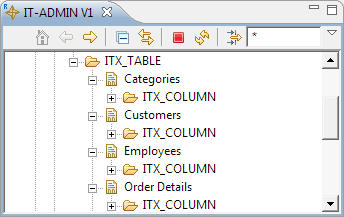
Under the items Categories, Customers, Employees, and Order Details of the item type ITX_TABLE, you can see further entries for the type ITX_COLUMN. The subject area in this example is based on the ITX-ADMINISTRATION model, which is designed in such a way that items of type ITX_TABLE can span a namespace for items of type ITX_COLUMN. If you expand one of the type entries, further items may become visible:
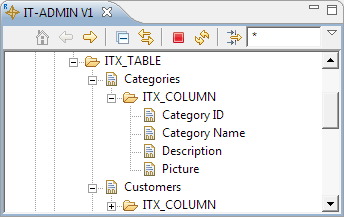
Depending on the information model, this hierarchy can extend over multiple levels (that is, items in a namespace can in turn define namespaces for other items). If you expand one of these items, additional item types can become visible, and so on.
By setting the user preferences option Permit expansion of namespace items with empty namespace under Metability Metability Explorer (see Metability-related Preferences), you can influence the behavior of the navigation tree. If the check box is selected, it is possible to expand namespace items down to the item type level when no items exist in the namespace. Otherwise, such items cannot be expanded.
Filtering Items
When subject areas handle large amounts of metadata, the list of items can be quite long (for example, in the navigation tree or in a search result list):
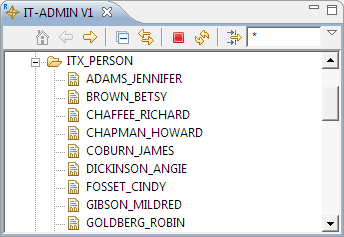
You can reduce the number of items that are listed to make the list more manageable by applying an item filter.
When you define a filter condition, it applies to all items in the list. For example, a filter condition of C* lists only items with names that begin with the letter C, as shown in this example for items of the ITX_HARDWARE and ITX_PERSON types:
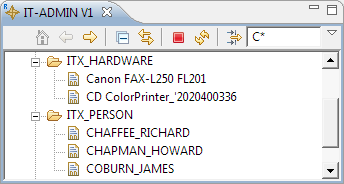
The options that are available in the navigation tree’s local toolbar are described in Navigation Tree Toolbar.
When you expand an item type with a great number of items, and the loading process takes
too long, you can click the Stop Loading Data icon  in the local toolbar to interrupt the loading of items into the window.
- Click the Filter Items icon
 in the local toolbar to open the Filter Items dialog.
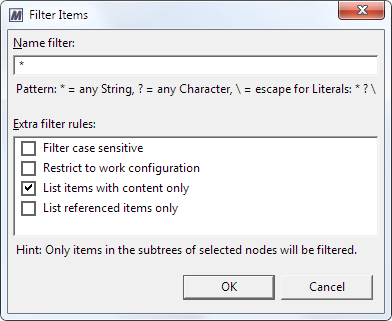
 - For a navigation tree, this Filter Items dialog appears:
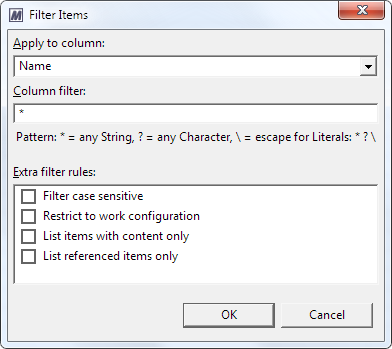
- For a Table view or a search result list, this dialog appears:
- From the Apply to column drop-down list on the Filter Items dialog for Table views or search result lists, select the column to which the filter applies.
- Enter the filter expression in the Name filter or Column filter field, as appropriate.
- Select the filter rules that you want to apply.
- Click OK to close the Filter Items dialog.
- Click the Refresh icon
 in the local toolbar to apply the filter.
 - You also can enter name and column filters directly in the respective fields in the local toolbars of navigation trees, Table views, and search result lists.
- By default, item lists show only visible items (that is, items with item state All Visible). To change this, clear the List items with content only check box on the Filter Items dialog.
The dialog’s appearance depends on whether you open it from the local toolbar of a navigation tree or from the local toolbar of a Table view or a search result list.
You can use a wildcard character at the beginning and end of the filter expression. Specifying C*, for instance, displays only items with names that begin with a C, while entering *max* finds all items whose names contain the string max.
Switching off an item filter again
| > | Enter an asterisk in the edit field in the local toolbar. |
