Editing Items
To edit an item, you must first open it in the Item Editor.
- Select the item you want to edit, either in the navigation tree of the Navigation frame, or in a diagram, a table, or a relationship tree in the Editor frame.
- Double-click the item.
Or
Right-click the item, and then select Open from the context menu.
Or
Select Item Open from the main menu bar.
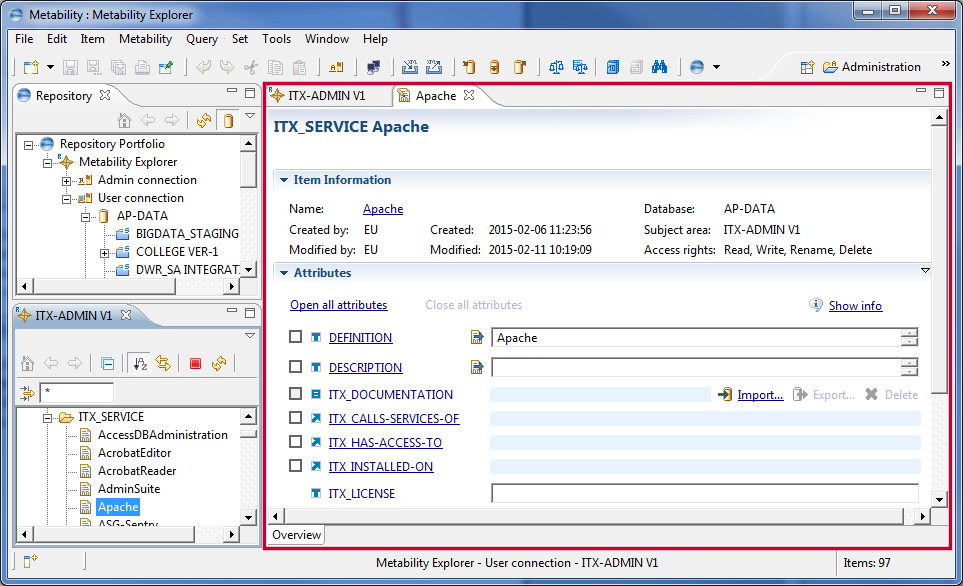
When an item is opened for editing, the Item Editor opens in a tabbed page in the Editor frame, as shown in this example (outlined in red):
The Item Editor’s page tab provides information on the save state of the opened item. An asterisk (*) at the beginning of the item name on the page tab indicates that you modified the item but did not yet save it. If you have not made changes to the item or if you already saved your changes, the asterisk is not visible:

Editor views, including the Item Editor, are different from all other views in Metability: They contain pages within tabbed pages, or subpages, that enable you to edit entities of complex structure (for example, items that have multiple attributes). The subpage tabs, by default, are located at the bottom of the tabbed page.
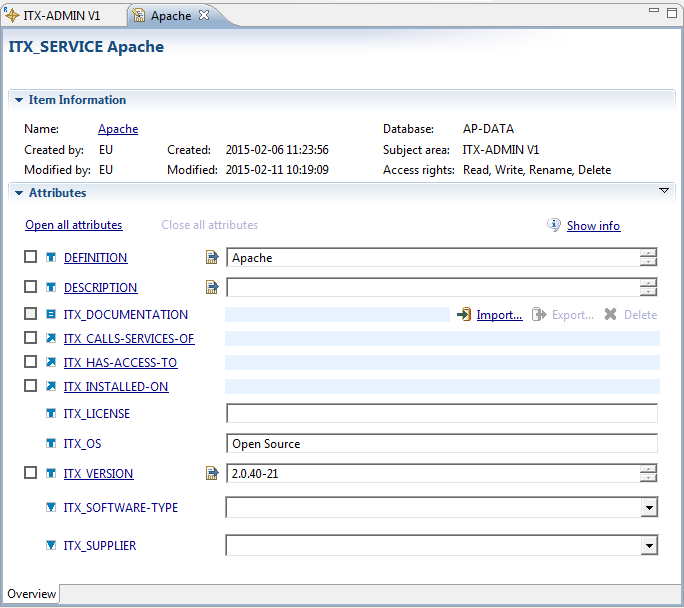
When an item is opened for editing, it usually opens to the Overview subpage, and this is the only subpage that is initially present:
To save the modified item to the database, you have various options.
To save the item that has the focus in the Editor frame
| > | Select File Save from the main menu bar. Save from the main menu bar. |
Or
Click the Save icon  in the main toolbar.
Or
Press the key combination Ctrl+S.
To save all modified items (and also all modified stored query results)
| > | Select File Save All from the main menu bar. Save All from the main menu bar. |
Or
Click the Save All icon  in the main toolbar.
Or
Press the key combination Ctrl+Shift+S.
Working with the Overview Subpage
The Overview subpage contains two groups:
- Item Information:
- Attributes:
This group contains all relevant general information about the item: name, ownership, recent change history, database and subject area, and access rights.
This group contains the attributes of the item. The content of the list depends on your settings in the Editor subnode of the Preferences dialog (see Editor).
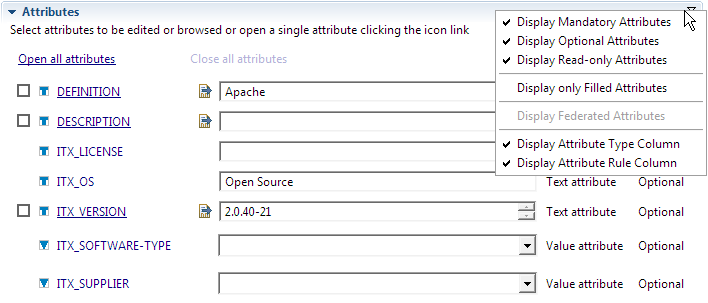
You also can modify the settings directly on the Overview subpage: Click the Attribute List Preferences icon  at the right end of the Attributes group title and then select in the menu that opens the types of attributes you want to display:
Each attribute row contains these elements:
- A check box.
- For information on how to edit binary attributes, see Editing Binary Attributes.
- For information on how to edit value attributes, see Editing Value Attributes and Special Text Attributes.
- An icon that indicates the attribute type:
- The attribute name.
- An Open the external editor icon
 .
. - The attribute content.
- The attribute type: Binary, Link, Namespace, Text, or Value attribute.
- The attribute rule: Optional, Mandatory, Info, or Read-only.
The check boxes enable you to select attributes to open by subsequently clicking the hyperlink Open selected attributes. Since value attributes and binary attributes do not have separate Attribute Edit subpages, the check box is provided only for text, link, and namespace attributes.
| Attribute Type | |
|---|---|
|
|
|
|
|
|
|
|
|
|
|
|
|
|
|
|
|
The names of text attributes, formatted and unformatted link attributes, and namespace attributes are displayed as hyperlinks. When you click the hyperlink, a subpage for editing the attribute opens.
For text and binary attributes, these icons open the attribute in an external editor. For namespace, value, and both types of link attributes, the icons are not available.
For text, namespace, and both types of link attributes, the displayed contents depend on your settings in the Generate Preview for Attributes group in the Editor subnode of the Preferences dialog (see Editor). Since binary and value attributes do not have Attribute Edit subpages, editing controls are provided in addition to the displayed attribute contents.
This table lists the displayed contents and editing controls for each attribute type:
| Attribute Type | Content Information | ||||||
|---|---|---|---|---|---|---|---|
|
Binary attribute |
If the attribute has content, the text *** has content *** is displayed in the attribute content field; otherwise, the field is empty. To the right of the field, three pairs of icons and hyperlinks provide editing actions for the binary attribute (see Editing Binary Attributes for details). |
||||||
|
|||||||
|
|||||||
|
|||||||
|
The attribute text is displayed. You can edit the text directly in the field. See Editing Value Attributes and Special Text Attributes for details. |
Whether this field is present depends on your settings in the Attribute List Settings subnode of the Preferences dialog (see Attribute List Settings).
Whether this field is present depends on your settings in the Attribute List Settings subnode of the Preferences dialog (see Attribute List Settings).
To open a single attribute
| > | Click the attribute name (third column in the attribute list). |
To open multiple attributes
| > | Select the desired attributes in the check boxes in the first column of the attribute list, and click the Open selected attributes hyperlink above the attribute list. |
To open all attributes
| > | Click the Open all attributes hyperlink above the attribute list. |
When you open an attribute for editing, the Attribute Edit subpage opens within the Item Edit view. For details, see Working with Attribute Edit Subpages.
To close all opened attributes
| > | On the Overview subpage, click the Close all attributes hyperlink. |
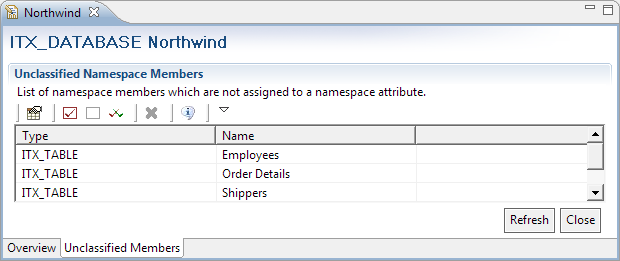
In subject areas that support extended namespace attributes (that is, subject areas of Release 3.7), items can exist in the namespace of another item without having an entry in a namespace attribute of that item. Such items are called unclassified namespace members.
To display unclassified namespace members
| > | On the Overview subpage, click the Show unclassified namespace members hyperlink above the attribute list. |
The Unclassified Members subpage opens displaying a list of unclassified namespace members:
For information on how to reassign the unclassified members to a namespace attribute, see To assign an unclassified namespace member.
The icons in the local toolbar of this subpage provide these functions:
| Command | Function | |
|---|---|---|
|
|
Customize Columns |
Opens a dialog where you can select columns for display. |
|
|
Select All Items |
Selects all items in the list. |
|
|
Deselect All Items |
Clears all selected items. |
|
|
Invert Selection |
Clears all selected items, and selects all unselected items. |
|
|
Delete the Selected Namespace Members |
Removes selected items from the namespace (that is, the items are deleted). This icon is active only when an item is selected. |
|
|
Attribute Info |
Opens the Meta Information view, which displays a short description for unclassified namespace members. |
|
|
Menu |
Opens a drop-down list providing access to all local toolbar commands. |
Read-only Mode Command Buttons
There are three situations in which the Item Editor opens in read-only mode:
- When an item was created by another user and you have only read access rights for the subject area, the header in the Overview subpage looks like this:
- When an item is locked because another user is currently editing it, the header in the Overview subpage looks like this:
- When the Open Editor in read-only mode check box has been selected in the user preferences under Metability
 Items
Items Editor (see Specifying Other User-defined Settings), the header in the Overview subpage looks like it does for a locked item.


When the Item Editor is in read-only mode, these command buttons are available above the top right edge of the view:
| Command | Function |
|---|---|
|
Refresh item |
Reloads the item from the database. |
|
Edit item |
Tries to change to edit mode and lock the item for editing. If the attempt to edit the item fails because the item is still locked, an error message displays:
|
Working with Attribute Edit Subpages
These types of attribute each have an Attribute Edit subpage that is appropriate to their specific set of data:
- For text attributes, see Editing Text Attributes.
- For link attributes, see Editing Link Attributes.
- For namespace attributes, see Editing Namespace Attributes.
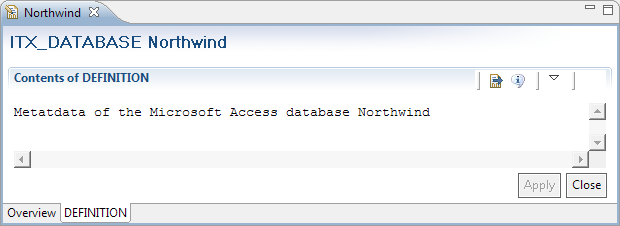
By clicking a tab, you move its Attribute Edit subpage to the foreground. In this example, the Attribute Edit subpage for the DEFINITION attribute is in the foreground:
Editing Text Attributes
You can edit text attributes in multiple ways:
- Directly on the Overview subpage.
- You must enable the editing of text attributes on the Overview page in your preferences. For details, see Editor.
- Attributes for which a specific data type or a list of valid values has been set always are edited on the Overview subpage.
- On the Attribute Edit subpage, in which you can enter and edit text as you would in any other simple, Windows-based text editor. You can open the subpage by clicking the text attribute’s name hyperlink.
- In the default editor of your operating system. You can open it by clicking the Open the external editor icon or by opening the Attribute Edit subpage and then pressing the key combination Ctrl+Alt+E on your keyboard.
 Items
Items Editor subnode of the Preferences dialog, such attributes open in a new tabbed page instead of the subpage.
The Attribute Edit subpage for text attributes has two command buttons:
- Apply: Applies text changes to the attribute.
- Close: Closes the subpage.
If you have made any changes to the text and have not clicked the Apply button yet, you are prompted about whether you want to apply the changes to the text attribute:

- Click Yes to apply the changes and close the subpage.
- Click No to close the subpage without applying the changes.
- Click Cancel to continue editing the attribute.
Applying changes to an attribute does not mean that these changes are actually stored in the database. When you close an item that contains changed attributes, you will be prompted whether you want to save the item.
You can save an item before closing it by selecting the Save option from the File menu, which becomes active when an item with unsaved changes has the focus.
Editing Value Attributes and Special Text Attributes
These types of attributes always are edited directly on the Overview subpage:
- Regular value attributes and single-line text attributes1Single-line text attributes can store only a single line of content (that is, like regular value attributes). You can define such attributes by specifying an asterisk (*) as their only valid value in the information model.
- Value attributes and text attributes for which a list, a sequence, or a range of valid values have been defined
- Value attributes and text attributes for which a specific data type has been set
For regular value attributes and single-line text attributes, click inside the attribute’s text field to edit the attribute value:

If a range of valid values has been defined for a value or text attribute, a tooltip displays when you click in the text field informing you about the permitted ranges:

For attributes for which a list or a sequence of valid values has been defined, the text field is replaced by a drop-down list from which you can select the values:

For attributes of data type real and integer, a tooltip displays when you click in the text field informing you about the data type. When you edit the attribute, Metability verifies that the entered attribute value conforms with the attribute’s data type.
For attributes of data type boolean, the text field is replaced by option buttons:

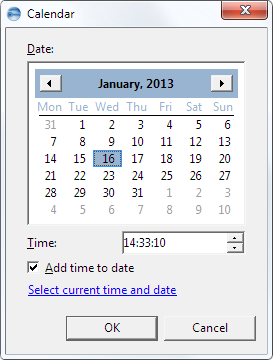
For attributes of data type date, the text field is replaced by Edit and Delete buttons:

Clicking the Edit button opens a dialog where you can select the date and, optionally, the time that you want to store in the attribute:
Editing Unformatted Link Attributes
The Attribute Edit subpage for editing unformatted link attributes is similar to the subpage for editing text attributes. The difference between them is the content of their local toolbar and the context menu (see Context Menus in the Editor Frame).
Unformatted link attributes are edited like text attributes, but they can have links embedded in their flow text. You can create these links in two ways:
- By typing in the target item type and name, plus, in parentheses, the optional qualifier.
- By calling up a dialog to insert a link into the flow text.
Example:
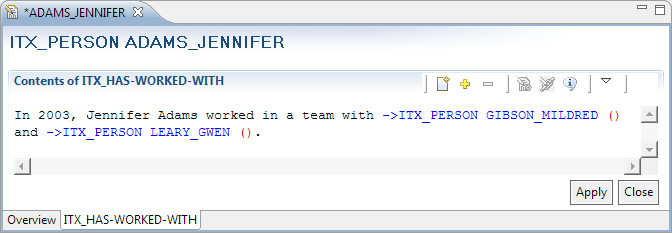
The target item of a link must be specified by a link key and a traditional 32 character item name, plus an optional qualifier, enclosed within parentheses. It is not possible to specify the target item by the structured name. The link key references the item type of the target item. In Rochade, every item type in an information model is mapped to a link key. The link key can be, but must not necessarily be identical with the item type name.
In the example, ->ITX_PERSON is the link key for the item type ITX_PERSON and GIBSON_MILDRED and LEARY_GWEN are the item names.
The icons in the local toolbar of this subpage provide these functions:
| Command | Function | |
|---|---|---|
|
|
New Link Target |
Opens the New Item dialog, in which you can specify a new target item for a new link. This option is available when the cursor is positioned inside normal flow text. For details, see To add a link to a new item. |
|
|
Add Link |
Opens the Search for Items dialog, in which you can specify an existing target item for a new link. This option is available when the cursor is positioned inside normal flow text. For details, see To add a link to an existing item. |
|
|
Remove Link |
Removes a link from the flow text. This option is available when the cursor is positioned inside a link specification. |
|
|
Open Link Target Item |
Opens the referenced item. This option is available when the cursor is positioned inside a link specification. |
|
|
Modify Link |
Opens a dialog in which you can edit the qualifier. This option is available when the cursor is positioned inside a link specification. |
|
|
Attribute Info |
Opens the Meta Information view, which displays a short description of the attribute’s purpose. |
|
|
Menu |
Opens a drop-down list providing access to all other local toolbar commands. |
Editing Link Attributes
The Attribute Edit subpage for editing link attributes is different than the subpage for normal text attributes, since link attributes possess special properties:
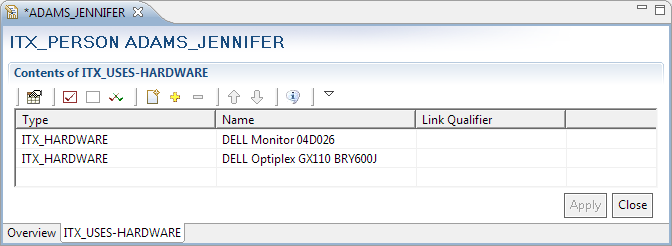
The icons in the local toolbar of this subpage provide these functions:
| Command | Function | |
|---|---|---|
|
|
Customize Columns |
Opens a dialog where you can add columns to or remove them from the display. |
|
|
Select All Items |
Selects all items in the list. |
|
|
Deselect All Items |
Clears all selected items. |
|
|
Invert Selection |
Clears all selected items, and selects all unselected items. |
|
|
Add a Link to a New Item |
Starts the process of adding a link to a new item. For details, see To add a link to a new item. |
|
|
Add a Link to an Existing Item |
Starts the process of adding a link to an existing item. For details, see To add a link to an existing item. |
|
|
Delete the Selected Links |
Immediately removes the currently selected links from the list. You can revoke this remove operation by clicking the Close button and then clicking No when you are asked if you would like to apply changes. The Delete icon is active only when an item is selected. |
|
|
Move Up the Selected Links |
Moves the selected links upward in the sequence of links. |
|
|
Move Down the Selected Links |
Moves the selected links downward in the sequence of links. The icons are active only when the link attribute is defined with ordered links in the model and when at least one item is selected. |
|
|
Attribute Info |
Opens the Meta Information view, which displays a short description of the attribute’s purpose. |
|
|
Menu |
Opens a drop-down list providing access to all other local toolbar commands. |
The buttons at the bottom of this subpage provide these functions:
- Apply
- Close
- Click Yes to apply the changes and close the subpage.
- Click No to close the subpage without applying the changes.
- Click Cancel to continue editing the link attribute.
This button becomes active when you make changes to the links. It applies these changes to the link attribute.
This button closes the subpage for editing link attributes. If you have made any changes to the links and have not clicked the Apply button yet, you are queried about whether you want to apply the changes to the link attribute:

To edit an item in the link list
| > | Double-click the item you want to edit. The item will be opened in an Item Edit view. From here, you can proceed to edit the item like any other item (that is, edit its attributes in their Attribute Edit subpages). |
- Click the Add a Link to a New Item icon.
- Click the Use root as namespace option button to create the new item in the root namespace.
- Click Next.
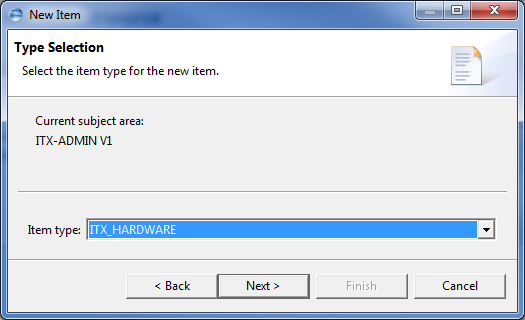
- Select an item type for the new item.
- Click Next.
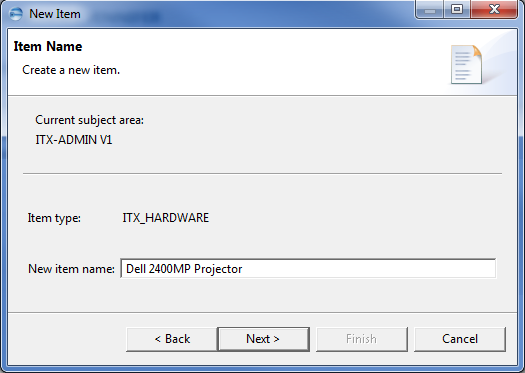
- Enter a name for the new item.
- Click Next.
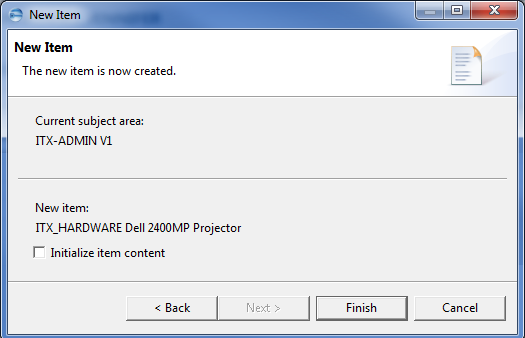
- Select the Initialize item content check box if you want the new item to be active; otherwise, it will be an empty item.
- Click Finish to create the item.
Since a new item is actually created in this process, the Namespace Item page opens in the New Item dialog :
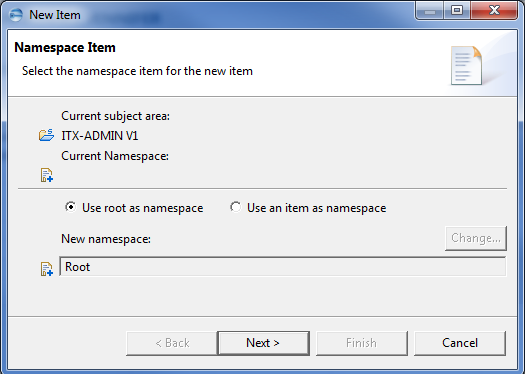
If your subject area does not support namespace attributes, the dialog opens directly to the page displayed in step 4.
Or
Click the Use an item as namespace option button and then Change to select an item that spans the namespace for the new item.
The Type Selection page displays:
The Item Name page displays:
The New Item page displays:
To add a link to an existing item
- Click the Add a Link to an Existing Item icon.
- Specify your search criteria and then click Search.
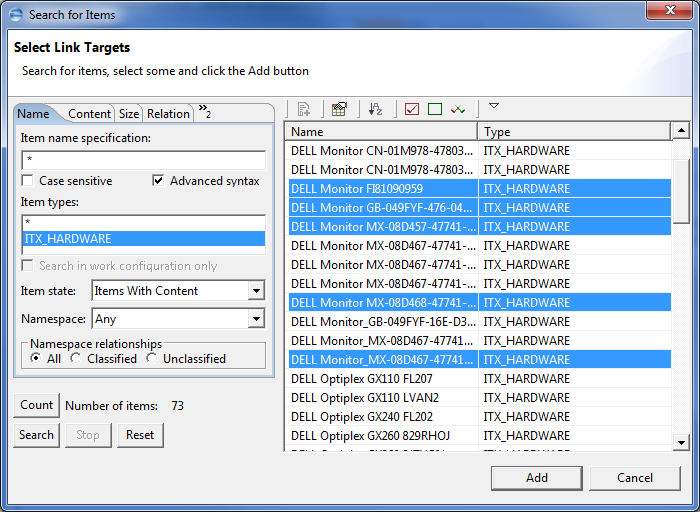
- Select one or more items and then click Add to add a link to the selected items.
The dialog that opens is similar to the Search view. For a description of its options, see Item Search Queries.
The items that match the search criteria are displayed in the result list:
Editing Namespace Attributes
You can use either the Attribute Edit subpage for namespace attributes or the navigation tree to work on items in the namespace of another item.
Using the Attribute Edit Subpage for Namespace Attributes
This subpage lists all items of a namespace with their types and names:
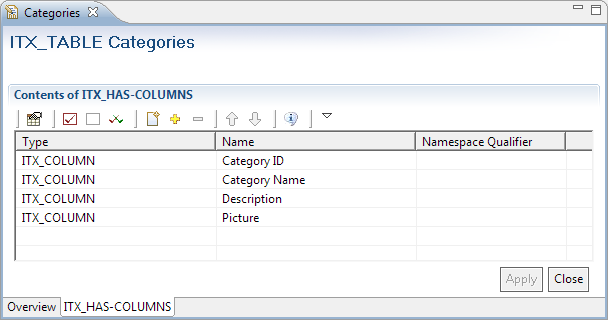
The Close button below the list of namespace members closes the subpage for editing namespace attributes. The icons in the local toolbar of this subpage provide these functions:
| Command | Function | |
|---|---|---|
|
|
Customize Columns |
Opens a dialog where you can add columns to or remove them from the display. |
|
|
Select All Items |
Selects all items in the table. |
|
|
Deselect All Items |
Clears all selected items. |
|
|
Invert Selection |
Clears all selected items and selects all unselected items. |
|
|
Create a New Namespace Member and Assign it to the Attribute |
Starts the process of creating a new item in the current namespace (see To create a new namespace member). |
|
|
Assign Unclassified Namespace Members to the Attribute |
Displays a list of unclassified namespace members so you can add them to the table. The icon is available only for subject areas that support unclassified namespace members (that is, subject areas of Release 3.7). |
|
|
Detach the Selected Namespace Members from the Namespace Attribute |
Detaches the selected items from the namespace attribute (that is, the items become unclassified namespace members). The icon is available only for subject areas that support unclassified namespace members (that is, subject areas of Release 3.7). |
|
|
Move Up the Selected Relationships |
Moves the selected relationships up in the list by one position. The icon is enabled only for namespace attributes for which you defined in the information model that the relationship order is significant. |
|
|
Move Down the Selected Relationships |
Moves the selected relationships down in the list by one position. The icon is enabled only for namespace attributes for which you defined in the information model that the relationship order is significant. |
|
|
Attribute Info |
Opens the Meta Information view, which displays a short description of the attribute’s purpose. |
|
|
Menu |
Opens the local drop-down menu. Its commands correspond to the other local toolbar commands listed in this table. |
To edit an item that belongs to a namespace
| > | Double-click the namespace member you want to edit. |
The item opens in an Item Edit view. From here, you can proceed to edit the item as described in Editing Items.
To create a new namespace member
- Click the New Member icon in the local toolbar.
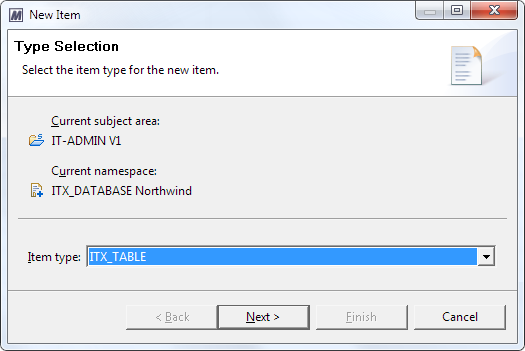
- Select the type of item that you want to create, and click Next.
- Enter a name for the new item, and click Next:
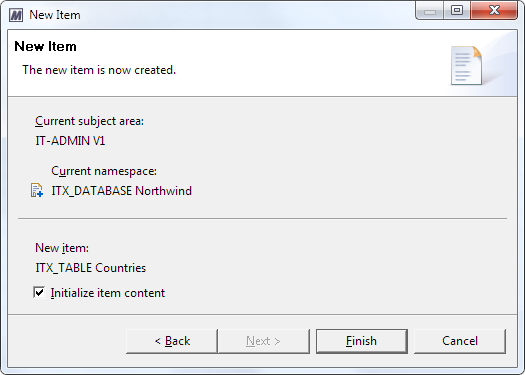
- Select the Initialize item content check box if you want the new item to be active; otherwise, it will be an empty item.
- Click Finish to create the item and add it to the namespace.
The New Item dialog opens to the Type Selection page:
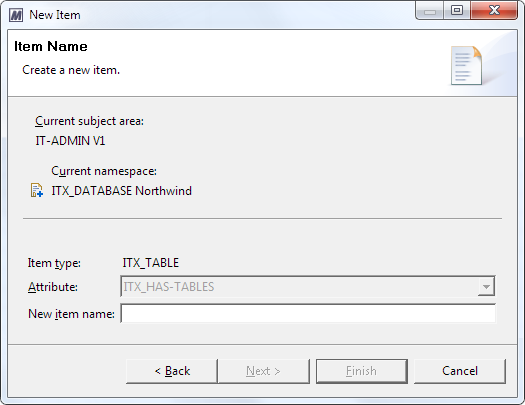
The final page of the New Item dialog appears:
- Select the items that you want to detach.
- Click the Detach the Selected Namespace Members from the Namespace Attribute icon in the local toolbar.
The selected items are detached from the namespace attribute and added to the pool of unclassified namespace members.
For deleting a namespace member, use the procedure as described under Using the Navigation Tree.
To assign an unclassified namespace member
- Open the item that spans the namespace of the unclassified namespace member.
- Open the namespace attribute to which you want to assign the namespace member.
- In the local toolbar, click the Assign Unclassified Namespace Members to the Attribute icon.
- Select the unclassified namespace member that you want to assign, and click OK.
The Assign Members dialog appears:
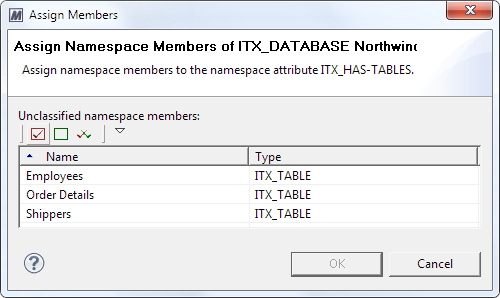
The selected item is removed from the pool of unclassified namespace members and assigned to the namespace attribute.
To delete an unclassified namespace member
- Open the Unclassified Members subpage as described in To display unclassified namespace members.
- Follow the steps described in Steps to delete items.
Using the Navigation Tree
You can use the navigation tree to open, create, and delete items that belong to the namespace of another item:
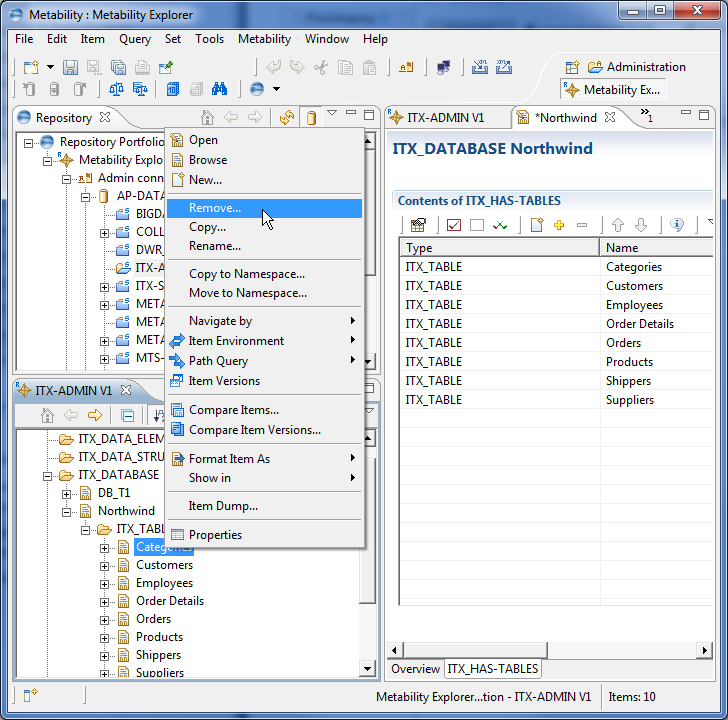
While the Attribute Edit subpage for namespace attributes displays only the namespace items that are assigned to that namespace attribute (that is, classified namespace members), the navigation tree displays all namespace items of an item (that is, classified and unclassified namespace members). The example above shows the corresponding views for the item ITX_DATABASE Northwind, which spans a namespace for items of the type ITX_TABLE.
- To commence editing a namespace item from the navigation tree, proceed as described under Editing Items.
- To create a new namespace item in the navigation tree, select either the item that spans the namespace or the item type on the next level down (in the example, item ITX_DATABASE Northwind or item type ITX_TABLE) and then proceed as described under Creating Items.
- To delete a namespace item, select it in the navigation tree and then proceed as described under Deleting Items.
The navigation tree provides further options for processing items—including namespace items—in general, and also some specific options for namespace items. For an overview, see Accessing Item Functions.
Editing Binary Attributes
For binary attributes, no Attribute Edit subpages are provided—the required editing actions are available on the Overview subpage and let you import attribute content from an external file, export existing attribute content to an external file, and delete existing attribute content:

With binary attributes, the content column is divided into four subcolumns:
| Subcolumn | Function |
|---|---|
|
Content indicator |
If the binary attribute has content, this is indicated by the text *** has content ***. Otherwise, this field is empty. |
|
|
Hyperlink for importing binary attribute content from an external file. |
|
|
Hyperlink for exporting binary attribute content to an external file. If no binary attribute content exists, the hyperlink is inactive. |
|
|
Hyperlink for deleting binary attribute content. If no binary attribute content exists, the hyperlink is inactive. |
Using MIME Type-specific Editors for Attributes
In interaction with Eclipse, Metability provides an edit mode that enables you to edit attributes using custom editors depending on the attributes’ MIME type. This topicdescribes the steps required to associate an editor with an attribute.
To associate an editor with an attribute
- Open Model Administration.
- Open the information model that contains the item type to which the attribute is attached that you want to associate with an editor.
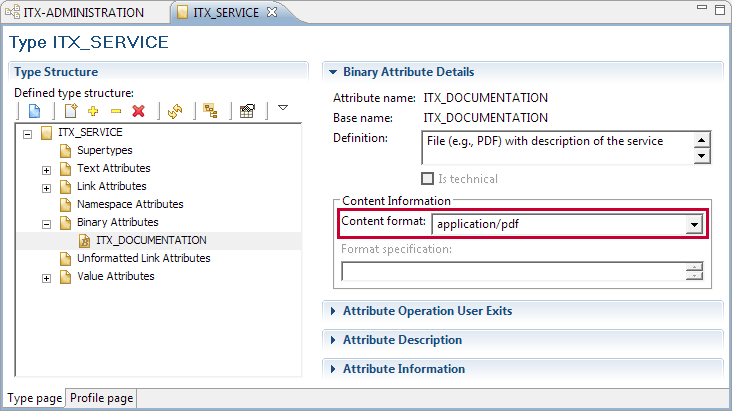
- Specify a MIME type for the attribute:
- Open the item type to which the attribute is attached.
- Select a MIME type from the Content format drop-down list or enter a new type in the list field (for example, application/pdf):
- Save your changes.
- Generate the information model, and reorganize any subject area based on it.
- Close Model Administration.
- Click Window
 Preferences to open the Preferences dialog.
 - Define a file extension for the MIME type:
- Expand the Metability
 Items
Items Editor node and then click the Attribute MIME Types subnode:
 - Search the Defined MIME types table for the MIME type that you specified for the attribute and then memorize the extension assigned to it (for example, pdf).
- Associate an editor with the file extension:
- Expand the General
 Editors node and then click the File Associations subnode:
 - Search the File types list for the MIME type’s file extension. The file extensions are preceded by an asterisk and a dot (for example, *.pdf).
- Select the entry for the file extension to display the currently associated editors in the Associated editors list.
- In the Associated editors list, select the editor entry and then click the Default button to make it the default editor for the file extension.
- Enable the MIME type-specific editor mode:
- Expand Metability
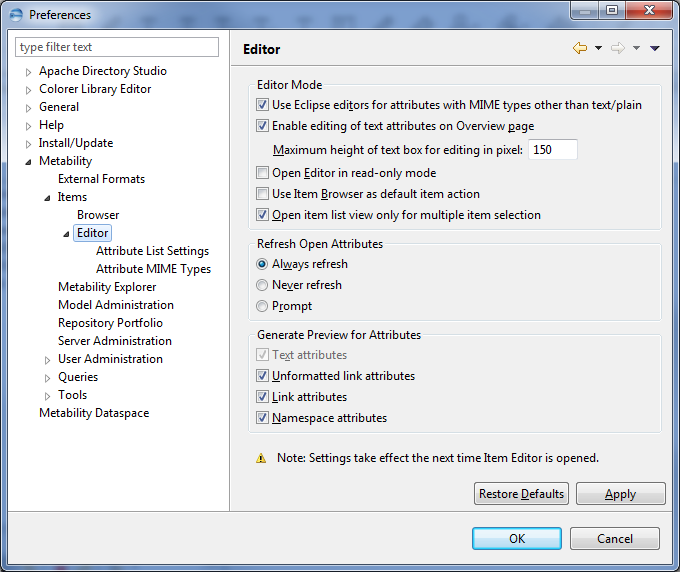
 Items node and then click the Editor subnode:
 - In the Editor Mode group, select the Use Eclipse editors for attributes with MIME types other than text/plain check box.
- Close the Preferences dialog.
For detailed information on how to perform the individual steps, see Model Administration.
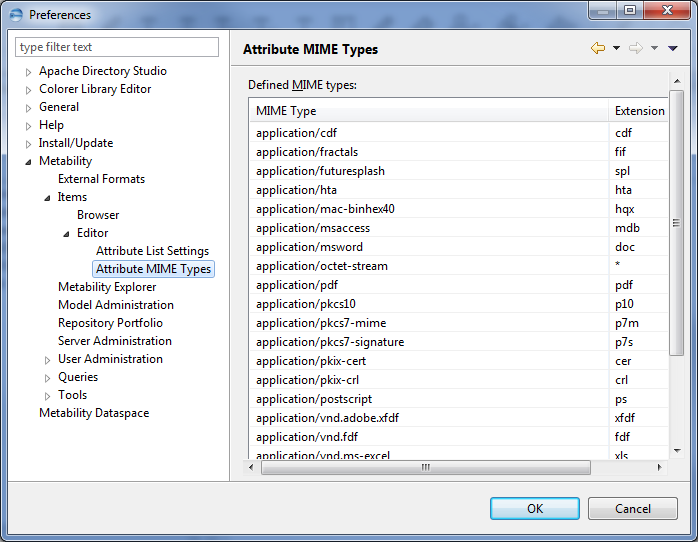
If the table does not contain the MIME type, click the Define button to open the Define a MIME Type dialog:
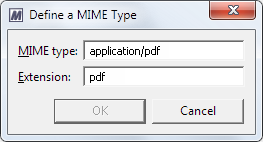
Enter a MIME type and a file extension and then click OK to add the new type. Do not precede the file extension with an asterisk (*) or a dot (.).
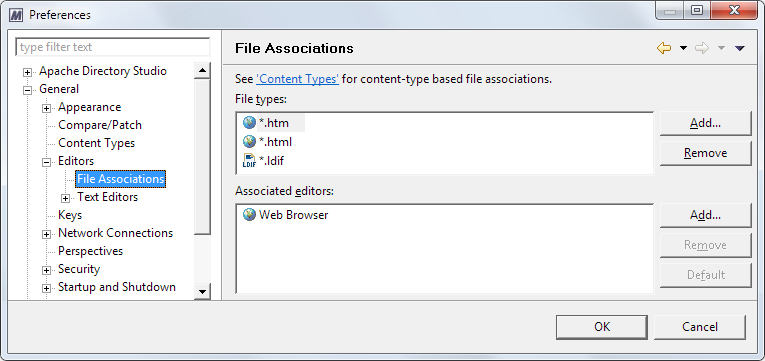
If the list does not contain the extension, click the Add button next to it to open the Define a New File Type page of the New File Type dialog:
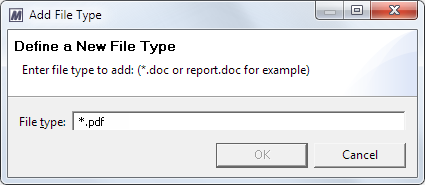
Enter a file extension preceded by an asterisk and a dot and then click OK to add the extension and return to the Preferences dialog.
If the list is empty or does not contain the desired editor, click the Add button next to it to open the Editor Selection dialog:
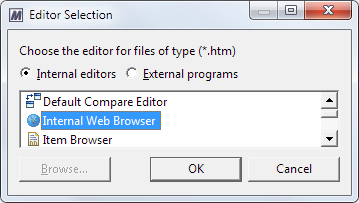
Click the Internal Editors option button and then select an editor in the list.
Or
Click the External Programs option button and then the Browse button to select an executable file from the file system.
Finally, click OK to return to the Preferences dialog.
Now, if you open an item in the Editor frame and then click the name hyperlink of the pertinent attribute, it opens in the associated editor:
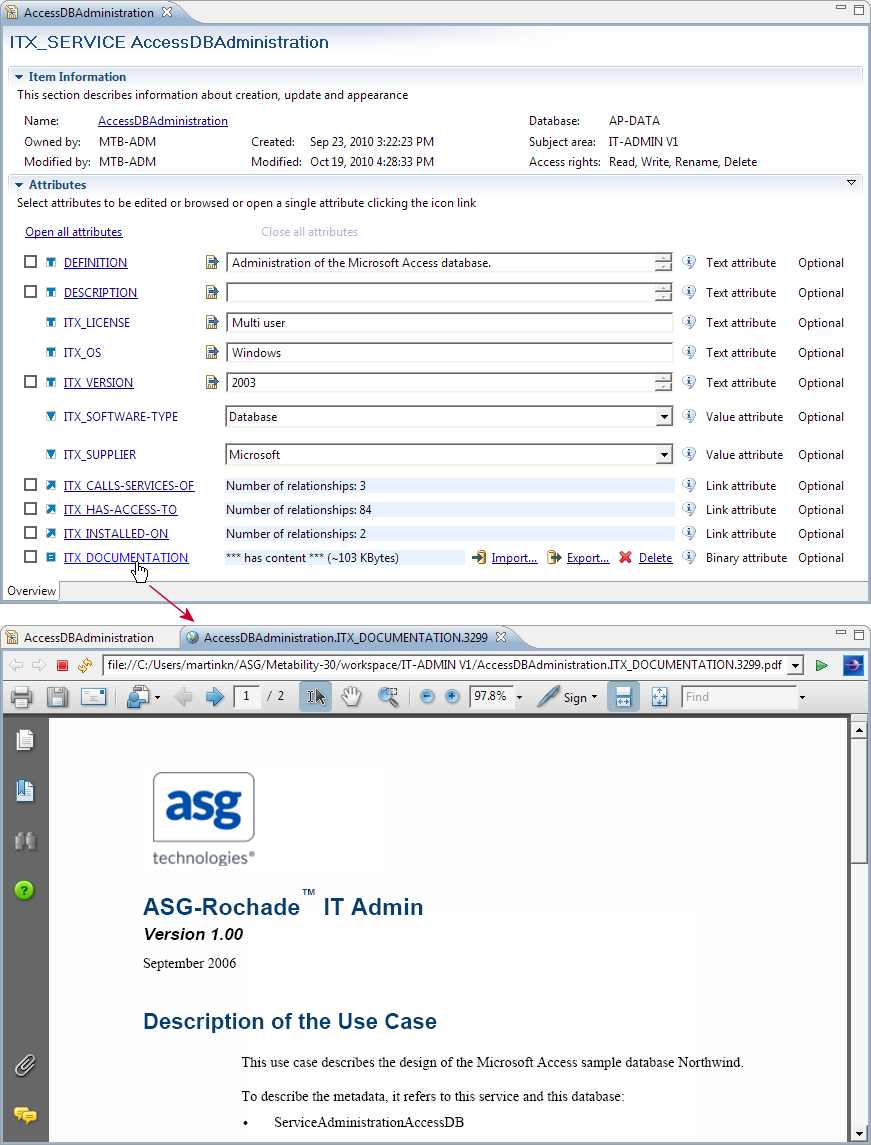
Changes in the attribute’s content are updated in the database when you close the editor.


